Showing posts with label blogger. Show all posts

Sunday, April 10, 2016

Latest Custom Robots.txt file settings in Blogger for SEO

Custom Robots.txt for blogger
Today I will show you How to Enable Custom Robot.txt File in Blogger for better SEO and search engine results?

Blogger now lets you edit your blog's robots.txt file. What are Robots.txt files, robots files are plain text files which instruct the search engines what to not index. Robot.txt is a way to tell search engines whether they are allow to index a page in the search result or not. The bots are automatic, and before they could access your site, they check the Robot.txt file to make sure whether they are allowed to crawl this page or not.

How to Enable Custom Robots.txt in Blogger


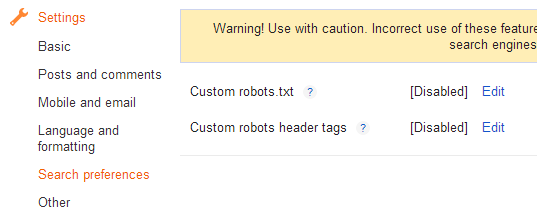
1. Blogger Dashboard >> Select Blog >> Select Settings tab >> Search Preferences

Robots.txt

2. Click on Edit in front of Custom robots.txt
3. Click on Yes and proceed to next step.
3. Next a box comes up and paste following given code.

User-agent: Mediapartners-Google
Disallow:

User-agent: *
Disallow: /search
Allow: /
Sitemap: http://YOURBLOGURL.blogspot.com/sitemap.xml
4. and finally click on Save Changes button to save code.

I hope this tip would help you. If you are having any issue regarding crawling then, feel free to leave your questions in the comments below and I would try to help you in solving them.

Friday, January 22, 2016

Best Tips For A New Business Website

Website Promote, Website Traffic, Business Website, Web Design, Promote Business, Promoote Website
Do you have a business website? Is your website winning you the benefits that you expected? If such questions coming on your way means you might need to contact a web design company to make a new business website design with some more workable features. Below listed are some tips for making a new business website design.

Balanced and Logical Content

Don't stuff too much information about your products or services on one web page, because the excess information might discourage your visitor to go ahead. Find out a Florida web design company having experienced professionals, that can arrange all your information properly on the website. Most important, is to be updated. Remove the information about your products or services you are no more offering.

Clearly visible contact details

Are you having contact details in your old website? If not, then this might the reason for the fall of your online business. Most visitors move away and visit other websites if they don't get the contact details, where they can make product or service related query. Do acknowledge contact details or contact form to allow the visitors to sort instant queries.

Option for live chat

Live chat option can attract more visitors, as they can get instant information and feedback from your business expert. Live chat can convert a visitor into a customer. Through live chat your expected buyers can sort their queries and also learn more about your offers. It can frame a rapport and activate the buying cycle.

Mobile Compatibility

Mobile phones are normally used nowadays to access the internet. People prefer online shopping on their smart phones to save their time. This is also a type of marketing, and it has highlighted the attention of many buyers. You should be sure that your new website is having mobile compatibility feature, that must not be confusing while going through the content catalogue.

Including the above mentioned features, your new website must also be SEO friendly, having additional features like Social Media Integration, Sitemap, Language Translator, Browser Compatibility and fast load times.

Your website is an investment, that plays an important role to promote your product or services. So search and contact the best website design company in USA and let the visitors look out your best services and products when they peep inside. Keep in mind, a good website design can support your business, on the other hand a not properly designed website can be a nightmare, disappointing your potential customers.

Author By Henry Brown

Best Digital Marketing Services via Rank You Up

SEO marketing, in Search, Website Traffic, Promote Business, Website Promote
Internet is the best stage to promote the dispatch of the new things. On the other hand, clients ought to direct their own particular exploration to choose the best Internet showcasing organization. A decent quality association will convey taking after SEO systems to upgrade the brand estimation of the customers. That is the errand it has close by and to see those outcomes work out, it strategizes, plans, executes, screens, adjusts and finishes off with the proper way of time.

Enhancement: Internet showcasing administration suppliers concentrate on offering quality substance to the groups of onlookers. No one in their right personality such as to peruse heaps of data on the page unless it is extremely intriguing.

Henceforth, you ought to keep the content material short and exact. Pictures talk louder than words and recordings are far superior.

It is an old saying yet very applicable in the period of computerized showcasing. For example, on the off chance that you are giving depiction of the item incorporate a picture or a video. It will go far in awing the mind of the general population.

Writes and articles: A rumored internet advertising organization has exhibit of experts who can compose snappy challenge about the property of the things.

They post articles and writes crosswise over various discussions on the Internet to upgrade the brand estimation of the organization.

In addition, they likewise collaborate with online clients to answer their inquiries about the results of the organization.

Because of industrious promoting exercises, the perceivability of the site will increment and it will improve the Internet activity.

Enhancing the heads and titles: The Internet crawler experts dispatch watchword research technique to discover the improved writings, which are utilized to hunt data identified with the things.

They plan the substance of the site focused on the watchword.

In addition, digital marketing specialists additionally deal with the format of the site to guarantee that client can look the data in a bother freeway.

Adjust the substance: The SEO group chipping away at the site ought to adjust its goal to upgrade the client experience.

Google calculations are changing each day, along these lines promoting specialists ought to adjust to the circumstance in a snappy and powerful way.

You ought to make versatile streamlined site since lion's share of individuals are utilizing advanced mobile phones to get to the Internetsite pages.

Ensure that site is not moderate or else the Google will minimize its rankings.

Off page procedures: A top notch SEO group will direct advertising on discussions that fit in with comparative corner of items.

Specialists add a connection to the site in the wake of composing the online journal to guarantee that the individual visits the site. Crawlers notice such connections and list them into the Internet index posting.

They will make your site conspicuous and build its positioning.

You can likewise submit connections to the unmistakable online registries situated over the Internet. Specialists ought to present the connections on pertinent classes with the goal that individuals could see the sites and visit them.

Submitted By william huges

Sunday, January 10, 2016

5 Ways You Can Increase Your Online Traffic

marketing, tips and tricks, website promote, SEO, Business Promotion
It's the end of the year and you're noticing your traffic becoming stale. Your New Year business goal is to increase online traffic by 12%, but you're only impressed by the results of some of your tactics, and you're not sure how relevant the rest are for today's web climate. While there are strategies that are essential to your web presence and some that are tailored to work for you, here are some growingly successful tactics and still relevant tips for seeing your traffic increase in 2016.

1. Use on-page SEO.
Making sure your page is search engine-friendly is still an important tactic in 2016. While Google may advise against link building, it still stands as one of the most important ranking elements this year. Create new content with external links, take a look at meta descriptions and brush up on keyword research. It's likely you'll see a gradual difference in your traffic and ranking on Google.

2. Use LinkedIn to post.
LinkedIn has paved the way for business networking, and it's where you'll see the most activity online for professionals on social media. Posting interesting and engaging content on LinkedIn could boost traffic to your site and increase your visibility within your industry. Make sure to add it to your social media strategy if you haven't already done so for the New Year.

3. Write a guest blog.
Guest blogging serves a similar purpose as posting on LinkedIn in terms of visibility. Despite what you may have heard, blogging is still relevant this year in terms of SEO as it keeps fresh content on your page (which is an important component for your ranking), but guest blogging is a great way to get some cross promotion. Make sure to stick with reputable sites and avoid anything spammy if you don't want a big penalty.

4. Interview interesting people.
Interviews with thought-leaders are a wave of thought provoking content that does very well on social media and on-site. Reach out to your industry leaders and people you admire for an interview, and keep it simple. Cross promotion is your best friend, as chances are they'll promote the interview to their massive tribe as well (or politely ask them to!).

5. Use Instagram for Freebies.
Adding a good sweepstakes or promotion across your social media channels is known to be tried and true for those who do it well, but ecommerce merchants are starting to find Instagram to be the forerunner in effective marketing channels. Giveaways are a fun way to increase your followers, but try adding a call to action to your site or to invite a friend to your channel in order for your followers to win.
Another rapidly growing tactic on Instagram is to send free samples to personalities and influencers with a huge follower base already. Do some research and find the Instagram influencer who has the fan base you want as clients. Most successful Instagrammers will have their rates dialed in, so be warned that those who have more followers have a much higher price tag. Opt for the quality of followers who will be interested in engaging with you than just focusing on the number.

Author - Nicole Ramirez

Saturday, January 2, 2016

How to boost your website traffic with SEO

website traffic, SEO, Boost Website, SEO Services, SEO Analysts
After making a website for your business the important thing that comes to your mind is, how to promote your website?? As the question, its answer also looks simple, but to achieve that level gonna take your lot of time. With latest cutting edge technology and tools marketers had develop tons of services that not take your a lot time, - we call those services as -"Online Marketing" or Digital Marketing.

Online Marketing is the Marketing that includes the promotion of your company website, products or any services or any brand to worldwide. People use these services to promote their brand to customers so that they get a lot of traffic and make their brand image and identity.

"Boost your Website Development with SEO Services"

As we all know 21st century is all about digital media, and everyone want to be online so that they get promote and know by everyone. In the same way website development is engrossing our IT sector with bundles and bundles of website hosted every hour on the Internet. With continuity of such huge flow of website, people really get confused to get their perfect result from these tons of websites. Therefore a new trend came into the way to promote your website that is SEO � Search Engine Optimization Adelaide and it is also a branch of Online Marketing.

SEO Analysts describes SEO as "Search Engine Optimization (SEO) is the procedure of influencing the visibility of a website or a website page in a Search Engine's unpaid results - often called as "characteristic," "natural," or "earned" results.

In a simple term, SEO is the online service that makes your website higher in the Ranking of Google and other search engines such as Yahoo and Bing. Generally user hit any search on Google Search Bar it gives the 10 most High Page Rank Website, SEO work on those website whose Page Rank is lower than 10, so that the website get easily crawled by google bots and get easily executed on the first hit by user.

There are two types of SEO Services:

1) On-Page Optimization
2) Off- Page Optimization

On Page Optimization is the SEO services that takes care of all on page condition of your website, it take care of your website content, how you had include your tags, it takes care of keyword, descriptions , title and head tags. It will also check your website for broken links, page or any other suitable error that can make your website not suitable for SEO.

To make a better website with environment friendly SEO you have to take care of these things:
 
  • Better titles and descriptions
  • Proper URL Structures
  • Good and Proper Navigation
  • Optimized internal links
  • Formatting of Text
  • Image optimization (image size, proper image names, use of ALT tag)
  • User friendly 404 pages
  • Fast loading pages
  • Google Authorship verification for all pages
  • Top quality fresh content- Important Factor
  • No broken links or links to Spam sites

Off page Optimization is the SEO services that is totally based on fetching more traffic on your website, and eventually the High PR. To make such things SEO analyst use different things to promote their website in the Internet. Off page is all about to make Link Building, where you can make build your link by sharing your website with other sites, promote your website in Social Media.

Off Page Optimization Services:
 
  • Article Submission
  • Link Building
  • Social Bookmarking
  • Directory Submission
  • Forum Posting
  • Blog Submission

SEO is the best services in Online Marketing through which you can easily promote your website, to a large audience without wasting a penny.

Author - Brandon Chandler

Monday, November 2, 2015

How to Open multiple links by a single click

Hello fellow Bloggers. A reader just asked about opening more than 1 link by clicking a link. I am presenting down the html code for that. You can open as many links by clicking single anchor text link. All the links will open in new tabs.

To open link in new tab

A regular link can be opened in new tab. Just place target='_blank' after the URL.
Like this
<a href="URL link" target="_blank">Text to Display</a>

To open multiple links in new tabs

To open more than one links just add the following code
onclick="window.open(&quot;YOUR_2nd_URL&quot;);"

Your link html will look like this
<a href="1st Link" onclick="window.open(&quot;2nd_Link&quot;);">Link Text</a> 

Just take this example Blogger SEO by UK . This link will open our homepage in current tab and 2nd link in new tab. But the text shown is one for both link tabs. Down is the html code.
<a href="http://www.blogtipsuk.com/" onclick="window.open(&quot;http://www.blogtipsuk.com/2015/05/how-to-make-money-with-infolinks-on-blogger.html&quot;);">Blogger SEO by UK</a> 

You can add as many links as you like with this code.
Hope its clear for all the readers. Have a good day!

Saturday, August 9, 2014

Buy or Sell Ad spaces in new Low Traffic Blogger/Blogspot

Buy or Sell Ad spaces in Low Traffic blogs
I see many bloggers and website owners that they sell ad spaces on there blog/website like renting a house and they earn a decent amount from that.I also like this method because in this method you don't need any kind of clicks or worry that how to increase CTR.

By selling ad spaces directly to your clients you will earn decent money of your choice because you are the admin of your site and blog. By selling ad spaces you also need a decent traffic to fulfill the requirement of advertiser but if your site contains a low traffic and cannot fulfill the advertisers need then the main problem is how to make money in a low traffic blog by selling ad spaces.

Best BuySellAds.com Alternatives for Low traffic sites

As we know that Buysellads is one of the famous site and best sites for publishers to put there ad spaces for renting.But we all know that buysellads have such requirement that they need minimum 50K Monthly Impressions.But your site contains only 500 to 1000 Daily visits and monthly impressions are 10k to 20k then you don't need to worry more there are some sites that will provide advertisers our site ad space and advertiser will directly contact you.I Recommended Buysellads for those sites whose monthly impressions are over 50,000 to 70,000. So here is a list of sites that can be called as Best BuySellAds.com Alternatives.

How to sell ad spaces in Low traffic blogs?

If you have a low traffic blog and still want to sell your Adspaces then you can use the below given websites.

1.  BlogAds.com is serving publishers from year 2002.Blogads represents thousands of premiere blogs like PerezHilton, DailyKos, Wonkette and Cute Overload.It allows you to choose your own prices,Accept or reject Ads,Phone and email publisher support,Advertsers can purhcase Adspaces directly,70%+ of revenue goes to the publishers.

2.  AdSella.com makes your task lot more easier.Simply set your listing,price and paste a line of code to your blog and just wait for your adspace to sell.It�s completely free and quite easy as well.Advertisers will contact your directly.Adsella gives you 80% of your revenue which is quite nice for low traffic blogs.

3.  According to me Puxee.com is the best alternative of BuySellAds.com for low traffic blogs.It provides you the easiest way to sell Advertising spaces on your blog.It pays through Paypal and shares 75% of the total revenue.As an administrator of your blog,you always keep control over your Adspace.

4.  Advertisespace.com is another best alternative of BuysellAds for low traffic blogs.It allows you to set your own price for a variety of adspaces.All un-sold inventory can be syndicated to their impact network to instantly generate revenue for you until your individually priced Adzones are sold.They provide javascript codes for the Ads which ensures that the loading speed of your blog remains same.

5.  PublicityClerks.com is another BuySellAds alternative.This site was launched in the year 2012 and is very popular now.Major advantage of using this site is,it accepts a blog which has only 5000 visits per month which means low traffic blogs.Just give it a try.

In this post I tell you that how to sell Ad spaces in Low Traffic Blogs. Hope that you will like my tutorial.
Tell me your opinions and feedback in comments below. Have a good day!

Thursday, August 7, 2014

Use stylish Mouse Pointers in Blogger/Blogspot

use Mouse Cursor in Blogger
Hello Friends, in today's tutorial I am going to tell you how to install a beautiful mouse cursor in your blogger blog with a very simple HTML code. Make your blog look beautiful with stylish mouse cursor and back to top button.

Mouse Cursor:

In computing, a pointer or mouse cursor (as part of a personal computer WIMP style of interaction) is a graphical image on the computer monitor or other display device. The pointer echoes movements of the pointing device, commonly a mouse or touchpad, and signals the point where actions of the user take place. It can be used to select and move other graphical user interface elements, and is distinct from the cursor, which responds to keyboard input. The cursor may also be repositioned using the pointer.
You would also like to add:  Emotion Smileys for Blogger Comments

Mostly people, especially new blogger want to make their blog more beautiful and shiny. There are many tricks have been shared on the internet about this issue. But the one I'm going to share, is the easiest method to add a mouse cursor in your blog. Let's now come straight to the solution.

How To Change Mouse Cursor In Blogger

Follow the steps below to do this

  • Log-in to your blog
  • Template >> HTML >> Proceed
  • Search For this code ]]></b:skin> (tip: Use CTRL+F)
  • Now Just above/before ]]></b:skin> insert following code

body{
cursor: url(IMAGE LINK), auto;
}
Now Save your template and view your blog.
Replace IMAGE LINK with the image link of your mouse pointer image.

Tell me in comments if this worked for you. In case of any error comment down I will try to solve your problem. Have a good day ahead!

Saturday, August 2, 2014

Evo Magz: Template Blogger Keren Responsive & SEO Friendly

Halo.. sahabat Blogger apa kabar? Blogger Peer kembali lagi setelah lama menghilang tentunya dengan desain dan tampilan yang baru. Terima kasih selama ini telah berkunjung ke blog ini dan mohon maaf kalau komentar anda semua tidak sempat saya balas, karena kesibukan saya dalam pekerjaan dan waktu istirahat sedikit jadinya untuk nyalurin hobby untuk nge-blog juga sedikit. Okey.. sesuai dengan judul post ini Evo Magz: Template Blogger Keren Responsive & SEO Friendly adalah template yang saya pakai di bloggerpeer.blogspot.com sekarang, kenapa saya memakai template Evo Magz? karena saya sangat suka dengan tampilan elegan, simple, fast loading, SEO friendly dan responsive dari Evo Magz Blogger magazine theme ini. Saya banyak ketinggalan dari teman-teman Blogger yang lainnya dalam perkembangan dunia Blog dan SEO, apalagi sekarang menggunakan template HTML5, menerapkan Schema.org markup dan responsive design adalah hal yang sangat direkomendasikan oleh semua search engine termasuk Google yang tentunya sangat berpengaruh positif pada perkembangan SEO pada blog (Onpage SEO) dan agar bisa terindeks cepat oleh search engine dan juga agar mobile friendly karena sekarang ini hampir 75% orang-orang menggunakan internet dengan mobile ataupun tablet. Mungkin ada yang bertanya kenapa template yang dulu saya ganti? dan kenapa tidak di-edit saja sendiri agar bisa responsive? padahal template itu tampilannya lumayan bagus, jawabannya adalah sederhana template saya yang dulu tidak memakai HTML5, tidak responsive, tidak memakai Schema markups dan juga skill saya dalam hal designing dan waktu untuk meng-edit terbatas makanya saya memakai template yang langsung jadi dan tinggal memasang saja, cuman saya hanya merubah sedikit tampilan sidebar dan merubah form komentarnya memakai versi comments form dari Adhy Suryadi www.kompiajaib.com

Evo Magz Blogger Template

Evo Magz adalah template yang dibuat oleh Mas Sugeng, salah satu Blogger Indonesia yang template hasil karyanya banyak dipakai oleh para Blogger. Dibawah ini adalah beberapa fitur dari Evo Magz Blogger Template ini

Fitur-Fitur Evo Magz Template - SEO Friendly Responsive HTML5 Blogger Theme

  • 100% Responsive
  • Custom Mobile Template
  • SEO Optimized
  • Ad and AdSense Optimized
  • Fully Customizable
  • Font Awesome
  • Breadcrumb
  • Auto Readmore
  • Related Posts
  • Share Buttons
  • Tab View Widget
  • Recent Post Widget
  • Numbered Page Navigation
  • Back to Top button
  • Custom Error page
  • Facebook Comments
  • and much more

Demo bisa dilihat di blog ini atau klik disini

Nah bagi anda yang ingin memakai template Evo Magz ini silahkan kunjungi blog-nya Mas Sugeng di www.mas-sugeng.com

Friday, August 1, 2014

Add Emoticons Smileys in Blogger Comments

Add Smileys in Blogger Comments
Emoticons/Smileys are a great way of making discussions more interesting and fun, so it's a pity that Blogger don't support them. In this tutorial, I will show you some simple steps on how to add some very cool emoticons called Kolobok to your Blogger/Blogspot comments, so that you and your blog visitors will be able to have an enjoyable time together.

UPDATE: Now available for threaded commenting system too!

How To Add Kolobok Smileys Emotions to Blogger Comments
Step 1.  Log in to your Blogger account and go to Template - Edit HTML

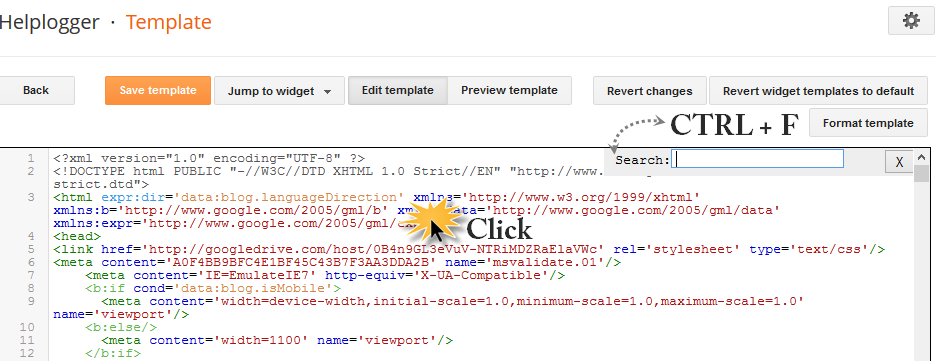
Step 2.  Click anywhere inside the code area and press the CTRL + F keys to open the search box

open the search box in blogger HTML

Step 3.  Search (CTRL + F) for this tag:
</body>

Step 4.  Copy and paste just above it, this code:

a) For previous commenting system with comments that have no reply function:
<!--kolobok-smileys-->
<script src='http://helplogger.googlecode.com/svn/trunk/[helplogger.blogspot.com]smileys.js' type='text/javascript'/>
<!--kolobok-smileys-->
b) For threaded commenting system with comments that have the reply function:
<script src='https://helplogger.googlecode.com/svn/trunk/kolobok threaded.js' type='text/javascript'/>
Note: ignore steps 5-8 if you are using threaded comments!

Step 5.  Now find this code snippet:
<b:loop values='data:post.comments' var='comment'>
Step 6.  Paste the following code just above it:
<div id='smileys'>
Step 7.  Find the following code (look carefully, it should be somewhere below the code from step 5)
</b:loop>
Step 8.  Paste the following tag just after it:
</div>
Step 9.  Now find this code:
a) For previous commenting system:
<data:blogTeamBlogMessage/>
Note: if you'll find it like 4 times, stop to the 2nd one!

b) For threaded commenting system:
<div class='post-footer-line post-footer-line-3'>

Step 10.  And add this code just after it:
<b:if cond='data:blog.pageType == &quot;item&quot;'><script type='text/javascript'>
//<![CDATA[
function moreSmilies() {
    document.getElementById('smiley-more').style.display = 'inline';
    document.getElementById('smiley-toggle').innerHTML = '<a href="javascript:lessSmilies()"><div style="font-size:small; font-weight:bold;color:#000000;">Hide Emoticons</div></a>';
}
function lessSmilies() {
    document.getElementById('smiley-more').style.display = 'none';
    document.getElementById('smiley-toggle').innerHTML = '<a href="javascript:moreSmilies()"><div style="font-size:small; font-weight:bold;">Show Emoticons</div></a>';
}
//]]>
</script>
<div class='emoticons'>
<a href="http://www.blogtipsuk.com/2014/08/add-emoticons-smileys-in-blogger-comments.html" ><img alt="Emoticons Smileys for Blogger Comments" title="Add these Smileys in your site" border="0" src="https://blogger.googleusercontent.com/img/b/R29vZ2xl/AVvXsEiDmllr9nOSfao1qljIRgkfbDNnuTM4x0QHq9XEOYobVNKXVFsnAKaBeQ4lrE-tVy4gUvUllcyM5bGY4bsG3jzmAwGkersSeh6uJ-aJeD-u_169-eJ2RmORgsjm1h3dXhdgz7hgfnPWSVoJ/s1600/Add+in+your+Site.jpg" height="20" width="100" /></a>
<span id='smiley-more' style='display: none;'>
<img src='https://blogger.googleusercontent.com/img/b/R29vZ2xl/AVvXsEh1zjBfunCN8Kin9SRlvlQb2XMtx6gEOwpJkh15nBVRS7E5l7HjKcFHXUwiLz3GRNbvIIw2VBW_d5ZZtlLfC38z-U-4XpZcFg6fI2rKx6O4WStwa8a8-WNvLimHvPAFdsVSJ2SAn6L_FJw/s1600/smile3.gif'/>:)
<img src='https://blogger.googleusercontent.com/img/b/R29vZ2xl/AVvXsEjWdFidwySYMHeXNYqYoQlvSG7J6arxL_x1qFQzpUWnABfT8l3BUSOlL1ShH-lewqiWP5G2sfGA8euzK78tmzJa44orPqRB1bJpvTcqbE8fJSBN0hQLTYosNLY_9OIxOQnTLRijXlqsWUQ/s1600/sad.gif'/>:(
<img src='https://blogger.googleusercontent.com/img/b/R29vZ2xl/AVvXsEi6B49TwelRiByli3-ldLDB9-O_gJ5kmvTxqDMG9PkDEcmaY0DAyQmcPFNCNL_tCFjyydbpfD9HCr1JS8WmLQ-JRhRoqdsLYHi1Rpc7KjyVg6i5V0Lp6VHm6I5mw_cw3exwTc2HldbF4jg/s1600/taunt.gif'/>:))
<img src='https://blogger.googleusercontent.com/img/b/R29vZ2xl/AVvXsEjLlfaCDGqhMkpu_LdFPL6QmhppoONoCJ-G_duZ5EqUF99118y6aGt7ibqKWdx5_bcfhlMji-79NVuoZSHDjGL0uHHmFyU1jZrHCGgnSYoNUPS2zPs3qf7pFsWTQNbVP25SSuSZgOzb2CE/s1600/cry2.gif'/>:((
<img src='https://blogger.googleusercontent.com/img/b/R29vZ2xl/AVvXsEiuNRbQ_e6BjB4mnB4fUTD-UvXnuuC4AnWEsyXqYqrQsuHPDTiTl6-12G0jAbwhW1597cLefenBkSvJ421-63t1ndw2UfV2JItJCDokRRH4CJuH8JtDQ13sBaWAob8_qCR7NFfzZ5QAync/s1600/rofl.gif'/>=))
<img src='https://blogger.googleusercontent.com/img/b/R29vZ2xl/AVvXsEj8AlS74q9JaUUAJqofU7KAnvwtSzZtujJWfS4UzK8coTIayc1tbgevftwMsEq5tjNCzbaYwwxYZQOqAJkH_-wl1sBmzNnZ1eaw5SVPN9jV0omRyTgyZncLTA0c-s3BMRruAhiR70t0rkU/s1600/suicide.gif'/>=D&gt;
<img src='https://blogger.googleusercontent.com/img/b/R29vZ2xl/AVvXsEin2sGqnYVffk8c24-VASKp9uUoxqmfIY72vU2IERNaPnfMOCaKmafDhNJq5UESHihxPcWmexSANvS_iWG887qys4LGTNQ4t7PNCV8TDRh9N3tLhtUKSLgAfe_GNiWC1c5ux0Qq96quGjE/s1600/biggrin.gif'/>:D
<img src='https://blogger.googleusercontent.com/img/b/R29vZ2xl/AVvXsEgODRyluB6QGL2JAVLZBv3KDmM0Z2N-hCX7qMkiKFfePQ1UwBIb4X-zH1p5NnrM2IB6mcvuiUXPXJH0PmrP1RW04kDLBQz4akmzWR_85pIDFkN1BP7hR8EeHCOY4LZ1D8OudJXTPjjaFJI/s1600/tongue.gif'/>:P
<img src='https://blogger.googleusercontent.com/img/b/R29vZ2xl/AVvXsEgM65y3Nrb5TG-PAv-f7bOtlxF7IYQi7CnSEoxdKU-aAZZw1ELVALbD6RFoEPMZ5JkhNLPsxVJ1-WWKI0SoUamU29JqAlm2TUSa5AmnQpax_V1HjMWeB_x0ek1DBX8dkfq80OOOxn3LfIU/s1600/shock.gif'/>:-O
<img src='https://blogger.googleusercontent.com/img/b/R29vZ2xl/AVvXsEg8X9CqOHdvsgEGXB0wxZUdJ6UBKQY5f3YqRCD8azO9ajmL5xjcEPz8-XuZOuBtaT4b8pbNRc7rmqSkH8CNvpjrICjbLqKwelLlRRuB__YbWUtGUUsXi59Vhl2JECMGxrgK926lhKjq4eE/s1600/think.gif'/>:-?
<img src='https://blogger.googleusercontent.com/img/b/R29vZ2xl/AVvXsEjh9JACyMilyWdkq1iORRRhiFcBkr4EYvbzGZMV1GIuzS5cu-OO5BBcI8ivE7rcnlqghCXx24UTnVz4mkGp9Pkqqb-Oji37qN38CHtzMfP4cFdUvQy-WuH6m6L7wuk9DSatrOTPs3VJojQ/s1600/unsure.gif'/>:-SS
<img src='https://blogger.googleusercontent.com/img/b/R29vZ2xl/AVvXsEjDo7zoHF0b18t8_7eD2xImVREpCI20cytHZptjOrAWCyCPly5OJxiWhbI4xi_I4o6-dhFENYIWxAIvys_qziLEZ3MVLcPWjo4m0d7NrxePq7PcHGCCJEgh6Bd18P0cl4o_Xz3rnk86qzw/s1600/flowers1.gif'/>:-f
<img src='https://blogger.googleusercontent.com/img/b/R29vZ2xl/AVvXsEhiBhr38Js3PSN62b3-CdzW2EPnZ6Nnoy9VVkgY6Ck6AprhMY64UfmHssrIRikfOZStqOf1-_ldbITJBdXC7pSceFCx2Hq2bCSbnoxIhbXrlyUJRoSK5X1EAcPHs80oM6xPVfjeb4HtQcw/s1600/doh.gif'/>d(
<img src='https://blogger.googleusercontent.com/img/b/R29vZ2xl/AVvXsEhFRMoX8IOQfy4pADd2ri-CUccTmc7zQwlJurEsLb4zGbnpO-r9IR3hWlFD_9GfSWKumRLwcQTxemlyThuLzNdT4mfAKIahKST8FZQBZz-QUUESywS2rl8YgjkfxssRX9uEqua3ax5-eZQ/s1600/air_kiss.gif'/>:-*
<img src='https://blogger.googleusercontent.com/img/b/R29vZ2xl/AVvXsEhzz0pllrAfPkDnnPhMJUAXaUiF3tDlbya-5TmdXi8LIuJYE4hbWxGfDG4KMNFZDiwjcQldpsl0sRlt8M2WA-QqLGSs6addusNot84I5YP-2HHY6R4av5cUQg4NmK8UCKCGyOx6DMSLA9A/s1600/threaten.gif'/>b-(
<img src='https://blogger.googleusercontent.com/img/b/R29vZ2xl/AVvXsEjmWx7cIfvAP5tmI6QNc9FKEqiRg0SVb28h-BImAlRzNZE10plj4o1mjMKlcm_gsMub5sURMNt4ofEezePSV5vCFzat0uzzgEm_7PZMfoZFltzAsJ6_iAIlLB5wTnXZvY5T8b4yow_FNoQ/s1600/help.gif'/>h-(
<img src='https://blogger.googleusercontent.com/img/b/R29vZ2xl/AVvXsEiuGPDhI6DEMgY_oO-gMvP8DpU_2pEVhJh34eG9fpRWdssu-TsmRkW2pTg9Q6QD9mslG6dP6xLC6BWvM9UeKe4P8yXOQH_NZN3E4Ao1bWaR3Q4Zx6CiJgUSKHFdN3a2suL3eLZrwG168xQ/s1600/good.gif'/>g-)
<img src='https://blogger.googleusercontent.com/img/b/R29vZ2xl/AVvXsEjcdap34WKwZXX9DW4vL6jvjYyCkeuj7RRxEdTXO37EBUHVAeP39yvL8PwMcUTWkMBijkL5KJy83El_It7lzHURyw56Aqc1FZ-exJLQC9oGSONvV2_ALeUim3Y4lptQyR5KQWK-gdcB-Ys/s1600/beee.gif'/>5-p
<img src='https://blogger.googleusercontent.com/img/b/R29vZ2xl/AVvXsEisKBNgV0HbZhyphenhyphencGbRYrkWI8f6mlZPIdsEw-Ow3hPlrU3hAgXa-DxoO5m_V6xNquPV1iQyL3SYeLUFW6P6i6I1csPuWO5fl2VDnagU6zVr2L2QOOG7pV0vhC3OF-FpSV-CxB5Ol3uAybxw/s1600/yahoo.gif'/>y-)
<img src='https://blogger.googleusercontent.com/img/b/R29vZ2xl/AVvXsEgXTKx_kWJSrn-uGQS-GEoyaXxf-W425hgL9N28IGC-k7lvecliHFov3HDJ_5hdmVkO2mvWOutakwpDp8OiTkXWiNLceDQXPIXa7YGsSVOwkqhl7wYjtU3N2ch0TcpheeukqXW3LM01vOc/s1600/crazy.gif'/>c-)
<img src='https://blogger.googleusercontent.com/img/b/R29vZ2xl/AVvXsEhPu98FOFtc043LfXPLNKoAwKNmXp2fyQ7bXLYTqNxHHSWy3bTXe4sh7YihBiDJ5MoWMdUHNHlbDw9Gmv4kcq56S9lbRow2SFxbyaWxrtCuO9OzhGR8obcabTiFTMJkm07ZIyg5CFjWtTg/s1600/spiteful.gif'/>s-)
<img src='https://blogger.googleusercontent.com/img/b/R29vZ2xl/AVvXsEgKdEyjAL2GDJpIzJ9NNOZJnHxCx9FK5uCDwwmxitOqgLbjY_oQl0e9VkzusQqoHkILHaOyqqthosXjHvdoMsGZkmoH7xQ5sh9zm3uHOUW_AvHdGeCNzsXhDfXYdFqWwJER8zPur_uBxWY/s1600/drinks.gif'/>d-)
<img src='https://blogger.googleusercontent.com/img/b/R29vZ2xl/AVvXsEi4b1nURvPslB6IESYpCZQeK-xJeC85I_PdKbPL5zA_3u_L89rCUuNh_I1BLyAlLfQLPbsyWBEm1lqGVIw5yIODM7Nq-acvDGWTiYaOsFJFu_SPDjolAwuO6t1WE_qB6M9hCf94GyRXTRg/s1600/cheer.gif'/>w-)
<img src='https://blogger.googleusercontent.com/img/b/R29vZ2xl/AVvXsEh677RC1AmEcIuoLvJ1ImAiujU1kGSv7JbIYxvs_Fwr5cQ3rnOvlaTPSA8h0_vPwzfSgfPSQuSXWvBxW2Yg_nkrIDwdP6VPXMTUygPJfuHmmiaI2uwNO4LcM_fVuUgFcQZch78slw1nlqI/s1600/hi+2.gif'/>:-h
<img src='https://blogger.googleusercontent.com/img/b/R29vZ2xl/AVvXsEh70YEfXa9u-hrFuMlWolLHrIxto1jRaX71NEoP8UwC0i8JOlc9MjW7IrsDSySF4dFYEbh3MeQuzgXmKr_rgjs3gj-Jgdtxhbr6A_75oeZQkxw_-Rf8TJrwtdzQvUYCZPZkxrNR02AKEiw/s1600/give_heart.gif'/>:X
</span>
<span id='smiley-toggle'><a href='javascript:moreSmilies()'><div style='font-size:small;font-weight:bold;'>Show Emoticons <img src='https://blogger.googleusercontent.com/img/b/R29vZ2xl/AVvXsEh1zjBfunCN8Kin9SRlvlQb2XMtx6gEOwpJkh15nBVRS7E5l7HjKcFHXUwiLz3GRNbvIIw2VBW_d5ZZtlLfC38z-U-4XpZcFg6fI2rKx6O4WStwa8a8-WNvLimHvPAFdsVSJ2SAn6L_FJw/s1600/smile3.gif'/></div></a></span>
</div></b:if>
Note: Ignore steps 11-12 if you are using threaded comments!


Step 11.  Finally, find this code
]]></b:skin>
Step 12.  Add this one below, just above ]]></b:skin>
.emoticons {-moz-background-clip: -moz-initial;-moz-background-origin: -moz-initial;-moz-background-inline-policy: -moz-initial;text-align: left;width:400px;}
.emoticons a, .emoticons a:hover {margin-left: 20px;text-decoration:none;}
Note: if you want to change the size of the emoticon container, edit the red code.

Step 13.  Save the Template and you're done. Enjoy!

Sunday, July 13, 2014

Hide or Show a Widget on some Pages Blogger

show and hide blogger widgets
Hi Bloggers, you may have noticed, all the widgets/gadgets you add to your blog, will be displayed on all the pages by default, including the homepage as well. And I'm sure very few know that AdSense could disable your account in case you've put ad units inside the content of your contact or privacy policy pages. Therefore, hiding certain elements inside your blog pages is not only a matter of design, but it is also a requirement.

Today I'll show you the easiest and simple ways to show or hide any widget in your blog to show on pages you like. So let's start.

To hide (or show) widgets in particular posts, static pages, homepage or archive pages, you can use these conditional tags.

How to Hide or Show a Widget on some Pages Blogger


Step 1. Go to Blogger's Dashboard > Layout and name the HTML/Javascript gadgets that you have already added. Doing this, it will be easier for you to identify the widgets that you have in your Blogger's template. Give it a unique title so that it does not match with any of the titles of any other widgets already added.

Step 2. Next thing to do is to go to Template and click on Edit HTML

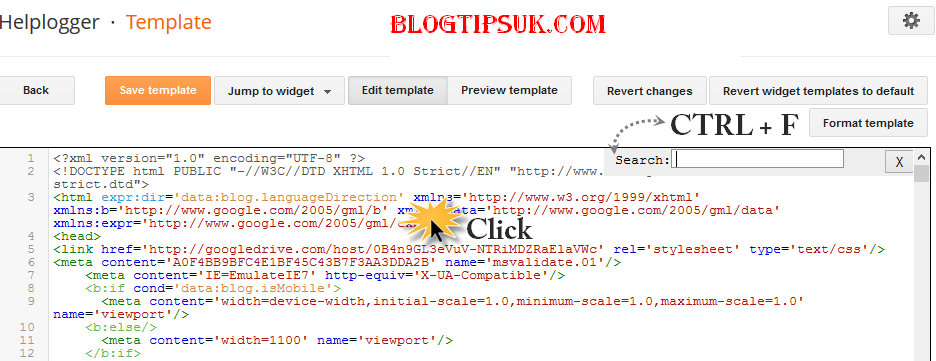
Step 3. Click anywhere inside the code area and press the CTRL + F keys to open the search box

blogger template, ctrl + f, search box

Step 4. Find the HTML of your widget by typing the widget's name in the search box - hit Enter.

Let's say that the title for one of your widgets is "Recent Posts". After searching for the widget's name, You will find a similar code in my template:
<b:widget id='HTML1' locked='false' title='Recent Posts' type='HTML'>
<b:includable id='main'>
<!-- only display title if it's non-empty -->
<b:if cond='data:title != ""'>
<h2 class='title'><data:title/></h2>
</b:if>
<div class='widget-content'>
<data:content/>
</div>
<b:include name='quickedit'/>
</b:includable>
</b:widget>  
This code represents the widget/gadget that you have added in the Page Elements location (Layout).


Step 5. After you've found your widget's code, add the following conditional tags marked with red just below and above to hide the widget from specific pages or posts in Blogger. For instance, in case you want:

To show the widget only in Homepage:

<b:widget id='HTML1' locked='false' title='Recent Posts' type='HTML'>
<b:includable id='main'>
<b:if cond='data:blog.url == data:blog.homepageUrl'>
<!-- only display title if it's non-empty -->
<b:if cond='data:title != ""'>
<h2 class='title'><data:title/></h2>
</b:if>
<div class='widget-content'>
<data:content/>
</div>

<b:include name='quickedit'/>
</b:if>
</b:includable>
</b:widget>

To show Blogger widget only in post pages 

<b:widget id='HTML1' locked='false' title='Recent Posts' type='HTML'>
<b:includable id='main'>
<b:if cond='data:blog.pageType == "item"'>
<!-- only display title if it's non-empty -->
<b:if cond='data:title != ""'>
<h2 class='title'><data:title/></h2>
</b:if>
<div class='widget-content'>
<data:content/>
</div>

<b:include name='quickedit'/>
</b:if>
</b:includable>
</b:widget>

To hide Blogger widget in post pages

<b:widget id='HTML1' locked='false' title='Recent Posts' type='HTML'>
<b:includable id='main'>
<b:if cond='data:blog.pageType!= "item"'>
<!-- only display title if it's non-empty -->
<b:if cond='data:title != ""'>
<h2 class='title'><data:title/></h2>
</b:if>
<div class='widget-content'>
<data:content/>
</div>

<b:include name='quickedit'/>
</b:if>
</b:includable>
</b:widget>

To show the widget in a specific page

<b:widget id='HTML1' locked='false' title='Recent Posts' type='HTML'>
<b:includable id='main'>
<b:if cond='data:blog.url == "URL of the page"'>
<!-- only display title if it's non-empty -->
<b:if cond='data:title != ""'>
<h2 class='title'><data:title/></h2>
</b:if>
<div class='widget-content'>
<data:content/>
</div>

<b:include name='quickedit'/>
</b:if>
</b:includable>
</b:widget>

Note: Replace URL of the page with the address of the page in which you want the widget to appear

To hide a widget only in a particular page

<b:widget id='HTML1' locked='false' title='Recent Posts' type='HTML'>
<b:includable id='main'>
<b:if cond='data:blog.url != "URL of the page"'>
<!-- only display title if it's non-empty -->
<b:if cond='data:title != ""'>
<h2 class='title'><data:title/></h2>
</b:if>
<div class='widget-content'>
<data:content/>
</div>

<b:include name='quickedit'/>
</b:if>
</b:includable>
</b:widget> 

To show widgets only in static pages

<b:widget id='HTML1' locked='false' title='Recent Posts' type='HTML'>
<b:includable id='main'>
<b:if cond='data:blog.pageType == "static_page"'>
<!-- only display title if it's non-empty -->
<b:if cond='data:title != ""'>
<h2 class='title'><data:title/></h2>
</b:if>
<div class='widget-content'>
<data:content/>
</div>

<b:include name='quickedit'/>
</b:if>
</b:includable>
</b:widget> 
To hide widgets in Static Pages
<b:widget id='HTML1' locked='false' title='Recent Posts' type='HTML'>
<b:includable id='main'>
<b:if cond='data:blog.pageType != "static_page"'>
<!-- only display title if it's non-empty -->
<b:if cond='data:title != ""'>
<h2 class='title'><data:title/></h2>
</b:if>
<div class='widget-content'>
<data:content/>
</div>

<b:include name='quickedit'/>
</b:if>
</b:includable>
</b:widget> 

To show widgets only in Archive Pages

 <b:widget id='HTML1' locked='false' title='Recent Posts' type='HTML'>
<b:includable id='main'>
<b:if cond='data:blog.pageType == "archive"'>
<!-- only display title if it's non-empty -->
<b:if cond='data:title != ""'>
<h2 class='title'><data:title/></h2>
</b:if>
<div class='widget-content'>
<data:content/>
</div>

<b:include name='quickedit'/>
</b:if>
</b:includable>
</b:widget> 
Note:  Pay attention each time you're adding a new address which should end up with .com, otherwise it may not work.

Step 6. After you have added the conditional tags, Save Template and view your blog.

Summary:

1.  See which widget you are willing to hide or show in some pages.
2.  Give that widget a Title in you Blogger Layout.
3.  Search it in your HTML code and use the above tags.

That's it!  Have a Good Day :)

Wednesday, June 11, 2014

Free On Page SEO for Blogger/Blogspot blogs

Get Free on-page SEO for Blogger
Hello from BlogTipsUK.com to all the new beginner bloggers who are facing problems establishing their blogs. Beginners work a lot in writing content but face problems like doing basic SEO of their blogs to get traffic naturally from Search Engines.

We believe good Content without good traffic is nothing. Basic SEO is the best source for getting organic traffic from search engines. So today I am going to share a simple task from BlogTipsUK.com , by doing which you can earn a simple reward that is free on-page SEO for your blog from our SEO analyst and professional blogger, Umar Khaleeq.

Note: You must Join BlogTipsUK.com socially to earn rewards. Every blog will be picked for SEO by owner's choice.

Follow these simple steps. and read the note at the end of post for the terms of the task.

Step 1.  Join BlogTipsUK.com

You must Join BlogTipsUK.com socially to earn rewards.


Step 2.  Join these sites under our Referral Link

By joining these all sites will help you to start earning money online with your blog and eventually will help us too if you join with my links. See a complete list of sites that work best for bloggers to earn money online. if you need any help regarding any site, comment on the respected post.
(this is optional)

Step 3.  Apply all our Widgets in your blog

Apply all our 100% working Best Blogger widgets in your blog without any changing. These widgets will help your blog in many ways. All widgets are stylish and loads fast. Here is the list:
1.  Social Media Floating Widget
2.  Recent Posts Widget
3.  Related Posts Widget
4.  Sliding Facebook Like Box Widget
5.  Facebook comment box in blogger (this is optional)

Step 4.  BackLinks

Enter any one link in a blog post of your choice. Remember only one link is required in any one of your blog's post. (in a post not in sidebar). These two links are mentioned below:

1.  <a href="http://www.blogtipsuk.com/2014/03/increase-traffic-visitors-to-blog-easily.html" rel="dofollow">Increase blog traffic</a>
2.  <a href="http://www.blogtipsuk.com/2014/03/earn-money-from-blogger-blogs-blogging.html" rel="dofollow">earn money from blogging</a>

After doing all the above procedures, please post your blog's link on our facebook page. I will try to reply you as soon as possible. When a blog is picked for on-page SEO, you just need to select a template and I�ll fully optimized it for better SEO. Which will results in better ranking and increases your blog's traffic from all the search engines. Else you can also see our blog's SEO section for more help and info on traffic and SEO.

Reward Terms

1. You must join our site socially e.g., on facebook, twitter and subscribe us by email.
2. You must complete all the steps given above to qualify for free SEO.
3. Optional points are not required for getting rewards.
4. After doing all the steps, leave your blog link on our FB page, which I will review and reply you.
5. Finally, You'll need to select a template and I�ll fully optimized it for better SEO.

Have a Good Day ahead! Keep Smiling.

Tuesday, April 15, 2014

Highlight Author Comments in Blogger websites with CSS

Change Author Comments Color Style
Hi friends, you surely have seen on many blogs and websites whenever an Admin of the blog or website make a reply to your comments, its comment's color and style is changed from other comments. These admin styled Comments are the best way to make good relationship with blog visitors or Followers.
So do you have a blog and your blog is getting good traffic then your blog will also be getting many comments, that may be positive or negative related to your blog website content.


 If you want to highlight your comments in your blog website, then here is the trick to do that and make your comments stylish,colorful and recognizable to others.Here I am going to share the trick to highlight Author Comments in Threaded comments and this trick also work in basic commenting system. This is coded using simple CSS and Jquery.

How To change Author Comments style In Blogger

Learn how to change blogger admin comments style and color in blogger template using CSS and Jquery for better interaction with your blog's users in easy steps.

Step 1.  Login to Blogger >> Go to Dashboard >> Template >> Edit Html

Step 2.  Find </body> and copy the following code above it [Tip: Ctrl+F]
<script type="text/javascript">
    $(function() {
      function highlight(){
        $(&#39;.user.blog-author,.ssyby&#39;).closest(&#39;.comment-block&#39;)
          .css(&#39;border&#39;, &#39;1px solid #e1e1e1&#39;)
          .css(&#39;background&#39;,&#39;#f1f1f1 url(&quot;https://blogger.googleusercontent.com/img/b/R29vZ2xl/AVvXsEgUCwe_QieE5CTKyqafaxfCjqNUBipAAmS415-nA_0R3MMAZj42LZPSAOhCCa_2ooO0-Hnse_Ljk1nr30JCAobEnEjk1fHCvybfuDxzb0DJ2M4sD6MNJTcIaVhmHizPwV8qzzKb1-yzEZ4/s1600/admin_comment1.png&quot;) no-repeat bottom right&#39;)
          .css(&#39;padding&#39;, &#39;10px&#39;);
          }
          $(document).bind(&#39;ready scroll click&#39;, highlight);
   });</script><a style="display:none" href="http://www.blogtipsuk.com" >Blogger seo tips</a>
Step 3.  Change red color bolded text according to your choice for border of the author comment.

Step 4.  Now save your template and you are done.

Congratulations you are done. If you enjoyed this article please like and share.

Monday, April 14, 2014

Install Scrolling "Back To Top" Button for Blogger/Blogspot

"Back To Top" Button
You surely have seen on many blogs and websites a  "Back To Top" Button in the sidebar at the bottom of the page that shows an image when clicked, it takes the user to top of your blog website. Animated back to top button in blogger website is one of the best Jquery style animated widget that looks good and also visitors enjoy easy site navigation scroll to top.

The best thing about this button is that it appears only when the user scrolls down the page and disappears as he scrolls up, and also one more feature of this script you can add your own image that you like as the back to top button.

Exactly same type of Back to Top Button in being used in our site. Probably one of the best Back to Top Button.

You would also like to use:  Sharing Buttons for websites in Blogger.

Add Smooth Scrolling "Back To Top" Button Widget to Blogger Jquery

Step 1.  Log in to your Blogger Dashboard, then go to Layout and click on Add a Gadget link
Step 2.  From the pop-up window, scroll down and choose HTML/JavaScript.
Step 3.  Select & Copy the code below and paste it into the new HTML/JavaScript:
<script src='http://ajax.googleapis.com/ajax/libs/jqueryui/1.8.23/jquery-ui.min.js' type='text/javascript'></script>
<script type="text/javascript">
var scrolltotop={
//Modified by www.blogtipsuk.com more JQuery Scroll to Top Design
//startline: Integer. Number of pixels from top of doc scrollbar is scrolled before showing control
//scrollto: Keyword (Integer, or "Scroll_to_Element_ID"). How far to scroll document up when control is clicked on (0=top).
setting: {startline:100, scrollto: 0, scrollduration:1000, fadeduration:[500, 100]},
controlHTML: '<img src="IMAGE LINK" />', //HTML for control, which is auto wrapped in DIV w/ ID="topcontrol"
controlattrs: {offsetx:5, offsety:5}, //offset of control relative to right/ bottom of window corner
anchorkeyword: '#top', //Enter href value of HTML anchors on the page that should also act as "Scroll Up" links
state: {isvisible:false, shouldvisible:false},
scrollup:function(){
if (!this.cssfixedsupport) //if control is positioned using JavaScript
this.$control.css({opacity:0}) //hide control immediately after clicking it
var dest=isNaN(this.setting.scrollto)? this.setting.scrollto : parseInt(this.setting.scrollto)
if (typeof dest=="string" && jQuery('#'+dest).length==1) //check element set by string exists
dest=jQuery('#'+dest).offset().top
else
dest=0
this.$body.animate({scrollTop: dest}, this.setting.scrollduration);
},
keepfixed:function(){
var $window=jQuery(window)
var controlx=$window.scrollLeft() + $window.width() - this.$control.width() - this.controlattrs.offsetx
var controly=$window.scrollTop() + $window.height() - this.$control.height() - this.controlattrs.offsety
this.$control.css({left:controlx+'px', top:controly+'px'})
},
togglecontrol:function(){
var scrolltop=jQuery(window).scrollTop()
if (!this.cssfixedsupport)
this.keepfixed()
this.state.shouldvisible=(scrolltop>=this.setting.startline)? true : false
if (this.state.shouldvisible && !this.state.isvisible){
this.$control.stop().animate({opacity:1}, this.setting.fadeduration[0])
this.state.isvisible=true
}
else if (this.state.shouldvisible==false && this.state.isvisible){
this.$control.stop().animate({opacity:0}, this.setting.fadeduration[1])
this.state.isvisible=false
}
},
init:function(){
jQuery(document).ready(function($){
var mainobj=scrolltotop
var iebrws=document.all
mainobj.cssfixedsupport=!iebrws || iebrws && document.compatMode=="CSS1Compat" && window.XMLHttpRequest //not IE or IE7+ browsers in standards mode
mainobj.$body=(window.opera)? (document.compatMode=="CSS1Compat"? $('html') : $('body')) : $('html,body')
 mainobj.$control=$('<div id="topcontrol">'+mainobj.controlHTML+'</div>')
.css({position:mainobj.cssfixedsupport? 'fixed' : 'absolute', bottom:mainobj.controlattrs.offsety, right:mainobj.controlattrs.offsetx, opacity:0, cursor:'pointer'})
.attr({title:'Scroll to Top'})
.click(function(){mainobj.scrollup(); return false})
.appendTo('body')
if (document.all && !window.XMLHttpRequest && mainobj.$control.text()!='') //loose check for IE6 and below, plus whether control contains any text
mainobj.$control.css({width:mainobj.$control.width()}) //IE6- seems to require an explicit width on a DIV containing text
mainobj.togglecontrol()
$('a[href="' + mainobj.anchorkeyword +'"]').click(function(){
mainobj.scrollup()
return false
})
$(window).bind('scroll resize', function(e){
mainobj.togglecontrol()
})
})
}
}
scrolltotop.init()
</script>


Step 4.  Replace IMAGE LINK with the image link of your back to top button.We have collected some back to top buttons for your ease. If you want to add image link then right click any button below and select "Copy image URL" and add this link:

Collection of Back to Top buttons

back to topback to topback to topback to topback to topback to topback to top

Step 5.  Save the Widget and drag it near the footer or any bottom position.
Step 6.  View your blogger website to see Smooth Scrolling "Back To Top" Button.

Related Posts reduces bounce rate

Want some other widgets for blog designs or need any help regarding this post, then you can comment below. I will try to answer as soon as possible. Enjoy your day!

Thursday, April 3, 2014

Add Floating Sliding Facebook LikeBox Widget in Blogger

Facebook LikeBox Widget
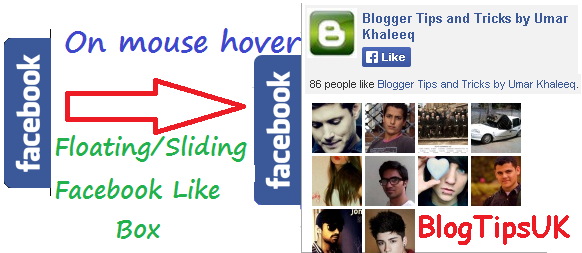
Blogging has become a trend now a days online. Every blogger want there blog attractive and stylish so they always add new and more beautiful widgets in there blogs.Today I am going to share a very easy and simple way to put a sliding Facebook like box which is called Sliding Facebook Like Box or Floating Facebook Like Box.The widget works as a fb image remains in a fixed position on the right hand side of your site.  When you hover over the blue facebook image, the like box will then slide and reveal itself using jquery.
Simple when you take your mouse on facebook image , like box will then appear.

Add Facebook Floating Like Box Widget in your blogger websites
The process of adding this widget to your blog is simplest. You need just to follow below steps:

1. Open Blogger
2. Go to Layout
3. Add a Gadget
4. Add HTML/JavaScript
5. Copy the below code and Save
<!--Floating Facebook Widget by http://bloggerseotipstraining.blogspot.com/ START-->
<script type="text/javascript"> /*<![CDATA[*/ jQuery(document).ready(function() {jQuery(".blogtipsuk").hover(function() {jQuery(this).stop().animate({right: "0"}, "medium");}, function() {jQuery(this).stop().animate({right: "-250"}, "medium");}, 500);}); /*]]>*/ </script> <style type="text/css"> .blogtipsuk{background: url("https://blogger.googleusercontent.com/img/b/R29vZ2xl/AVvXsEix0P0BqL-WwJFfYAmG0alCSaqBgn0IQ9xf4IKUd_TAkUplGRjCCTE6Or6BGssWwR7Fji3kSnKFc7tMA6allM2qXrskhLyvo4C0VjCw-YbUqXLCD631SZVjPrIkPZDxa6_96ZAmO6ywA_QX/") no-repeat scroll left center transparent !important; float: right;height: 270px;padding: 0 5px 0 46px;width: 245px;z-index:  99999;position:fixed;right:-250px;top:20%;} .blogtipsuk div{ padding: 0; margin-right:-8px; border:4px solid  #3b5998; background:#fafafa;} .blogtipsuk span{bottom: 4px;font: 8px "lucida grande",tahoma,verdana,arial,sans-serif;position: absolute;right: 6px;text-align: right;z-index: 99999;} .blogtipsuk span a{color: gray;text-decoration:none;} .blogtipsuk span a:hover{text-decoration:underline;} } </style><!--Brought to you by http://bloggerseotipstraining.blogspot.com/--><div class="blogtipsuk" style="">
<!--http://bloggerseotipstraining.blogspot.com/2014/04/add-stylish-facebook-floating-like-box-widget-to-blogger.html--><div>
<!-- http://bloggerseotipstraining.blogspot.com/2014/04/add-stylish-facebook-floating-like-box-widget-to-blogger.html--> <iframe src="http://www.facebook.com/plugins/likebox.php?href=Write URL of Facebook Page&width=245&colorscheme=light&show_faces=true&border_color=white&connections=9&stream=false&header=false&height=270" scrolling="no" frameborder="0" scrolling="no" style="border: white; overflow: hidden; height: 270px; width: 245px;background:#fafafa;color:000;"><!--Brought to you by www.BlogTipsUK.com--></iframe><!--Brought to you by http://bloggerseotipstraining.blogspot.com/--><span><!--Brought to you by http://bloggerseotipstraining.blogspot.com/--><b:if cond='data:blog.url == data:blog.homepageUrl'><center>
<a style="color:#a8a8a8;font-size:8px;" href="http://www.blogtipsuk.com">New Blogger Tips</a> - <a style="color:#a8a8a8;font-size:8px;" href="http://bloggerseotipstraining.blogspot.com/2014/04/add-stylish-facebook-floating-like-box-widget-to-blogger.html">Floating Facebook LikeBox in website</a></center></b:if>
</span></div>
</div>
<!--Floating Facebook Widget by http://bloggerseotipstraining.blogspot.com/ END-->
6. Save Arrangement 

Customization

1. The floating is set to right side of your blog, if you want set it for left side of your blog then simply change the bolded float:right property to float:left
2. Change Write URL of Facebook Page with your own facebook page URL.

Note:
If the floating facebook like box widget is not working properly after step 1, then you need to add jquery to your site. 
Follow the instructions below. 
1. Go to Design>Edit HTML
2. Search for <head> and just below it paste the following JQuery code. 
<script src='https://ajax.googleapis.com/ajax/libs/jquery/1.6.1/jquery.min.js' type='text/javascript'/>


Friday, March 28, 2014

Related Posts Widget for Blogger/Blogspot with Images

Related Posts Widget for Blogger
How to add Related Posts Widget to Blogger

Related posts Widget will generate the list of linked or connected posts . This Widget can be added either in homepage (under each posts) or inside the post. By placing this related posts Widget, there is chance to spread the other similar posts to visitors and they may have a tendency to take that post from the list, it will reduce the bounce rate of your blog and will keep your visitors from suddenly quit from your blog. Let's see how to add related posts widget to your Blogger site.


How to add Related Posts Widget to Blogger

Step 1. Log in to your Blogger Dashboard, then go to Template and click Edit HTML.
Step 2. Find below text from search (Ctrl + F)
]]></b:skin>

Step 3. Copy and paste the given code above this line.

<!--BlogTipsUK Related Posts with thumbnails Start-->
#related-posts {
float:center;
text-transform:none;
height:100%;
min-height:100%;
padding-top:5px;
padding-left:5px;
}
#related-posts h2{
font-size: 18px;
letter-spacing: 2px;
font-weight: bold;
text-transform: none;
color: #5D5D5D;
font-family: Arial Narrow;
margin-bottom: 0.75em;
margin-top: 0em;
padding-top: 0em;
}
#related-posts a{
border-right: 1px dotted #DDDDDD;
color:#5D5D5D;
}
#related-posts a:hover{
color:black;
background-color:#EDEDEF;
}

<!--BlogTipsUK Related Posts with thumbnails End-->

Step 4.  Copy and paste the below code where you want to show the related posts.
<b:if cond='data:blog.pageType == &quot;item&quot;'>
<div id='related-posts'>
<b:loop values='data:post.labels' var='label'>
<b:if cond='data:label.isLast != &quot;true&quot;'>
</b:if>
<script expr:src='&quot;/feeds/posts/default/-/&quot; + data:label.name + &quot;?alt=json-in-script&amp;callback=related_results_labels_thumbs&amp;max-results=6&quot;' type='text/javascript'/></b:loop>
<script type='text/javascript'>
removeRelatedDuplicates_thumbs();
printRelatedLabels_thumbs(&quot;<data:post.url/>&quot;);
</script>
</div><div style='clear:both'/>
</b:if>
<b:if cond='data:blog.url == data:blog.homepageUrl'><b:if cond='data:post.isFirstPost'>
<a href='http://www.blogtipsuk.com/2014/03/related-posts-widget-images-for-blogger-blogspot.html' >Related Posts</a></b:if></b:if>

Change red color to change number of posts displayed in widget.

Step 5.  Find below text from search (Ctrl + F)

</head>

Step 6.  Copy and paste the below code above this line.
<script type='text/javascript'>
var defaultnoimage="https://blogger.googleusercontent.com/img/b/R29vZ2xl/AVvXsEimI2V376_pyeMfXA0X0ff94j1qoPpFNVUkc16rXib3esevhUnUJBgHJqRX8-tLo2hc6nt_Go98yxDf63mvt4RTH4Dtnqfx4iULJiUHwS_6YV6Keerkra63CNrmqDFoHw9EvQlvho0-8Rc/s400/noimage.png";
var maxresults=6;
var splittercolor="#DDDDDD";
var relatedpoststitle="Related Posts";
</script>
<script src='https://googledrive.com/host/0Bxhkdxy8J6szQ2tCNUJJdllKVVk/' type='text/javascript'></script>

Change the red value to show number of posts. Change the green color to change color of splitter line between posts. Change the blue color to change Name of title.

 I hope this article will help you.We have just ?added a Related Posts Widget to Blogger. If so please like and share our blog. You can check here more Exciting Blogger Widgets.

Wednesday, March 26, 2014

Add Facebook Comment Box to Blogger/Blogspot

Facebook Comment Box in Blogger
Facebook comment for your blog can serve as a good way to make your site more engaging and encourage readers to drop comments if they're already logged in to Facebook. It also serves as a source of traffic since using Facebook comment shares the comment and post page on the visitor�s viewer's Facebook wall. One thing should be noted though: Facebook comment has no SEO value since it�s being displayed in an iframe which Google won't index. Comments made with the regular comment box on your site has more advantages especially if you get loads of comment, more keywords you didn't actually mention in the post content but appearing in comments do bring more search engine traffic. This is something Facebook comment lacks, except the extra traffic you get from Facebook.

I just thought you should know that before you implement it on your blog. As you can see, I do use it too. I wrote a post on this particular topic earlier but Facebook has changed since, lots of things on the post may not look exactly as explained. Also, this one has a feature the previous one didn't have � getting notified of every comment made on your blog.

Also Read: Add social media FB buttons in Blogger

How to add Facebook comment box to Blogger Blogspot Blogs

There are about five steps to get this done. Just follow the steps and you'll have a nice Facebook comment box installed on your blog in no time.

1. Creating a Facebook Application:

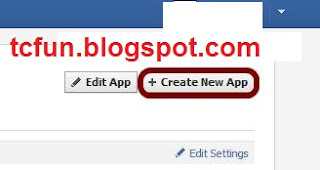
i. Head on to facebook developer page, you should create a new app by clicking the button at the top right.
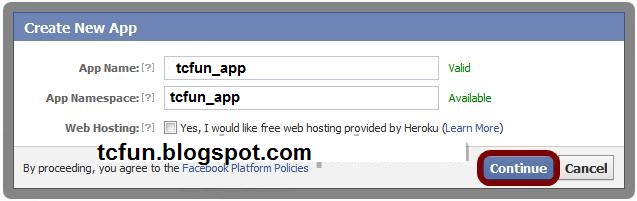
ii. Enter your application name and namespace,input the captcha code and proceed.
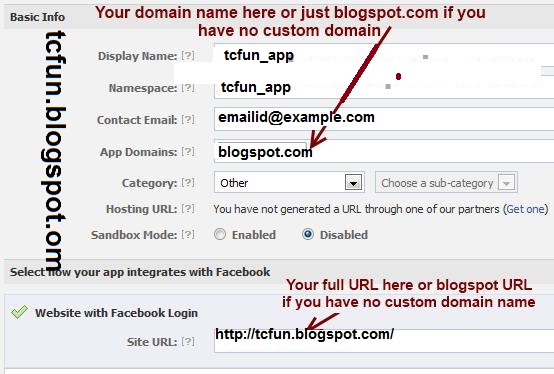
iii. On the next page, enter your custom domain name (if you�re using a custom domain) or just blogspot.com (if you�re using blogspot sub domain) in the space provided for App domain.

For App website, enter your blog URL. ( http://www.xyz.com/ or http://xyz.blogspot.com/ ). Be sure it starts with http:// and ends with / as shown in the screenshot below:
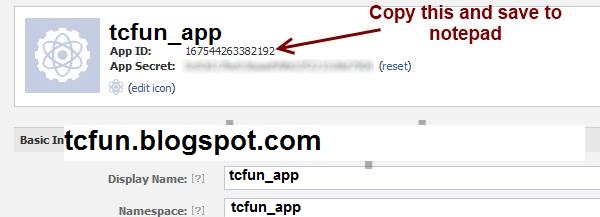
iv. Scroll down a bit and hit the Save Changes button. Now you're done with creating your facebook application but there's one more thing to do. On that same page, you should see your application ID. Copy it and save somewhere, you're gonna be needing it.
Now let's head to your blog and add following html codes to add facebook comment box.

2. Add html codes to your template for Facebook Comment Box 

Add these four sets of codes into your template to make this comment box work in your blog site.

Step 1. Log in to your blogger account and click on Template > Edit HTML
i. Press Ctrl + F and search for this code
<html
This should be found on the second or third line of your template.
Right in front of this, add the following code:
xmlns:fb='http://www.facebook.com/2008/fbml'
>>Be sure to have a space before and after this code. Take a look at the example below:
<html xmlns:fb='http://www.facebook.com/2008/fbml' expr:dir='data:blog����..2005/gml/expr' >
ii. Press CTRL + F on your keyboard and search for this:
<body>
If you can't find this, search for something similar. You should search for this instead:
<body expr:class='&quot;loading&quot; + data:blog.mobileClass'>
Get Facebook LikeBox Widget

In the next line, paste this code:
<div id="fb-root"></div>
<script>
window.fbAsyncInit = function() {
FB.init({
appId : 'YOUR APPLICATION ID HERE',
status : true, // check login status
cookie : true, // enable cookies to allow the server to access the session
xfbml : true // parse XFBML
});
};
(function() {
var e = document.createElement('script');
e.src = document.location.protocol + '//connect.facebook.net/en_US/all.js';
e.async = true;
document.getElementById('fb-root').appendChild(e);
}());
</script>
Be sure to replace YOUR APPLICATION ID HERE with the application ID I asked you to copy earlier, remember?
iii. Now, let�s add the open graph meta tag. Search for this code in your template:
</head>
In the line above it, paste this piece of code:
<meta property="fb:app_id" content="YOUR_APP_ID" />
Replace YOUR_APP_ID with that same application ID you previously copied.

iv. Now here�s the last part of tweaking your template your template to make it display Facebook comment box. The last thing is the iframe to display the comment box where you want. Search for this in your template:
<data:post.body/>
If you�re using a magazine style template, you�re likely to have more than one occurrence of this. Using the wrong one won�t make the comment show up. If you�re not sure about which one to use, search for this instead:
<div class='post-footer-line post-footer-line-1'>
In the line just below it, paste this code:
<b:if cond='data:blog.pageType == &quot;item&quot;'>
<style>
.blogtipsuk-fb-comments
{
-webkit-border-radius: 5px;
-moz-border-radius: 5px;
border-radius: 5px;
border:1px solid #BBBBBB;
background-color:#F2F2F2;
-webkit-box-shadow: #B3B3B3 5px 5px 5px;
-moz-box-shadow: #B3B3B3 5px 5px 5px;
box-shadow: #B3B3B3 5px 5px 5px;
padding: 5px;
margin: 10px;
}
</style>
<p align='center'>
<div align='center' class='blogtipsuk-fb-comments' style='background: #f2f2f2;'>
<font size='6'><strong>Love to hear what you think!</strong></font>
<br/>
<script src='http://connect.facebook.net/en_US/all.js#xfbml=1'/>
<div><fb:comments expr:href='data:post.url' expr:title='data:post.title' expr:xid='data:post.id' width='450'/></div><div align='right'>[
<a href='http://bloggerseotipstraining.blogspot.com/' target='_blank'><small>Blogger Widgets</small></a> | <a href='http://bloggerseotipstraining.blogspot.com/2014/03/add-facebook-comment-box-to-blogger-websites.html' target='_blank'><small>Facebook Comments in Blogger</small></a>]</div></div></p></b:if>
Save your template, the Facebook comment form should now appear. If it looks rather small, replace width=�450' with width=�600'. This increases the width from 450px to 600px.

Get Free SEO for Blogger

If this works for you, you can say thank you by sharing on Facebook, hitting the Google +1 button or simply using the comment box. Also, it would be nice of you not to remove the credit link to allow others find this useful widget. If you're having problems implementing this as well, don�t hesitate to let me know maybe I can be of help.