Tuesday, February 28, 2023

Discord Keeps Restarting? 6 Best Ways to Fix it!

Fix Discord Keeps Restarting

Discord is a simple chat app similar to Skype and Slack, but it’s geared toward video gaming. It serves as a platform for gamers to connect, coordinate play, and voice talk while gaming.

As of now, Discord supports all sorts of communication options you can think of, such as voice chat, video calls, and text messaging. Discord is free for all; you just need an active discord account to start.

We are discussing Discord because many users have recently messaged us asking how to fix the ‘Discord keeps restarting‘ problem. If you’re a gamer and use Discord to connect with your friends, the app restarting itself can be very disruptive.

Why Does Discord Keep Restarting?

There could be several reasons for the Discord desktop on your computer to restart or crash. It may be linked with the software but outdated drivers, corrupted Discord installation files, incompatibility issues, etc.

Since the Discord desktop app doesn’t tell the actual reason behind the restart or crash, you need to go through general troubleshooting methods to fix the problem.

6 Ways to Fix Discord Keeps Restarting

There are quite a few things you can do to fix Discord keeps restarting problem on a PC. Below, we have shared some effective solutions to Discord keeps restarting problem. Let’s get started.

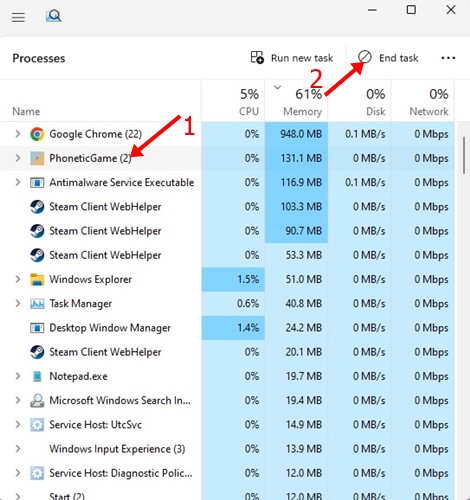
1. Restart your computer

Restart your computer

If the Discord app keeps restarting on Windows, you need to restart your computer. Restarting the computer will possibly eliminate bugs that may be preventing Discord from running properly.

Since it’s difficult to find processes that hamper the functionality of the running apps, restarting the computer sounds easy, and it gets the job done.

Several Discord users on the Microsoft forum have claimed to fix Discord keeps restarting problem just by restarting their computer. So, click on the Start Menu and select the Power Button. On the Power options, select ‘Restart‘. This will restart your computer.

2. Update Your Discord App

Check for updates

Updating the apps is a good security practice; you can use the new features. Discord is one such app that receives frequent updates.

If you don’t regularly use the Discord app, chances are that your Discord app is outdated, and it will face incompatibility issues.

An outdated Discord app can restart itself, which can be pretty disruptive, especially if you are in a conversation.

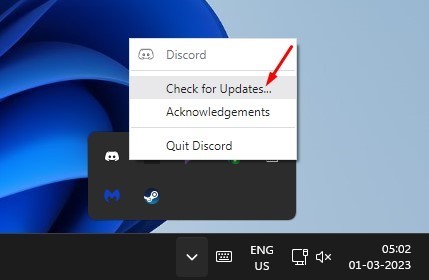
So, you can try updating the Discord app to check if the problem resolves. To update the Discord app, right-click the Discord icon on the system tray and select ‘Check for updates‘. This will automatically update your Discord desktop app.

3. Clear the Discord Cache

An outdated Discord cache can create network-related problems; sometimes, it can even force restart the application or crash your Windows device.

So, if Discord keeps restarting itself without any reason, you can try clearing the Discord app cache to resolve the issue. Here’s how to do it.

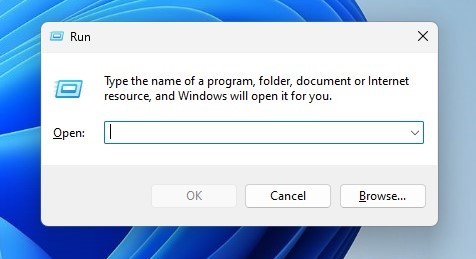
1. Press the Windows Key + R button to open the RUN dialog box.

RUN dialog box

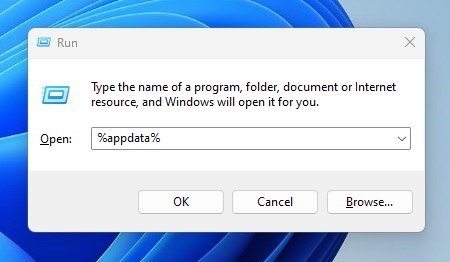
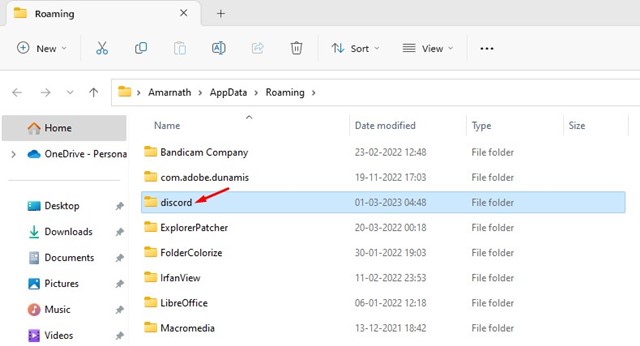
2. On the RUN dialog box, enter %appdata% and press Enter.

%appdata%

3. Next, find and double-click on the Discord folder.

Discord

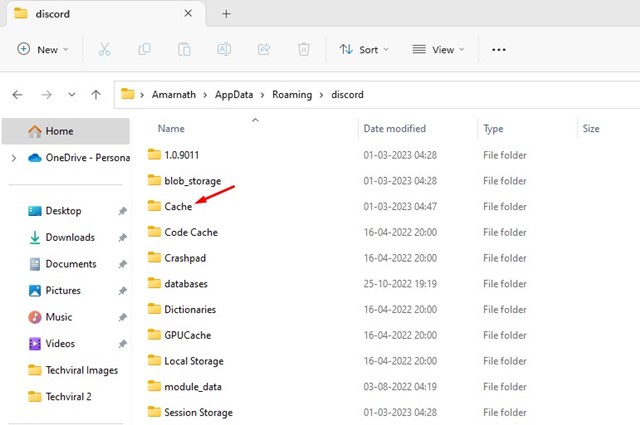
4. On the Discord folder, find the Cache. Open the Cache folder.

Cache

5. Now press the CTRL + A button to select all files. Once selected, delete all those files.

delete

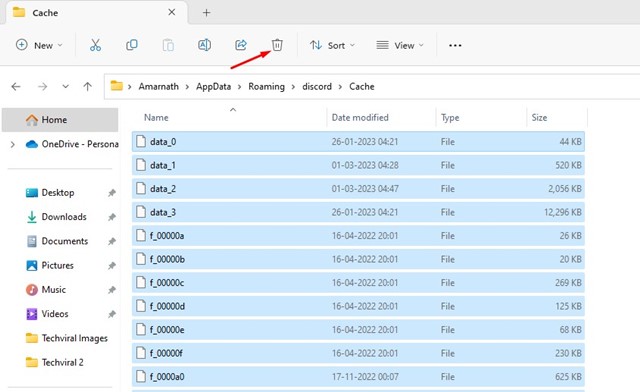
That’s it! After deleting the Discord app cache, restart your Windows PC, and launch the Discord app again. This time the app won’t restart or crash.

4. Enable Legacy Mode on Discord

Discord Legacy Audio is an audio subsystem that delivers high-quality sound output in real-time. But the subsystem requires modern hardware, which may be missing on your computer.

You may experience audio problems, or Discord keeps restarting issues due to the modern audio subsystem of Discord. You can prevent this by switching to Legacy Audio Subsystem on Discord. Here’s what you need to do.

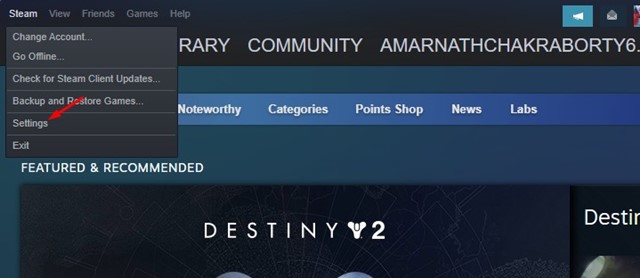
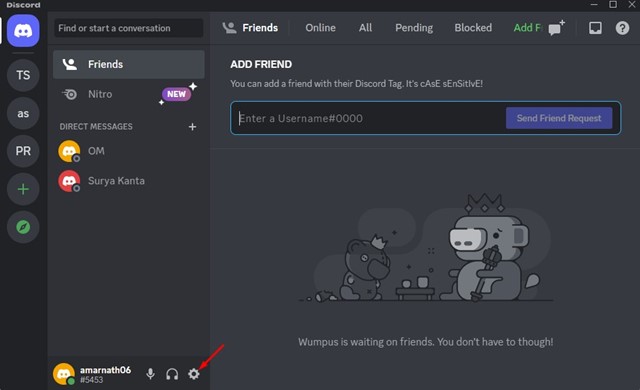
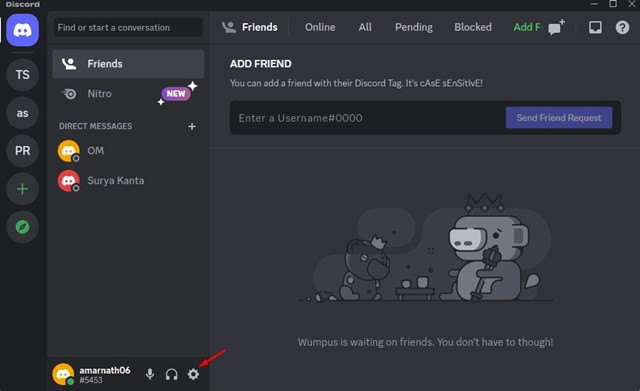
1. Open the Discord app and click the Settings gear icon at the bottom.

Settings gear

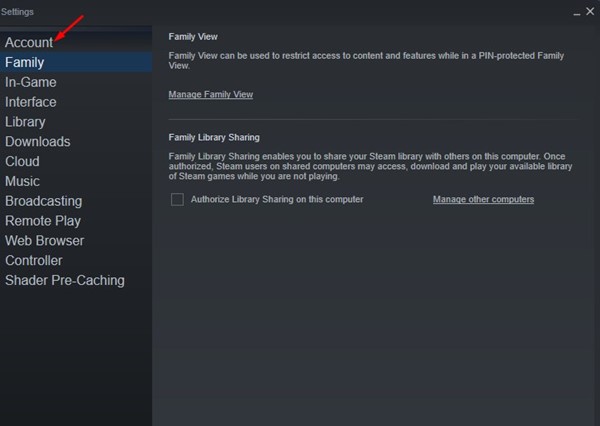
2. Next, switch to the Voice & Video tab on the Discord Settings.

Voice & Video

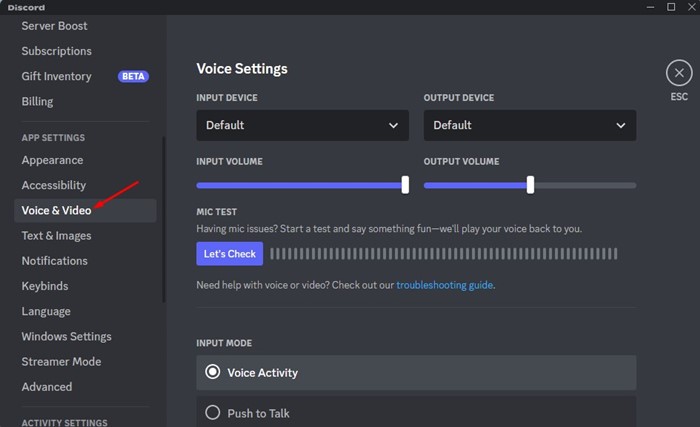
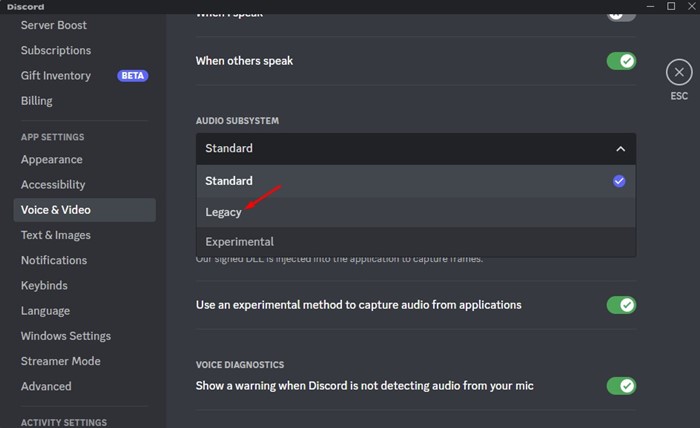
3. On the right side, click on the Audio Subsystem drop-down and select ‘Legacy

Legacy

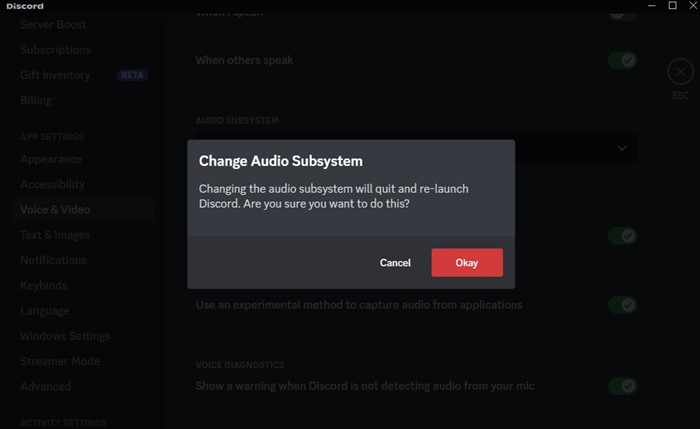
4. On the Change Audio Subsystem prompt, click the ‘Okay‘ button.

Okay

That’s it! This is how you can switch to Legacy Audio Subsystem on Discord. Make sure to restart your computer.

5. Disable Hardware Acceleration on Discord

If you don’t know, Hardware acceleration is a feature that forces the app to use your GPU for better video encoding and decoding.

Hardware acceleration is known for triggering various errors, especially if your PC doesn’t have a dedicated GPU. So, it’s best to disable the hardware acceleration on Discord to resolve the app crashing problem.

1. Open the Discord app and click the Settings gear icon.

Settings gear

2. On the Settings page, scroll down and click on Voice & Video.

Voice & Video

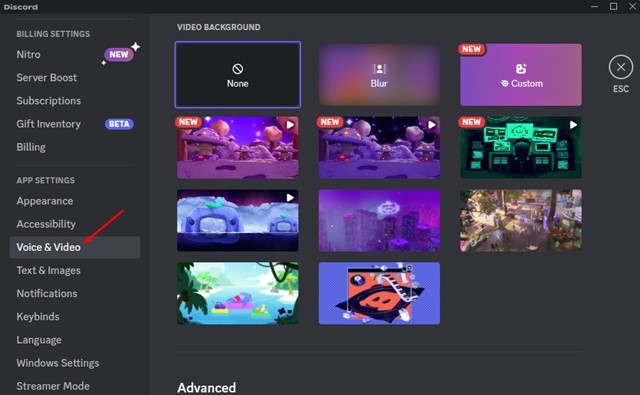
3. On the right side, scroll down and turn off the ‘Hardware Acceleration‘ feature.

Hardware Acceleration

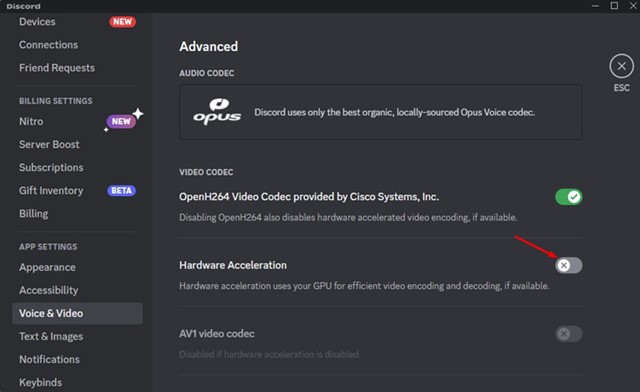
That’s it! Now restart your Discord app to apply the changes. If hardware acceleration were the culprit, the Discord app wouldn’t restart again.

6. Reinstall the Discord App

Reinstall the Discord App

If nothing has worked to resolve Discord keep restarting issue, the final remaining option is to reinstall the Discord App.

Reinstalling will remove the existing Discord installation from your device and install a fresh copy. This means you will have the up-to-date Discord version and fresh files.

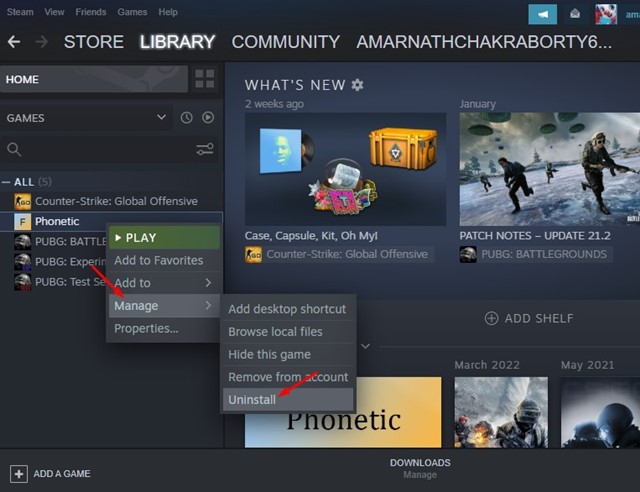
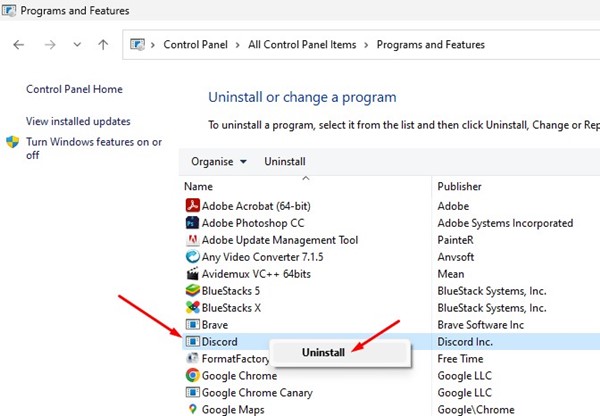
If the Discord app crashing or restarts due to a corrupted installation file, it will be fixed. To reinstall Discord, open Control Panel, right-click on Discord, and select ‘Uninstall’.

Once uninstalled, you need to head to the official site of Discord and download & install the desktop app.

Also read: How to Fix ‘Discord Installation has Failed’ Error

These are the working methods to fix Discord keeps restarting problem on the PC. If you need more help resolving Discord keeps restarting or the Discord app crashing on Windows, let us know in the comments. Also, if the article helped you, share it with your friends.

The post Discord Keeps Restarting? 6 Best Ways to Fix it! appeared first on TechViral.


from TechViral https://ift.tt/37hXQWt

YouTube accused of collecting UK children's data

The video platform faces a challenge over claims it is gathering and using the data of under-13s.

from BBC News - Technology https://ift.tt/xq5jzZO

FTX's Nishad Singh pleads guilty to fraud charges

Former FTX engineer says he is 'unbelievably sorry' for his role in the alleged crypto scheme.

from BBC News - Technology https://ift.tt/lyaNCuO

How to Fix ‘Failed to start game (app already running)’ Steam Error

Fix 'Failed to start game (app already running)' Steam Error

Who doesn’t love PC gaming? Of course, everyone does, and Steam is the kind in the PC gaming section. Steam is a platform from where you can download and play games on your computer.

With it, you can even play multiplayer games like PUBG, Among the US, Call of Duty, etc. It’s a platform that everyone can join for free and download & play games online.

However, recently a Steam error has been troubling many gamers. PC users have recently reported that the Steam desktop client shows a ‘Failed to start the game (app already running)’ error message.

The error message appears while running a specific game on Steam, preventing users from playing it. If you have purchased the game from the Steam Store, you may feel frustrated and may look for ways to fix it.

Fix ‘Failed to start the game (app already running)’ Steam Error

Fortunately, the Failed to start game (app already running) error on Steam can be easily fixed; provided you know the actual cause. Below, we have shared some best ways to resolve the ‘Failed to start game (app already running)’ error on Steam. Let’s get started.

1. Close the Game from the Task Manager

Close the Game from the Task Manager

If you read the error carefully, you will know that the error message appears when the Steam client detects another instance of the game running in the background.

The game is already running in the background, and it’s minimized. When this happens, a new game instance won’t launch on Steam.

Hence, you need to open the Task Manager and closely look for the game launcher or the game itself. If running, right-click on the Game or the launcher and select ‘End Task‘.

After closing all instances of the game, you want to play from the Task Manager, launch it again via Steam. You won’t get the ‘Failed to start game (app already running)’ error this time.

2. Restart your computer

Restart your computer

If the above method fails to work, and Steam game won’t open, it’s recommended to restart your computer. If you don’t find your game on the Task Manager, chances are that some processes are still running in the background silently.

Since finding such background processes is difficult, you can try restarting your Windows computer. Restarting will terminate all running processes and force your game to start from scratch.

To restart your Windows computer, click the Windows button > Power Button. On the Power menu, select ‘Restart’. This will restart your Windows computer.

3. Opt out of the Steam Beta

Many users have reported that opting out of Steam Beta has helped them fix the ‘Failed to start game (app already running)’ error.

If you are a Steam Beta user, try opting out and see if the error resolves. Here’s what you need to do if game not opening on Steam.

1. First of all, launch the Steam app on your computer.

2. When the Steam app opens, click the Steam icon in the top-left corner.

Steam

3. Select ‘Settings‘ from the list of options that appears.

Settings

4. On the Settings screen, click on Account.

Account

5. On the right side, click the Change button in the Beta participation section.

Change

6. Next, click the drop-down and select ‘NONE-Opt out of all beta programs‘. After making the changes, click on the Ok button.

NONE-Opt out of all beta programs

That’s it! This is how you can fix the ‘Failed to start game (app already running)’ error message by opting out of Steam Beta participation.

4. Verify the Integrity of the Game File

If you are getting the error message while running the Counter-Strike: Global Offensive game, you can try verifying the integrity of its game files. Doing so will automatically repair the corrupted or faulty steam files.

It’s pretty easy to verify the integrity of the game file on Steam. For that, follow some of the simple steps we have mentioned below.

1. Launch the Steam desktop, and switch to the Library tab.

Library

2. Next, right-click on the game which fails to load and select ‘Properties‘.

Properties

3. On the Game Properties, switch to the Local Files section.

Local Files

4. Next, on the right side, click on the Verify integrity of game files.

Verify integrity of demo files..

That’s it! Now you need to wait until Steam finds and fixes the corrupted files of the game.

5. Reinstall the Problematic Game

You can try reinstalling the game if you still see the same error, even after following all our shared methods. This will probably fix Steam game won’t launch problems.

The problem with reinstallation is that you will have to download the game again, which would cost you lots of internet bandwidth.

So, if you have a metered connection, reinstallation is not recommended. However, you can try reinstalling the problematic game if you have an unmetered connection. Here’s how to reinstall the Problematic game on Steam.

Uninstall

  • Open the Steam client and switch to the Library tab.
  • Right-click on the game which fails to load and select Manage > Uninstall.
  • On the Uninstall confirmation prompt, click the ‘Uninstall‘ button again.

That’s it! That’s how easy it is to uninstall a game from Steam on desktop.

6. Reinstall the Steam Client

Reinstalling the Steam Client is the least recommended way to fix ‘Failed to start game (app already running)’ error message.

But, if you have purchased the game, you can still try it to avoid wasting your money.

The ‘Failed to start game (app already running)’ can sometimes appear due to corrupted Steam installation files. So, if the Steam client is problematic, no method will work.

To reinstall the Steam client on Desktop, open Control Panel, right-click on the Steam app and select ‘Uninstall’. You need to follow the on-screen instructions to complete the uninstall process. Once uninstalled, download & install Steam again.

So, these are some of the best ways to resolve ‘Failed to start game (app already running)’ message on the computer. If you need more help resolving Steam Game won’t open error message, let us know in the comments below.

The post How to Fix ‘Failed to start game (app already running)’ Steam Error appeared first on TechViral.


from TechViral https://ift.tt/2cFoTON

Monday, February 27, 2023

Canada bans TikTok on government devices

The federal government says the video app is an "unacceptable" risk to privacy and security.

from BBC News - Technology https://ift.tt/1DK6vqb

Steam Won’t Open? 8 Best Ways to Fix it

Steam Won't Open? 8 Best Ways to Fix it

The popular video game digital distribution service and storefront by Valve, Steam, was launched in 2003. Today, it has become a go-to platform for millions of gamers to download & play video games online.

While the company behind Steam constantly tries to improve its desktop client, Windows users still sometimes face problems.

A few Steam users have recently reported that their Steam Client is not opening on their desktop. So, if Steam won’t open on your computer and you are looking for help, continue reading the guide.

Fix Steam Won’t Open on Windows

Steam fails to open on Windows for several reasons, and you can try a couple of things to fix it. Below, we have shared some simple methods to fix the Steam won’t open problem on Windows.

1. Restart your Windows Computer

Restart your computer

The first thing you should do when Steam won’t open is restarting your computer. Certain programs or processes may be running in the background preventing Steam clients from opening.

Since finding such apps and processes is difficult, the best you can do is restart your Windows computer. Restarting will probably terminate all apps and processes and will fix the issue.

After the restart, open the Steam app again on your computer. This time Steam would open.

2. Close all Steam Tasks in the background

The Steam desktop client has many bugs and sometimes slows down the PC. The Windows client needs lots of optimizations as well.

When you install Steam on your computer for the first time, it creates a startup entry so that the client launches automatically at the Startup.

So, the Steam client may be already running in the background; hence it’s not opening. Hence, you need to ensure that there’s no Steam app running on your computer.

If the Steam client is not showing in the system tray, you need to open Task Manager and end task all Steam tasks. Here’s what you need to do.

1. First, click on Windows Search and type in Task Manager. Next, open the Task Manager app from the list.

Task Manager

2. Look for the ‘Steam‘ app when the Task Manager opens.

3. Right-click on Steam and select ‘End Task‘. Alternatively, select the Steam app and click the End Task button at the top-right corner.

End Task

That’s it! This is how you can end all Steam tasks running in the background.

3. Run Steam As an Administrator

'Run as administrator'

Another best way to fix Steam won’t open Windows 10 is to run the desktop client with administrator privileges. Many users have already claimed to fix steam shortcut won’t open issues by running the client as an administrator. Here’s what you need to do.

To Run Steam as an administrator on Windows 10/11, right-click on the desktop shortcut and select ‘Run as administrator’. This will run the Steam desktop client with administrator privileges.

4. Always Run Steam as an Administrator

If the above method worked to fix Steam won’t open, you must set the Steam client to always run as an administrator. Here’s how you can force Steam app to always run as an administrator.

1. Right-click on the Steam desktop icon and select ‘Properties‘.

Properties

2. On the Steam Properties, switch to the Compatibility tab.

Compatibility

3. Next, in the Settings section, check the box for ‘Run this program as an administrator‘.

'Run this program as an administrator'

4. Once done, click on the Apply button and then on Ok.

That’s it! This will always run the Steam desktop app as an administrator on Windows.

5. Clear the Steam App Cache

If you use the Steam app regularly, the app cache folder for Steam is already filled up. When the cache file gets corrupted, Steam fails to open on Windows.

Hence, you need to clear the Steam app cache folder to fix Steam shortcut won’t open. Here’s what you need to do.

1. Right-click on the Steam desktop icon and select ‘Open file location‘.

Open file location

2. This will open the Steam folder. You need to find and click on Appcache.

Appcache

3. Right-click on the appcache folder, and select ‘Delete‘.

Delete

That’s it! This is how you can clear the Steam app cache on Windows. After clearing the cache, restart your computer and launch the Steam client again.

6. Allow Steam App Through the Firewall

Microsoft’s Windows has a robust firewall that blocks suspicious connections from your computer.

Sometimes, the Windows Defender firewall accidentally blocks the Steam app from connecting to the internet; when this happens, Steam fails to load on Windows.

You can easily resolve this issue by allowing the Steam app through Windows Firewall. Here are the steps to allow Steam through the Firewall on Windows.

1. First, click on Windows Search and type ‘Windows Defender‘. Next, open the Windows Defender Firewall from the list.

Windows Firewall

2. When the firewall app opens, click on the Allow an app or feature through Windows Defender Firewall link on the left side.

'Allow an app or feature through Windows Defender Firewall

3. On the next screen, click on Change Settings.

Change settings

4. On the next Window, find and check the ‘Private‘ and ‘Public‘ check boxes for both Steam and Steam Web Helper.

Steam

5. After making the changes, click the Ok button and restart your computer.

That’s it! That’s how easy it is to allow Steam through a firewall on a Windows computer.

7. Update Your Operating System

If Steam is still not opening, there is a higher chance that your Windows System files are corrupted, or there may be a compatibility issue.

While there are many ways to deal with corrupted Windows files, if you want to rule out compatibility issues, it’s best to update the Windows Version.

Check for updates

Updating the Windows version is easy; head to Settings > Windows Update. On the Windows Update screen, click on the Check for updates button.

This will automatically check for all available updates and will download & install them automatically. After updating Windows, launch the Steam client again.

8. Reinstall Steam App

Reinstallation is a good idea if no method has worked for you. Reinstalling Steam would fix the corrupted Steam files on your system.

So, if Steam is not opening on Windows, there is a higher probability of the Steam configuration or installation files being corrupted.

To reinstall Steam on the desktop, open Control Panel, right-click on the Steam app and select ‘Uninstall‘. Next, follow the on-screen instructions to complete the uninstall process.

Once uninstalled, you need to visit the official site of Steam and install the desktop client again. After installing it, open it and log in to your Steam account.

Also Read: 10 Best Free Steam Games Worth Playing

These are the best working methods to fix Steam won’t open issues. You can do a few other things, such as running a full antivirus scan, updating the device drivers, etc. If you need more help fixing Steam not opening on Windows, let us know in the comments below.

The post Steam Won’t Open? 8 Best Ways to Fix it appeared first on TechViral.


from TechViral https://ift.tt/A9Kz52e

Elon Musk defends racist tirade by Dilbert creator Scott Adams

Twitter's CEO accused US media of racism after multiple newspapers dropped the popular cartoon.

from BBC News - Technology https://ift.tt/RdsHLKG

The tiny diamond sphere that could unlock clean power

A diamond sphere made in Germany was key to December's breakthrough fusion experiment in California.

from BBC News - Technology https://ift.tt/KuvLnSy

OnePlus Finally Revealed OnePlus 11 Concept With Liquid Cooling

OnePlus Finally Revealed OnePlus 11 Concept With Liquid Cooling

Today, OnePlus officially unveiled its OnePlus 11 Concept at MWC Barcelona 2023 event, whose mysterious image has been shown off by the company in some past weeks, so finally, we got all information regarding those blue strips and the smartphone’s design.

In the previous report, we made an assumption on this Blue LED back panel and proved that their main objective is not lightning as it is some new technology from the company to make the device cool, so let’s find it out below.

OnePlus 11 Concept: All Details

OnePlus Finally Revealed OnePlus 11 Concept With Liquid Cooling

OnePlus already launched OnePlus 11 in February, and it made this concept on the same phone to show off its latest technology and design at MWC Barcelona 2023 event, whose first day was today.

You all might have heard about liquid cooling for PCs, but liquid cooling in smartphones sounds rare, but now it is done by OnePlus. I won’t say they are first, but they did it in a very fantastic and different way.

As you can see above how this back panel looks like. However, it features glowing blue pipelines that can glow in different modes. Also, these pipes contain water, oil, and mica, as multiple YouTubers say.

These pipes and their panel process cooling for phones via liquid, and OnePlus’s this cooling technology is called “Active CryoFlux”.

The company claimed that its technology is capable of providing better cooling that will reflect better performance from games and faster charging speeds.

Now, let’s talk about its design. We have seen multiple smartphones that have LED on their back panel, but their existence doesn’t contribute anything to the system.

Oneplus 11 Concept Cooling CryoFlux

But the colorful strips in the OnePlus 11 concept have a reason, as it combines technology and an immersive look. From a closer, these pipes look like to be moving, and these colorful strips also cover the boundary of the camera bump.

While this prototype’s all specs are the same as OnePlus 11, it just has a different back panel that is made of glass to show light strips clearly with the brand logo.

Besides, let me clarify that this phone is not for sale as the company has only made this prototype for its purposed event.

The post OnePlus Finally Revealed OnePlus 11 Concept With Liquid Cooling appeared first on TechViral.


from TechViral https://ift.tt/IVL7BWl

Apple’s Reality Pro Headset Would Break ‘iPhone Required’ Rule

Apple’s Reality Pro Headset Would Break 'iPhone Required' Rule

Apple’s upcoming AR/VR headset’s some of the major details that have surfaced, which is definitely worth discussing as this device may break the ‘iPhone required‘ rule of Apple.

Besides, this information is coming from Bloomberg‘s Mark Gurman, so we can rely on it, and it also includes details regarding the second generation of this AR/VR headset, so let’s discuss it below.

Apple’s AR/VR Headset May Feature ‘In-Air’ Typing Capabilities

Apple's AR/VR Headset May Feature 'In-Air' Typing Capabilities

The latest edition of the Power On newsletter from Bloomberg’s Mark Gurman noted that the upcoming headset, which is better known as the Apple Reality Pro headset, would not require a paired ‌iPhone‌ to use it or even to setup it up.

Every Apple product user knows that to use or set up Apple Watch, iPhone is required, but this priority doesn’t apply to this headset.

As the report noted, the headset could have the ability to download the user’s data directly from iCloud, and also, transferring data or setting it up from ‌iPhone‌ will be an option.

Besides, the internal prototypes of the headset include “in-air typing,” which allows giving text input by hand gestures with certain devices and eye movements, but Gurman mentioned this feature as ‘finicky‘ in its testing phase.

In the future, we may see some improvements in this feature, or the company will also launch a remote to control it.

Separately, Mark Gurman also expressed some details about the second-generation Reality Pro headset.

Apple has started working on second-generation AR/VR headsets, and also it is working on multiple models of first-generation AR/VR headsets that are powered by an M2 chip.

And as Apple is planning advanced features and upgraded performance for the second-generation Reality Pro headset, for which the M2 chip is less powerful so Apple would go with M3 or M4 chip which is yet to get launched.

This Apple Reality Pro headset was highly rumored to launch in Q1 of this year, and then, many tipsters suggested that Apple is likely to unveil it at WWDC 2023 event, which could take place in June.

But now, for the second time, its launch timeline got changed as an Apple analyst Ming-Chi Kuo shared that Apple may unveil it at WWDC in June, but higher chances are that they will launch it alongside iPhone 15 series in September or later this year.

The post Apple’s Reality Pro Headset Would Break ‘iPhone Required’ Rule appeared first on TechViral.


from TechViral https://ift.tt/sDxCwAt

What Does Timer Mean on WhatsApp? How to get rid of it

What Does Timer Mean on WhatsApp? How to get rid of it

Being the most used instant messaging app, WhatsApp is used by almost everyone with an Android or iPhone right now.

The app lets you exchange texts, make voice and video calls, create and join groups, share files, and what’s not.

Also, the company behind WhatsApp regularly pushes updates and entices users by offering new features. If you’re an active WhatsApp user, at some point, you might have to think about what does timer mean on WhatsApp.

The timer symbol on WhatsApp can appear in two different situations, and many users still don’t know what it means. Below, we have discussed ‘What does Timer mean on WhatsApp‘. Let’s get started.

What Does Timer Mean on WhatsApp?

Like every similar category of apps, WhatsApp also uses a few symbols to describe certain features.

For example, the blue tick on the chat messages is shown when the read receipts are enabled. Blue Tick signifies that the receiver has read the message.

Similarly, the timer icon on WhatsApp appears in two different parts of the app. You will either see it in a chat or the WhatsApp profile.

What Does Timer Mean on WhatsApp Chat?

If you see a timer symbol in your messages in a selected chat, it could mean ‘Network Issues’. The timer is displayed next to the message when the app experiences an issue with your network.

What Does Timer Mean on WhatsApp Chat?

The timer icon means that the message is not sent. The best thing you can do to remove the timer icon on WhatsApp messages is to resolve internet connection problems.

You can confirm whether your internet is working by opening fast.com. The site will show you the current internet speed. Alternatively, if you’re connected to WiFi, you can switch to Mobile data.

Whenever the WhatsApp app detects the internet, the message will be sent, and the timer icon next to the message will be gone.

What Does Timer Mean on WhatsApp Profile?

While messaging someone on WhatsApp, you may see a time icon on the profile picture. The timer icon can appear in individual chats or the group’s picture.

The appearance of timer symbol on WhatsApp profile means disappearing messages. If you don’t know, Disappearing messages is an optional feature you must manually turn on for more privacy.

WhatsApp’s disappearing messages allow you to set messages to disappear automatically after 24 hours, 7 days, or 90 days of being sent. It’s a great privacy feature that you should use.

So, when a person enables the disappearing message feature, you see the timer icon on the profile picture, meaning the sender has activated the Disappearing message.

How to Send Disappearing Messages on WhatsApp?

If you haven’t yet used the Disappearing messages on WhatsApp, here are the steps to help you get started.

1. First, open the WhatsApp app on your Android or iPhone.

2. Open the chat where you want to send the disappearing messages.

3. Next, click on their profile picture.

profile picture

4. On the next screen, scroll down and tap on Disappearing Messages.

Disappearing Messages

5. Now, you will be asked to select the duration for the disappearing messages.

select the duration

6. Select the duration and move back to the chat page. You will notice a timer icon on the person’s profile picture.

Timer icon on the person's profile picture

This is how you can enable Disappearing messages on WhatsApp. The messages you will send with this feature enabled will disappear automatically.

How to get rid of clock symbol on WhatsApp?

The WhatsApp clock symbol problem means the WhatsApp app is waiting for an active connection to send the message.

You need to check your internet connection if the clock symbol appears on the messages. You can switch your internet connection to WiFi or Mobile.

If the clock symbol appears on the WhatsApp profile picture, disable the disappearing message feature. Here’s what you need to do.

1. Open WhatsApp and select the chat where the clock symbol appears.

2. Next, tap on the person’s profile picture on the chat page.

tap on the person's profile picture

3. On the next screen, scroll down and tap on Disappearing Messages.

Disappearing Messages

4. On the duration prompt, select ‘Off

Off

That’s it! This is how you can get rid of the clock symbol on WhatsApp.

Also Read: How to Send Anonymous Messages on WhatsApp

So, this guide is all about timers on WhatsApp Profile pictures and what it means. We have also discussed what the timer on WhatsApp Messages means. If you need more help understanding what timer means on WhatsApp, let us know in the comments.

The post What Does Timer Mean on WhatsApp? How to get rid of it appeared first on TechViral.


from TechViral https://ift.tt/FlUimeB

Sunday, February 26, 2023

Missing Chinese tech banker 'assisting' authorities

Bao Fan's disappearance this month renewed concerns of a potential crackdown on finance and tech figures.

from BBC News - Technology https://ift.tt/TcIqfwk

The high-tech weeding machines cutting herbicide use

Using AI technology, the latest weeding systems can automatically find and spray individual weeds.

from BBC News - Technology https://ift.tt/s67gYai

How to Fix File Explorer Tabs Not Showing in Windows 11?

Fix File Explorer Tabs Not Showing in Windows 11

Microsoft gave Windows users many reasons to switch to its new Windows 11. Windows 11 has a fresh look, themes, features, and many other visual changes.

If you are already a Windows 11 user using the 22H2 build, you are already witnessing the very useful ‘File Explorer Tabs’. Yes, the Windows 11 22H2 build got the tab support for File Explorer, and it’s a very useful multitasking feature.

However, the problem is that many Windows 11 cannot find the new File Explorer tabs even after updating their Windows 11 version to build 22621.675.

Many Windows 11 users installed the latest updates to experience the new tabs in File Explorer, but some were disappointed. Many users have reported missing tabs in Windows 11 file explorer.

7 Ways to Fix File Explorer Tabs Not Showing in Windows 11

So, continue reading the guide if File Explorer tabs are not showing in Windows 11, despite installing the Windows 11 22H2 update. Below are some of the best methods to troubleshoot File explorer tabs not showing Windows 11.

1. Make sure you are using the correct Windows 11 build

Not every build of Windows 11 has file explorer tabs. To experience the new file explorer tabs, ensure your PC runs on Windows 11 Build 22621.675 or later.

If you have installed the update delivered on October 18 – KB5019509, you should see the tabs in the file explorer. Here’s how to ensure your PC runs on Windows 11 Build 22621.675 or above.

1. Press the Windows + R button on your keyboard to open the RUN Dialog box.

RUN Dialog box

2. When the RUN dialog box opens, type in winver and press the Enter button.

winver

3. This will open the Above Windows app. Here you need to check the Windows 11 version.

check the Windows 11 version

That’s it! This is how you can check if your PC uses the correct Windows 11 build for the File Explorer tabs.

2. Update your Windows 11

You should update your operating system if your PC is not running on Windows 11 Build 22621.675 or above. It’s easy to install the Windows 11 22H2 update. Here’s what you need to do.

1. First, click the Windows 11 Start button and select Settings.

Settings

2. On the Settings app, switch to Windows Updates.

Windows Updates

3. On the right side, click the Check for updates button.

Check for updates

4. Now you need to download & install all pending updates. If your PC is compatible with Windows 11 22H2, the version update will appear on the Windows update screen.

That’s it! This is how you can update your Windows 11 to fix file explorer tabs not showing on Windows 11.

3. Restart your Windows Explorer

If you don’t restart your PC often, it’s best to restart only the Windows Explorer process from the Task Manager.

New file explorer features may fail to show up due to the processes running in the background. And when you restart your computer or Windows explorer, all background processes likely preventing the File explorer tabs from showing up will be terminated.

It’s pretty easy to restart Windows Explorer on Windows 11. For that, follow some of the simple steps we have shared below.

1. First, click on Windows 11 search and type in Task Manager. Next, open the Task Manager app from the list.

Task Manager

2. When the Task Manager opens, switch to the Processes tab.

Processes

3. Find and select the Windows Explorer process on the right side. On the top-right corner, click on Restart. Or else, right-click on Windows Explorer and select Restart.

Restart

That’s it! This will restart File Explorer on your Windows 11 computer. Once restarted, open File Explorer and check whether tabs are appearing.

4. Enable Tabs in File Explorer via ViveTool

Well, a method enables tabs in Windows 11 File explorer forcefully. But that requires using the ViveTool.

We have already shared a detailed guide on enabling tabs in File Explorer using ViveTool. The method requires joining Windows Insider, downloading the ViveTool ZIP file, and executing a few commands on the Command Prompt.

Follow that guide to force enable tabs in the Windows 11 File Explorer using Vivetool.

5. Clear the File Explorer Cache

If everything is right on your end, but if File Explorer tabs are still not showing in Windows 11, you must clear the File Explorer Cache.

Windows 11 22H2 file explorer tabs not showing problem may be because of a corrupted file explorer cache. Hence, you can enable Windows 11 explorer tabs by clearing the cache file of File Explorer. Here’s what you need to do.

1. First, open File Explorer on your Windows 11. You can press the Windows + E button to open it.

2. On the top menu, click the three dots shown in the screenshot below.

three dots

3. Select ‘Options‘ from the list of options that appears.

Options

4. On the Folder options, switch to the General tab. Next, click on the Clear button in the Privacy section.

Clear

That’s it! After making the changes, click the Ok button to close the Folder options prompt.

6. Run the SFC command

SFC or System File Checker is a utility that scans and repairs corrupted system files. If the system files that handle the functionality of File Explorer are corrupted, the tabs won’t show up.

Also, you will need help with using the features of Windows 11 File Explorer. Hence, you can run the SFC command to fix File Explorer tabs not appearing on Windows 11.

1. Click on Windows 11 search and type in Command Prompt. Next, right-click on the Command Prompt and select ‘Run as administrator‘.

Command Prompt

2. When the Command Prompt opens, type in the given command and press the Enter button.

SFC /scannow

SFC /scannow

3. Now, you need to wait patiently until the scan completes.

That’s it! This should fix Windows 11 File Explorer no tabs problem.

7. Reinstall the Windows 11 22H2 Update

If you have followed every method exactly how they are described, chances are that the missing File explorer tabs on Windows 11 issue might be fixed. If nothing worked for you, the remaining option is to reinstall the Windows 11 22H2 update. Here’s what you need to do.

1. First, click the Windows 11 Start button and select Settings.

Settings

2. On Settings, switch to Windows Update.

Windows Updates

3. Next, on the right side, click on Update history.

Update history


4. On the Update history screen, click on Uninstall updates.

Uninstall updates

5. Now, find the recent updates and look for the 22H2 build. Click on the Uninstall button next to it.

Uninstall

6. Once uninstalled, restart your computer and check for updates again. This time install the Windows 11 22H2 update again.

That’s it! This should fix no tabs on Windows 11 file explorer problem.

Also read: Windows 11 ISO Free Download

These are easy ways to fix missing file explorer tabs on Windows 11. If you need more help fixing the no file explorer tabs Windows 11 problem, let us know in the comments. Also, if the article helped you, share it with your friends.

The post How to Fix File Explorer Tabs Not Showing in Windows 11? appeared first on TechViral.


from TechViral https://ift.tt/zfDCtc6