The War on Larkiv game was accepted and promoted by the world's largest children's game platform.
from BBC News - Technology https://ift.tt/bTHuioU
Friday, September 30, 2022
How To Watch Tesla’s 2022 AI Day Event Online
Like last year, Tesla is going to host the event on AI Day, which will be live in just a few hours. Besides, the company is expected to announce new projects and unveil its new testing results at this event.
Everyone can’t attend this in-person event because the company has only sent invitations to the journalists, technical folks, and robotics engineers, which does mean that you can’t watch it.
Even you can watch this event in your comfort and in an easy way so just keep with the article below for complete details about this event.
Tesla 2022 AI Day Event: What To Expect & Timings

The event is going to be held atTesla’ss headquarters in Palo Alto, California, and at the same time, it will also be streamed live for everyone out there.
You will be able to watch this stream live only onTesla’ss official website but on its subdirectory of the live streams, for which you can click here to watch.
AI Day 2022 streaming live at 6:15pm PT →
— Tesla (@Tesla) September 30, 2022
And the starting time of this event’s live stream is 9:15 PM ET / 6:15 PM PT, which is earlier than last year’s AI Day event, so we might get its duration a little longer, which means more announcements.
Besides, the company officially hasn’t revealed what we are going to see at this event, but the many invitation holders unveil that we are likely to see the latest developments in artificial intelligence.
And also, we could see a prototype of Optimus, which isTesla’ss humanoid robot that it unveiled last year, and we are also expecting something new on Full Self-Driving, Dojo SuperComputer, and more.
As Tesla is expanding its robotics division, Elon Musk has also announced on his Twitter account that this event will also be a recruiting opportunity for AI and robotics engineers. The tweet also mentions that they “will be highly technical”.
The post How To Watch Tesla’s 2022 AI Day Event Online appeared first on TechViral.
from TechViral https://ift.tt/NHDMcBs
Messages reveal how Musk and Twitter boss fell out
New text messages between Musk and Twitter boss Parag Agrawal reveal how the relationship broke down.
from BBC News - Technology https://ift.tt/foyNG6D
from BBC News - Technology https://ift.tt/foyNG6D
20 Best Free And Public DNS Servers
Have you ever tried changing the DNS to browse faster? If not, then today, in this article, we will teach you to do so, and not only that even we will also present an excellent list in which we will show you 20 free DNS (Domain Name System) servers to browse faster.
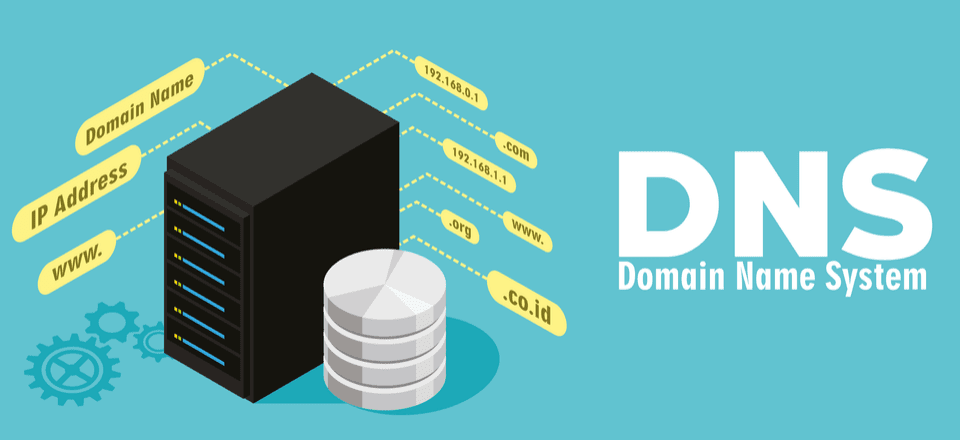
When we type an address of a website on the URL bar of a browser, it simply sends a request to the Internet operator’s DNS (Domain Name System) server to resolve the IP (Internet Protocol) address, which is assigned to that domain name.
Once the IP (Internet Protocol) address is obtained, another request is sent to that IP (Internet Protocol) to obtain the necessary data to present the respective web page.
List of 20 Free And Public DNS Servers
Web browsing works like this, as whenever you visit a certain website, this whole process gets repeated. However, in some cases, the operator’s own DNS (Domain Name System) server can slow this process. Hence, for this reason, it is common to use other DNS servers to speed up the interpretation of the IP address that refers to a certain domain name, and thus, it helps to increase the browsing speed. So, now without wasting much time, let’s explore this awesome list we mentioned below.
- Primary DNS Server: 8.8.8.8
- Secondary DNS Server: 8.8.4.4
Comodo Secure DNS
- Primary DNS Server: 8.26.56.26
- Secondary DNS Server: 8.20.247.20
FreeDNS
- Primary DNS Server: 37.235.1.174
- Secondary DNS Server: 37.235.1.177
Alternate DNS
- Primary DNS Server: 198.101.242.72
- Secondary DNS Server: 23.253.163.53
Dyn
- Primary DNS Server: 216.146.35.35
- Secondary DNS Server: 216.146.36.36
DNS.WATCH
- Primary DNS Server: 84.200.69.80
- Secondary DNS Server: 84.200.70.40
Cloudflare
- Primary DNS Server: 1.1.1.1
- Secondary DNS Server: 1.0.0.1
GreenTeamDNS
- Primary DNS Server: 81.218.119.11
- Secondary DNS Server: 209.88.198.133
Norton ConnectSafe
- Primary DNS Server: 199.85.126.10
- Secondary DNS Server: 199.85.127.10
Hurricane Electric
- Primary DNS Server: 74.82.42.42
- Secondary DNS Server: N/A
Level3
- Primary DNS Server: 209.244.0.3
- Secondary DNS Server: 209.244.0.4
Neustar Security
- Primary DNS Server: 156.154.70.1
- Secondary DNS Server: 156.154.71.1
OpenNIC
- Primary DNS Server: 23.94.60.240
- Secondary DNS Server: 128.52.130.209
OpenDNS Home
- Primary DNS Server: 208.67.222.222
- Secondary DNS Server: 208.67.220.220
Quad9
- Primary DNS Server: 9.9.9.9
- Secondary DNS Server: 149.112.112.112
Yandex.DNS
- Primary DNS Server: 77.88.8.8
- Secondary DNS Server: 77.88.8.1
SafeDNS
- Primary DNS Server: 195.46.39.39
- Secondary DNS Server: 195.46.39.40
puntCAT
- Primary DNS Server: 109.69.8.51
- Secondary DNS Server: N/A
Verisign
- Primary DNS Server: 64.6.64.6
- Secondary DNS Server: 64.6.65.6
UncensoredDNS
- Primary DNS Server: 91.239.100.100
- Secondary DNS Server: 89.233.43.71
What is a primary DNS server and a secondary DNS server?
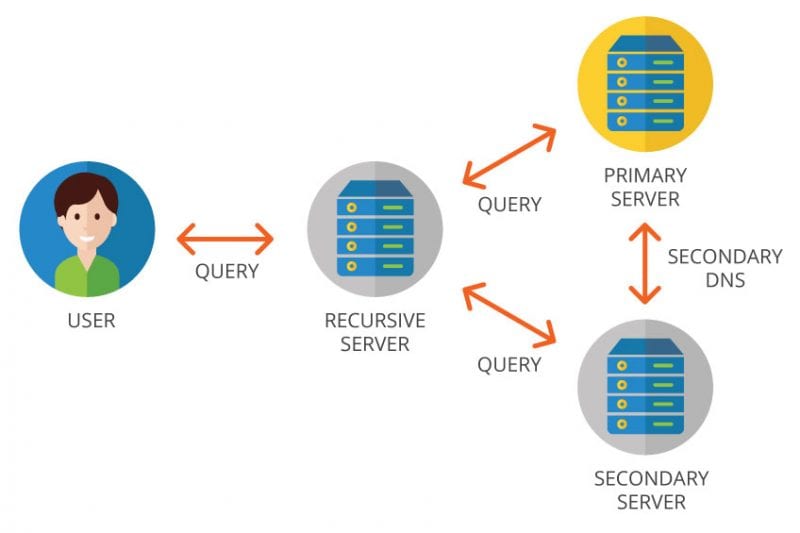
Let me clarify one thing the primary DNS (Domain Name System) server is the preferred DNS (Domain Name System), and the secondary is the alternate DNS (Domain Name System).
Inserting both in the configuration of the network adapter means that you are simply adding a layer of redundancy, simply because, if an error occurs in one, the other one will simply start its work.
In addition to the third-party DNS (Domain Name System), servers that are searched to offer faster browsing are also searched to avoid registering the activity in web browsing and accessing websites blocked by the operator.
However, we all have to remember that they do not provide faster web browsing, as some can allow you to avoid listing activity. Therefore, it is convenient to read all the details about the server you want to use.
How to find the best DNS, and what to look for in them?
To find the best DNS (Domain Name System), we have several types of tools like the Namebench, which is available for the tech giant Microsoft’s Windows, the tech giant Apple’s Mac, and Linux as well, as we told earlier in this para that this tool will help you to find the best DNS for your network connection. Second, we can use the well-known DNS Jumper tool, as it is one of the best tools currently available on the Internet to modify the configuration quickly.
At the time of opting for the DNS servers, we will address, in addition to speed, other issues as well; for example, we will also have to search if the responsible company keeps records or not of the visited addresses and if it sells that information to third parties or not. And not only that, but we also have to look for security to know if it has DNSSEC and DNSCrypt.
How to change DNS in Windows, Linux, and macOS?
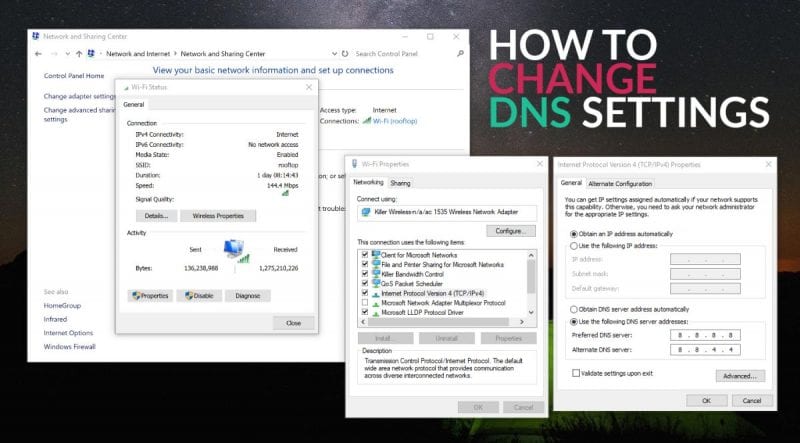
Changing the DNS of our operator by any of the third-party DNS is simple. For this, we will follow these steps according to our operating System. If you want to change them at the router level and apply them to all computers and connected devices, we give you the keys at the end.
Steps for Microsoft Windows:-
- First, open Windows search and type Control Panel. Next, open the Control Panel app.
- On the Control Panel, click on the Network and Internet Settings
- On the next screen, click on the Change adapter options
- Right-click on the adapter and then select Properties
- Then select the Internet Protocol version 4 (TCP/IPv4) and then select Properties
- Activate Use the following DNS server addresses
- Now simply complete with the chosen DNS
Steps for macOS:-
- System preferences
- Net
- Select the connection in use and then click on Advanced
- Now navigate to the DNS tab, then press the + button, and now add your desired DNS
Steps for Linux:-
- First, go to System.
- Then select preferences
- Now select the Network connections.
- After that, select connection and press on the sprocket
- Now modify DNS in the IPv4 section
These are our best DNS recommendations for you. Hence, as a suggestion, we recommend you try some of these alternatives to find one that meets your expectations. So, what do you think about this list? Share all your views and thoughts in the comment section below.
The post 20 Best Free And Public DNS Servers appeared first on TechViral.
from TechViral https://ift.tt/UjJVoTc
How to Enable One-Handed Mode in Android (No-Root)
An easy way to use the large screen on Android is by having one-hand mode. Here we will discuss the method that will make any large-screen Android easier to operate with one hand.
Usually, people love to have large screen Android for the standard or the large display, but this large screen troubles the users when they try to use their device with a single hand as mostly the large screen Android can’t be operated with a single hand. Like Android with the 5-inch display and more are very tough to use with one hand. Now at that time, you have two options either to go for another Android with a small screen or use the method that we are going to discuss right here.
Also Read: How To Change Working Of Hardware Buttons In Android
Get One Hand Mode on Large Screen Android
Here we will discuss the method that will make any large-screen Android easier to operate with one hand. The method will contact your screen functionality and make it according to your one-hand finger reach. So have a look at the complete method discussed below to proceed.
There are several ways to tame the big screen on Android devices without using the apps that ask for root access.
Using Launcher Apps (NO ROOT)
Well, these apps might not give you the proper one-handed mode. However, these apps can provide shortcuts that will help you reach every part of your Android screen with ease.
1. Nova Launcher Prime
Well, Nova launcher prime allows users to assign gestures to several tasks. You can assign gestures like swiping down to open the notifications and swiping up to open the recent apps. These gestures will help you to reach the functions easily.
However, the gesture feature in the Nova launcher is available on the pro version. So, if you are not using apps like Lucky Patcher apk or Freedom APK, you need to buy the service.
2. Swiftly Switch
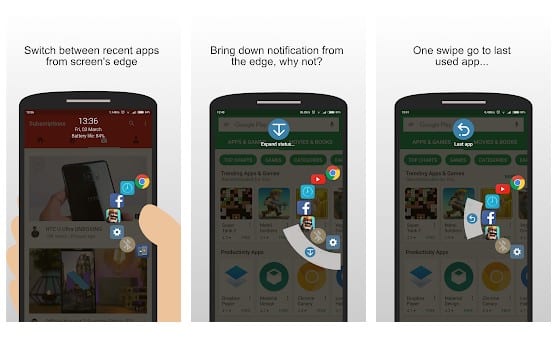
This is another extraordinary app that helps you switch between recent apps and easily open the notification drawer. The app also provides gestures like Nova Launcher Prime. Moreover, you can assign a gesture to the back button.
The best part about Swiftly Switch is that it’s completely free. There is also a pro version available which activates some other cool features.
3. Swiftkey Keyboard
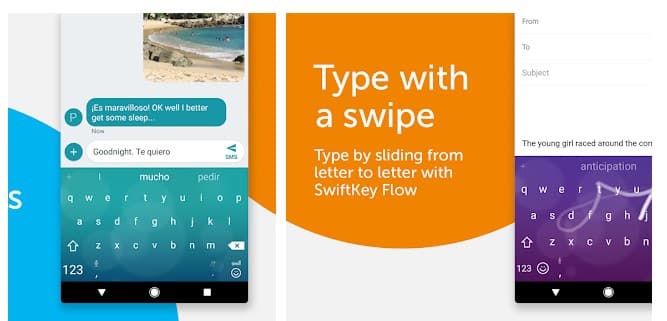
Now, another most frustrating thing with big-screen Android devices is the keyboard. Well, we must admit that large screen phones make navigation and keyboard typing difficult. Therefore, Swiftkey is the best option to fix the key-reaching struggle.
With the help of the Swiftkey keyboard, you can enable the keyboard app in a compact mode. It will give you a small compact keyboard on either edge of the screen, which makes it easy to type using one hand.
With this method, you can easily use your Android with a single hand without facing any trouble with the large screen where your fingers might not reach the extreme corners, and that too by having app padding around them. So try this out today. Hope you like this cool post; keep on sharing. Leave a comment below if you have any related queries about this.
The post How to Enable One-Handed Mode in Android (No-Root) appeared first on TechViral.
from TechViral https://ift.tt/O94YJLv
Twitter Also Adds TikTok-Like Format For Its Videos
On Thursday, Twitter made it official that the platform is getting a new immersive video player to show videos with a scroll-like feature which is the exact idea that came from the short video platform TikTok.
Short videos are becoming mainstream on many social platforms, but for Twitter, we didn’t expect this feature is coming as Twitter is a micro-blogging platform. Let’s go into complete detail below.
TikTok-Like Video Player Is Coming To Twitter
 The company has revealed all details about this update in two significant segments: this new immersive video viewer and the new video section in the explorer tab.
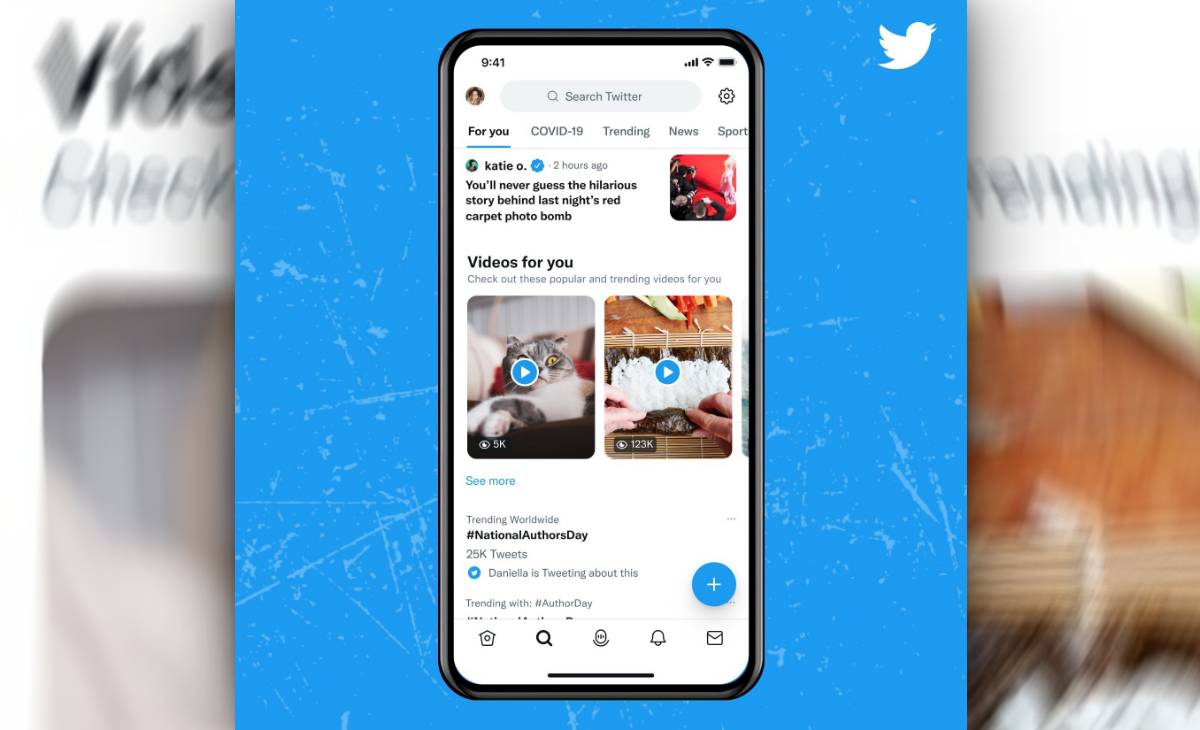
Firstly, let’s discuss the new immersive viewer. This new video viewer will show you the video in full screen with a new option of showing users’ accounts with follow button, and you will also see the text there.
Besides, the seek and options such as comment, like, retweet, and share will be the same as earlier, but in terms of a new feature, you can now scroll for more videos that are expected to be related to the first video.
And to activate this view, you have to tap on the playing video like Instagram Reels.
Second, there’s a new video carousel in Explore tab’s “For You” section that will show you popular and trending videos in the immersive view according to your interest base. As you can see in the above image, what will it look like.
As we all know, the full-screen video viewer with a scrolling option for more videos was presented by ByteDance-owned TikTok, but it doesn’t mean that the other platforms can’t use it.
And in some last years, Instagram, YouTube, and now Twitter added the same kind of features, and it completely depends on their users what they are experiencing or are they actually liking them.
Let me know your thoughts on it in the comment section below.
The post Twitter Also Adds TikTok-Like Format For Its Videos appeared first on TechViral.
from TechViral https://ift.tt/YIJbhkg
Thursday, September 29, 2022
Google Officially Confirmed To Shutting Down Its Stadia Platform
After a bunch of rumors in some earlier months, Google has finally confirmed that it is shutting down its cloud gaming platform, Stadia. Google is ending it in mid-January 2023.
Even the project didn’t stay for at least 5 years. Besides, the company has also announced to give refunds for game purchases and all purchases of in-app DLC content whose purchases were made through the Stadia store.
Google’s Stadia To End In January 2023
 As we all know, cloud gaming has gained a lot of attention in the last some years, but it didn’t work out well for Google. In November 2019, Google launched its Stadia platform to compete with Xbox, Nvidia, and Sony’s cloud gaming services.
Its shutdown has been announced via a blog from Google, as it usually does, where Stadia’s vice president and general manager, Phil Harrison, has detailed many things.
Phil explained the reason for this shutdown by saying, “it hasn’t gained the traction with users that we expected, so we’ve made the difficult decision to begin winding down our Stadia streaming service.”
And he also mentioned that it is not going to be a waste of resources as the company built a strong technology foundation because it can be useful in other parts of Google, such as YouTube, Google Play, and Augmented Reality steps.
Also, the company is planning to make this technology available to their industry partners, and the employee team of Stadia will continue in the company’s different divisions.
Now let’s talk about refunds. Phil mentioned that all Stadia hardware purchases would be refunded through Google Store, and users don’t even have to refund any hardware.
And the transactions of games and add-on purchases will be refunded via Stadia Store, and from today onwards, you can’t buy games or make any transactions from it.
But the company will not refund transactions of Stadia Pro subscriptions, and you don’t have to pay further charges for your Pro subscription until the shutdown date. Besides, you can check out more exact details in the official FAQ.
In the upcoming month, the company might also start showing some kind of banner or notice bar on the platform to make users aware of this shutdown so, until January, you can enjoy your game.
The post Google Officially Confirmed To Shutting Down Its Stadia Platform appeared first on TechViral.
from TechViral https://ift.tt/Hl9IzqD
How to Reset Graphics Card on Windows 11 (4 Methods)
It doesn’t matter how powerful your gaming PC is; if you’re using Windows, you will likely face problems. Windows operating system has more bugs than macOS or Linux, which is the only reason it receives frequent updates.
While playing games on your Gaming PC, you may experience issues like frame drops, games taking a long to start, and a computer showing BSOD while starting games. Some users have also reported monitor gets into power-saving mode while playing games.
If you are facing issues while playing games on your Windows 11 computer, you can do quite a few things to get your problems fixed. The best way to fix gaming-related issues on Windows 11 is by resetting the graphics card.
Reset Graphics Card on Windows 11
Since it was the graphics card that was responsible for playing games, you may try to reset it. Resetting the graphic card will rule out incorrect settings and bugs. Below, we have shared a few simple methods to reset graphics cards on Windows 11. Let’s get started.
1) Restart the GPU Only
If your device lags while launching a game, you can restart the GPU unit instead of restarting your entire Windows device.
It’s pretty easy to restart the Graphics card on Windows 11, as a keyboard shortcut is available.
To restart the Graphics card in Windows, you need to press the Windows Key + CTRL + SHIFT + B button together. As you press the key combination, your screen will turn black.
Don’t worry, as this is a part of the process. Your Windows experience will be recovered as soon as the restart process is complete.
2) Disable & Enable the Graphic Card on Device Manager
Another best method to restart the graphics card on Windows 11 is the Device Manager. On Device Manager, you need to make a few changes to restart the graphics card. Here’s what you need to do.
1. First, click on the Windows 11 search and type Device Manager. Next, open the Device Manager app from the list.
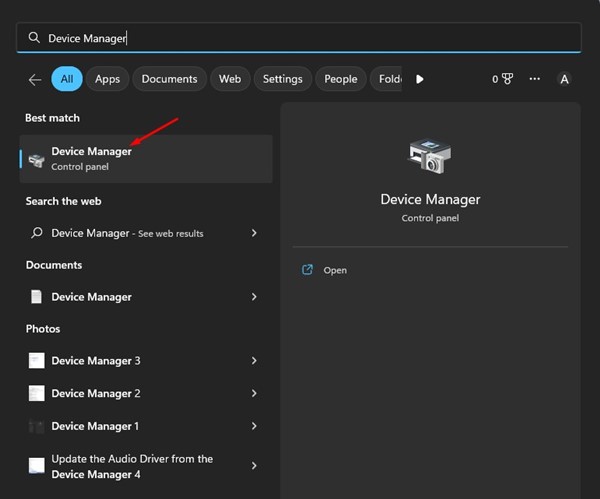
2. On the Device Manager, expand the Display Adapters.
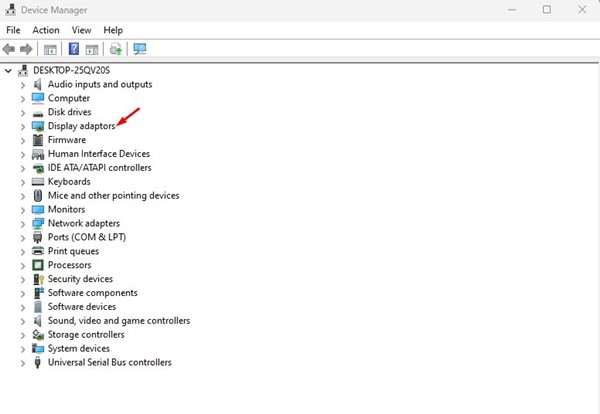
3. Now, right-click on your Graphics card and select Uninstall Device.
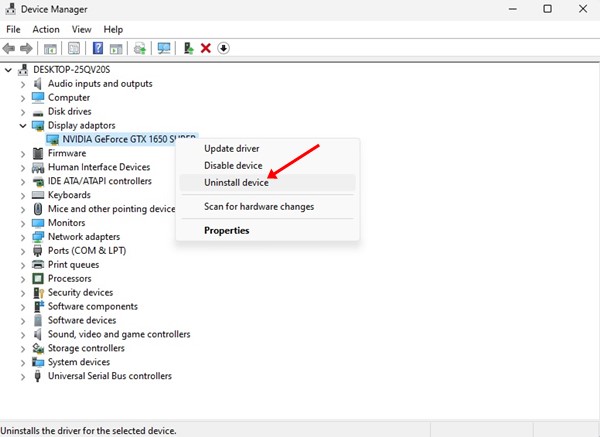
4. This will uninstall the graphic card driver. Once done, restart your computer.
That’s it! During the restart, Windows 11 will automatically install the Graphic card again. This is the easiest method to reset the graphics card in Windows 11.
3) Reset Graphics Card from BIOS
Resetting the graphics card is possible from the BIOS, but the steps will be a bit complicated. Here are some simple steps to reset the graphics card from BIOS.
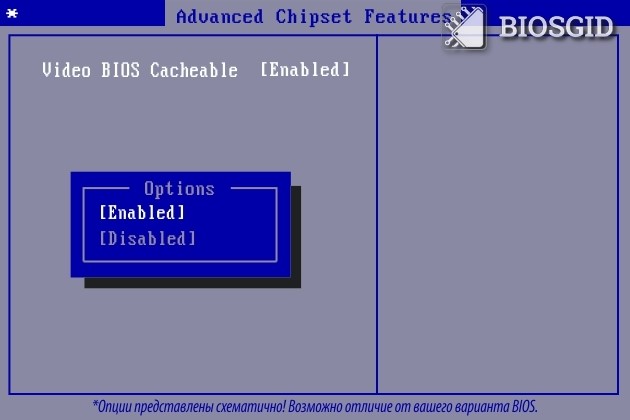
1. First, restart your computer and enter the BIOS. You need to press the F10 key to enter the BIOS setup. You may have to press F8, ESC, or DEL on some motherboards.
2. On the BIOS setup, find and select the Advanced Chipset Features.
3. On the next options, select ‘Video BIOS Cacheable‘.
4. Now use the + and – keys to change the BIOS Settings.
5. Next, press the F10 key on your keyboard. You will see a confirmation prompt; click on the Yes button.
That’s it! This will possibly reset the Graphics card settings. The steps may vary depending on the motherboard you are using.
4) Update Your Graphics Card
Well, if you are still getting problems related to graphics cards while playing games, updating the graphics drivers is a good idea. Maybe you are facing problems due to outdated graphics card drivers. Updating the graphics driver won’t reset the graphics settings, but it will fix many issues.
1. First, click on the Windows 11 search and type Device Manager.
2. On the Device Manager, expand the Display Adapters.
3. Now, right-click on your Graphics card and select Update driver.

4. On the next window, select Search automatically for the drivers.
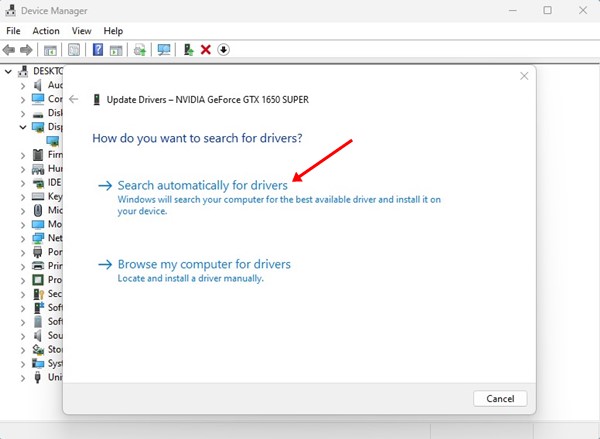
That’s it! This is how you can update the graphics card drivers on Windows 11 computer.
Also read: How to Check the Graphics Card (GPU) in Windows 11
So, these are some of the best methods to reset graphics cards in Windows 11. If you know other ways to reset the graphics card, let us know in the comments below.
The post How to Reset Graphics Card on Windows 11 (4 Methods) appeared first on TechViral.
from TechViral https://ift.tt/w9JmZsW
Google to close Stadia cloud service and refund gamers
Stadia allows players to stream games online without owning a console.
from BBC News - Technology https://ift.tt/ZajeN9m
from BBC News - Technology https://ift.tt/ZajeN9m
10 Best Flash Games of 2022 That You Should Try
Games are of different types – some are based on the gameplay, and some are based on the backend operation of those games. Some flash games usually run over the internet using the flash player or can even run on a computer device.
Let’s admit it; Flash games are always almighty time-killers. Unlike regular games, Flash games don’t require high-end specifications; they can be played right from the web browser. However, the problem is that Flash is going away forever, and major web browsers have already dropped flash support.
Still, many users find a way to run flash-based videos or games on their web browser. If you are one of those looking for the best Flash games to play today, you have landed on the right page.
10 Best Flash Games of 2022 That You Should Try
In this following article, we have listed some of the best Flash games you can play today. You can play these flash games on any compatible web browser. Let’s get started and explore the list.
1. Indestructo Tank

This was the first game I tried while searching for Flash games, and I got pretty addicted to this game and played it for 2 hours. It’s also one of the best browser games.
Indestructo Tank is a blaze diversion in which you must drive a tank and protect it from foes. Once the foes begin assaulting the tank, the tank will be impacted into the sky, and you can demolish the helicopters and planes.
The more planes you demolish, the more focused you will procure. In any case, dependably remember to achieve the base experience level before the fuel closes.
2. Electricman 2HS
Electricman2HS is addictive and a standout amongst other glimmer amusements. Fundamentally, In this amusement, you need to battle with alternate players to score however much as could be expected.
You need to utilize the kicks, punches, and other guarded material to shield yourself and assault alternate players. You can likewise utilize alternate developments, for example, ease back movement assault to overcome alternate players.
3. Double Wires

Ever needed to fly around like a creepy crawly man? On the off chance that yes, at that point, with this bit of glimmer amusement, you can draw near to it. You need to utilize the mouse to shoot the wires and keep the person from falling.
If the person falls, the diversion will be finished. So, it’s another best browser game.
4. Bowman

This is the last but not the least as I tried this game and have had lots of fun playing this. Bowman is another fun and truly outstanding top glimmer diversion. Essentially, you are a toxophilite in the Bowman diversion, and there is no objective.
Rather than this, you simply need to shoot the bolts specifically at alternate adversaries. The best thing is that it can be played against both human players and the PC.
5. The New Yorker Jigsaw

Well, this is one of the best real-life jigsaw puzzle games you can play from your web browser. In the flash game, you will see a wide range of virtual puzzle pieces snap together.
The gameplay is highly satisfying, and it’s one of the best games you can play on your web browser. The great thing about The New Yorker Jigsaw is that it also has a non-flash version which you can play right now. Peach.
6. T-REX
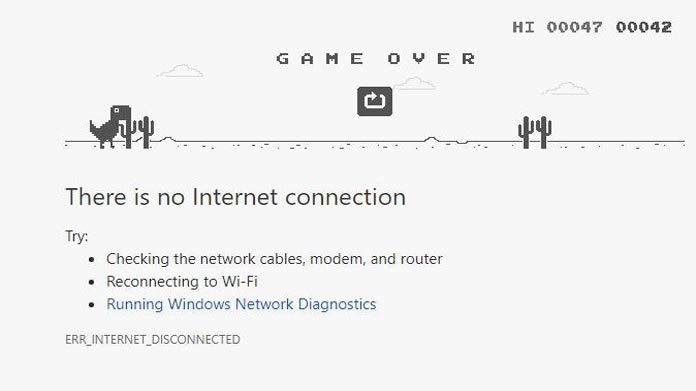
You don’t need to visit any website to play the T-REX game. The game is already there on your Google Chrome Browser. The great thing is that the T-REX flash game doesn’t need an internet connection to run as it’s meant for offline mode itself.
Disconnect the internet from your computer, and press the Space bar on Google Chrome. You can play the game without an internet connection.
7. 8 Ball Pool
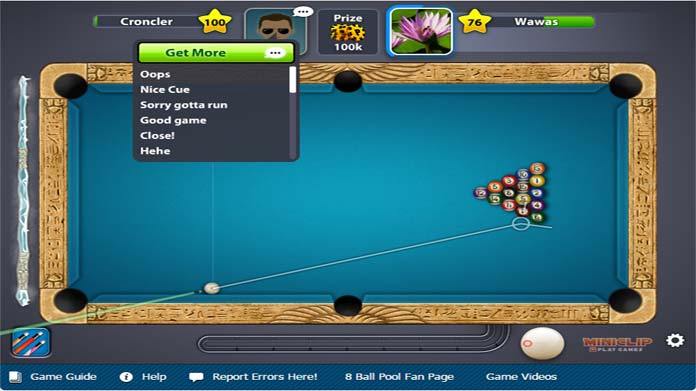
8 Ball Pool is another excellent flash game on the list, which is meant for snooker lovers. It’s a flash game that allows users to connect their Facebook accounts to play with friends. Users can also log in as a guest to play the game.
8. Pac Man Doodle

Pac-Man Doodle is another excellent flash game on the list, which you can play right from the Google Search Result. This is an easter egg from Google; users just need to search for Pac-Man Doodle on Google to Play the addictive game.
9. Table Tennis
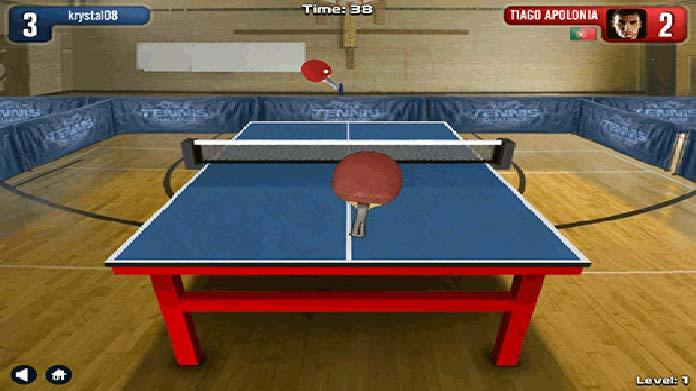
Table Tennis from Y8 is another great flash game on the list which every sports lover would love to play. The great thing about Table Tennis is that it allows users to play with their friends, and users need to connect their Facebook accounts to play the game.
10. Google Snake Game
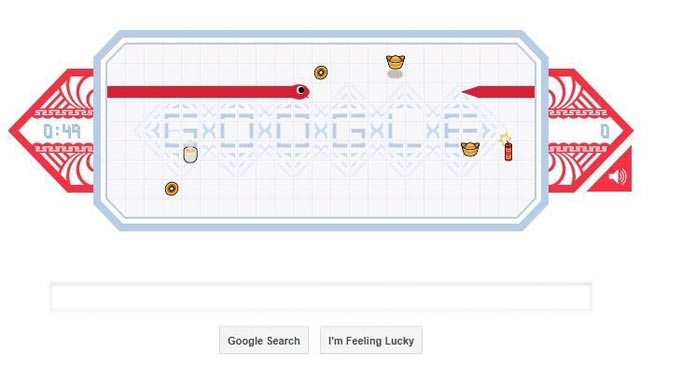
Google Snake Game is another great easter egg from Google that you would love to play. The search giant Google added the flash game to its search engine in 2013. In this game, the player must move the snake to eat the sweets and sugar cubes while avoiding small crackers.
Also read: Unblocked Games 2022: Best Games to Play at School or Work
So, these are the best flash games that you can play today. Drop the game’s name in the comment box below if you want to suggest any other browser or flash games.
The post 10 Best Flash Games of 2022 That You Should Try appeared first on TechViral.
from TechViral https://ift.tt/4OwKeWS
How To Send Large Files From Android
Let’s admit it, we all have been through such situations where we spend hours creating a document, video, or image, only to see that the file is too large to be sent as an email attachment.
Even if you don’t plan to send files in email attachments, the file sharing utilities for Android have some sort of limits for file size. To eliminate such things, you need to use apps that allow you to send large files from your Android.
Best Apps to Send Large Files From Android
Hence, if you are interested in such a category of apps, you have landed on the right page. Below, we have shared a few best Android apps that let you send large files from your Android smartphone. Let’s check out.
1. SugarSync
SugarSync is not exactly a file-sharing app; it’s a backup app that lets you back up your important files, photos, music, and more on any device.
You can use this application to sync your important files to the cloud, backup photos were taken on your Android, and sync multiple folders at once. You even have the option to wipe your data in case of phone theft or data loss.
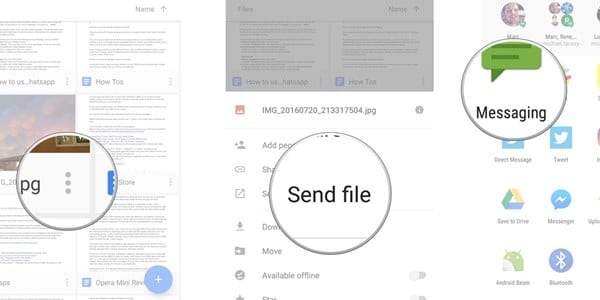
2. Files by Google
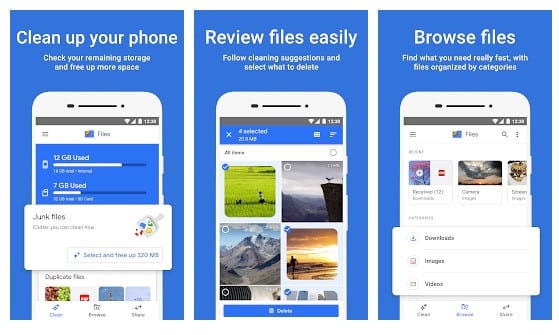
Files by Google is a full-fledged file manager app for Android that provides many file management features. You can use this to clean up your phone’s storage, find files faster, share files offline with others, and more.
If you talk about file sharing, Files by Google allows you to share pictures, videos, documents, or apps with other nearby devices. The file-sharing speed is pretty fast, and there’s no restriction on the file size.
3. Google Drive
The well-known service Google drive is a fantastic alternative to all these file-sharing services; it’s straightforward to send files through it.
You need to upload your file, get the link to access it, and share it with the person you can, and that’s it. The other users can easily access your profile.
4. Send Anywhere
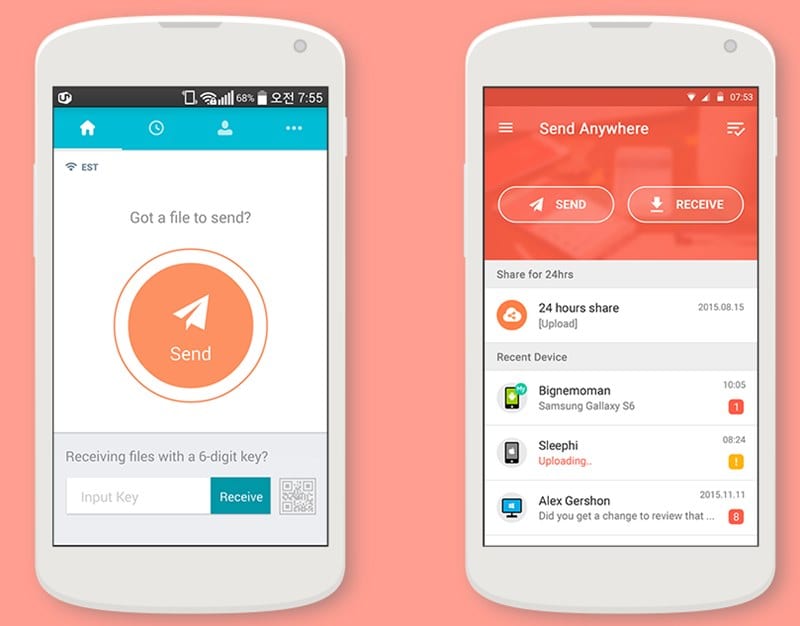
Send Anywhere is one of the great Android apps on the list that lets you transfer files of any size quickly. It’s a bit different from all other file transfer apps, as it uses WiFi direct to transfer files.
You can also use Send Anywhere to transfer files between Android and PC. Alternatively, Send Anywhere also has a cloud storage service that you can purchase to save your important files.
5. FilestoFriends

This is another good app but with some limitations. With FilestoFriends, you can transfer files up to 1Gb for free. However, this also offers a Plus package that lets you send up to 5GB of files and provides some other premium services. This will be very useful if you are looking for a handy way to share big files.
6. SuperBeam
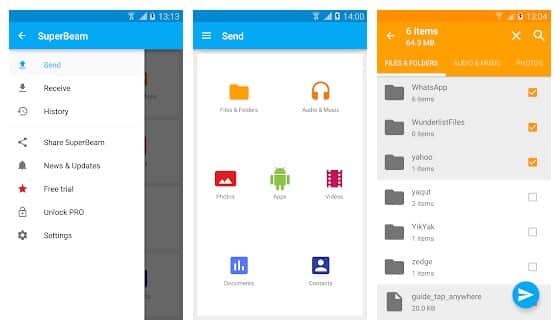
SuperBeam is a handy app for local sharing. If you are looking for a file-sharing app for local sharing, then SuperBeam might be the perfect pick for you. The app uses WiFi direct to share files, and the file sharing speed is also quite high.
Since it is a local file-sharing app, both the recipient and the sender must have the SuperBeam app installed on their device. The app is entirely free to use, but it shows some ads.
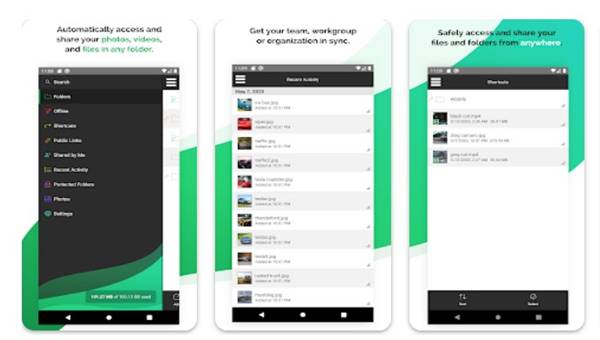
7. AirDroid
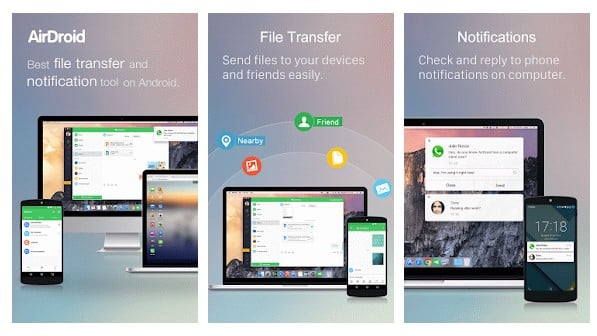
AirDroid is another excellent Android app on the list which can be used to share large files. The great thing about AirDroid is that it can be accessed through a computer web browser.
Besides that, AirDroid is available on almost all major platforms, including Mac, Linux, Android, Windows, etc. So, the app can be used to transfer files on these platforms.
So, these are some of the best Android apps that lets you send large files from Android. If you know of any other such files to send large files, let us know in the comments below.
The post How To Send Large Files From Android appeared first on TechViral.
from TechViral https://ift.tt/rLBUwbz
iOS 16: How to Fix Battery Drain Issue On iPhone (8 Methods)
Apple launched iOS 16 this year, slowly rolling out to compatible iPhones. Even though iOS 16 has introduced many new features, such as the haptic keyboard, new lock screen, photos with Face ID, etc., it still has some bugs ruining the iPhone experience.
To tackle bugs in iOS 16, Apple has already released two updates at frequent intervals. However, many iPhone users were now claiming severe battery drain issues after installing the iOS 16 upgrade.
If you are staying active on social networking sites, you might have seen many posts and comments talking about iOS 16 severely draining the battery life out of their older generation iPhones.
Best Methods to Fix Battery Drain issue on iPhone
So, this guide may be useful if your iPhone is running on iOS 16 and you face a battery drainage issue. Here we have shared some of the best methods to fix battery drain issues in iOS 16. Let’s get started.
1) Enable the Low Power Mode
Well, Low Power Mode is a battery-saving feature of the iPhone. The power mode can surely deliver a few minutes of extra standby.
When the low power mode is enabled on an iPhone, it restricts a few background activities happening on your iPhone. It increases your iPhone’s standby time by disabling those background activities. Here’s how to enable the feature.
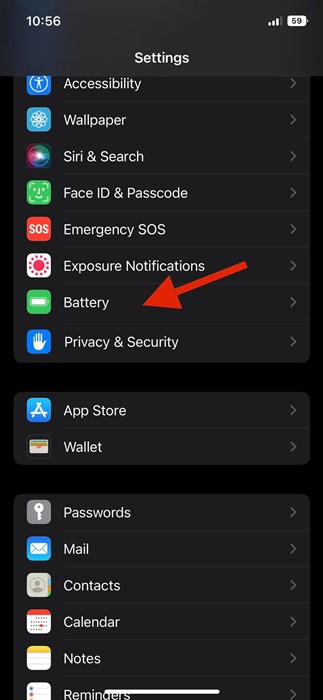
1. First, launch the Settings app on your Apple iPhone.
2. On the Settings app, scroll down and tap on the Battery.

3. On the Battery screen, find the Low Power Mode option. You need to turn on the toggle beside Low Power Mode to enable the battery-saving feature.
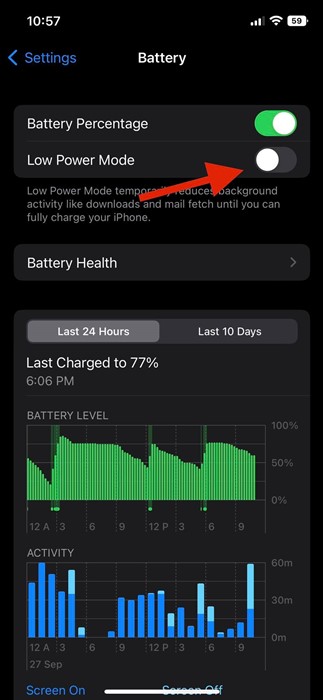
That’s it! This is how you can enable low power mode on your iOS 16 to save battery life.
2) Disable Background App Refresh
Background app refresh is a handy feature as the app shows you the latest information, but the same feature can drain your iPhone’s battery life. Hence, if you want to fix the battery drain issue on your iOS 16, it’s a good idea to turn off the background app refresh.
1. First of all, open the Settings app on your iPhone.
2. On the Settings app, scroll down and tap on General.
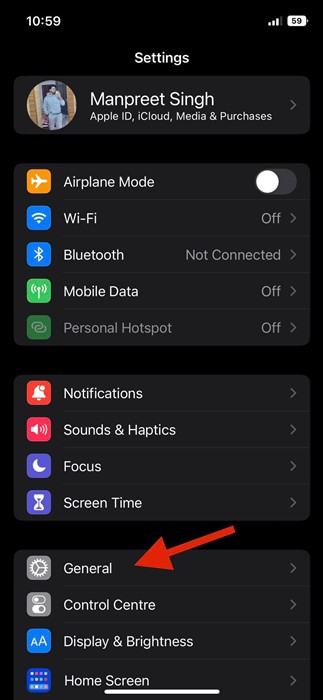
3. On the General screen, scroll down and tap on the Background App Refresh.
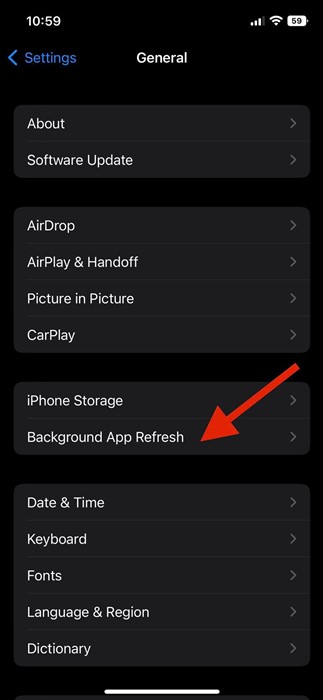
4. On the next screen, select ‘Off‘ to turn off the background app refresh feature.
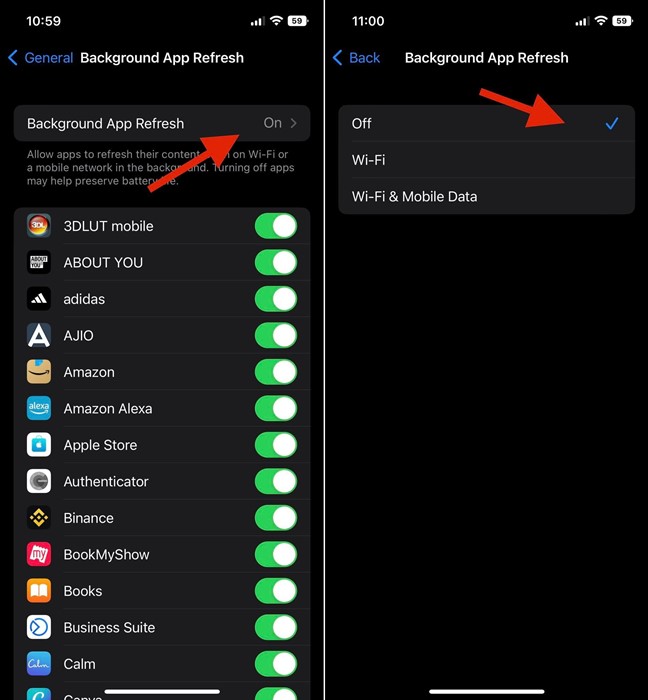
That’s it! This will disable the background app refresh on your iOS 16.
3) Turn Off Haptic Touch Keyboard Feedback
On iOS 16, Apple added support for keyboard haptics. The feature is responsible for triggering vibrations while typing on the keyboard. This is useful but can drain your iPhone’s battery life faster. Hence, you may also like to disable this feature if you want to save your battery life.
1. First of all, open the Settings app on your iPhone.
2. On the Settings app, scroll down and tap on the Sounds & Haptics option.
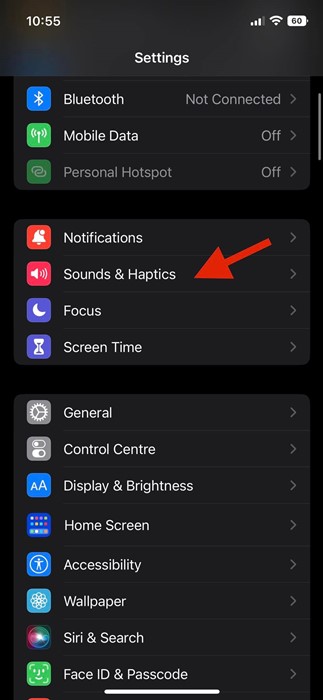
3. On the Sounds & haptics, scroll down and tap on the Keyboard Feedback.
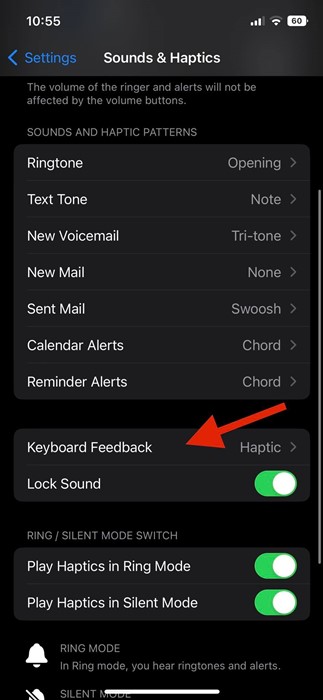
4. On the Next screen, disable the toggle for ‘Haptic‘
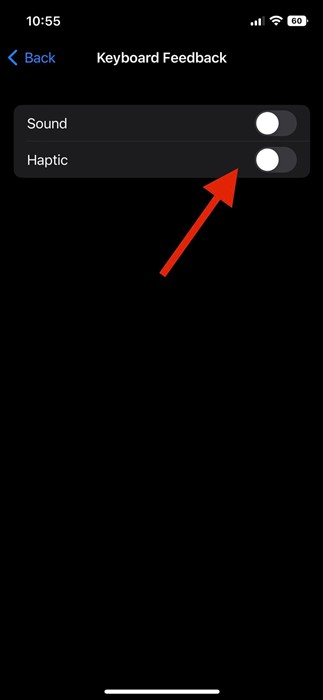
That’s it! This will disable the keyboard haptics on your iPhone running on iOS 16.
4) Find and Uninstall Unnecessary Apps
You might be using hundreds of apps on your new iPhone, but there is some type of apps that drains the battery life. On iOS 16, you can find and uninstall those unnecessary apps to save battery life. Here’s what you need to do.
1. First of all, open the Settings app on your iPhone.
2. On the Settings, tap on the Battery.
3. Next, scroll down to the Battery Usage by App section on the Battery screen. Here you will find all apps with their battery usage.
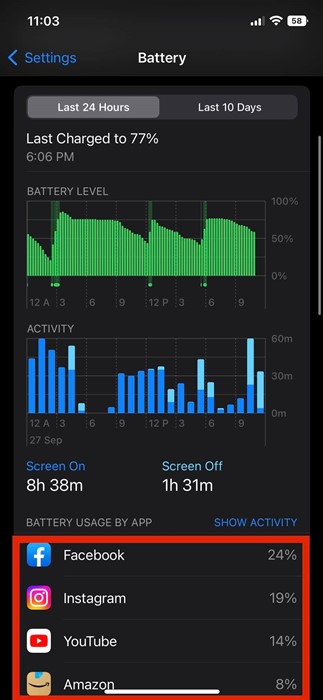
If you find any unnecessary apps on this list, you can uninstall them. The job here is to eliminate all unnecessary apps draining the battery life.
5) Enable Optimized Battery Charging
Optimized Battery Charging won’t fix the battery drainage issue, nor will it speed up the charging. Instead, it will increase the life span of your iPhone’s battery. Enabling this feature will reduce battery aging. Here’s how to enable the feature.
1. First, open the Settings app on your iPhone.
2. On the Settings app, scroll down and tap on the Battery.

3. On the Battery screen, scroll down and tap on Battery Health.
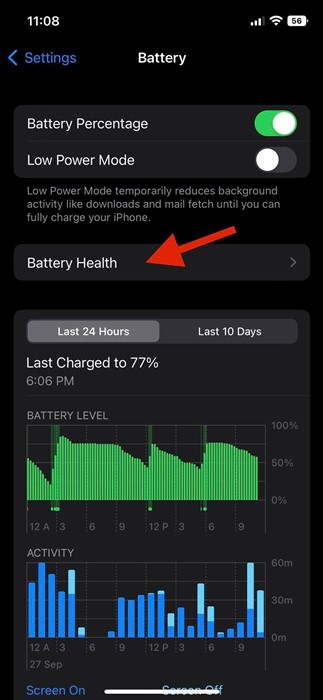
4. Now, scroll down to the Optimized Battery Charging and enable the feature.

That’s it! This is how you can enable optimized battery charging on iOS 16.
6) Turn on the Dark Mode
Well, the Dark Mode on iPhone is designed to emit blue light and reduce eye strain, but it also contributes a lot to preserving the battery life. Enabling the dark mode will surely save some battery life. Here’s how to enable dark mode on iPhone.
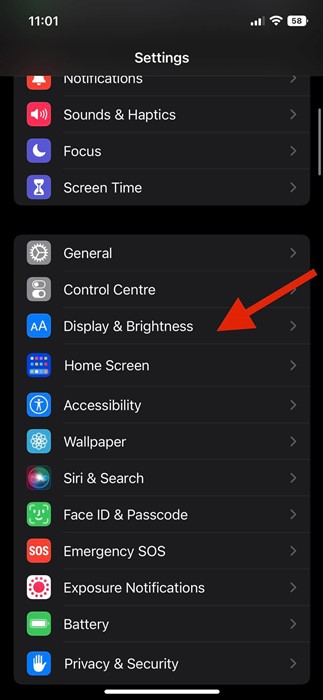
1. First of all, open the Settings app on your iPhone.
2. On the Settings app, scroll down and tap on Display & Brightness.
3. On the Display & Brightness, switch to the Dark option.
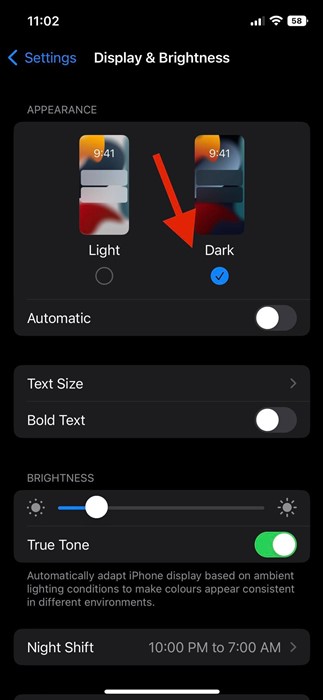
That’s it! This will immediately enable the dark mode on your iPhone.
7) Turn Off Mobile Data, wifi Hotspot, Bluetooth
Let’s admit it, we all have a bad habit of keeping system features such as Mobile data, wifi hotspots, Bluetooth, etc., all the time. Enabling these things doesn’t harm your device, but they surely drain the iPhone’s battery life. Hence, when not in use, you should disable mobile data, Bluetooth, wifi, hotspot, etc.
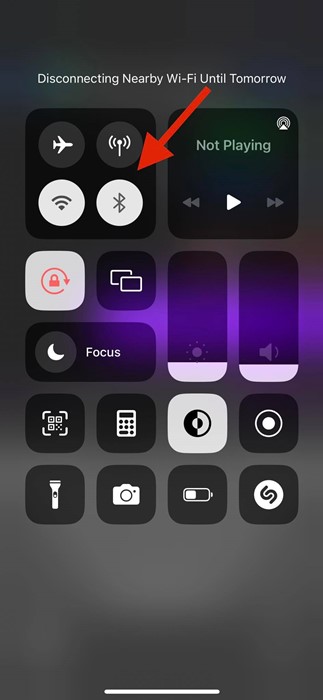
To do that, you need to open the Control Center on your iPhone and disable the wifi, Bluetooth, Mobile Data, etc., when not in use. If you cannot find all options in the Control Center, you can disable these things from your iPhone’s Settings app.
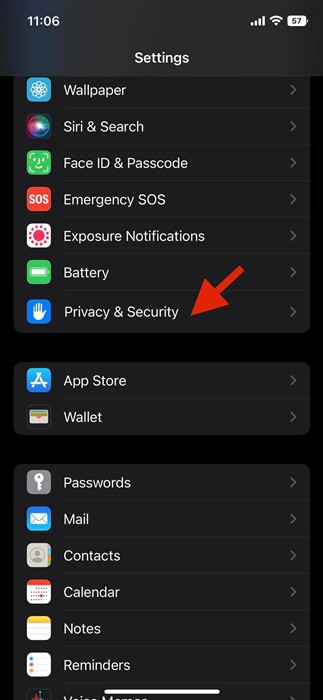
8) Disable the Location services
Frequent use of apps that relies on location services can drain your battery life faster. Apps like Maps, Food Delivery Apps, Location Sharing apps, etc., were known for draining the battery life of any phone faster. Hence, if you don’t use those apps, it’s best to disable the location services. Here’s how to disable location services on iPhone.
1. First of all, open the Settings app on your iPhone.
2. On the Settings app, scroll down and tap on the Privacy & security option.
3. On the Privacy & Security screen, tap on the Location services.
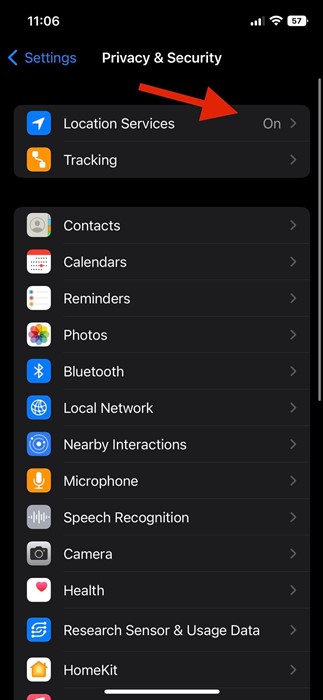
4. On the Location services, turn off the toggle for Location Services.
5. On the Confirmation prompt, tap on the Turn off button.
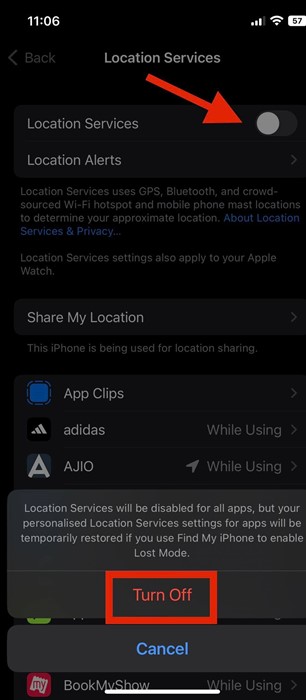
That’s it! This will disable the location services on your iPhone.
Also read: 10 Best iOS 16 Lock Screen Widgets for iPhone
So, these are some of the best methods to fix the iOS 16 battery drain issue. All these methods will help you fix battery problems not only on iOS 16 but also on older versions of iOS. If you know of other ways to fix the iOS 16 battery drain issue, let us know in the comments below.
The post iOS 16: How to Fix Battery Drain Issue On iPhone (8 Methods) appeared first on TechViral.
from TechViral https://ift.tt/RbvS7Kh
Subscribe to:
Posts (Atom)