In a blow to the London stock market, the firm said in March that it would not list shares in the UK.
from BBC News - Technology https://ift.tt/vxByKnb
Sunday, April 30, 2023
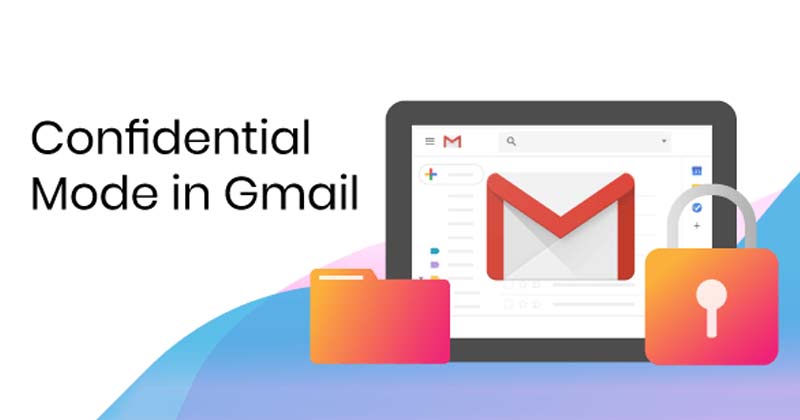
How to Send Encrypted/Confidential Email in Gmail
Gmail is right now the most used email service out there. The service is free; you can send unlimited emails to any address. However, if you use Gmail for business purposes, you might want to send encrypted or confidential emails.
Gmail has a feature that lets you send confidential emails in a few easy steps. If you send confidential emails via Gmail, the receiver would be prompted to enter the SMS passcode to access the email content.
Steps to Send Password Protected Email in Gmail
So, if you want to send encrypted or confidential emails in Gmail, you are reading the right guide. This article will share a step-by-step guide on sending confidential emails in Gmail. Let’s check out.
Send Encrypted Emails (Confidential Mode)
In this method, we will use Gmail’s Confidential Mode to send encrypted emails. Here are some of the simple steps to follow.
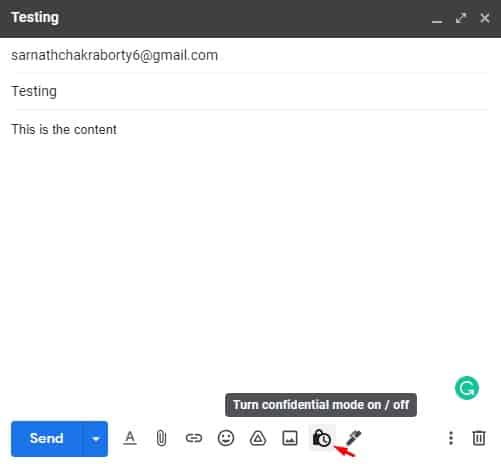
1. First of all, open Gmail and compose an email. Then, click on the Confidential mode button, as shown below.
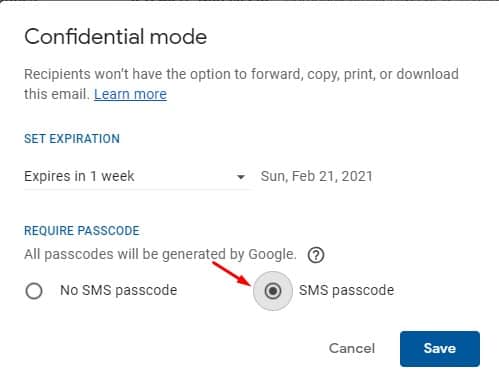
2. On the Confidential mode pop-up, select SMS Passcode and click the Save button.
3. Once done, click on the Send button. Now you will be asked to enter the recipient’s phone number. Enter the recipient’s phone number and click on the Send button.

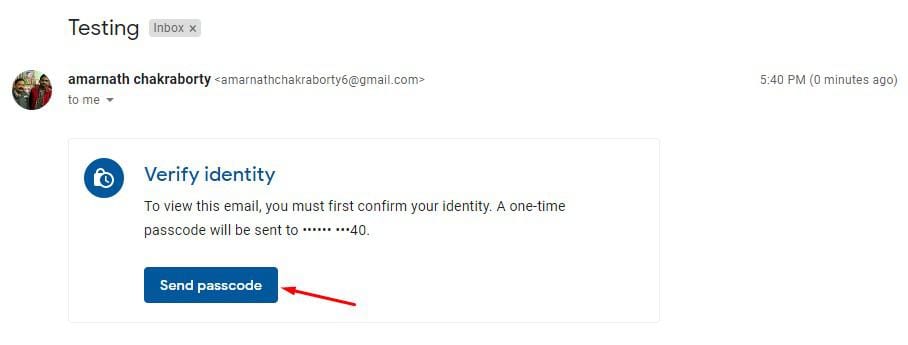
4. This will send the encrypted email to the receiver. The receiver would need to click on the Send Passcode button. As they click the Send Passcode button, they will receive a passcode on their phone number.
That’s it! You are done. This is how you can send encrypted emails on Gmail.
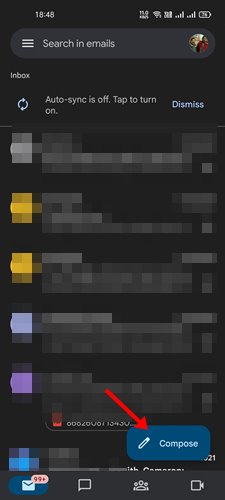
Send Password Protected Emails on Gmail mobile
The Gmail mobile app for Android or iPhone allows you to send password-protected emails. Here’s how to send password-protected emails in Gmail mobile.
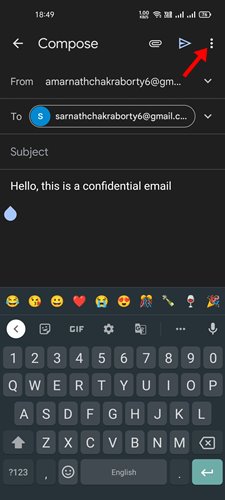
1. Open the Gmail app and compose an email you want to password-protect and send.
2. On the top-right corner, tap on the three dots.
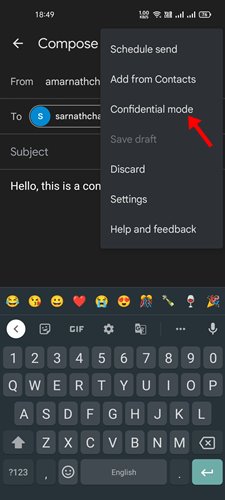
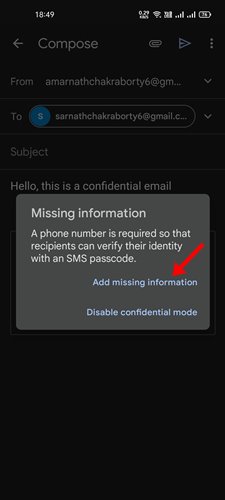
3. From the list of options that appears, select ‘Confidential mode‘.
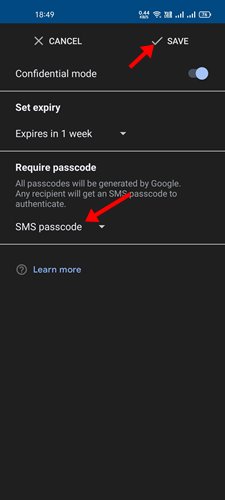
4. Select the ‘SMS‘ passcode on the Require passcode drop-down and tap the Save button.
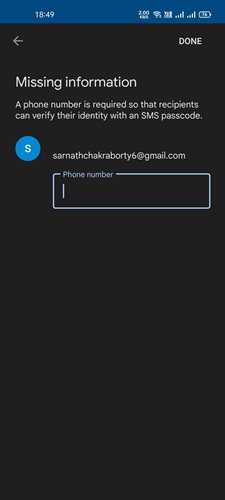
5. On the missing information prompt, tap ‘Add missing information‘.
6. Now, enter the phone number where you want to receive the passcode and tap the Done button.
That’s it! This is how you can send password-protected emails in Gmail for Android/iOS.
Password Protected Gmail Attachments

Another best way to send Password protected emails in Gmail is by sending password-protected attachments.
In this method, you must create an encrypted ZIP or RAR file containing your files and then send it to the Gmail address. You can use any file compression utility to create a password-protected ZIP/RAR file.
This is the least preferred method, but many users still rely on archive tools to send password-protected file attachments to Gmail.
The post How to Send Encrypted/Confidential Email in Gmail appeared first on TechViral.
from TechViral https://ift.tt/4T678So
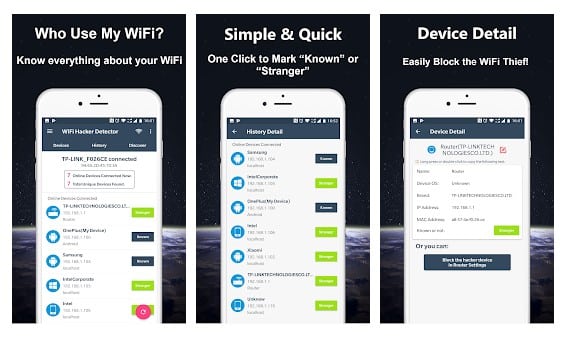
10 Best Android Apps to See Who’s Connected to My WiFi?

If you think your WiFi connection is slow because someone else is using it without your permission, we will list a few Android WiFi apps to detect intruders. So, let’s check out some of the best Android WiFi checker apps.
Well, it’s no doubt that the internet has become a part of our lives. It is all because of the increased usage of smartphones and other internet-connected devices. Having a WiFi connection has become a mandatory thing in this world.
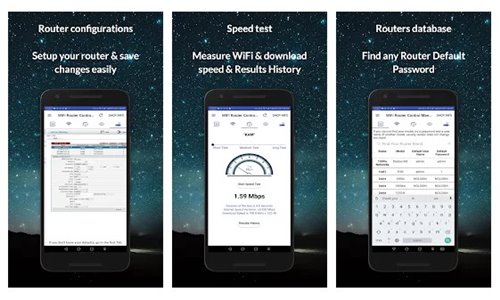
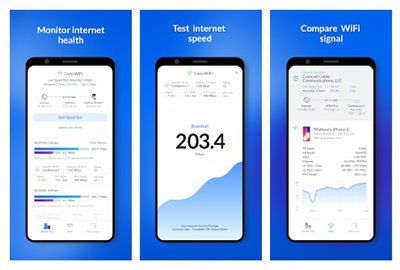
Also Read: Best WiFi Speed Test Apps For Android
List of 10 Best Apps to Check Devices Connected to WiFi
So, here in this article, we will share the best apps to Check Devices Connected to WiFi and Block them.
So, let’s explore the list of best Android apps to see Who’s connected to my WiFi?
1. WiFi Monitor
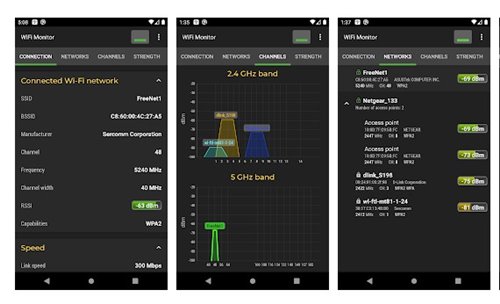
WiFi Monitor is an Android app that helps you analyze your WiFi network. It can scan your WiFi network and show you the signal strength, frequency, connection speed, etc.
It also has a feature that scans and finds all devices connected to your WiFi network. WiFi Monitor is an excellent monitoring app that can help you find devices connected to your WiFi.
2. WiFi Tools
WiFi Tools are not very popular, but it still includes tools to improve the network performance and find devices connected to your WiFi. Besides finding devices connected to your WiFi, it also offers other useful tools such as PING, LAN Scanner, Port Scanner, DNS Lookup, Traceroute, etc.
The user interface of WiFi Tools is lightweight, but without any prior knowledge, you will find this app complicated to use.
3. Router Admin Setup
Router Admin Setup is an Android app configuring your WiFi router and controls its settings. So, regardless of your router, you can use this application to control your router.
More importantly, Router Admin Setup brings lots of tools to manage, control & set up any router. This application lets you quickly figure out who is connected to your device.
4. WiFiman
WiFiman is one of the top-rated network scanner apps on the Google Play Store. With WiFiman, you can easily detect available WiFi networks and Bluetooth, scan network subnets for additional details, run a download/upload speed test, etc.
The app is known for its powerful network analyzing capabilities and WiFi speed testing features. This is an excellent app for detecting other devices connected to a WiFi network.
5. Fing- Network Tools
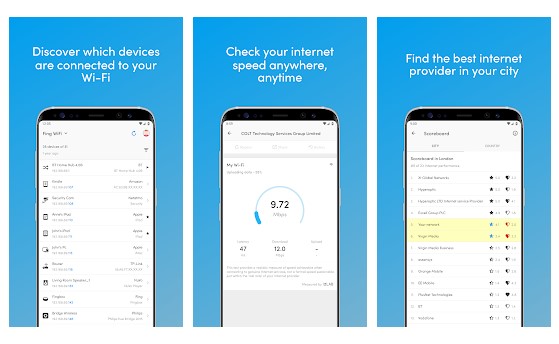 Fing- Network Tools is one of the best WiFi analyzer apps on the Google Play Store. The best thing about Fing- Network Tools is that it allows users to scan the entire WiFi network to search for connected devices.
The app can help you get the most accurate device recognition of IP Address, MAC Address, device name, model, vendor, and manufacturer.
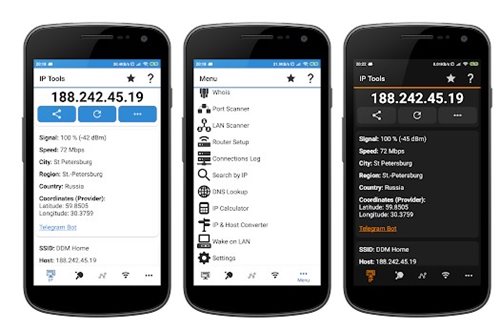
6. IP Tools
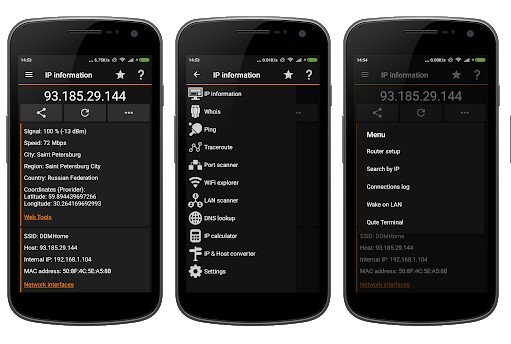 IP Tools might be the best pick if you are searching for an Android app that can help you get a full and clear picture of your network state. Guess what? IP Tools has a powerful WiFi analyzer that can scan and find devices connected to your WiFi network.
IP Tools also show complete information about the connected device, like IP Address, MAC address, Device Name, etc.
7. Network Scanner
 Network Scanner is one of the most advanced WiFi apps on your Android smartphone. Besides scanning and showing WiFi-connected devices, Network Scanner also shows the network’s suspicious vulnerabilities or security issues.
Not only that, but Network Scanner also offers some advanced tools for Wake on Lan, Ping, Traceroute, etc. The app arrives with an excellent user interface, and it’s the best Android WiFi scanning app you can use today.
8. WiFi Thief Detector
 If you are searching for an Android app that detects devices connected to your WiFi network, try WiFi Thief Detector. It’s a network scanner app that helps users spot devices connected to a WiFi network.
The WiFi Thief Detector also shows crucial information about the connected devices like IP Addresses, MAC ID, vendor listing, etc.
9. Who is on my WiFi
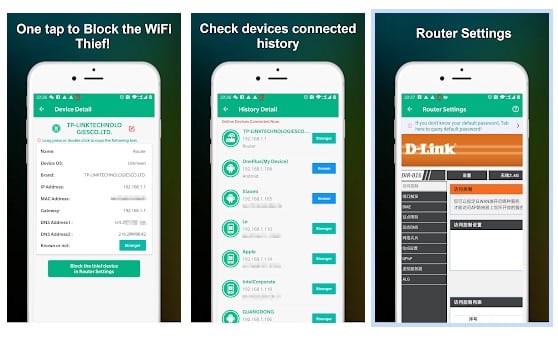 As the app’s name says, Who is on my WiFi is an Android app that can help you detect devices connected to the WiFi network.
The best thing about Who is on my WiFi is that it also provides router settings for popular routers like D-Link, TP-Link, etc. So, after detecting the unknown device, you can easily block it through the app itself.
10. WiFi Inspector
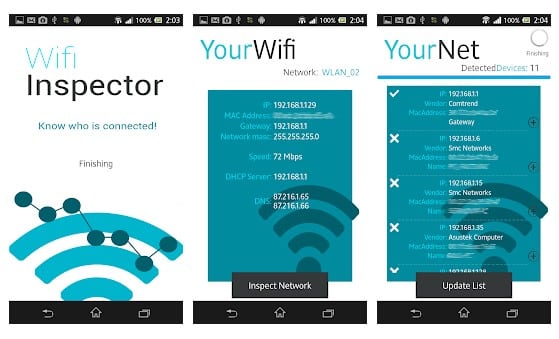 WiFi Inspector is another best and most easy-to-use Android network scanner app that can see all devices connected to the network. Moreover, the app shows detailed information about the connected devices like, IP Address, manufacturer, device name, MAC address, etc.
Millions of users now use the app, and it’s the best network scanner app you can use on your Android.
Frequently Asked Questions
Who is on my WiFi online check?
To check who is on your WiFi, log in to your router’s app or web interface. Once logged in, you need to look at the Connected Devices or Connected Client List.
Which is the best network scanner app?
All the apps we have listed in the article are network scanners. You can use these apps to scan your WiFi network and determine which devices are connected to your internet.
Is Fing – Network Tools safe?
Yes, Fing is one of the leading network scanner apps for Android. It can provide you with all useful information related to your WiFi network. Along with it, you also get an option to check who’s connected to your WiFi.
Are these apps safe to use?
Yes, all the apps we have listed in the article are safe to use. Since they are safe, they are available on the Google Play Store. Also, most of the apps in the article are free to download and use.
So, these are the best Android apps to find out Who’s connected to my WiFi? Not only connected devices, but you can also find and fix many wifi-related problems with these free Android apps.
The post 10 Best Android Apps to See Who’s Connected to My WiFi? appeared first on TechViral.
from TechViral https://ift.tt/e2cHzwn
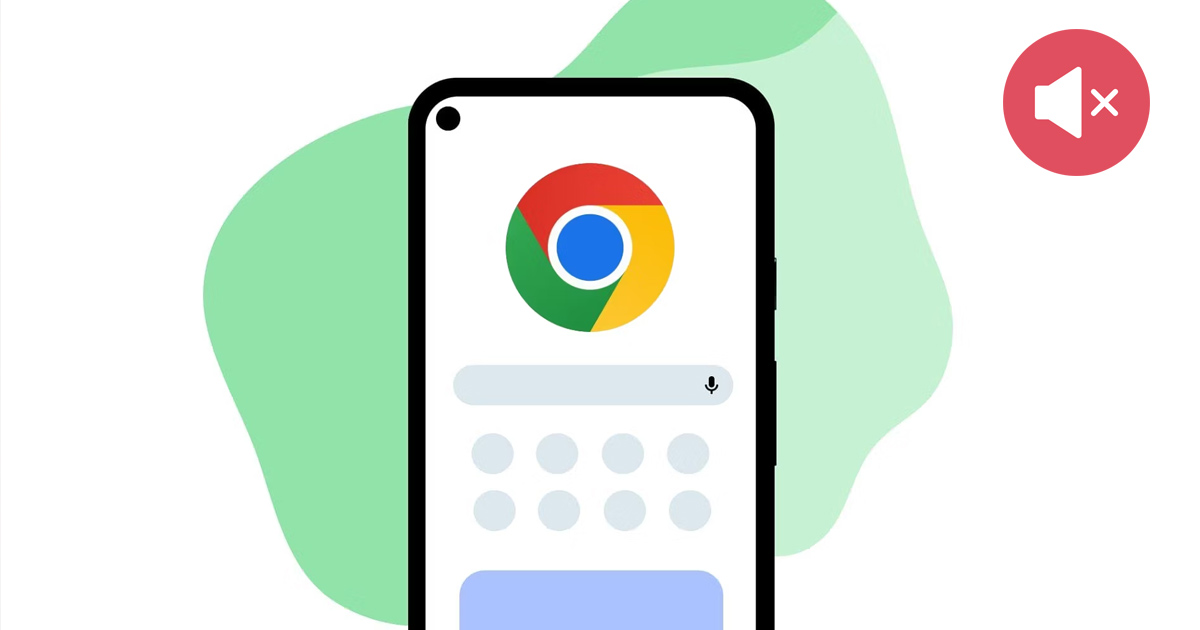
How to Fix No Sound in Google Chrome for Android (8 Methods)
Sound is an essential part of the multimedia experience. And when it comes to smartphones, we use various apps to watch music videos, listen to music, interact with online multimedia content, etc.
Most users prefer the Google Chrome browser to satisfy their online media needs; the browser handles the media files pretty well. However, recently, many Chrome for Android users were found to be facing problems with sound.
Users have claimed that there’s no sound in Google Chrome for Android. The video plays on sites, but there’s no audio. If you are facing the same problem, continue reading the guide.
Fix No Sound in Google Chrome for Android
There could be various reasons that may lead to no sound issue on the Google Chrome browser. Mainly, you have to check the Sound settings of your smartphone and the browser to resolve the issue. Here are the best ways to fix no sound in Google Chrome for Android.
1. Check your phone’s volume level
Android allows you to adjust the volume level for notifications, media, ringtones, and Alarms. However, on the volume control, you need to ensure that the media volume isn’t set to mute.
You will never hear any sound if the Media Volume is muted. Here’s how you can check the volume levels on your phone.
1. Open your Android app drawer and select Settings.

2. When the Settings app opens, tap ‘Sound & Vibration‘.
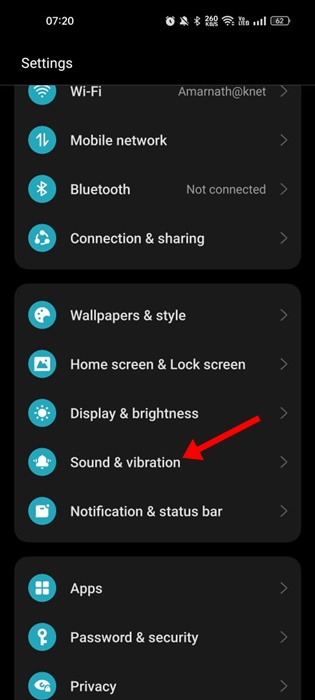
3. On the Sound & vibration screen, you will see four different types of volume controls.
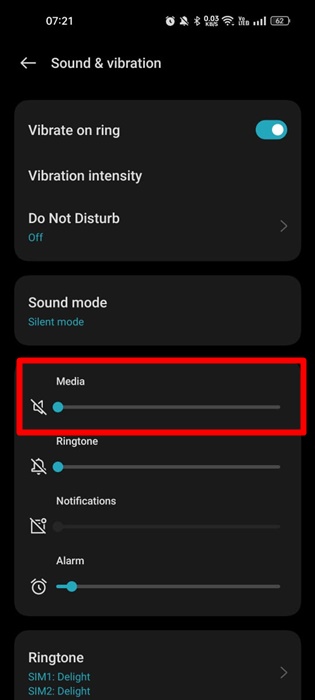
4. Use the slider underneath Media to increase the volume level.
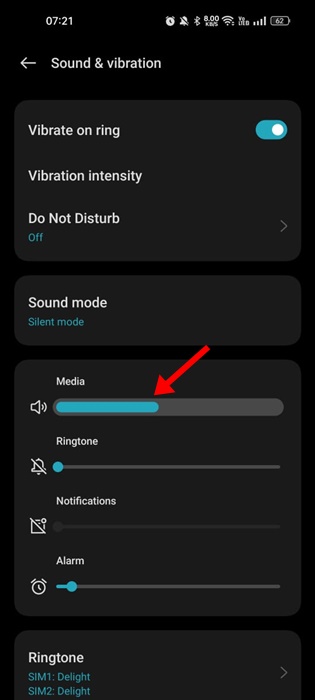
That’s it! You can also directly press the Volume button and adjust the media slider on your Android smartphone.
2. Make sure the video you’re playing has the sound
It’s very important to check whether the video you’re viewing has the sound.
If there’s no sound in the video, everything you do will fail. Hence, play 2 or 3 videos on the Google Chrome browser before following the next methods.
This will help you confirm whether your Chrome has a problem, or it was the video that has no sound.
3. Force-Stop Google Chrome Browser & Reopen it
If the media volume level is set to maximum, you still cannot hear any sound in the Google Chrome browser; you can try force-closing the browser and reopening it.
Force stop will release Google Chrome from your Android’s memory, possibly fixing no sound issue. Here’s how to force stop the Google Chrome web browser on Android.
1. First, long press on the Google Chrome app and select ‘App Info‘.
2. Tap the ‘Force Stop‘ option on the App info screen.
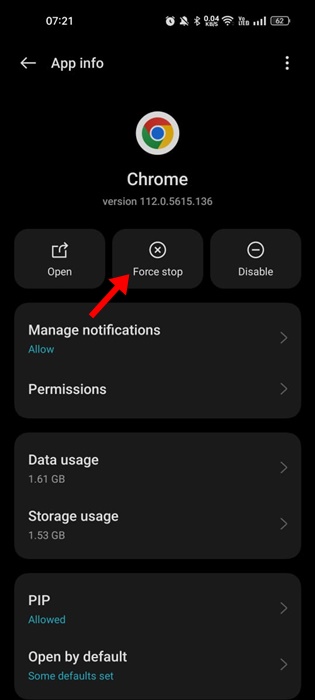
That’s it! This will force stop the Google Chrome application. Once stopped, tap on the Google Chrome browser again to open it.
4. Make sure Music and Audio Permission is Enabled
If the Music & Audio permission is disabled for the Google Chrome browser, no matter how hard you try, the audio won’t play. You will continue to get issues related to no sound in Google Chrome Android.
Hence, in this method, we will modify the permissions for the Google Chrome browser and allow music and audio access. So, here’s what you need to do.
1. Long press on the Google Chrome browser and select ‘App Info‘.
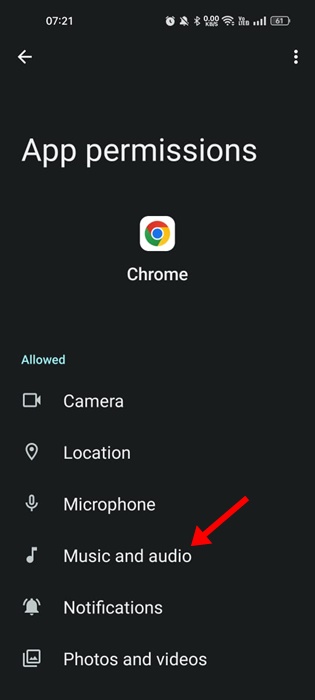
2. On the App Info screen, select Permissions.
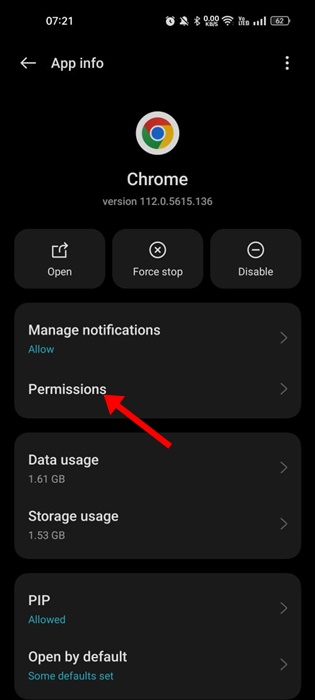
3. On the Permissions, tap on Music and Audio.
4. On the Music and audio permission, select ‘Allow‘
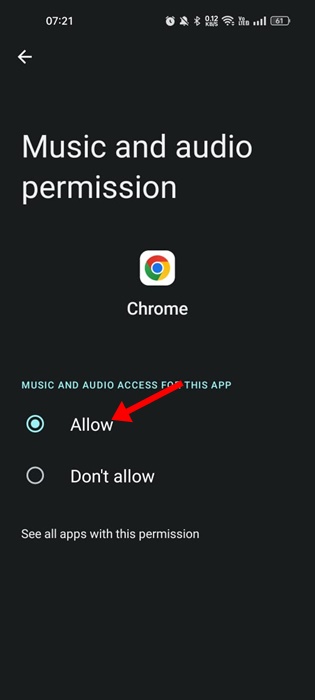
That’s it! This is how you can allow music and audio access for the Google Chrome web browser for Android.
5. Allow Websites in Chrome to Play Sound
Both the desktop version and the mobile app of Google Chrome allow you to manage permissions for each site separately. So, if you cannot hear the sound of video on only a selected site, chances are you’ve accidentally disabled sound permission for that website.
Hence, you need to open that website in your Google Chrome for Android and follow the steps we have shared to allow the sound to play.
1. Open the Google Chrome browser and tap the three dots in the top-right corner.

2. Select Settings on the menu that appears.
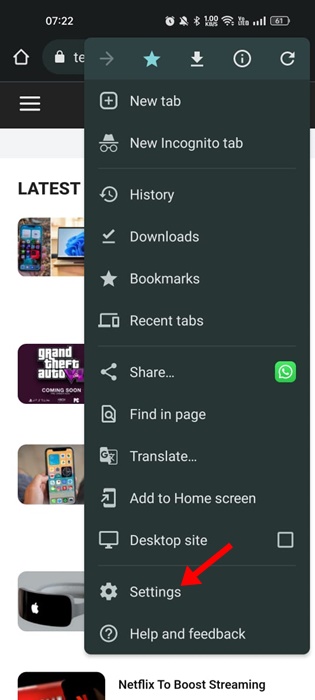
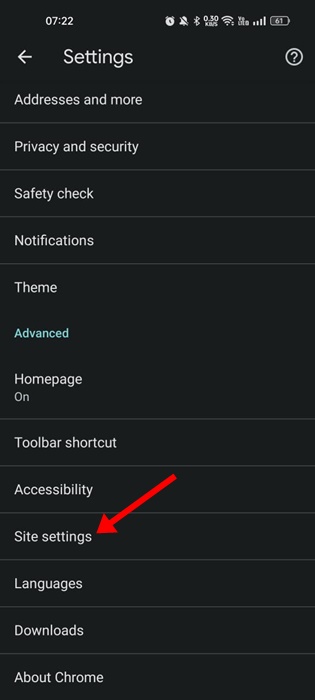
3. Scroll down a bit, and select ‘Site Settings‘.
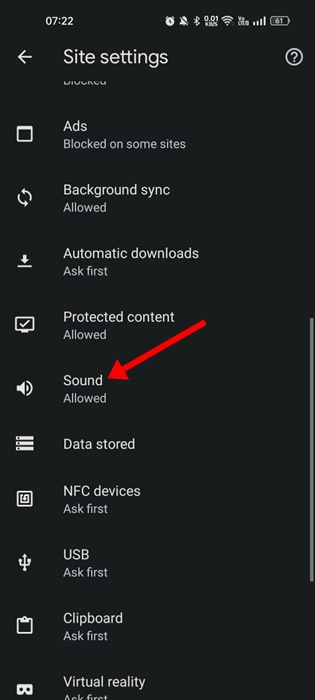
4. On the Site Settings, tap on the ‘Sound‘.
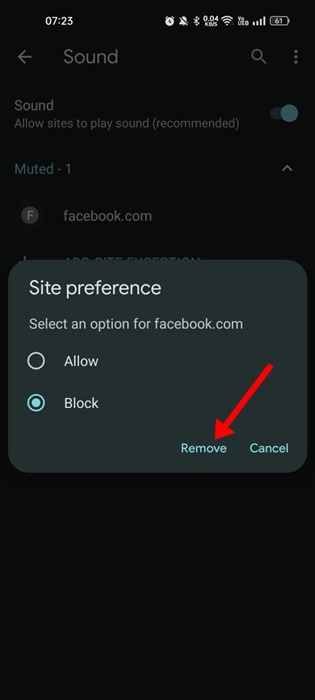
5. Now, on the Sound screen, enable the toggle beside ‘Sound’.
6. The sites that don’t have sound permissions will appear in the Muted section.

7. To remove the site from the Muted section and to regain sound, tap on the Site URL and select ‘Remove‘
That’s it! This will allow your favorite website to play sound on the Google Chrome web browser.
6. Reset the Google Chrome Flags
If you are a regular Chrome user, you may know that from the Chrome://flags webpage, you can enable or disable experimental features.
Some experimental features may prevent the audio playback on the browser. Since it’s difficult to know which Chrome Flags have the problem, the best you can do is reset all Chrome flags on Android. Here’s what you need to do.
1. Open the Google Chrome browser on your Android, and on the address bar, enter chrome://flags/
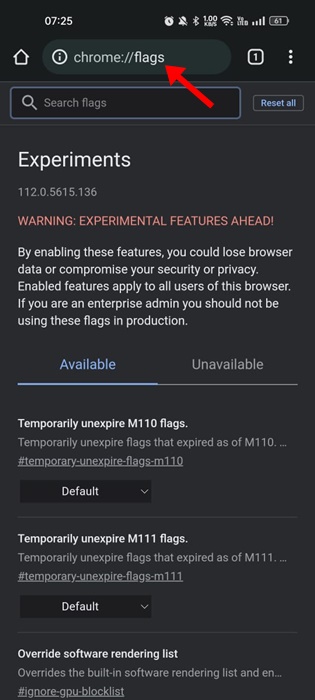
2. Now look at the top of the webpage; beside the search field, you will find a ‘Reset all‘ button.
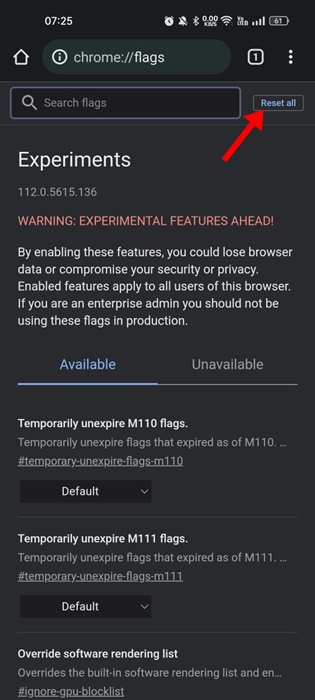
3. Click on the Reset All button to reset all Chrome flags.
After the reset, you will be asked to relaunch the web browser. Tap on the Relaunch button to reboot the Chrome browser for Android.
7. Clear Google Chrome Cache
Corrupted Cache files not only slow down the performance of the web pages but also leads to various other problems, such as audio stopped working. Hence, you can clear the browser cache if there’s still no sound in Google Chrome for Android. Here’s how to do it.
1. Long press on the Google Chrome browser icon and select ‘App Info‘.
2. Tap on Storage Usage on the App info screen.

3. On the Storage usage, tap on the ‘Clear Cache‘.
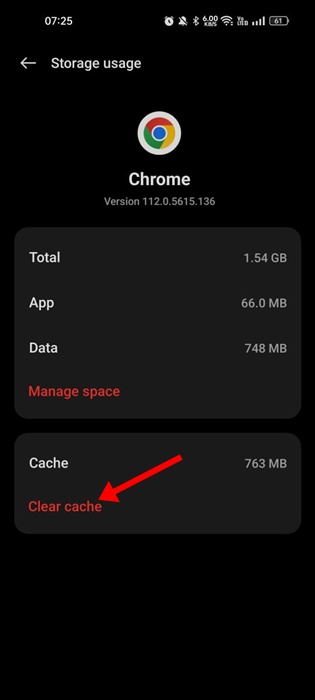
4. If the sound still doesn’t play, tap ‘Manage Space‘ and select ‘Clear all data‘.
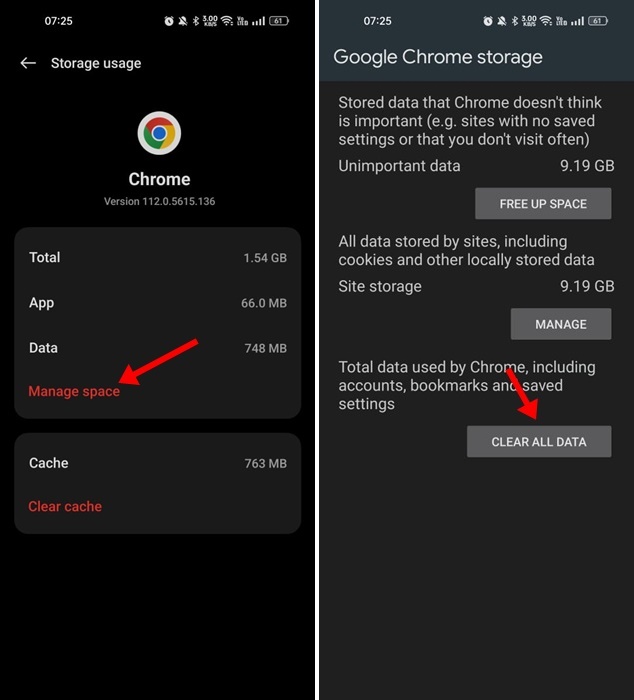
If you’ve cleared all data of Google Chrome, you will be asked to sign in with your Google Account.
8. Few Other Things to Try
The above methods would have fixed no sound in the Google Chrome issue, but if the problem persists, you can try a few basic things. Here we have listed some of them.
- Update your Google Chrome browser.
- Always make sure the video you’re playing has the audio.
- Downgrade your Google Chrome version.
- Switch to a Google Chrome alternative.
No sound in Google Chrome for Android can be problematic, but it can be fixed by following these methods. We are sure that one of the solutions in this article has worked for you. Also, if you need more help, please discuss it with us in the comments.
The post How to Fix No Sound in Google Chrome for Android (8 Methods) appeared first on TechViral.
from TechViral https://ift.tt/CDx2uBv
How to Fix Instagram Stories Freezing in 2023 (8 Methods)

You have many platforms to share your photos and videos in high-quality, but out of all, Instagram is the most popular choice, and it has a strong user base.
Being a photo-sharing app, Instagram has improved greatly over the past few years. Today, you can share photos and videos, react to posts, exchange texts, share stories/reels, etc., on the app for free.
While the Instagram app is feature-rich, sometimes you may face problems using some features. For example, many users have recently claimed that their Instagram video freezes but audio continues.
The video can be on your Instagram feed, story, or reel. So, if you are experiencing video freezing issues on Instagram, continue reading the article. Below, we have shared all possible methods to fix Instagram Stories keep freezing issue.
Why Instagram Video is Freezing?
Instagram video freezes but sound continues is usually a problem with your internet. If your internet is not stable, you will experience such problems.
Also, several versions of Instagram have this problem, and the best way to resolve this is by updating the app from the Google Play Store or iOS App Store.
Below, we have listed all possible reasons why Instagram videos stop after a few seconds or freeze.
- Your Instagram app is outdated.
- Your internet connection is not stable.
- Instagram’s servers are down.
- Instagram app’s cache files are corrupted.
- You are using VPN/Proxy Services.
Fix Instagram Stories Randomly Freezing
Now that you know all possible reasons why Instagram video freezes but sound continues, you may look for ways to troubleshoot it. Below, we have shared a few best ways to resolve Instagram videos (Reels, Stories, Feed) keep freezing issues.
1. Check Your Internet Connection

This is the first thing you should do once you notice the freezing on Instagram videos. If your internet is not stable, Instagram videos will fail to play or won’t load.
You will also face other issues like Instagram photos not showing, videos not loading, Instagram reels not scrolling, etc.
Hence, before following the next methods, head to the fast.com website and confirm your internet is stable. You can try switching to a different network or mobile data if you have internet issues.
2. Update the Instagram App
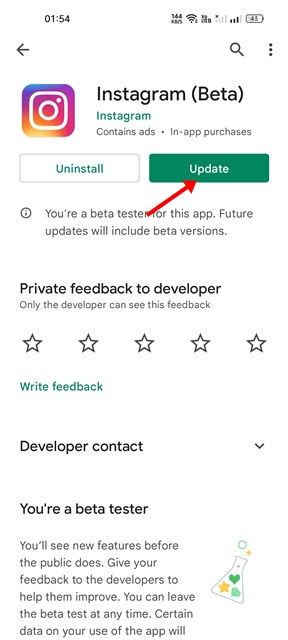
If your internet is stable, but Instagram reels videos are still freezing, you need to update your Instagram app.
Updating the Instagram app will possibly remove the bugs or glitches preventing Reels or Stories from loading properly.
So, head to the Google Play Store or Apple App Store and update your Instagram account. Once updated, open the app and play the Reels/Stories again.
3. Check if Instagram is down
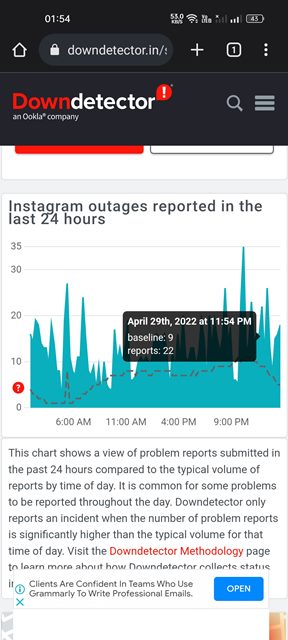
Like every other social networking site, Instagram’s servers are often down for maintenance. And when the servers are down, the Instagram video will freeze no matter how hard you try.
You will also face other problems like Instagram video freezes but audio continues, the images won’t load on the Instagram feed, messages won’t load properly, etc.
To check if Instagram’s servers are down, check out this webpage from Downdetector. If the servers are down, you must wait until the service is restored.
4. Force Stop & reopen the Instagram app
Force closing is an evergreen solution to various Android app problems. When you force-stop an app, all background processes and services related to that app are released from the memory.
So, if any background process is interfering with the functionality of the Instagram app, it will be fixed instantly. Here’s how you can force-stop the Instagram app.
1. First, long press on the Instagram app icon and select ‘App Info‘.

2. Tap the ‘Force Stop‘ option on the App Info screen.
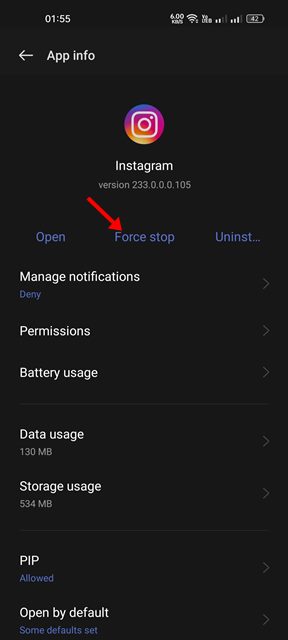
3. This will force stop the Instagram app. Now open the Instagram app again.
That’s it! That’s how easy it is to force stop the Instagram app for Android.
5. Disable Instagram’s Data Saver Mode
Data Saver mode on Instagram is useful as it reduces data consumption. However, the same feature can sometimes interfere with Stories playback. Hence, if Instagram Stories are still freezing, you can disable the data saver mode.
1. Open the Instagram app and tap the Profile Picture at the bottom-right corner.
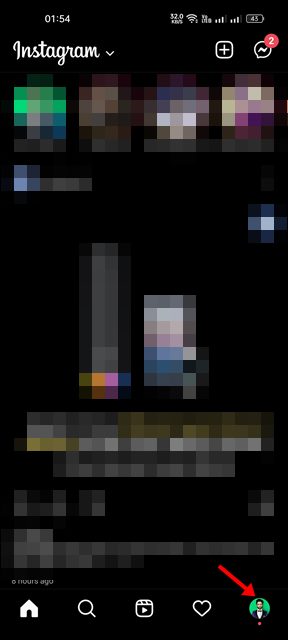
2. On the next screen, tap on the hamburger menu at the top-right corner.

3. From the list of options that appears, select ‘Settings‘.
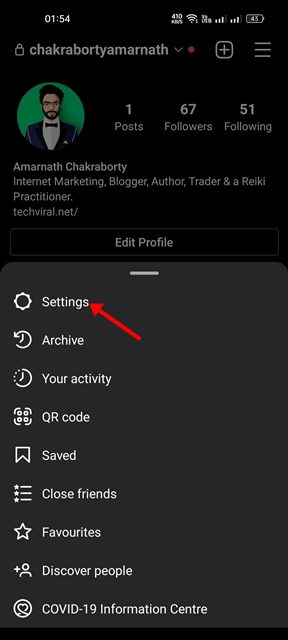
4. On the Settings, select ‘Account‘.
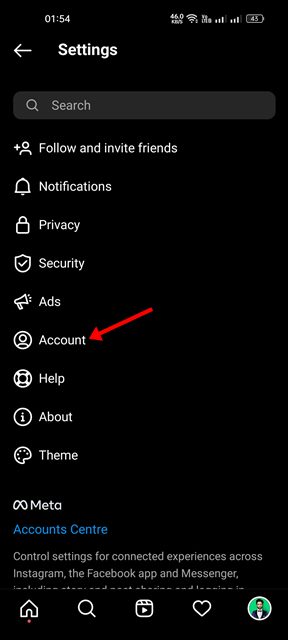
5. On the Account screen, tap on Mobile data use.
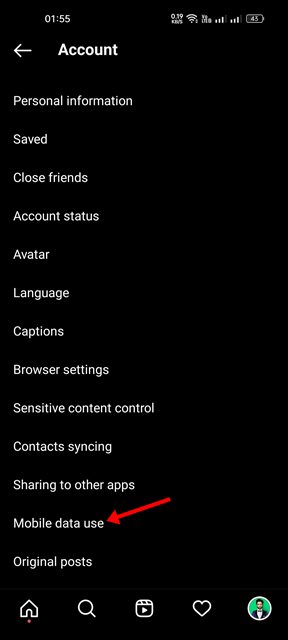
6. Next, on the Mobile data settings, turn off the toggle for ‘Data Saver‘.

That’s it! This will disable the Data Saver Mode of Instagram. Once disabled, recheck the Instagram Story; it won’t freeze this time.
6. Disable the VPN/Proxy Services
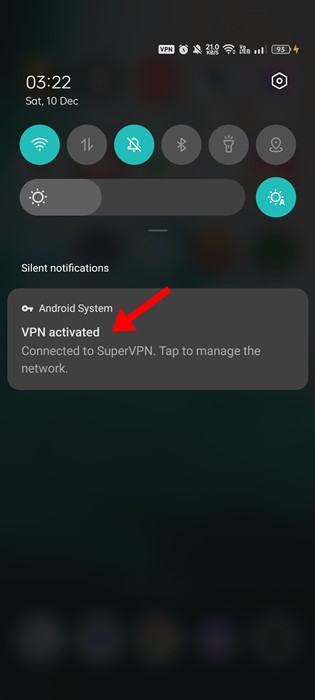
Instagram video freeze but audio continues issue maybe because of the use of VPN or Proxy services.
If you are using any VPN or Proxy app on your smartphone, it’s recommended to disable it and then play the videos. This is because when you use VPN or proxy services, your Instagram app tries to connect with a different server far from your actual location.
This process lengthens the time of connection and creates video playback issues. Hence, disable the VPN/Proxy apps and then play the Instagram video again.
7. Clear Instagram Cache and Data
Apps like Instagram use cached data to provide a smooth user experience. However, if this cached data gets corrupted for any reason, it will create problems like Instagram Stories freezing.
The best you can do to resolve cache-related issues is to clear the App’s cached data. Here’s how to clear the Instagram app cache on Android.
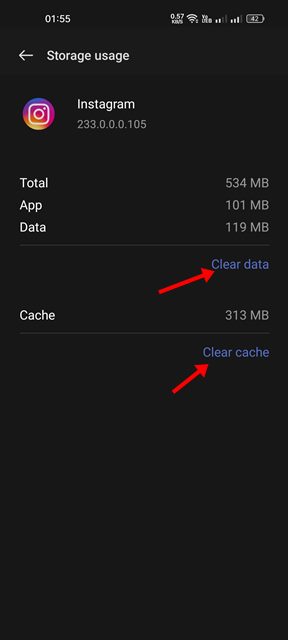
1. Long press on the Instagram app icon and select ‘App Info‘.
2. On the App Info screen, tap on ‘Storage usage‘.
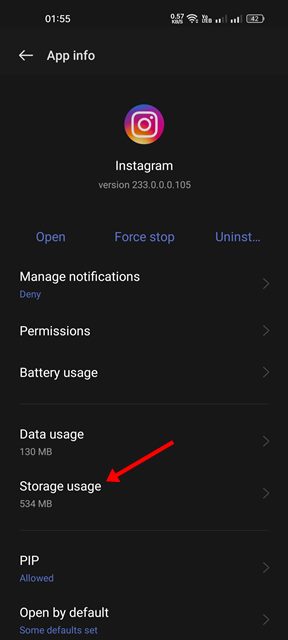
3. On the Storage usage, tap on the Clear Cache button and then on ‘Clear Data‘.
That’s it! This will clear the Instagram app’s cached data. Once done, reopen the Instagram app and sign in to your account.
8. Reinstall the Instagram App
If Instagram Stories are still freezing, you should reinstall the Instagram application.
Reinstallation is the only remaining option to deal with Instagram video keep freezing issues. However, reinstallation will remove your account details and all saved data.
To reinstall the Instagram app, press the Instagram app icon and select ‘Uninstall’. Once uninstalled, install the Instagram app again. This should fix the issue.
Also read: How to View Sent Photos on Instagram
Instagram Stories freezing could be frustrating, but it can be fixed by following the methods we have shared in this article. If you need more help resolving Instagram video freeze issues, let us know in the comments below.
The post How to Fix Instagram Stories Freezing in 2023 (8 Methods) appeared first on TechViral.
from TechViral https://ift.tt/CRMHB4I
Subscribe to:
Posts (Atom)