Saturday, December 31, 2022

How to Get Sound on Reddit (Full Guide)

How to Get Sound on Reddit

If you are an internet user, you may know about Reddit. And if you are reading this article, you are a Reddit user but don’t know how to get sound on Reddit. Reddit, being called the ‘Front page of the Internet’ offers many features to its features.

As a part of safety, Reddit mutes the sound of videos shared on the platform. Reddit is a text-based platform that mutes the sound of certain videos that it thinks are unsafe for work (NSFW) content.

Yes, it is possible that the video you’re viewing is posted without a sound, and you can’t do anything here. But, if a video is muted by default on Reddit, you can easily enable the sound.

Get Sound on Reddit (Desktop & Mobile)

Hence, if you have just joined Reddit and don’t know how to get sound on the platform, you may find this guide quite helpful. Below, we have shared a few simple steps to help you get sound on Reddit. Let’s get started.

1. How to Get Sound on Reddit Desktop?

If you use the web version of Reddit on your PC, you must follow these steps to enable the sound on a video. Here’s how to turn on sound on Reddit PC.

1. First, open your favorite web browser and visit Reddit.com. Next, log in to your Reddit account.

2. After logging in, navigate to the video where you want to enable the sound. At the bottom right corner of the video player, tap on the speaker button.

speaker button

3. If the video is muted, the volume icon will have a cross (X) symbol. If it’s unmuted, the regular speaker icon will appear.

4. Click on the speaker icon to mute/unmute the video.

speaker icon

5. If the video is not muted, and you still can’t hear the sound, you need to check the volume of your computer.

check the volume of your computer

That’s it! This is how you can easily get sound on Reddit for desktop.

2. How to Get Sound on Reddit Videos Android

Reddit app is more popular than the web version, and it also mutes videos by default. Here’s how you can get sound on Reddit videos on Android.

1. First, open the Reddit app on your Android device.

2. Next, locate the video which you want to play.

3. Look at the speaker icon at the bottom right corner.

speaker icon

4. If the video is muted, a cross (x) will appear beside the speaker icon. You need to tap on the speaker icon to enable the sound.

tap on the speaker icon

5. To mute the video again, tap on the speaker icon again.

mute the video

That’s it! This is how you can get sound on Reddit mobile in easy steps. The steps are basically the same for both the mobile and the web versions of Reddit.

3. How to get sound on Reddit for iOS

Well, the iOS app for Reddit has a feature that mutes all videos by default. The feature is called Quite audio mode, and it mutes all videos by default. You need to turn this off to get sound on Reddit for iOS.

How to get sound on Reddit for iOS

  • First of all, open the Reddit app on your iOS.
  • Next, tap on the profile icon in the top-left corner.
  • From the list of options that appears, select Settings.
  • On Settings, scroll down to Quiet audio mode and toggle off this feature.

That’s it! This is how you can easily enable sound on Reddit for iOS.

4. Use Reddit Clients on Android

There are many third-party Reddit client apps available for Android that provide you with added features. Third-party Reddit clients have a feature that lets you turn off the default mute for videos.

This means you don’t need to tap on the Speaker icon every time to unmute the video. For a list of the best Reddit clients, check out this guide – Reddit apps for Android.

We have shared a few best Reddit apps for Android that offers you many amazing features. You will get a better Reddit app experience with third-party Reddit apps than the official one. You should check that guide and pick the one that suits your need.

So, these are the few best ways to get sound on Reddit in easy steps. If you need more help enabling sound on Reddit, let us know in the comments below. Also, if the article helped you share it with your friends also.

The post How to Get Sound on Reddit (Full Guide) appeared first on TechViral.


from TechViral https://ift.tt/GJdmU5k

10 Best Snapchat Saver Apps for Android in 2023

Best Snapchat Saver Apps for Android

Snapchat is undoubtedly the best photo and video-sharing app out there. It’s an app known for its unique photo and video filters.

If you are an active Snapchat user, you may know that the app records when you take a screenshot and notifies the other person. This thing is done to protect the privacy of the uploader.

Whether you capture a screenshot of a chat, story, or video, the Snapchat app will notify the uploader to make them aware. While it’s a great privacy protection feature, many users may still want to take screenshots on Snapchat without them knowing.

If you want to save snaps from Snapchat without them knowing, you need to start using the Snapchat Saver app. Snapchat saver apps for Android are a mix of screenshot tools and video recorders. But, they follow a different concept to capture the objects displayed on the screen.

10 Best SnapchaTopt Saver Apps

Snapchat Saver apps can easily capture screenshots or record snaps without notifying the other user. So, let’s check out the best Snapchat saver apps for Android.

1. SaveStory

SaveStory

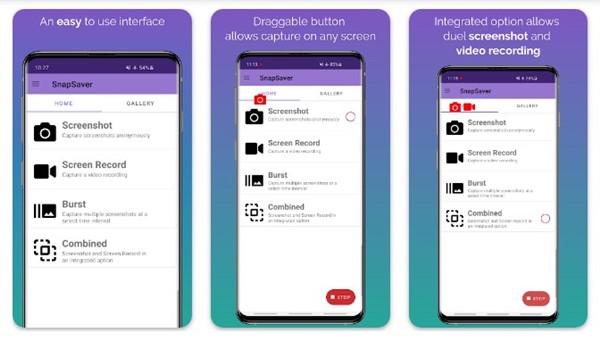
SaveStory is both a video recorder and a screenshot tool for Android. The app lets you capture screenshots of any app, and you also have the option to record the screen.

The good thing about SaveStory is that it works fine on both rooted and non-rooted Android smartphones and sends no notification when a screenshot is captured.

It also has a feature that allows you to set continuous screenshots. With this feature, the app automatically captures a series of screenshots within a few seconds.

The app can also record the internal audio if your device runs on Android 10 or above. Overall, SaveStory is a great Snapchat saver app for Android.

2. Private Screenshots

Private Screenshots

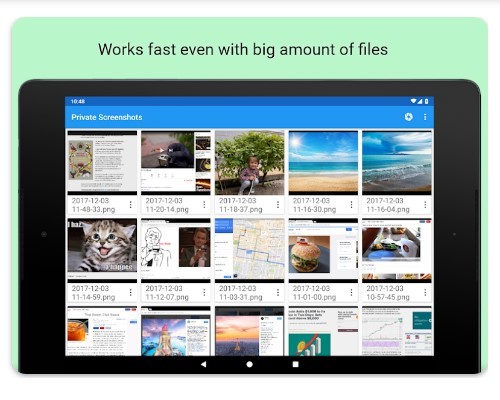
Private Screenshots app for Android can capture screenshots without notifying the end person. The good thing about Private Screenshots is that it works will all sorts of apps that detect screenshots you made from conversations.

However, Private Screenshots don’t work with protected apps like Netflix, Tor Provider, Banking apps, etc. You will get a black screen if you try to capture screenshots in protected apps.

After capturing a screenshot, Private Screenshots saves the files into a hidden directory, and it doesn’t broadcast any message about new screenshots.

The concept of Private Screenshots is different; instead of capturing the screenshot directly, it launches a presentation mode on your device and then captures the whole screen. In this way, the apps can’t detect that a screenshot has been taken.

3. ShotSaver

ShotSaver

ShotSaver is another great Snapchat saver app for Android that allows you to take screenshots and record screen anonymously. While the app works fine on older versions of Snapchat, it sometimes fails to capture a screenshot on the latest version of Snapchat.

The most prominent part of ShotSaver is its easy-to-use interface. The user interface looks clean and suits well with Android’s material design.

Another unique feature of ShotSaver is the ability to capture screenshots & record screens in the same session. You don’t need to log in or create an account to use this app, and it works with Snapchat chats.

The other person is not notified when you capture a screenshot or record videos with ShotSaver. You can view the captured images/videos from the Gallery app of your Android.

4. Screenshot Easy

Screenshot Easy

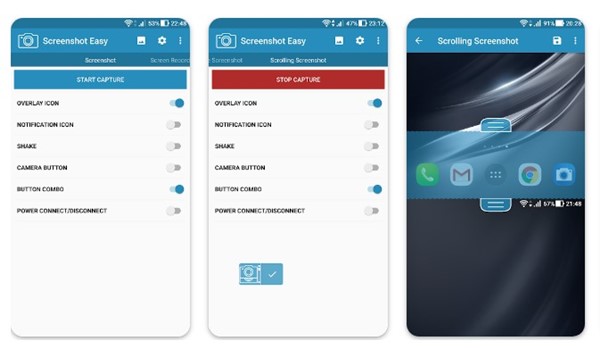
Screenshot Easy is a full-fledged and simple-to-use screenshot tool for Android devices. It lets you take a screenshot on your smartphone the easy way.

It also has a screen recording feature that records everything displayed on the screen. You also can capture full-page screenshots, scrolling screenshots, screenshots in high quality, etc.

The app also provides you with multiple ways to capture screenshots. For example, you can add a screen capture option to the Notification panel, enable the shake-to-capture feature, add an overlay icon for screen recording/screenshot, etc.

However, you should note that this app will send a notification if you try to capture a screenshot or record screen on Snapchat. It’s just a simple screen capture app for Android that can be used to save Snapchat stories or snap.

5. AZ Recorder

AZ Recorder

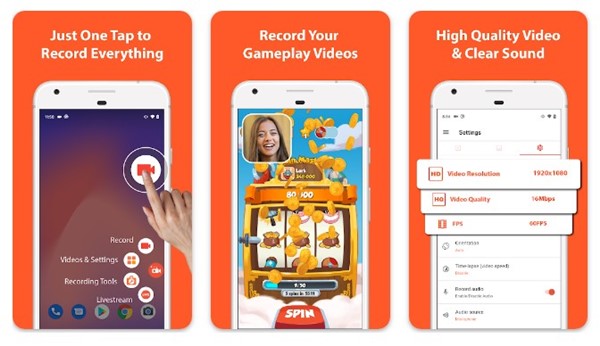
AZ Recorder is a very popular screen recorder app for Android that can record your screen at better quality. It’s a high-quality screen recorder with the ability to capture internal audio.

It has many unique features that make the app more useful. You can use this app to capture screenshots as well. And you also get a video editor for editing the screen captures.

AZ Recorder is perfect if you want to save a Snapchat story without any watermark. Yes, the app will notify the other user that you have captured a screenshot, but if you are okay with it, it’s one of the best apps you will ever use.

The app works with all sorts of social networking and instant messaging apps such as WhatsApp, Telegram, Snapchat, Instagram, etc.

6. AirDroid Cast

AirDroid Cast

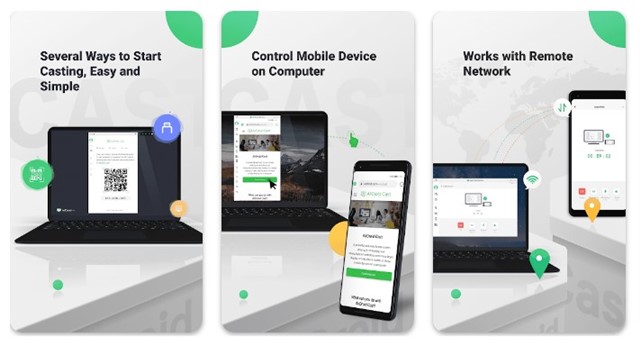
AirDroid Cast is a screen mirroring app, but it’s an odd one on the list. If you want to save a Snapchat story or capture a screenshot without letting the other one know, the best option is to mirror the phone screen to a PC and then use the PC’s screen recorder to capture the screen.

The goal is to mirror your Android screen to a PC with AirDroid Cast and then record the PC screen. This way, you will record your PC’s screen, not the Snapchat app. This won’t notify the other person that you have captured the screenshot.

The AirDroid Cast is a powerful and easy-to-use screen-sharing & controlling tool that allows sharing mobile screens to Windows or macOS.

7. ApowerMirror

ApowerMirror

ApowerMirror follows the same concept as AirDroid Cast. It’s a screen mirroring app with more features than AirDroid Cast.

The app facilitates wireless screen mirroring, and you can use it to cast Android to a PC, MAC, or even Smart TV with audio.

The goal here remains the same, you mirror your Android screen to a PC and then record the PC screen. This way, you will be recording the PC screen, preventing Snapchat from notifying the other user.

The app is completely free to download and use; it supports mirroring 4 devices simultaneously without any delay.

8. SnapScreenshot Tool

SnapScreenshot Tool

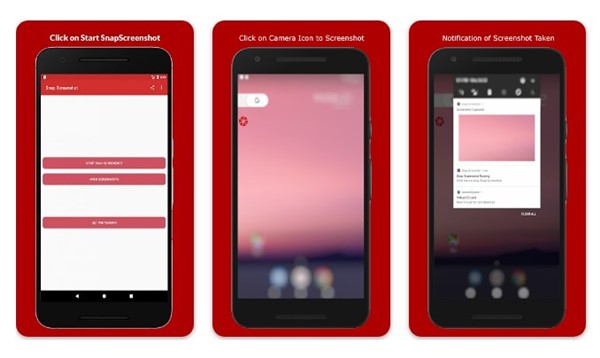
SnapScreenshot Tool is a screenshot utility designed for apps that notifies other people when you capture a screenshot. The app is fully compatible with Snapchat, and it will let you capture screenshots on the app anonymously.

However, you should note that the app won’t work with protected apps like Netflix, Banking apps, etc. You will get a blank screen if you attempt to capture screenshots of protected apps.

To capture while using apps, SnapScreenshot Tool provides a floating camera button that sticks to the screen. You need to tap on the floating camera button to take the screenshot.

9. Apowersoft Screen Recorder

Apowersoft Screen Recorder

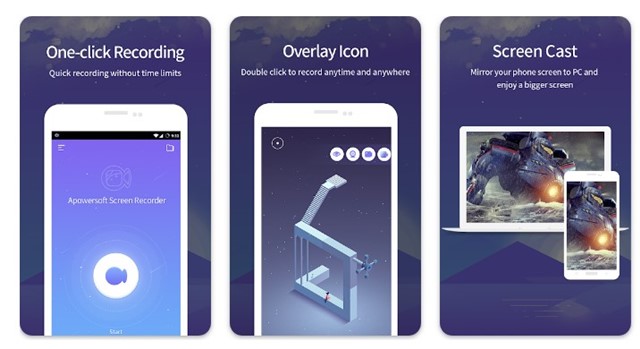
If you are looking for a Snapchat saver app and don’t care if the app sends notifications to the end user, you may find Apowersoft Screen Recorder very helpful.

Apowersoft Screen Recorder is one of the best and easy to use screen recorder apps that can record your entire Android screen in high quality.

Apowersoft Screen Recorder also has a screencasting feature that lets you cast your mobile screen to a computer. If you don’t want to notify the other user about the screen capture, just cast your phone screen to the computer and record the computer screen.

Some of the key features of the Apowersoft Screen Recorder include recording screen with internal audio, front camera recording, flexible overlay icon, video editing features, etc.

10. SnapGrab

SnapGrab

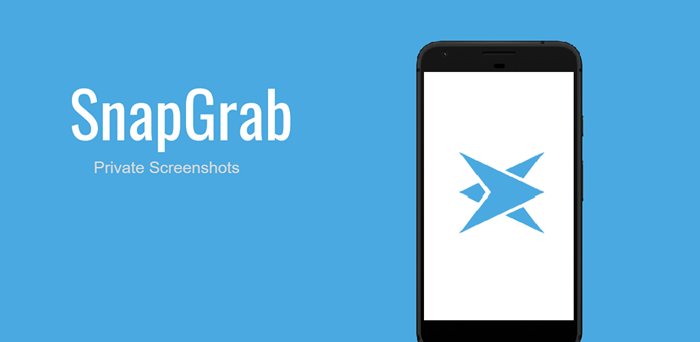
Due to some reasons, SnapGrab has been taken down from the Google Play Store. However, you can still download it from third-party app stores.

SnapGrab is a private screenshot app that’s designed especially for Snapchat. You can install this app to Save Snapchat pictures and videos without notifying the end user.

Everything is good in the app, from the user interface to the features. The app doesn’t put a watermark on your recorded videos or screenshots.

However, since the app is no longer available on the Google Play Store, you must be very careful while downloading it from third-party app stores. Make sure to pick a reliable third-party app store to download the app for Android.

Also Read: How to Take Screenshots on Snapchat Without Them Knowing?

So, these are some of the best Snapchat saver apps for Android that you can use today. If you want to suggest any other similar apps, let us know in the comments. Also, if the article helped you, share it with your friends.

The post 10 Best Snapchat Saver Apps for Android in 2023 appeared first on TechViral.


from TechViral https://ift.tt/FaB47VK

Friday, December 30, 2022

How to Recover Deleted Messages on Messenger

Recover Deleted Messages on Messenger

Let’s admit it; Messenger is a great app for exchanging messages. While it also has a video and voice calling option, Messenger is known for its chat options. On Messenger, you connect with your Facebook friend, exchange texts, and make voice/video calls.

While Messenger is a great app to have fun, what if you have accidentally deleted some messages and want to recover them? Like Instagram, Messenger also doesn’t let you recover deleted messages in easy steps.

There’s no option to recover the deleted texts; once deleted, it is gone forever. You can’t get those messages back in the chat box. However, you can request Facebook to provide you with the Messenger data, including your deleted messages.

Facebook’s Download Your Information feature can provide you with all information it has collected from you. This includes the messages you’ve exchanged via messenger. You can download that data and view it on your computer/mobile with an HTML/JSON reader.

Recover Deleted Messages on Messenger

So, if you want to recover deleted messages on Messenger, continue reading the guide. Below, we have shared a few best and easy methods to recover permanently deleted messages on Messenger. Let’s get started.

1) Check if Messages Are Being Archived

If you don’t know, Facebook offers a Message Archive feature that lets you hide your messages. The messages you move to the Archive folder won’t appear on your Messenger.

A user can send chats to the archive folder accidentally. When this happens, the messages won’t appear in Messenger’s inbox and can trick you into believing that the messages have been deleted. So, before trying the next methods, check if the message was archived.

1. Open the Messenger app on your Android/iOS device. Next, tap on the profile picture displayed in the top-left corner.

profile picture

2. This will open your Profile page. Scroll down and tap on the Archived Chats.

Archived Chats

3. You will want to unarchive a chat, long press on the chat and select ‘Unarchive

Unarchive

That’s it! This will restore the chat back to your Messenger inbox.

2) Download a copy of your information

As we have mentioned above, you can also request your Facebook data. The download your information file that Facebook will provide will also have the Messages you’ve exchanged with other people on Messenger. Here’s how to download a copy of your information from Facebook.

1. First, open the Facebook website on your computer and click on the profile picture in the top-right corner.

2. From the list of options that appears, select Settings & Privacy.

3. On Settings & Privacy, select Settings.

Settings

4. Next, on the left pane, click on Privacy.

Privacy

5. Next, click on the Your Facebook Information.

Your Facebook Information

6. On the right side, click on Download Profile Information.

Download Profile Information

7. Select either HTML or JSON format on the Select file option. HTML format is easy to view; the JSON format would allow another service to import it more easily.

HTML

8. On the date range, select All time.

9. Next, scroll down and click on the Deselect all link. Once done, select ‘Messages‘.

Messages

10. Now scroll down to the bottom and click the Request a download.

Request a download

That’s it! This will request a download. Once your copy has been created, it will be available for download for a few days. You will find your download file under the ‘Available files‘ section. Download the file on your computer, unzip it and check your deleted messages.

3) Check the Message from the Messenger Cache Files

Well, this one may only work on some Android versions. Also, it may not work if you’re using the latest version of Messenger. Messenger saves a cache file for your chat on your smartphone. You must use a file manager app to view the Messenger cache file.

  • First of all, open the File Manager app on your Android.
  • Next, navigate to Internal Storage > Android > Data.
  • On the Data folder, find com.facebook.katana > fb_temp
  • Now you need to analyze the fb_temp file to find your deleted text.

Important: If you have cleared the cache of Messenger recently, you will not find the app. Deleting the Messenger cache removes the temp file from your device.

Also read: How to Hide Messages on Messenger

These are a few simple methods to recover deleted Messages on Messenger. If you need more help recovering permanently deleted Messenger Messages, let us know in the comments below. Also, if the article helped you, share it with your friends.

The post How to Recover Deleted Messages on Messenger appeared first on TechViral.


from TechViral https://ift.tt/lRSv4aG

Thursday, December 29, 2022

Fix Unfortunately Gmail has stopped (7 Best Ways)

Fix Unfortunately Gmail has stopped

Let’s admit that we all have more than one email app installed on our Android smartphones. While the Gmail app ships with all Android devices, many still prefer third-party email apps for better email management.

However, users sometimes face problems using email apps on their Android smartphones. Android can sometimes show errors while opening email apps as ‘Unfortunately Gmail has stopped’.

Email keeps stopping problem is not evident only on Gmail; it can appear on other email apps for Android as well. Hence, if you are facing problems like email keeps stopping or email app crashing on Android, you have landed on the right page.

Fix Email Keeps Stopping on Android

Below, we have shared a few best methods to fix email keeps stopping problems on Android. We have used Gmail to demonstrate the methods; you need to follow the same methods for other email apps. Let’s get started.

1. Reopen the Gmail app

The first thing to do if you have encountered the ‘Gmail has stopped’ error message is to reopen the app. This is one of the best things you can ever do to resolve the email message.

Reopening the app will remove all its processes from the background and free up the RAM. Your email app will attempt to make a fresh connection, possibly fixing the email keeps-stopping issue.

2. Restart your Android device

Restart your Android smartphone

If reopening the app didn’t help, you need to restart your Android smartphone. Restarting Android will terminate all background apps and processes. So, if any background app or process conflicts with the email app’s functioning, a restart will fix it.

Restarting Android is super easy, just press and hold the Power button to open the Power options. On the Power options, select Restart. This will restart your Android device.

3. Force Stop the Email app

If the above two methods don’t help, you must force stop the email app. Force stop is a great option on Android to deal with apps that refuse to close normally.

The good thing is that force-stopping the email app will stop all services related to the app in the background. To force stop an email app, follow the steps shared below.

1. First of all, long press on the email app on your Android and select ‘App Info

App Info

2. On the App info screen, tap on the Force Stop option.

Force Stop

That’s it! This will force stop the email app and resolve the email keeps stopping problem on your Android device.

4. Uninstall Android System Webview Updates

Android System Webview has no direct link with email keeps stopping, and many users have found uninstalling the updates for the Android system Webview app helpful.

For many users, simply uninstalling the Android system webview updates has fixed email keeps stopping problem. Hence, you can also try this if the problem hasn’t yet been fixed.

1. First of all, open the Settings app on your device. Next, navigate to the Apps.

Apps

2. On the Apps, tap on the App List or App Management.

App Management

3. Now, from the list of apps, find and tap on the Android System Webview.

Android System Webview

4. Once done, tap on the three dots in the top-right corner and select ‘Uninstall updates

Uninstall updates

That’s it! That’s how easy it is to fix email keeps stopping problems by uninstalling the Android System Webview updates.

5. Sign out of your email account

If any account-related problem prevents you from using the email app, signing out and logging back in will fix it. You just need to sign out from the email app and sign back in.

The sign-out process may vary depending on the email app you are using. However, if your Gmail app keeps stopping on Android, the only app to sign out of the Gmail app is to remove your entire account from your phone.

There’s no ‘Sign out’ option for Android’s Gmail app. And this is the reason third-party email management apps were the best.

6. Clear the Email App Cache

Even after following all methods, if the email app keeps stopping, the only option you have is to clear the email app cache. It’s possible that an outdated or corrupted cache file might be preventing you from using the email app properly.

It’s easy to clear the Gmail app cache. For that, follow some of the simple steps we have shared below.

1. First of all, long press on the Gmail app icon and select ‘App Info‘.

App Info

2. On the App Info screen, tap on Storage Usage.

Storage Usage

3. On the Storage screen, tap on the Clear cache option.

Clear cache

That’s it! That’s how easy it is to clear the email app’s cache. After clearing the cache file, you may be asked to log back in.

7. Update the App

Update the App

Outdated apps often have bugs and glitches that may forcibly close the app once it’s opened. Another prominent reason the ‘Email keeps stopping’ error message is the bugs residing on the outdated app version.

You can eliminate such bugs by installing the latest version of the email app on your Android. Just head to the Google Play Store and install the pending app updates. Once updated, use the app normally; the email app won’t stop anymore.

Also read: How to Recover Permanently Deleted Gmail Emails

So, these are the few simple methods to fix email keeps stopping on Android smartphones. If you need more help resolving the Gmail not responding or the email app keeps stopping the problem, let us know in the comments. Also, if the article helped you, share it with your friends.

The post Fix Unfortunately Gmail has stopped (7 Best Ways) appeared first on TechViral.


from TechViral https://ift.tt/yu1O8hZ

How to Recover Deleted Instagram Messages

Recover Deleted Instagram Messages

Instagram is a great photo and video-sharing platform. It also allows you to exchange text messages, make voice/video calls, and more. If you are an active Instagram user, the site has a ‘Recently Deleted’ section that keeps your deleted photos, videos, reels, and Instagram stories.

The content you delete from your Instagram account moves directly to the Recently Deleted folder, allowing you to restore them later. If you don’t restore the content, it will be automatically deleted after 30 days.

While the ‘Recently Deleted‘ feature is great, it didn’t work for deleted messages. The Instagram messages that you delete accidentally aren’t moved to the Recently Deleted folder; hence if you want to recover the messages, you need to request Instagram to send you a copy of the data that it had stored.

Recover Deleted Instagram Messages

In this article, we will discuss how to recover deleted Instagram messages. You get an option to recover the messages, but this won’t restore them to your chats. First, let’s check out how to recover deleted Instagram Messages.

Note: To request your saved data, it’s recommended to use the web version of Instagram from the desktop. Few users may not find the option to request data on mobile.

1. First, open the Instagram web version on your computer and click on the Profile picture.

Profile picture

2. From the list of options that appears, click on Settings.

Settings

3. On the Instagram Settings, switch to the Privacy and security tab.

Privacy and security

4. On the right side, scroll down to the Data Download section

5. Next, click on the Request Download link.

Request Download

6. Now, Instagram will ask you to provide an email to send a copy of your information.

provide an email

7. Make sure to enter your registered email address. On the Information format, select ‘HTML‘ and click on the Next button.


Note: You can also select JSON, which would require an additional app installation. You can handle HTML files from a web browser.

8. Now, you will be asked to enter your Instagram password. Enter the password and click on the Request download button.

Request download

That’s it! Now Instagram will create a file of your information and email a link once it’s ready. However, the download file may take up to 14 days to reach your email inbox.

create a file of your information

Important: Please note that the link sent to you in the email will automatically expire after 4 days. If you don’t open the link within 4 days, you must request your data again. And you can request your data from Instagram once every 14 days.

How to Open the Downloaded Messages?

After a few days, an email with a download link will arrive in your email inbox. You need to follow that link and download your data. The data will be available in the format you have selected in the above method.

If you have requested JSON format, you will need a JSON editor to read the file. If you have selected the HTML, you can open the file directly on your web browser.

1. After opening the file, you need to open the messages.json file.

2. The file will show all your conversations in numbers like #146, #147, etc. Each of the numbers will have participants and conversation information.

3. You must tap the conversation number and select ‘conversations‘. You will be able to see all messages.

4. If you are opening the HTML file, head to the messages > inbox > ‘named folder’. Next, tap on the chats.html file.

Currently, there’s no way to recover these messages on Instagram chats. You can only read it from the HTML/JSON editor.

Also, it’s important to note that the messages won’t have the ones you’ve unsent from the chat. Right now, there’s no way to recover unsent messages on Instagram.

How to Recover Deleted Instagram Photos & Videos

How to Recover Deleted Instagram Photos & Videos

If you don’t know how to access the Recently Deleted folder on Instagram, we have shared a detailed guide for recovering deleted Instagram Photos & Videos.

You can use the Instagram mobile app to recover deleted photos & videos. The post will be recovered back to your Instagram account.

So, this guide is about recovering deleted messages on Instagram. The steps are quite easy, but it’s recommended to use a desktop web browser. The steps may not work on the mobile app of Instagram.

If you need more help recovering deleted Instagram messages, let us know in the comments. Also, if the article helped you, make sure to share it with your friends as well.

The post How to Recover Deleted Instagram Messages appeared first on TechViral.


from TechViral https://ift.tt/yI8pNna

Twitter in data-protection probe after '400 million' user details up for sale

Politicians and celebrities are said to be affected but the scale of the data breach is unverified.

from BBC News - Technology https://ift.tt/IQagzXl

Wednesday, December 28, 2022

Ukraine was ‘sea change' for spies – GCHQ head

Sir Jeremy Fleming interviews head of US intelligence agency as guest editor of Radio 4's Today programme.

from BBC News - Technology https://ift.tt/sn7YtOC

How to Fix Facebook Content Is Not Available Error (6 Methods)

Fix Facebook Content Is Not Available Error

Facebook is a great social networking site that allows you many interesting and useful features. One of the key features of Facebook is its ability to post content. For example, you can share text, images, videos, GIFs, etc., on your profile.

Once shared, your friends and followers can see your content. If a post is set to public, not only your friends and followers, everyone with a Facebook account can see it.

While Facebook is unique in its ways, it has a few flaws. For example, while viewing posts on Facebook, you may sometimes see an error message. Here is a few error screen that you may see on Facebook Posts.

  • Sorry, this content isn’t available right now.
  • Sorry, this page isn’t available.
  • This content isn’t available right now.

These are three common Facebook error messages that you may encounter while viewing certain posts.

Fix Facebook Content isn’t available

If you encounter one of the three error messages we’ve listed, you can’t fix it. Actually, there’s no fix for the above errors as they appear due to a reason. ‘This Content Isn’t available’ on Facebook isn’t actually an error; it appears when the post you’re trying to view has been removed.

Below, we have listed a few reasons why Facebook Content Is Not Available error message appears and how you can fix it. Let’s get started.

1. The Content is no longer available

If a specific Facebook post is showing a ‘This Content Isn’t Available’ error message, chances are that the poster has deleted the content.

Even if the original poster doesn’t delete the content, the content may have violated the terms & conditions of Facebook and hence had been removed.

Facebook is strict when it comes to reviewing reported posts. If a post has been reported, it checks whether it violates the community guidelines. If Facebook finds the post violating the guidelines, it will take down within a few minutes or hours.

There are a few things that aren’t allowed on Facebook. Here’s the list of things:

  • Nudity or other sexually suggestive content
  • Hate speech, credible threats, or direct attacks on an individual or group
  • Content that contains self-harm or excessive violence
  • Fake or impostor profiles
  • Spam

2. The Privacy Settings of the Content have been Changed

The Privacy Settings

The ‘Sorry, this page isn’t available’ page on Facebook usually appears when the link you are trying to view is removed or has changed the privacy settings.

Certain pages on Facebook shares posts with a few privacy settings. For example, a post might be available for a certain community, region, age group, etc.

If you don’t fall into the set categories, you may see the content isn’t available error on Facebook. You may also see other messages while viewing content with manual privacy settings.

3. The Facebook Profile has been Deleted

Well, this is not uncommon. If you can’t view a post, the poster has deleted their Facebook profile.

If you have the post link but are getting the ‘Sorry, this page isn’t available’ error, chances are the profile that shared it has been deleted or deactivated. You can confirm it by opening the profile URL on a new tab page.

If the profile page also shows an error message, it’s deleted or deactivated. You can only view the post once the profile gets restored.

4. You have been blocked

One of the most prominent reasons the ‘Facebook Content is Not Available’ error appears is when the poster has blocked you.

You can only do a little if you have been blocked and there’s no way to view the content. However, before making any conclusion, you should check whether you have been blocked or the poster has deactivated/deleted the account.

In both cases, you will get the same error message. You can ask your friends whether they can see the poster’s profile. If the profile is visible to them, but you’re unable to find it on Facebook, you’ve been blocked.

5. You Blocked the User

You Blocked the User

Just like getting blocked, you can’t see the posts of the person you’ve blocked from your account. If you have blocked the poster and trying to see their post, you will encounter an error message.

Facebook shows the same error when trying to view posts of the person who has blocked you or you have blocked. So, check the Facebook Block list and unblock the person. Once unblocked, you can view the post.

6. Check if Servers of Facebook is Down

Facebook is experiencing a technical problem

If the person has not blocked you and the post doesn’t violate the terms and conditions of Facebook, but you are still getting the ‘Sorry, this page isn’t available’ error message; chances are that Facebook is facing a downtime.

If the Facebook servers are down, you won’t be able to use most of the platform’s features. This includes failing to view Facebook posts.

At times, Facebook may even log you out and ask you to sign in again. If this happens, you should check Facebook’s Server Status at Downdetector.

If Facebook is down worldwide, you must wait for a few hours until the servers are restored. Once the servers are restored, you can view the posts again.

Also Read: 20 Best Facebook Tips & Tricks

So, these are some of the most prominent reasons why Facebook shows content not available error messages. Please let us know in the comments if you need more help. Also, if the article helped you, make sure to share it with your friends as well.

The post How to Fix Facebook Content Is Not Available Error (6 Methods) appeared first on TechViral.


from TechViral https://ift.tt/4jTO5Nx

Royal Mail hit by post-Christmas online outage

Problems emerge on the website and app on the first day of regular post following the festive period.

from BBC News - Technology https://ift.tt/ZudTKs0

TikTok: Welsh speakers use social media to teach others

Meet the social media influencers sharing their love of the Welsh language to new audiences.

from BBC News - Technology https://ift.tt/L2RVk0C

Apple and Tesla: Tech shares tumble amid supply issues

Both companies have suffered major losses over concerns about supply chain hiccups in China.

from BBC News - Technology https://ift.tt/elbWDjH

Fix Steam Unable to Verify the Email Address (5 Best Ways)

Fix Steam Unable to Verify the Email Address

Most online services you use today ask you to verify your identity by entering your email address. After entering the email address, the service/app sends you an email with the verification code.

Email verification is now very popular, and Steam also uses this verification method. Verifying your email address with Steam improves the security of your Steam account. Once you verify your email address, Steam will require access to your email account to change the account credential.

In this way, the email verification process in Steam eliminates hacking attempts. However, the problem is that many users can’t verify email addresses on Steam. So, if Steam is unable to verify your account, don’t panic! You have a solution.

In this article, we will share a few useful tips that will let you fix Steam Unable to verify email address. Let’s get started.

How to Verify Email Address on Steam?

If the verification email for your Steam account is not reaching your email inbox, you need to check whether you are following the right way to verify your email. Ensure you follow these steps to verify email address on Steam.

  • Right-click on the Steam icon on your system tray and select Settings.
  • On the Steam Settings, switch to the Account tab on the left.
  • On the right side, click on the Verify Email address button.
  • Now enter your email address and follow the on-screen instructions.
  • You will receive an email message from Steam Support. Open that email and click on the unique link provided.

That’s it! This will verify your email address on Steam.

Fix Steam Unable to Verify the Email Address

If you’re verifying your email address on Steam by following the steps we have shared above, you will be able to verify your email address without any issues. However, if the email message from Steam support is not reaching your inbox, follow these tips.

1. Make Sure the Email Address is correct

Before following anything else, ensure that the email you entered on Steam is correct. By correct, we mean the spelling mistake.

If you have made a spelling mistake while typing your email address on Steam, you won’t receive any verification email.

Also, make sure you are checking the correct email account. So, before following the next methods, ensure these things.

2. Check the Spam Folder of your Email Inbox

Check the Spam Folder of your Email Inbox

Be it Yahoo, Gmail, or any other email provider; you must keep checking the Spam folder while waiting for the verification email to arrive.

The most popular email service, Gmail, sometimes identifies emails from Steam as spam, moving them to the Spam folder.

If the email verification message is taking longer than usual to arrive, chances are that it has already arrived and resided in the Spam folder.

3. Check If Steam’s servers are down

Check If Steam's servers are down

If the servers of Steam are down, no matter how many times you attempt to verify your email, all will go in vain. When you try to verify an email, the email verification is sent to the Steam Server.

After sending the request to the server, Steam creates a verification email for you and sends it to your email address. So, when Steam’s servers are down for maintenance, Steam will fail to create a verification email.

Similarly, your mail provider’s servers are equally important. So, ensure that Steam’s and email provider’s servers are up and running.

4. User a different email address for verification

User a different email address for verification

If nothing helps, you can sign up with another email address. You have hundreds of free email address providers on the web.

You can easily create a new email address and use it to create a Steam account. Creating a new steam account is easy; you can create it from Steam’s web version or desktop client.

5. Use Steam Support

Use Steam Support

Steam has an excellent support group that can help you review purchases and account status and gets personalized help. If Steam can’t verify your email address, you must raise a problem in the Steam forum.

You can also participate in the Steam Community and connect with people who have dealt with the same problem.

Also read: How to Share Steam Games through Steam Family Sharing

So, these are the few best methods to fix Steam unable to verify the email address. If you need more help resolving can’t verify email in Steam, let us know in the comments below. Also, if the article helped you, share it with your friends as well.

The post Fix Steam Unable to Verify the Email Address (5 Best Ways) appeared first on TechViral.


from TechViral https://ift.tt/uGc3Mqv