Apple has warned shipments of the iPhone 14 would be delayed due to Covid-19 restrictions.
from BBC News - Technology https://ift.tt/xDI4wk7
Wednesday, November 30, 2022
Ex-FTX boss Bankman-Fried: 'I didn't try to commit fraud'
In a wide-ranging interview with The New York Times, the former FTX chief says he has almost no money left.
from BBC News - Technology https://ift.tt/GfJmVh1
from BBC News - Technology https://ift.tt/GfJmVh1
Google Pixel 7a’s Leaked Render Unveiled Its First Look
Google Pixel 7a is still distant from its launch, but its new leaks have clarified exactly what it would look like and whether it will have design changes compared to the Pixel 6a.
In terms of leaks, we got new high-quality renders of this smartphone with some of the details regarding its dimensions from a trustworthy source.
All Details About Google Pixel 7a
![]()
These high-quality renders are revealed by the well popular leaker, On Leaks, who have such a great description score of providing accurate leaks that can be found as valid in the future.
According to the renders, the Google Pixel 7a’s design will be the same as the first model of this lineup, which usually appears with an A-series smartphone from Google.
It has the same camera bump of shiny metal as the Google Pixel 7, with two cameras setup which could retain Sony’s IMX787 and IMX712 sensors, according to a leak.
Besides, the render only shows a single color option for the smartphone, but it is expected to arrive in two more color options which could be Lime, Grey, or Black.
I only found one difference between it and Pixel 7, which is the bezels. As you can see in the above image, the bezel from the bottom is broader, which means making it more affordable than the Pixel 7.
However, there will be more differences in terms of its specification, which are currently unspecified, and this smartphone will also have some additional features too, such as having a better refresh rate than before.
Availability
Google Pixel 7a’s launch is highly expected to take place in Q2 2023 based on previous launches of this series of smartphones which Google made possible in its well-known event, Google I/O.
This means 6 months countdown is in the way of its launch as Google I/O 2023 intends to take place in early May.
The post Google Pixel 7a’s Leaked Render Unveiled Its First Look appeared first on TechViral.
from TechViral https://ift.tt/E8gVyxZ
Tuesday, November 29, 2022
How to Fix the “SIM Not Provisioned MM 2” Error (8 Methods)
Just bought a new smartphone? But, unable to make calls or use the internet due to an unknown SIM card error? If this happens to you, you have landed on the right page.
While using a new SIM on your smartphone, you may get an error that reads ‘SIM not provisioned MM2’ error. If you are getting the same error, let me tell you that it could be easily fixed.
However, before going through the fixes for the ‘SIM Not Provisioned MM2’ error, first, know what the error means and the actual problem.
What Does ‘SIM Not Provisioned MM2’ Mean?
Well, the ‘SIM Not Provisioned MM2’ is a common error, especially amongst those who buy a new smartphone or a SIM card.
When you insert a SIM card into your phone, the SIM enables your phone to be identified as yours on the mobile network. Only after the identification you can make & receive calls, send SMS, and connect to the mobile internet.
However, if you are getting a ‘SIM Not Provisioned’ error message after inserting your new SIM card on your smartphone, it means the SIM can’t share information between your smartphone and your cellular network provider.
Why does the ‘SIM Not Provisioned MM2’ error appear?
Well, there is not one by multiple reasons that trigger the ‘SIM Not Provisioned MM2’ error message. Below, we have shared some common reasons that lead to SIM Not Provisioned error messages.
- You have just purchased a new SIM card.
- While transferring your contacts into the new SIM.
- Your telecom operator’s servers are unavailable.
- Your new SIM card still needs to be fully activated.
- SIM Card needs to be properly connected.
These are some prominent reasons that lead to the ‘SIM Not Provisioned MM2’ error message on a new smartphone.
How to fix the ‘SIM Not Provisioned MM2’ error message?
1. Restart Your Smartphone
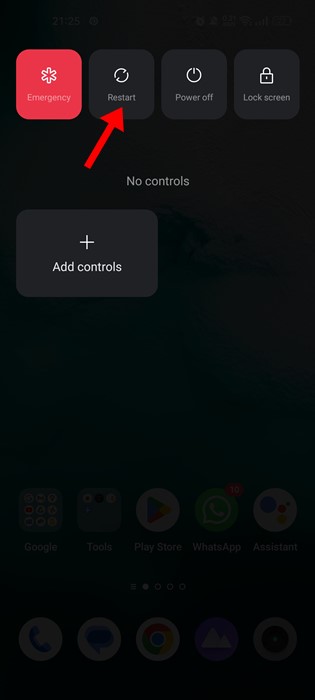
Even if your phone has installed all necessary APN settings for your new SIM card, you still need to restart to activate those settings.
After inserting a new SIM card, make sure to install all settings that were sent to your phone via flash messages. Once done, restart your smartphone.
After the restart, try to make a call or connect to the internet; you won’t see the ‘SIM Not Provisioned MM2’ error anymore.
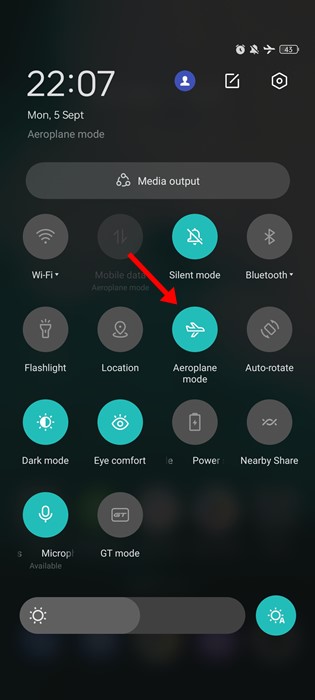
2. Toggle On/Off Airplane Mode
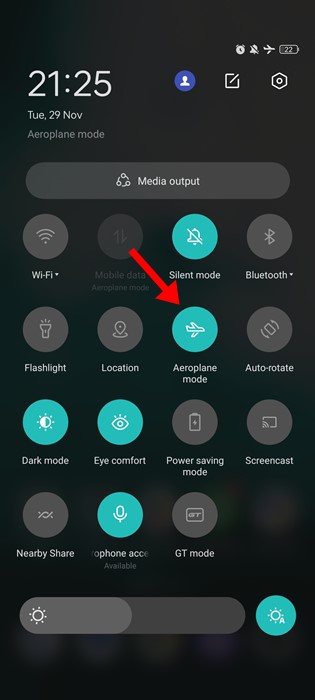
Enabling Airplane mode disables all cellular network connections. This means you won’t be able to use the internet, make & receive calls, send/receive SMS, etc.
You can try enabling and disabling the Airplane mode to resolve the ‘SIM Not Provisioned MM2’ error message. Doing so will re-establish a fresh connection and rule out any network error that might trigger the SIM not Provisioned error.
To enable Airplane mode, you need to pull down the Notification shutter and tap on the ‘Airplane mode’ or ‘Flight Mode’. Once enabled, wait for a few seconds and disable Airplane Mode.
3. Update the Carrier Services
If you are using an Android smartphone, your phone has the Carrier Services app that connects your phone and mobile networks.
An outdated Carrier services app sometimes leads to the ‘SIM Not Provisioned MM2’ error. Also, if you are getting the SIM Not Provisioned error without swapping your SIM, chances are there’s a problem with the Carrier Services. Hence, you need to update the Google App.
1. Open the Google Play Store and tap on your profile picture.
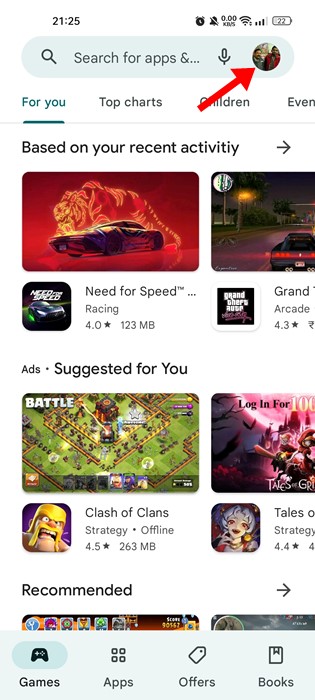
2. From the list of options that appears, select ‘Manage apps and devces’
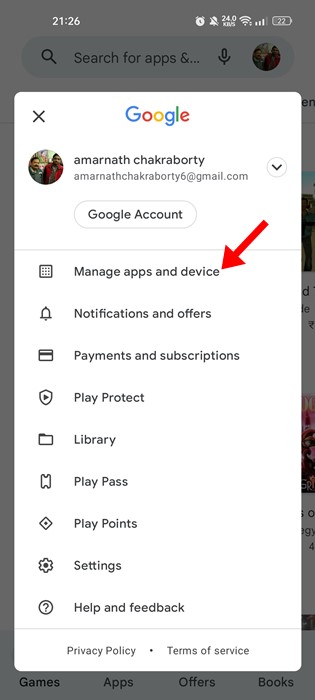
3. Now select the Updates Available section.
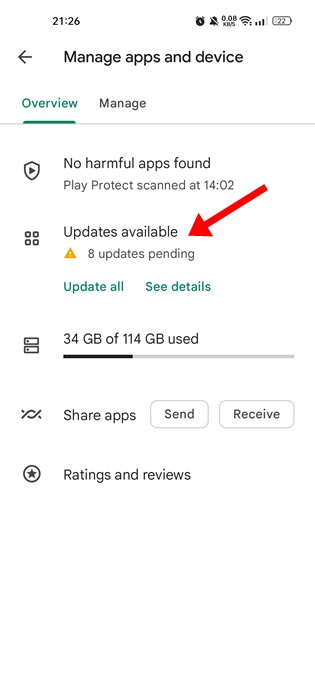
4. Now, find the Carrier Services app and install the update.
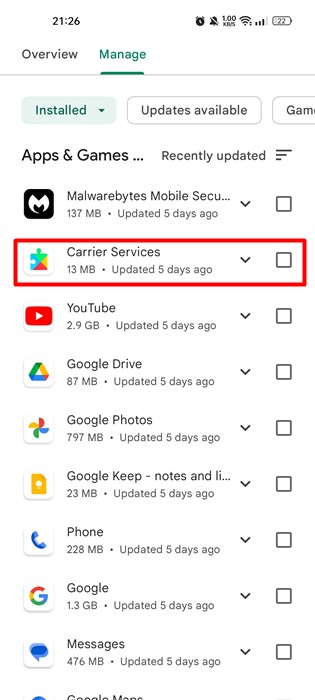
That’s it! This is how you can update the Carrier Services app on your Android. If no update is available, your SIM has some other problems.
4. Make sure your SIM Card is Activated
In many countries, SIM cards need less than 24 hours for activation. However, in some regions, it may take a few days.
So, if you have just purchased a new SIM card and inserted it into your phone, you need to wait until your SIM gets fully activated.
Until and unless the telecom operator activates your SIM card, you will get a ‘SIM Not Provisioned MM2’ error while making calls or sending SMS. You can contact your Carrier or Network Provider from any other number to enquire about the activation status.
5. Make sure the SIM card is properly inserted
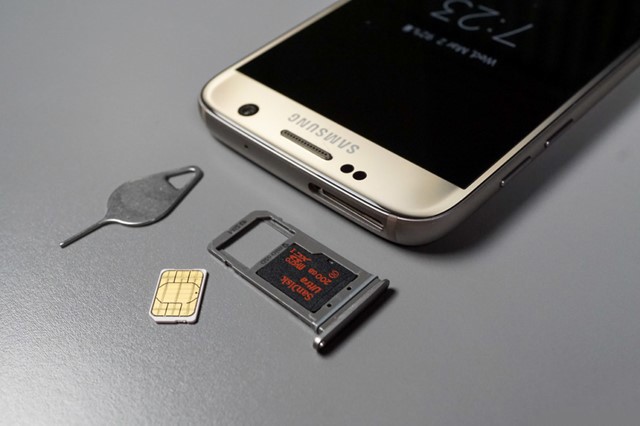
If your SIM card is activated and ready to make calls, you still get the ‘SIM Not Provisioned MM2’ error message; then you need to check if the SIM is correctly seated on your Phone.
You must check for physical damage even if your SIM card is correctly seated. The problem may reside even on your SIM Card Slot.
You can switch off your smartphone and eject the SIM card. After ejecting it, insert it again and turn on your smartphone. After the restart, wait for the cellular network to appear and then try to make calls.
6. Insert SIM Card in a different slot
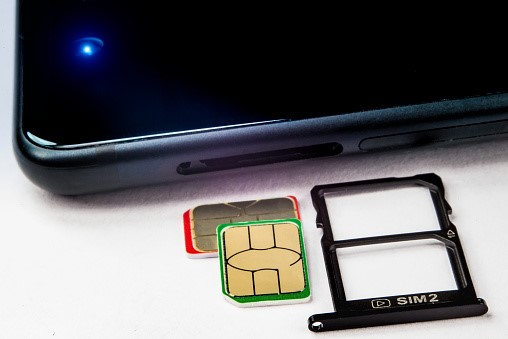
If you have a dual SIM smartphone, you can insert your new SIM card in a different slot. If the other slot is already occupied, then swap the SIM cards.
Trying another slot will help you rule out problems related to the SIM card slot on your smartphone. If the SIM Card slot has the problem, you will get the same ‘SIM Not Provisioned MM2’ or any other network error even on your active SIM card.
7. Contact or Reach out to your Network Provider
‘SIM Not Provisioned MM2’ is usually an error that has to do with the SIM Card. In rare cases, it has to do with your smartphone.
So, if you have tried your best to fix the problem, but nothing worked for you, then it’s time to contact or reach your Network Provider.
You can take your SIM card to your Network provider or contact them with any other number and explain the problem. Tell them the things you have tried to resolve the ‘SIM Not Provisioned MM2’ error.
They will help you to resolve the issue. If it’s a network-related problem, it will be fixed within a few days.
8. Get a new SIM Card
If your Network provider fails to resolve the issue or the error message frequently appears on your phone, it’s time to get a new SIM Card.
You can get a new SIM Card for your old phone number through MNP. However, this is the least recommended method, and you should request a new SIM card if the problem still needs to be fixed, even after raising a complaint to your Network Provider.
Also Read: How To Fix ‘SIM not provisioned MM2’ Error Message
We have shared all possible ways to resolve the SIM Not Provisioned error message. So, these are some simple steps to fix the ‘SIM Not Provisioned MM2’ error message on a smartphone. If you need more help resolving the ‘SIM Not Provisioned MM2’ error, let us know in the comments below.
The post How to Fix the “SIM Not Provisioned MM 2” Error (8 Methods) appeared first on TechViral.
from TechViral https://ift.tt/ukz8EBR
Twitter ends Covid-misinformation policy, under Musk
The Twitter website says it stopped enforcing its misleading information policy on 23 November.
from BBC News - Technology https://ift.tt/cEVAXhL
from BBC News - Technology https://ift.tt/cEVAXhL
WhatsApp’s New Feature Will Let You Chat With ‘Yourself’
WhatsApp has rolled out a new feature, ‘Message Yourself,’ for everyone with a stable update, and with this feature, users can message themself on the same account.
While the company made this announcement official on Monday, though it will be rolled out gradually, so there are still many users who don’t get it, so here’s how you can get it.
WhatsApp’s Message Yourself Feature: All Details
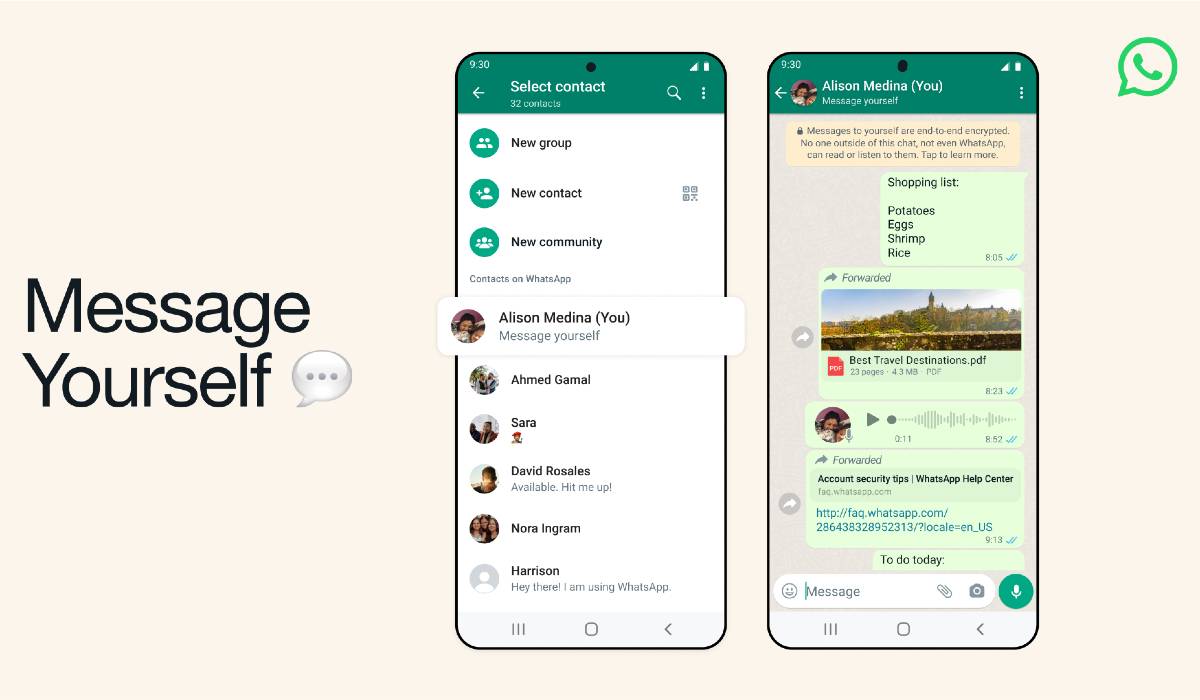
WhatsApp has been testing this Message Yourself feature for the past 4 months, and in October, the company released this feature in the Android 2.22.24.2 beta version for testing and feedback.
And now, it is available for all users of its Android and iOS app. This feature can be compared with Telegram’s ‘Saved Messages’, which is being used for the same type of work but less than WhatsApp’s.
As you can send important notes, web links, documents, and voice notes to yourself with this feature so that they can stay in the chat history.
Also, it can be used as a tool for positivity by doing self-talk or sending some gratitude to yourself in the moderation chat method.
To use this feature, go to New Chat, which presents at the bottom right of the main screen, and then find yourself with the tag of ‘You’ and start chatting.
If you still aren’t able to find this feature in your app, so you’re not the only, even; many other users didn’t get it because whenever Meta’s WhatsApp app gets a new feature, so it is distributed slowly to all users.
And here are some simple ways you can get this feature, but there’s no surety if you don’t get it, so you have to wait for it.
- iOS users: Check the app’s update on App Store by searching for it.
- Uninstall it and try to install it from Play Store’s web version or from a different secure app store.
- Download the latest version of the app from the official site with this link and install it.
The post WhatsApp’s New Feature Will Let You Chat With ‘Yourself’ appeared first on TechViral.
from TechViral https://ift.tt/YKL6EZp
Monday, November 28, 2022
Crypto firm BlockFi files for bankruptcy after FTX collapse
The collapse of FTX had already forced BlockFi to suspend most activity on its platform.
from BBC News - Technology https://ift.tt/9tnidp3
from BBC News - Technology https://ift.tt/9tnidp3
Government denies weakening Online Safety Bill
New law will not require removal of "legal but harmful" content, which critics said risked free speech.
from BBC News - Technology https://ift.tt/NlaR7m3
from BBC News - Technology https://ift.tt/NlaR7m3
Facebook: Meta fined €265m by Irish Data Protection Commission
Phone numbers and email addresses of up to 533m users appeared on an online hacking forum.
from BBC News - Technology https://ift.tt/OocWGxT
from BBC News - Technology https://ift.tt/OocWGxT
Musk feuds with Apple over Twitter advertising
Elon Musk has tweeted that Apple has largely stopped advertising on his platform.
from BBC News - Technology https://ift.tt/Xunh5vD
from BBC News - Technology https://ift.tt/Xunh5vD
Meta fined €265m by Irish data watchdog over breach
The Irish Data Protection Commission says its inquiry has found Meta breached GDPR rules.
from BBC News - Technology https://ift.tt/YvNC5lP
from BBC News - Technology https://ift.tt/YvNC5lP
YouTube TV Remote: How to Control YouTube TV from Phone
YouTube is probably the biggest and best video streaming site in the world. It has endless hours of video content which you can watch for free. Not only that, but the site even allows you to go live and connect to your subscribers.
Google backs YouTube, and it comes built-in on Android smartphones. It doesn’t come built-in on iPhone, but you can install it from the Apple App Store. Apart from the video content, YouTube is also known for its availability.
You will find YouTube apps for Android, iOS, Streaming Devices, etc. On desktop computers and laptops, you need to use the web version of YouTube to watch videos for free.
YouTube TV Remote: How to Control YouTube TV from Phone
In this article, we will discuss the YouTube TV Remote and how to use your Android smartphone as a YouTube TV Remote. Let’s check out.
What is YouTube TV Remote?
YouTube TV Remote is a functionality of turning your smartphone into a remote for your YouTube app running on smart TVs.
If you use the YouTube TV app on your smart television or any streaming device, you can use the mobile app of YouTube to control the site’s features.
Since most users keep their Android smartphone with them while watching Smart TV, having a feature like YouTube TV Remote could be a time savior.
You can turn your Android device into a remote and control the YouTube app running on your Smart TV or streaming devices.
How to Control YouTube on your TV from your Phone?
If you have an Android TV or any Smart TV with the YouTube app, you can use your Android or iOS devices to control it.
With your Android or iOS smartphone, you will be able to control the video playback of your YouTube TV App. If you are interested in using your Android or iOS device as a remote for the YouTube TV app, continue reading the guide.
Note: We have used the Android version of the YouTube app to demonstrate the process. You need to implement the same steps on the YouTube app for iOS as well.
1. First of all, open your SmartTV or Android TV. Next, open the YouTube TV app.
2. Make sure your SmartTV and Android/iOS devices are connected to the same WiFi network.
3. Open the YouTube app on your mobile and tap the screencast button.
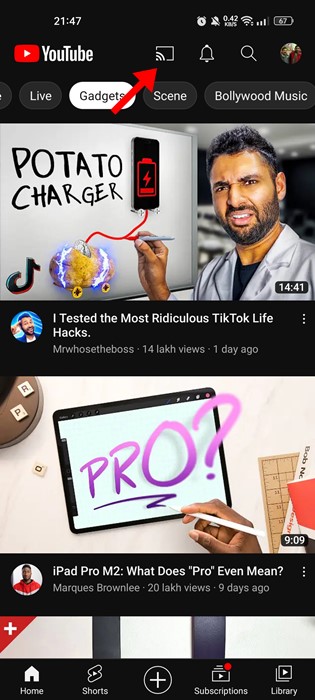
4. Now, on the Cast to prompt, tap on the Link with TV Code option.
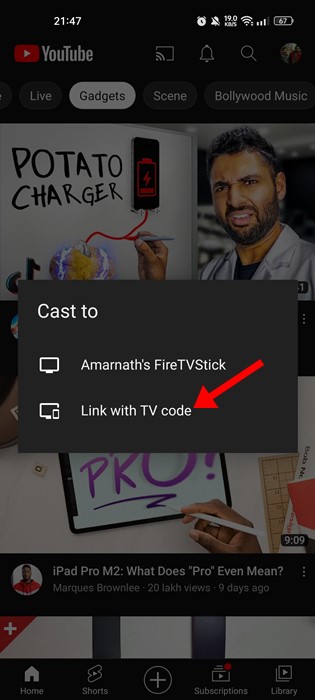
5. Now, on the YouTube TV app (on your television). Now navigate to Settings > Link with TV Code. Once done, you will see a code on your Television screen.
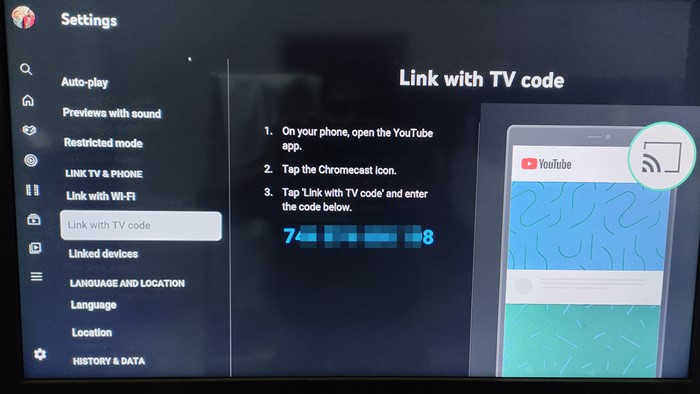
6. You need to enter the code on the YouTube mobile app to link your TV.
That’s it! This will link YouTube mobile app to your SmartTV. Now you can control your YouTube TV app from your smartphone.
YouTube TV Remote, How to use it?
Once the linking part is done, you will be able to use the YouTube TV Remote. This one will cast your YouTube mobile version on your smart television. Open any YouTube video and tap on the cast icon.

Now, if you want to play any video on your YouTube on TV, you need to tap on the YouTube video on the mobile app and tap on the Play Button.
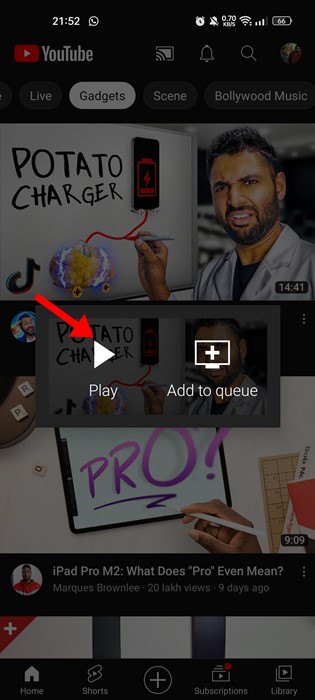
To open the YouTube TV Remote, tap on the cast button on the video player again.
On the prompt that appears next, tap on the Remote option.
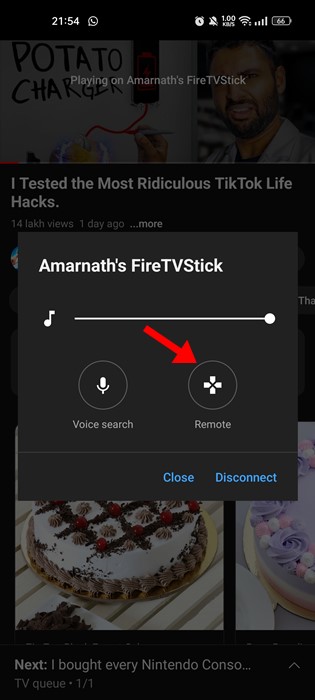
Now you will see the YouTube TV Remote on your mobile screen. You can now control your YouTube TV app from your smartphone.
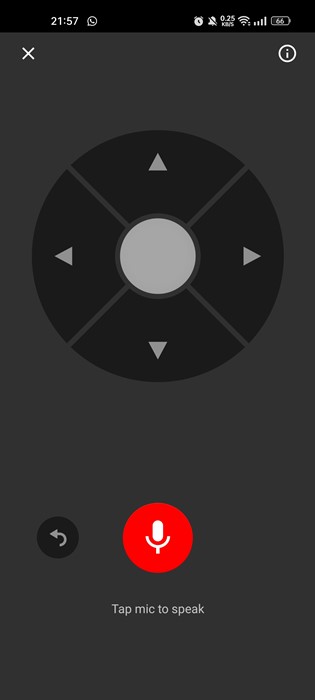
If you want to voice control your YouTube on TV, you need to tap the microphone button and speak. You also get a queue management feature that you can use.
That’s it! This is how you can turn your Android smartphone into YouTube TV Remote. The hidden Chromecast remote has been there for a while, but many users need to learn how to use it.
Also read: Free Youtube Proxy Sites
So, this guide is all about how to turn your Android into YouTube TV Remote. The method relies on Chromecast and will work on any Chromecast-supported device. With this, you can fully control YouTube on your TV from your smartphone. If you need more help with YouTube TV Remote, let us know in the comments below.
The post YouTube TV Remote: How to Control YouTube TV from Phone appeared first on TechViral.
from TechViral https://ift.tt/XqycLlv
The birth pangs of the Grand Theft Auto franchise
On its 25th anniversary, an early GTA producer reveals the trials faced by its original developers.
from BBC News - Technology https://ift.tt/EYaI341
from BBC News - Technology https://ift.tt/EYaI341
Sunday, November 27, 2022
Fix ‘Something Went Wrong, Please Try Again’ in Google Play Store
Google Play Store is Android’s default app store and the world’s biggest app store. You can download almost every type of app and game for your Android smartphone from the Google Play Store.
Even though it’s the most popular and preferred app store for Android, it still needs to be completely free of bugs. At times, Google Play Store for Android can show errors and prevent you from using the App store.
While downloading apps from the Google Play Store, users get an error message that reads ‘Something Went Wrong, Please Try Again’. If you are getting this error message, here’s what you need to do.
Why ‘Something Went Wrong, Please Try Again’ Error Appears?
The ‘Something Went Wrong, Please Try Again’ error message occurs due to various reasons. Here we have discussed a few possible reasons that trigger the error message.
- Poor or No Internet Connectivity.
- Corrupted Google Play Store’s App Data and Cache.
- You’re Signed in with multiple Google Accounts, and one of them is causing the error.
- Google Server Outage.
So, these are some of the possible causes of the ‘Something Went Wrong, Please Try Again’ error message on Google Play Store.
Fix ‘Something Went Wrong, Please Try Again’ in Google Play Store
Now that you know there could be various reasons to trigger the ‘Something Went Wrong, Please Try Again’ error, you need to follow some basic tips shared below to troubleshoot the problem. Here’s how you can fix the Google Play Store Error.
1) Check Your Internet Connection

Before trying anything else, you should check if your internet connection is working. No matter how often you try, you will receive errors if an internet connection is unavailable.
Google Play Store requires an active internet connection to serve apps and games. Hence, you must check your internet connection before following the next methods.
You can use Internet Speed test apps to check if your internet connection is working. If no internet speed test apps are available, you can open your web browser and visit the fast.com website.
2) Check If Google’s Servers are Down
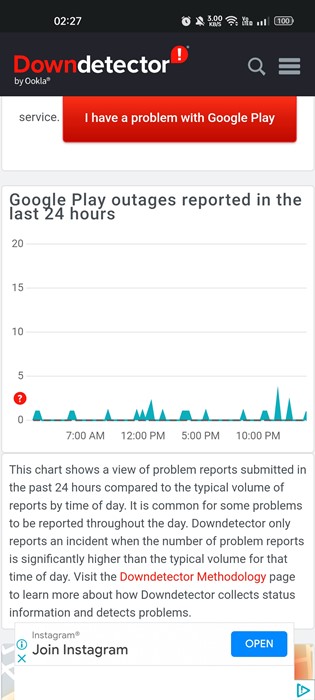
If your internet is working, but you still get the ‘Something Went Wrong, Please Try Again’ error message while accessing Google Play Store, you need to check if Google’s Servers were facing any outage.
If Google’s servers were down for maintenance, you wouldn’t be able to utilize the Google Play Store. Not only Google Play Store, but you will also face problems while using other Google Services such as YouTube, Gmail, Google Maps, etc.
To confirm it, you must check the Google Play Store’s Status Page in the Downdetector.
3) Force Stop the Google Play Store
The next thing you can do to resolve the ‘Something Went Wrong, Please Try Again’ error on Google Play Store is by force-stopping the app.
You only need to force quit and restart the app to resolve the error message. For that, long press on the Google Play Store app icon and select ‘App Info’.
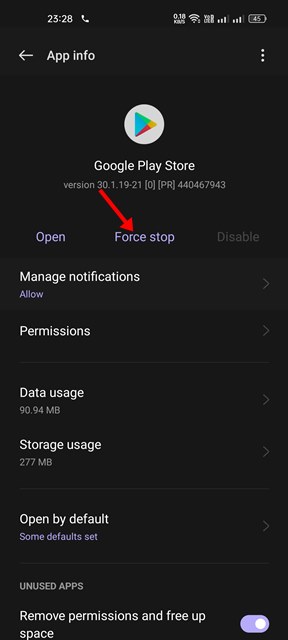
You need to tap the Force Stop button on the App Info screen. This will force stop Google Play Store on your Android device. Once done, relaunch the app.
4) Correct the Date and Time of your Smartphone
Many users have reported fixing the ‘Something Went Wrong, Please Try Again’ error by correcting the date and time. Incorrect date and time often trigger problems with the Google Play Store, and many apps would also stop working.
So, in this method, you must fix the incorrect date and time on your smartphone to resolve the ‘Something Went Wrong, Please Try Again’ error. Here’s how to do it.
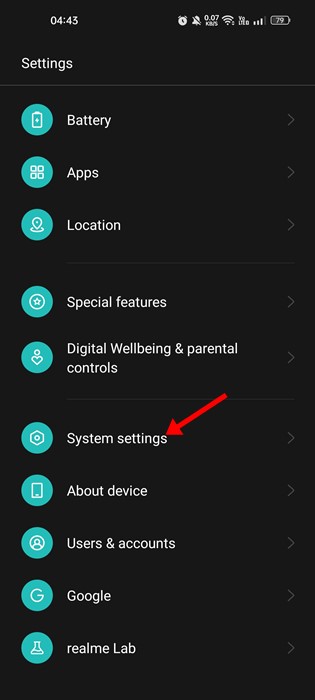
1. Open the Settings app on Android and select ‘System‘ or ‘System Settings‘.
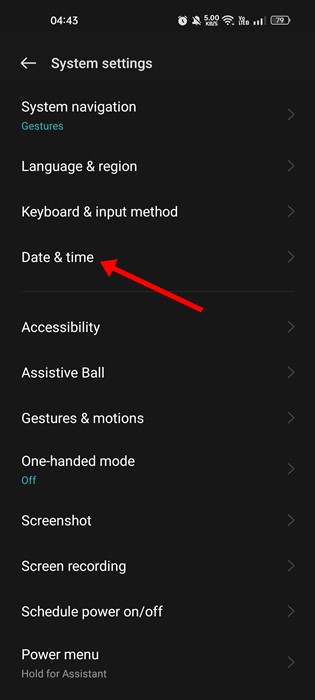
2. On the System Settings, tap on the Date & time option.
3. Next, on the Date & time, enable the option ‘Set time automatically’ and ‘Set time zone automatically’.
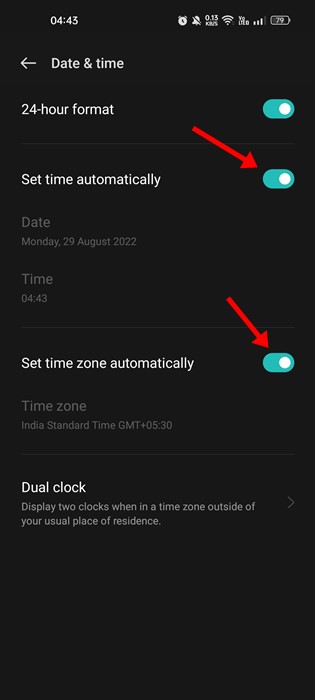
That’s it! This will correct the date and time on your Android smartphone. Once done, reopen the Google Play Store; you will no longer get the ‘Something Went Wrong, Please Try Again’ error message.
5) Toggle Flight Mode On/Off
Flight Mode or Airplane mode resets the network connection and can resolve many internet connectivity issues. So, if the ‘Something Went Wrong, Please Try Again’ error appears due to an internet issue, you need to try this method.
To toggle Airplane mode, you need to pull down the Notification shutter and tap on ‘Airplane Mode’. This would reset the Network settings and fix the Google Play Store error.
6) Clear Google Play Store & Services Cache
If you are still getting the ‘Something Went Wrong, Please Try Again’ error after following all methods, you need to clear the Google Play Store Cache. Clearing the data cache will fix many Google Play Store problems. Here’s how to Clear Google Play Store Cache.
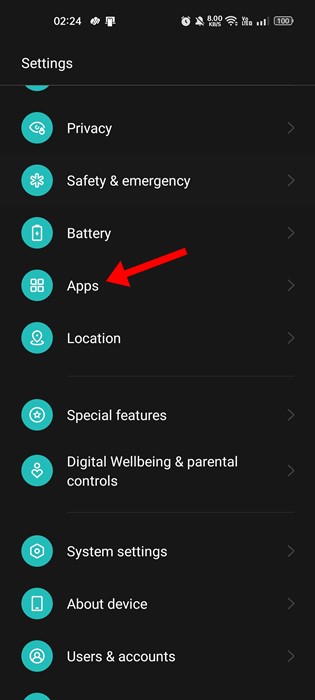
1. Open the Settings app on your Android and tap on the Apps.
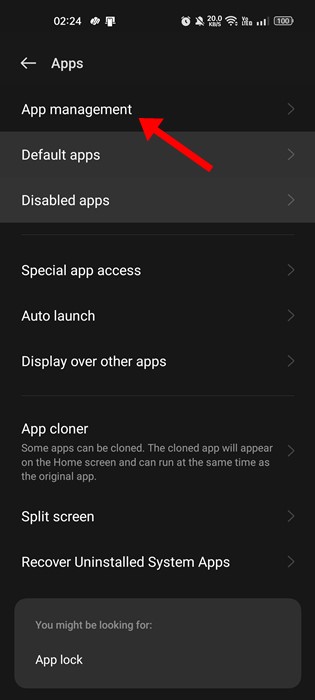
2. On the Apps page, tap on App Management.
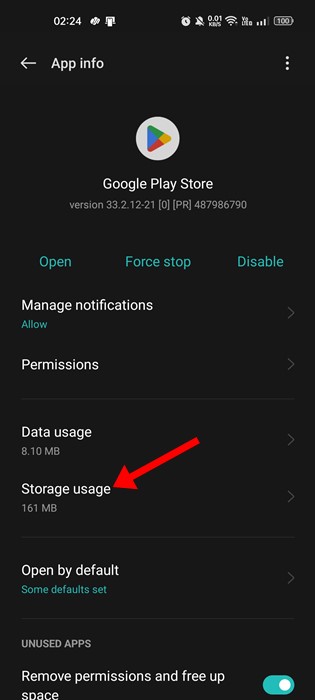
3. Now, find Google Play Store and tap on it. On the App info page, tap on Storage Usage.
4. On the next screen, tap on the Clear Cache button.
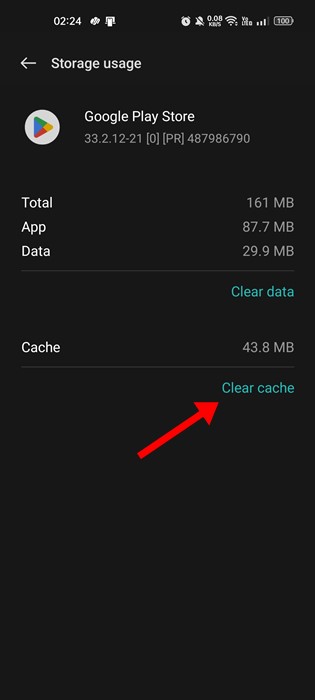
5. You must also clear the cache for Google Play Services.
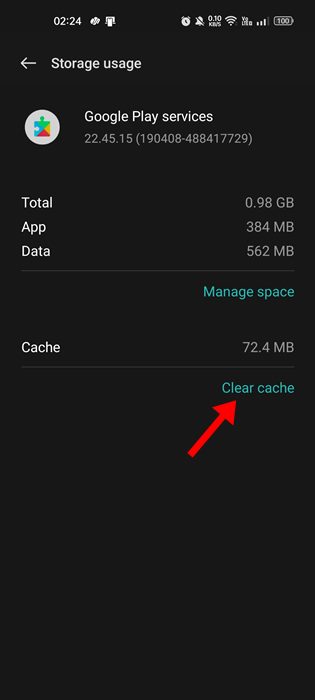
That’s it! This is how you can clear the data cache for the Google Play Store and Google Play Services.
7) Uninstall the Google Play Store Updates
Google Play Store automatically installs the updates in the background. And sometimes, uninstalling the Play Store updates can also resolve the ‘Something Went Wrong, Please Try Again’ issue.
Hence, if you are still getting the ‘Something Went Wrong, Please Try Again’, even after following all methods, you need to uninstall the Google Play Store updates.
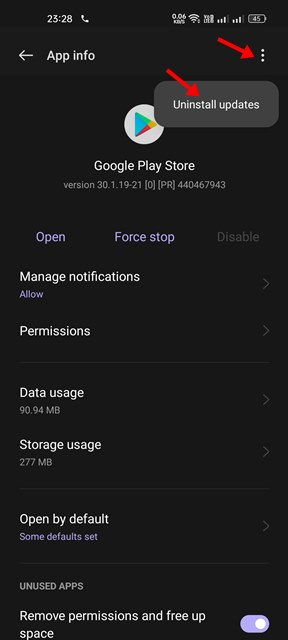
You need to open the Google Play Store App info page and tap on the three dots in the top-right corner. From the list of options that appears, select Uninstall updates.
That’s it! This will uninstall the recent Google Play Store Update. Once done, open the Google Play Store; this time, you won’t get the ‘Something Went Wrong, Please Try Again’ error message.
8) Remove Your Google Account and Sign in Again
If you have come so far, the final option is to remove the Google Account from your device and sign in again. For that, you need to follow these simple steps.
1. Open the Settings app on Android and tap ‘Passwords & accounts’. In some phones, the option may be named ‘Users & accounts’.
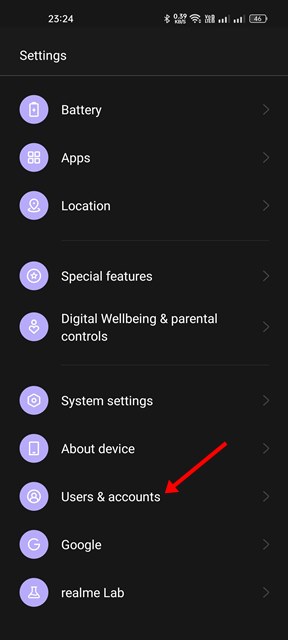
2. On the Passwords and accounts, tap on your Google Account.
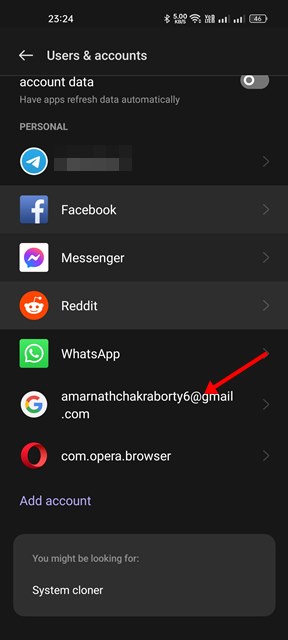
3. On the next screen, tap on three dots in the top-right corner.
4. From the list of options that appears, select ‘Remove Account‘

That’s it! This is how you can remove your Google Account from your Android smartphone. Once removed, sign in with the same account again.
Also read: How To Directly Download APK from Google Play Store on PC & Android
So, these are some of the best methods to fix ‘Something Went Wrong, Please Try Again’ on the Google Play Store. If you have followed all methods carefully, the error may be already fixed. If you need more help fixing Google Play Store errors, let us know in the comments below.
The post Fix ‘Something Went Wrong, Please Try Again’ in Google Play Store appeared first on TechViral.
from TechViral https://ift.tt/VXE5jGH
What is Killer Network Service in Windows? Fix “High CPU Usage”
If you are using Windows operating system, you may know that the operating system runs almost hundreds of processes in the background. Most processes don’t require your permission to run silently in the background.
Sometimes, your computer suffers due to improper functioning of devices or software related to the process. The tasks running in the background can hog your RAM resources, use disk space, and drain your battery life.
Recently, many Windows users reportedly faced problems due to Killer Network Service (KNS). Sometimes, the Killer Network Service raises the Disk usage; other times, it just runs in the background and consumes your memory.
What is Killer Network Service?
Like every other Microsoft service, Killer Network Service or KNS is a background service that runs silently. It’s an intel series of WIFi cards that focuses on improving the gaming experience.
If you see the Killer Network Service on your Task Manager, your laptop or PC might have an Intel Killer Wireless Series card. Intel Killer series of WiFi cards are perfect for gaming, and it does improve gaming performance.
Killer Network Service is mostly seen on gaming laptops, providing low latency while gaming over the WiFi network.
Is Killer Network Service a virus?
In simple words, NO! Killer Network Service is not a virus or malware. It’s just a background process that’s entirely legitimate and safe to run. If any Antivirus is flagging it as malware or virus, it’s a false positive warning.
However, if you are not using an Intel Killer Gaming Grade Wifi card, the Killer Network Service is still showing up in the task manager; it may be a virus or malware.
Sometimes malware disguises itself in Windows Service and tricks you into believing it’s a legitimate process. However, if you suspect, you should cross-check the process.
If Killer Network Service on Windows is using your PC’s resources for a longer period, there’s a possibility that it’s a virus or malware. Usually, the process resides on the C:\Program Files\KillerNetworking\KillerControlCenter. So, if the program is not on the same path, you should remove it as soon as possible.
How to Fix Killer Network Service High CPU Usage?
Well, there are not one but five or six different ways to fix Killer Network Service High CPU usage. You can either stop the service completely or uninstall it. Here are some of the best ways to fix Killer Network Service High CPU usage.
1) Stop Killer Network Service via Windows Services
This method will use the Windows Services app to stop the Killer Network Service. If you stop the service, the high disk or CPU usage will be fixed immediately. Here’s what you need to do.
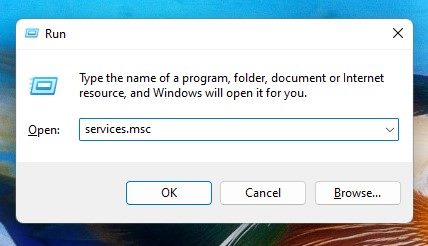
- First, press the Windows Key + R button on your keyboard.
- This will open the RUN dialog box. Type in services.msc and hit Enter.
- On the Windows Services, find the Killer Network Service.
- Double Click on the Killer Network Service. On the Service Status, select Stop.
- Once done, click the Apply button and close the Windows Services app.
That’s it! After making the above changes, restart your Windows computer. This will stop the Killer Network Service on your Windows computer.
2) Uninstall Killer Network Service Using Control Panel
If you cannot stop the Killer Network Service, uninstall it directly from the Control Panel. Here’s how you can uninstall Killer Network Service on Windows 10/11.
1. First, click on Windows Search and type Control Panel. Next, open the Control Panel app from the list.
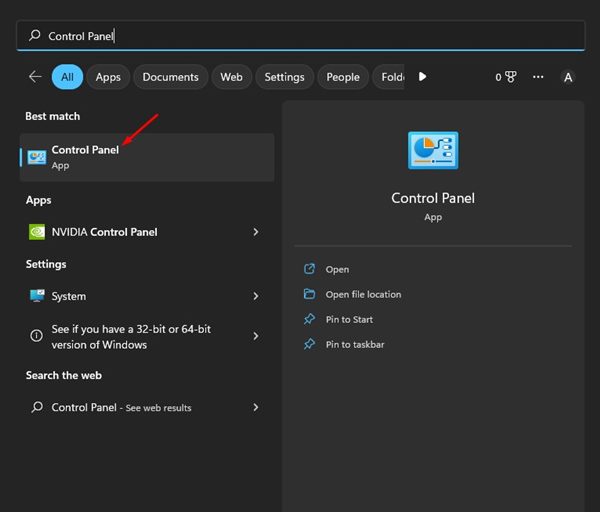
2. When the Control Panel opens, click on Programs and Features.
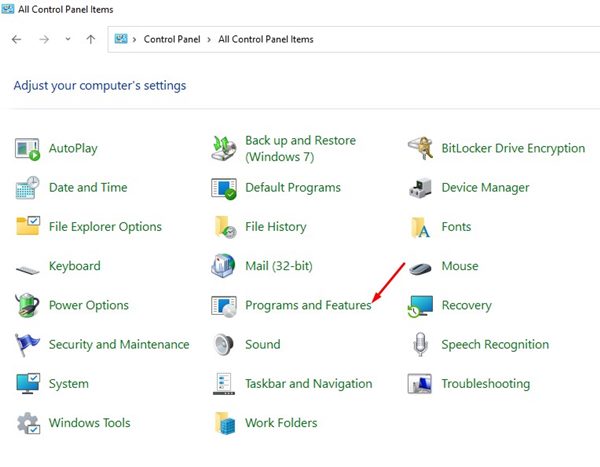
3. Now, on the Programs and Features, click on Uninstall a program.
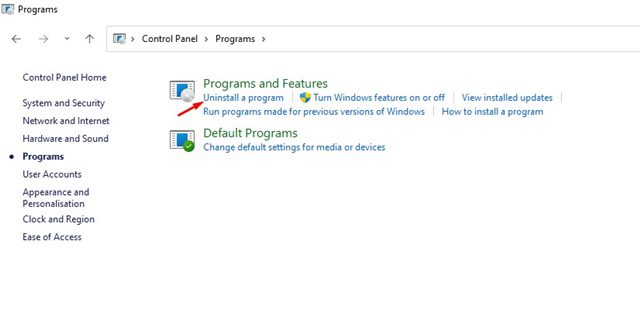
4. Now, you need to find the Killer Network Manager Suite. Right-click on it and select Uninstall.
5. You also need to uninstall the Killer Wireless Drivers from the Control Panel.
That’s it! After uninstalling both programs, the Killer Network Service won’t appear on your Windows Task Manager. This is how you can uninstall Killer Network Service from your Windows 10/11 computer.
3) Stop Killer Network Service via Resource Monitor
Resource Monitor is an advanced version of Task Manager for your Windows operating system. You can utilize it as well to stop Killer Network Service. Here’s what you need to do.
1. First, press the Windows Key + R button to open the RUN dialog Box.
2. When the RUN dialog box opens, type resmon and hit the Enter button.
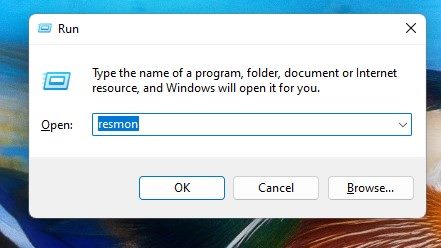
3. This will open the Resource Monitor. You need to find the Killer Network Service.
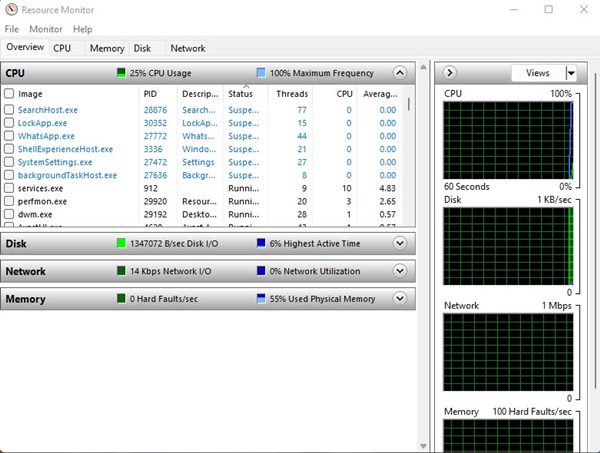
4. Right-click on the Killer Network Service and select ‘End Process’
That’s it! After making the changes, close the Resource Monitor on your computer. This is how you can stop Killer Network Service on Windows using Resource Monitor.
4) Run the DISM Command
Well, the DISM command will restore the health of your operating system. This won’t stop or uninstall the Killer Network Service. If you believe that the service has already corrupted the files of your Windows, you need to follow this method.
1. Click on the Windows search and type in Command Prompt. Right-click on the Command Prompt and select ‘Run as administrator’
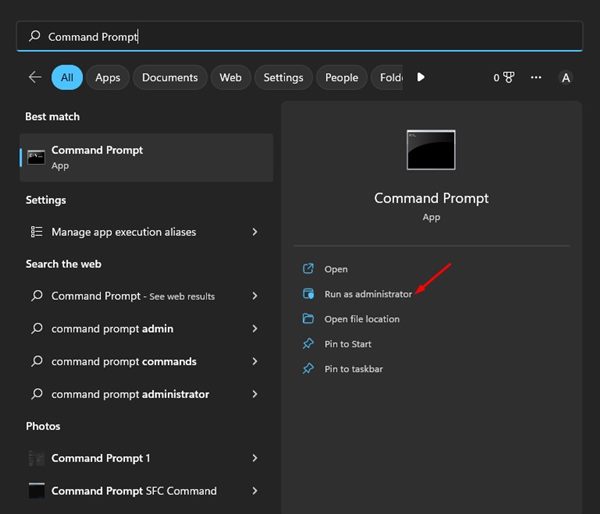
2. When the Command Prompt opens, execute the command we have shared below:
DISM.exe/online/clean-image/Restorehealth

3. This will restore the health of your operating system. You need to wait until the process completes.
That’s it! This is how you can restore the health of the Windows operating system by running the DISM command. If DISM didn’t help, you could try running the system file checker SFC command.
5) Roll back to the previous restore point
Both Windows 10 and Windows 11 provide you with an option to create a restore point. Restore points can roll back your operating system to a previous working state.
This is a part of the System Protection feature and does its job well. We have already shared a detailed guide on how to create a restore point.
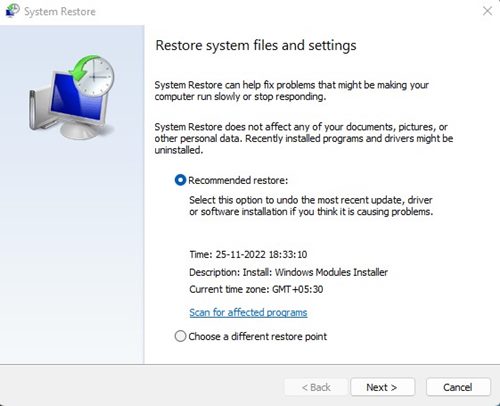
In addition, you can set up an automatic restore point in your Windows 10/11 computer/laptop.
If you already have a restore point, type Recovery on the Start Menu and follow the on-screen instructions to roll back to a previous restore point.
6) Update the Operating System
Having an up-to-date operating system becomes the key to maximizing performance. If you feel Killer Network Service is slowing down your PC, you can easily disable it.
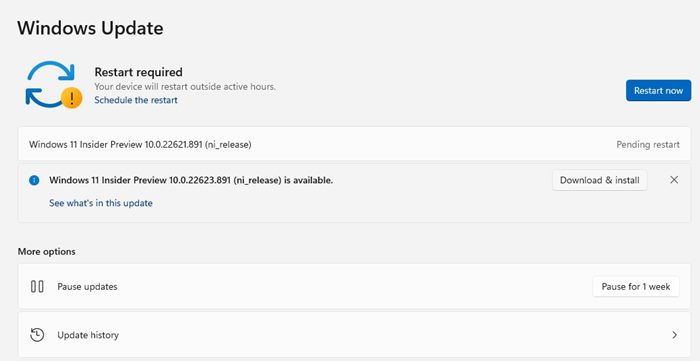
However, if you suspect that the slowdown of your system is due to a bug, then updating the operating system would help. To update Windows, head to Settings > Windows Update > Check for Update.
So, this guide is all about Killer Network Service and should you disable it. We have tried to answer all your questions related to Killer Network Service. If you need more help disabling killer Network Service on Windows, let us know in the comments below.
The post What is Killer Network Service in Windows? Fix “High CPU Usage” appeared first on TechViral.
from TechViral https://ift.tt/RbSHE7P
iPhone SE 4: Release Date, Design & Specification
iPhone series’ SE lineup only includes the handiest and less expensive phone from Apple, and now, the company is intending on its next generation, which will have a lot of changes, as spotted in leaks.
Besides, the company hasn’t made anything official yet, but we have blended almost every possible detail about this upcoming iPhone that is currently present online so let’s delve into the details below.
Apple iPhone SE 4: Everything We Know So Far
 First, let’s discuss its design which is a major component of it. According to many leaker’s reports, iPhone SE 4 is getting huge advancement in its design as it will now look more like 2018’s iPhone XR.
As we all know, iPhone SE 3’s design was inspired by the iPhone 8, and the company wants to make the next generation inspired by the next iPhone from iPhone 8, which is the iPhone XR.
Well-known leaker Jon Prosser has even released some concept render of it that notes many upgrades, such as the removal of the Home button and turning its space into a full screen with a classic notch.
With that, iPhone SE 4 and later will not support Touch ID as the button is getting removed, so it is also going to adopt Face ID entirely.
Besides, its chassis will be the same as iPhone XR, with rounded edges and curved bezels, so the volume and power buttons will comply differently than earlier.
Display
The third generation of iPhone SE had a 4.7-inch display size which was way smaller than any other iPhone, so Apple might also be considering increasing it.
Currently, there are no exact display sizes, but display chain analyst, Ross Young, highlighted that Apple would choose a 5.7-inch or 6.1-inch display.
It seems Apple may go with a 5.7-inch display size because the SE lineup means to smaller-sized iPhone, and by choosing a 6.1-inch display, the phone will become the exact same as iPhone XR.
Cameras
This iPhone’s rear camera will remain the same 12MP lens with f/1.8 apertures as the prior, but according to the rumors, we will see some upgrades to its front camera lens as Face ID will be its mainstream.
Performance

iPhone SE stays in demand because Apple always equips them with its latest powerful chip, such as iPhone 13 is powered by an A15 chip which is still in the top five powerful chips list, and it is also equipped with iPhone SE 3.
And likewise, iPhone SE 4 is going to inherit the latest A16 chip, which powers Apple’s latest iPhone 14 Pro and Pro Max, and it is the most powerful chip, which is still unbeatable and tops at first place in benchmarks.
Besides, Apple would also introduce the same A15 chip with iPhone SE 4 as currently there is no confirmation.
Also, there is the surety that the iPhone SE 4 will be 5G supported, as Apple clarified with the launch of the iPhone 14 that there all upcoming iPhones will be 5G supported.
Expected Features
The Crash detection feature will remain as balanced for this iPhone, but I hope to see a satellite connectivity feature in iPhone SE 4 as Apple has already launched it for iPhone 14 series.
And it is expected that in Q1 of next year, it will reach its advancement, and as Apple is already paying for satellite technologies so it will not be a problem for them.
Availability
Currently, there is not any official date for its launch, but iPhone SE is highly expected to arrive in March 2023, according to the earlier releases.
Still, there is no confirmation of this date; it may also face a delay of a year and arrive in 2024 due to the switch to USB C.
The post iPhone SE 4: Release Date, Design & Specification appeared first on TechViral.
from TechViral https://ift.tt/ghPFCx3
How to Remove Avast SafePrice from PC (Full Guide)
You have many antivirus software for Windows PC, such as Avast, Kaspersky, AVG, etc. Even though Windows includes a built-in security tool called Windows Defender, users still believe in third-party options.
It’s a good idea to rely on a premium or reliable third-party security program to protect your PC. And you have many choices regarding a ‘Reliable security Program’. Avast is a leading name in the security world and has various products available for security and productivity.
With the premium or free version of Avast, you also get an extension called Avast SafePrice. In this article, we will discuss the Avast SafePrice and what it does. Let’s get started.
What is Avast Safeprice?

Avast SafePrice is just a browser add-on that gets you a better deal. The free browser extension is designed to help you save money as you shop online and travel sites.
Avast SafePrice maintains its own database of trusted e-shops and displays them in the top right corner of your web browser.
So, when you visit an e-commerce website or shopping site, the Avast SafePrice extension checks for all available best offers, deals, and discount coupons.
If it finds any available coupon or offer, it lets you know. So, if you are an online shopper, you should take advantage of the Avast SafePrice Addon.
How to Download & Install Avast SafePrice Browser Extension?
Well, it’s easy to download & install the Avast SafePrice browser extension and addon. Avast SafePrice is available for all major web browsers such as Microsoft Edge, Google Chrome, Mozilla Firefox, etc.
To install & use Avast SafePrice, you must install the extension from the browser’s store. You can also download it from the official Avast Website. Here we have shared the example for the Google Chrome browser.
1. Open your Google Chrome web browser and visit the Avast SafePrice Chrome extension page.
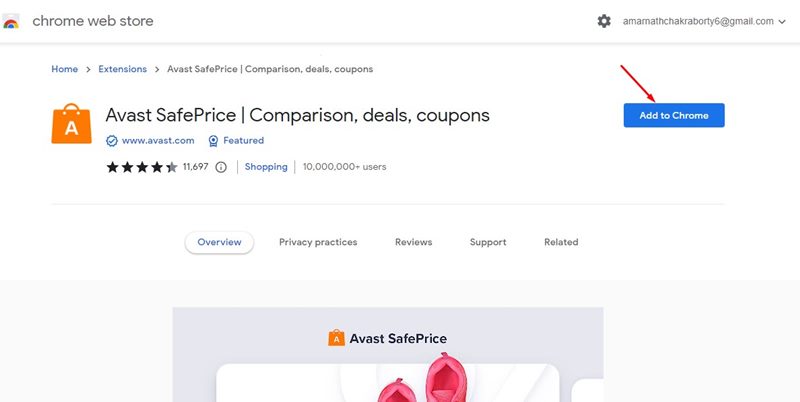
2. When the page opens, add the extension to your Chrome web browser.
3. Once added, you will find the Avast SafePrice Chrome extension icon on the toolbar.
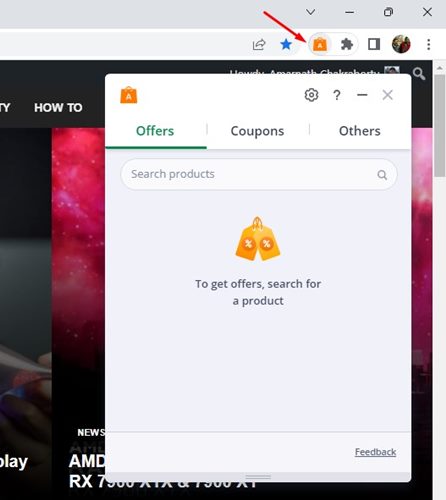
That’s it! Now, whenever you use a shopping site, the Avast SafePrice extension automatically checks for available coupons and deals.
How to use Avast SafePrice?
It’s pretty easy to use the Avast SafePrice browser extension. Once installed and enabled, the extension runs automatically in the background all the time.
It effectively scans your shopping site to find all available coupons and deals. And if it finds any, Avast SafePrice shows pop-up notifications.
If a coupon code is available for the product you are viewing on the shopping site, you will have the option to Apply a Coupon directly on the notification pop-up.
Is Avast SafePrice a Virus?

Well, if the Avast SafePrice extension suddenly appears in your web browser, even when you haven’t installed it, chances are that you have installed Avast Antivirus on your computer.
Avast SafePrice is also available as a component in Avast Antivirus. So, if you have just installed Avast Antivirus on your device, you will see the Avast SafePrice extension.
However, Avast SafePrice comes bundled with Avast Antivirus only in a few Windows build. For example, the Avast Antivirus installation file for Windows 11 doesn’t include the SafePrice extension.
Hence, if you install Avast Antivirus on Windows 11, you won’t see the Avast SafePrice extension. In that case, you need to install it on your web browser manually.
Now, as far as the question is concerned, ‘Is Avast SafePrice virus?’. No, it’s not. It’s a part of a security suite. Hence it’s not a virus or malware. You can use it without worrying about any privacy or security issue.
Does Avast SafePrice Collect My Data?
This is one of the most important questions you should ask yourself before questioning anything. Avast SafePrice is meant to find the best prices and coupons from the database of trusted e-shops.
To display the offers, it first collects anonymous data about the pages and products you have visited before. Avast, on its official site, does mention that the data Avast SafePrice collects is not connected to your personal data.
How to Remove Avast SafePrice
It’s easy to Remove the Avast SafePrice extension. There are multiple ways to remove Avast SafePrice from a computer. Here are some of them.
Remove Avast SafePrice from browser
Since Avast SafePrice is installed as an extension or add-on in your web browser, you need to visit the extension manager page of your browser and uninstall the extension. Here we have shared the example for removing Avast SafePrice on Chrome.
1. To remove Avast SafePrice, click on the three dots on your Chrome and select More Tools > Extensions.
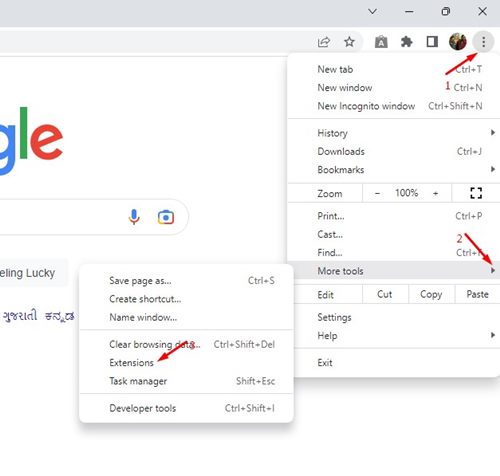
2. This will open the Extension page on your computer.
3. To remove the Avast SafePrice extension, click on the Remove button underneath the extension name.
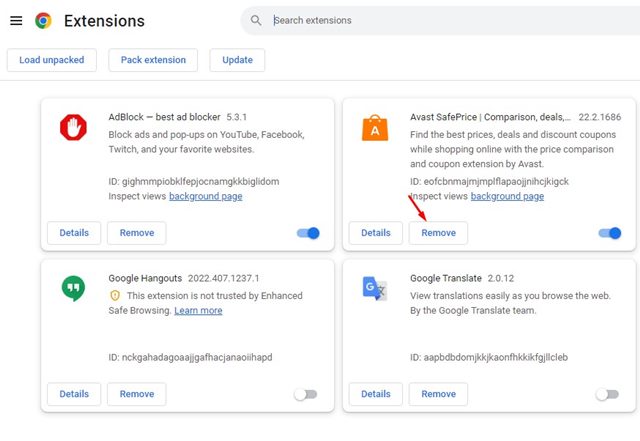
That’s it! This is how you can remove Avast SafePrice from your computer.
Remove Avast SafePrice from Avast Antivirus Interface
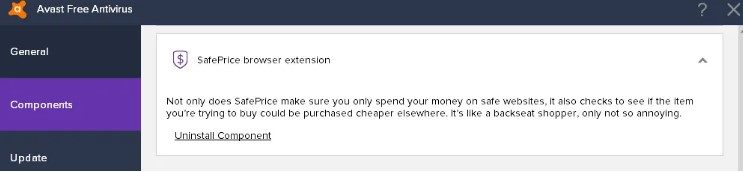
However, if you are using a very older version of Avast Antivirus, you must remove it from the Avast Antivirus Interface. You need to open Avast Antivirus and navigate to Settings > Components.
On the Components, scroll down to the ‘SafePrice browser extension’ and click on the ‘Uninstall Component‘. That’s it! This will remove avast safeprice from your computer.
Uninstall Avast SafePrice from Control Panel
On Control Panel, you need to change the Avast Antivirus setup file to remove the Avast SafePrice browser extension. You need to follow some of the simple steps we have shared below.
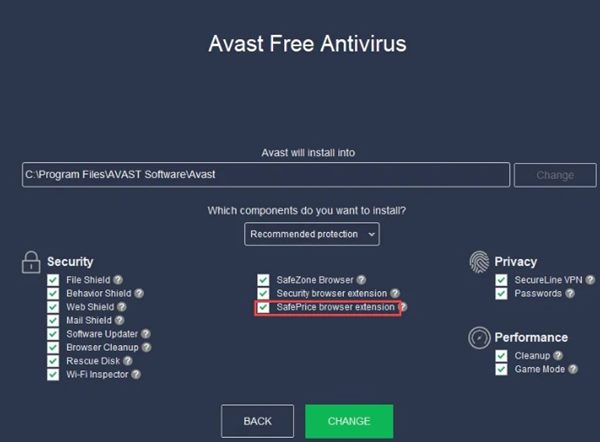
- First, open Windows search and type Control Panel. Next, open the Control Panel app from the list.
- When the Control Panel opens, click on Programs and Features.
- Now, right-click on the Avast Antivirus and select Change.
- On the Avast Antivirus Setup screen, uncheck the ‘SafePrice Browser Extension‘ and click the Change button.
That’s it! Now you need to wait for a few seconds until Avast Antivirus changes your system. This will remove Avast SafePrice from your computer.
Alos read: How to Remove Malware from PC Using Google Chrome
So, this guide is all about Avast SafePrice, and how to remove Avast SafePrice from your computer. If you need more help removing Avast SafePrice from your PC, let us know in the comments below. Also, if the article helped you, make sure to share it with your friends as well.
The post How to Remove Avast SafePrice from PC (Full Guide) appeared first on TechViral.
from TechViral https://ift.tt/mf2QIki
Subscribe to:
Posts (Atom)