Tuesday, January 31, 2023

How to Enable 5G on Your Android Device (All Brands)

Enable 5G on Your Android Device

Let’s admit it, 5G has been on the trend for the past few years. In India, users consider support for 5G connectivity even before purchasing a new smartphone.

While many regions still await 4G connectivity, 5G has been made available for beta testing. Now you also have smartphones that support 5G networks.

Now that 5G services are available in India, users have been searching for ways to enable and use 5G on their smartphones.

If you are also searching for the same, continue reading the guide. In this article, we have shared some easy steps to enable 5G on a supported smartphone. We have shared methods to enable 5G on the most popular smartphone brands. Let’s get started.

Check 5G Bands Supported on Your Phone

Check 5G Bands Supported on Your Phone

Before you go on and try to activate the 5G network, you first need to ensure you have a compatible device.

By compatible device, we mean the 5G compatible smartphone. There are few smartphone models available on the market that supports 5G out of the box.

Even though smartphone makers are now prioritizing 5G, few low and mid-end devices don’t have it. Even if your phone supports 5G connectivity, you still have to check what are the 5G bands that it supports.

We have already shared a detailed guide on how to check 5G bands supported on your phone. You need to go through the post to know all details.

Requirements to use 5G services

Well, the smartphone is one of many things you will need to use the 5G services. Below, we have shared all the possible things you will need to use the 5G services.

  • A 5G capable smartphone.
  • Make sure the phone supports the required 5G bands.
  • A SIM card that supports 5G.

In India, Airtel and JIO don’t require purchasing a new sim to use the 5G services. The existing 4G SIM will be able to connect with the 5G. However, you still need to ensure your sim card is updated.

How to Enable 5G on your Device?

If your phone checks all boxes for running the 5G services, you must follow these steps to enable the 5G network. We have shared steps to enable 5G on a smartphone (brand-wise).

Samsung Smartphones

You need to follow these simple steps if you have a Samsung smartphone compatible with the 5G services. Here’s how to enable 5G on Samsung smartphones.

  • Open the Settings app on your Samsung smartphone.
  • On Settings, tap on Connections > Mobile Networks.
  • Next, on the Mobile Networks > Network Mode.
  • Select 5G/LTE/3G/2G (auto connect) on the Network Mode.

That’s it! Now search for available networks manually and select the 5G network provided by your SIM card.

Google Pixel Smartphones

If you have a 5G-compatible Pixel smartphone, you must follow these simple steps to enable the 5G services.

  • First of all, open the Settings app on your Pixel device.
  • On Settings, select Network & Internet > SIMs.
  • Now select your SIM > Preferred Network Type.
  • On the Preferred Network type, select 5G.

That’s it! That’s how easy it is to activate 5G services on a Pixel smartphone.

OnePlus Smartphones

OnePlus also has many of its smartphones compatible with the 5G services. Hence, if you have a OnePlus smartphone, here are the steps to enable a 5G Network.

  • First, open the Settings app on your OnePlus smartphone.
  • Next, select WiFi & networks > SIM & Network.
  • Select the Preferred network type and set it to 2G/3G/4G/5G (automatic).

That’s it! After making the changes, your OnePlus smartphone will be ready to connect with the 5G network.

Oppo Smartphones

Oppo smartphone users also need to set their phone to connect with 5G network if they have a 5G ready SIM card. Here’s what they need to do.

  • Open the Settings app of Oppo Smartphone.
  • On Settings, select Connection & Sharing.
  • Next, tap on SIM 1 or SIM 2 (whichever it is).
  • Next, select Preferred Network Type > 2G/3G/4G/5G (automatic).

That’s it! Now your Oppo smartphone will connect to the 5G network whenever available.

Realme Smartphones

If you have a 5G compatible Realme Smartphone, you must follow these simple steps to enable the 5G services. Here’s what you need to do.

  • First of all, open the Settings app on your Realme Smartphone.
  • When the Settings app opens, tap on Connection & Sharing.
  • On the Connection & Sharing, pick your SIM card.
  • Next, tap on the Preferred network type > 2G/3G/4G/5G (automatic).

This will enable the 5G network type on your Realme smartphone.

Xiaomi/Poco Smartphones

A few devices from Xiaomi and Poco also support the 5G services. Here’s how to activate the 5G network on these smartphones.

  • First, open the Settings app on your Smartphone.
  • When the Settings app opens, tap on the SIM Card and mobile networks.
  • Next, tap on the Preferred network type > Prefer 5G.

After making the changes, restart your Xiaomi or Poco smartphone.

Vivo/iQoo smartphones

Like every other major smartphone brand, some Vivo/iQoo smartphones also support 5G network mode. Here’s how to enable 5G on Vivo or iQoo smartphones.

  • First of all, open the Settings app on your smartphone.
  • When the Settings app opens, tap on SIM 1 or SIM 2.
  • Next, select Mobile Network > Network Mode.
  • On the Network mode, select 5G Mode.

That’s it! This is how you can activate 5G network on Vivo and iQoo smartphones.

So, this is how you can enable 5G on an Android smartphone. Once you activate the 5G, you need to head to a location where 5G services are available. Your phone will detect the 5G services and connect automatically. If this article helped you, make sure to share it with your friends.

The post How to Enable 5G on Your Android Device (All Brands) appeared first on TechViral.


from TechViral https://ift.tt/JblkWYP

Tech layoffs: PayPal cuts 2,000 jobs as global economy weakens

The online payments platform is the latest technology firm to cut costs as the global economy weakens.

from BBC News - Technology https://ift.tt/hfwCrAK

Government promises robust crypto regulation

Proposals are being set out as scandals and tumbling values raise questions about the industry's future.

from BBC News - Technology https://ift.tt/XTnSV2L

Fix Telegram Stuck on Updating? (6 Best Ways)

Fix Telegram Stuck on Updating?

Yes, we admit, Telegram is less popular than WhatsApp or Messenger, but it still has millions of users who actively use it daily. Among all features that it provides, Telegram is mainly known for its group and channel-specific features.

On Telegram, you can find and join unlimited channels, create your own channel, make voice and video calls, exchange texts, etc. While the Telegram app for Android or iOS is well optimized, the one problem that users face is Telegram channel stuck on updating.

So, if you have just joined a Telegram channel, and the channel status shows ‘Updating’, continue reading the article. In this article, we have tried to answer your question: Why Does My Telegram Keep Updating?

Why Does My Telegram Keep Updating?

Telegram users in the past have reported that the App is stuck on the ‘Updating’ screen. You will see the ‘Updating’ status in the Telegram channel.

When the app is stuck in updating part, you won’t be able to see the new messages shared in the chat.

Apart from the Updating issue, users have also reported that their Telegram app stuck on Connecting. The Connecting Status appears on the main screen, and when it appears, the new messages won’t appear.

Being a regular Telegram user, sometimes I get frustrated seeing the ‘Updating’ Status on my favorite channels. Even sometimes, the app shows ‘Connecting’ on the main screen on the app. When both of these statuses appear, the Telegram app becomes unusable.

Below, we have shared some of the most prominent reasons why Telegram stuck on Updating screen.

  • Telegram is installing the updates in the background.
  • The servers of Telegram are down.
  • The version of Telegram you are using has a bug.
  • Your internet connection is slow or inactive.

These are the most prominent reasons why Telegram stuck in updating.

6 Best Ways To Fix Telegram Stuck on Updating

Now that you know the possible reasons for Telegram updating stuck, you may want to resolve it as soon as possible. Fortunately, the Telegram updating problem can be easily fixed by following our shared methods. Here’s what you can do.

1. Check Your Internet Connection

Check Your Internet Connection

If Telegram is stuck on updating or Telegram not updating messages, it’s time to check whether the internet connection is working.

Slow or unstable internet is the foremost reason for telegram stuck on connecting/updating problems. If your phone has no internet connection, you will likely see the ‘Connecting’ status instead of ‘Updating’.

The updating part happens after the connection. Hence, you must ensure that your phone is properly connected to the internet.

2. Check if Telegram is Down

Check if Telegram is Down

Like every other social networking and instant messaging app, the Telegram app can often run into problems. Maybe Telegram’s servers were down for maintenance; hence, the app cannot connect with the servers.

If Telegram’s servers are down, neither the mobile app, desktop app, or web version will work. You are likely to face problems such as Telegram stuck on connecting or Telegram stuck on Updating.

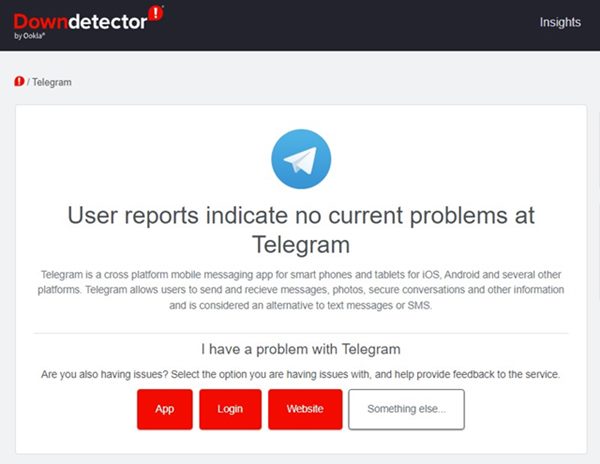
The easiest way to check whether Telegram’s servers are up is by checking the Telegram Server Status page at downdetector. If the servers are down, you must wait patiently until the servers are restored.

3. Force Stop the Telegram app

Force stop has no direct link with the Telegram app, but many users have claimed to fix Telegram stuck on updating problem by doing it.

Force Stop the Telegram app

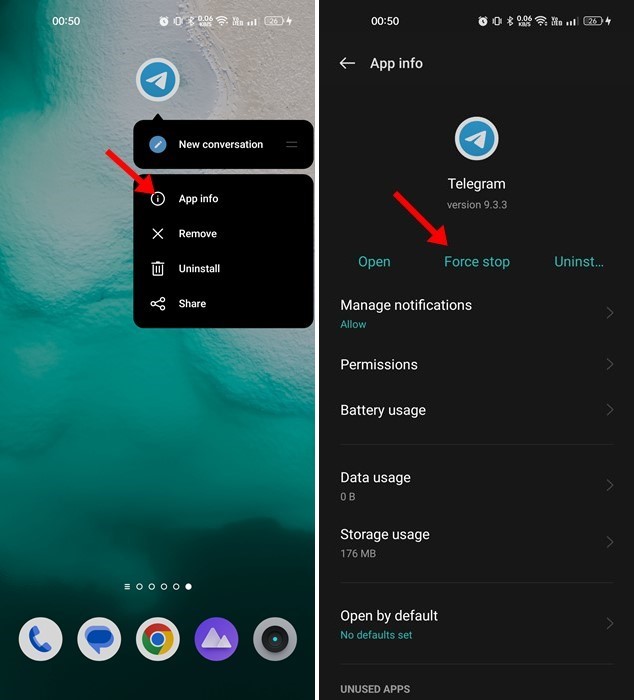
So, you can try that, and there’s no harm in doing it. Force-stopping the Telegram app will release all Telegram-related processes from the background. To force stop the Telegram app, long press the app icon on the home screen and select App Info.

On the App info screen, tap on the Force Stop button. Once done, open the Telegram app again. This time you can get past the ‘Updating’ or ‘Connecting’ screen.

4. Clear Telegram App’s Cache File

The Telegram app can get stuck on updating or connecting status because of corrupted cache files. Hence, you can also clear the Telegram App Cache file to resolve this issue. Here’s what you need to do.

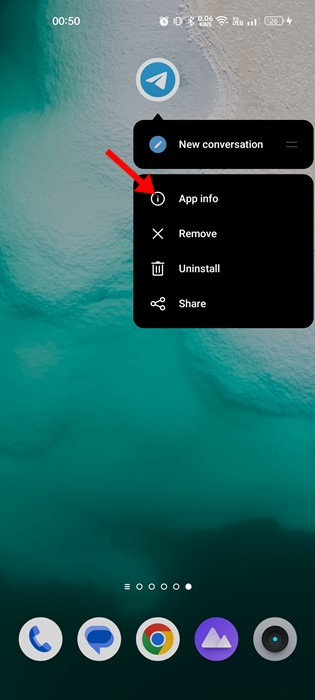
1. First, long press on the Telegram app icon and select ‘App Info‘.

App Info

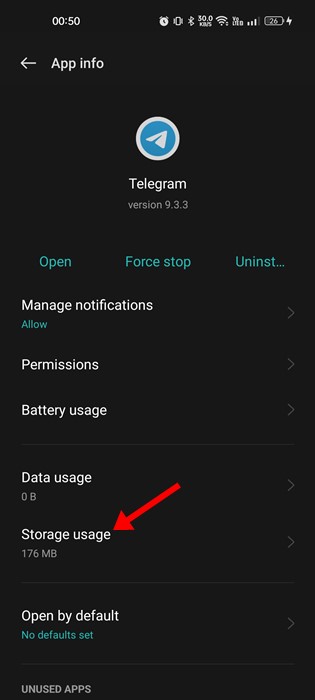
2. On the App Info screen, tap ‘Storage Usage‘.

Storage Usage

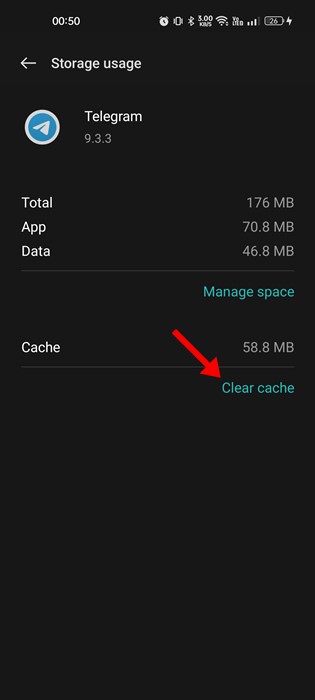
3. On Storage Usage, tap on Clear Cache.

Clear Cache

That’s it! This will clear the Telegram App Cache on your Android smartphone.

5. Disable the Proxy Settings or VPN

You are using a VPN/Proxy

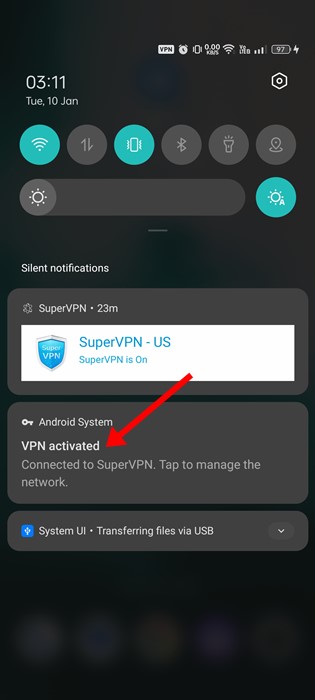
Telegram app doesn’t allow the use of a Proxy or VPN, but you can still use it. However, the problem is that when you connect to a VPN server, the Telegram app attempts to a server located far from you.

This process can take time, resulting in Telegram stuck in updating. You may even face other issues like media files taking a long time to download, images not appearing in chats, etc. So, if you use a VPN or Proxy server while using Telegram, you need to disable it.

6. Reset the Network Settings

Reset the Network Settings

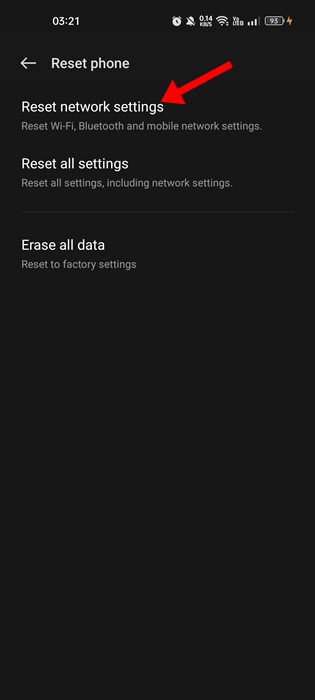
If you have come so far, nothing might have worked for you. The last remaining option to resolve Telegram stuck in updating is to reset the Network Settings.

It’s easy to reset the Network Settings on Android, but you will have to reconnect with the WiFi networks again. So, if you remember the password of your WiFi network, you can go ahead and reset the Network Settings.

Once you reset the network settings, you need to restart your smartphone. After the restart, connect to the WiFi network/mobile data and use the Telegram app.

Also read: Telegram Not Sending SMS Code? 5 Best Ways to Fix it

So, these are some of the best ways to resolve Telegram keep updating on Android smartphones. If you need more help fixing Telegram not updating messages or Telegram stuck on connecting issues, let us know in the comments. Also, if the article helped you, make sure to share it with your friends.

The post Fix Telegram Stuck on Updating? (6 Best Ways) appeared first on TechViral.


from TechViral https://ift.tt/Box1Rg8

Monday, January 30, 2023

How to Find Song on Snapchat in 2023

Find Song on Snapchat

Snapchat has many competitors today, like Instagram and TikTok, but it still dominates the photo-sharing section. It’s an app mainly known for its unique photo and video filter.

The major reason behind the success of Snapchat is the frequent updates. With every update, users get new filters to enhance their snaps. Yes, the company keeps adding regular features to the app, but they usually go unnoticed.

Recently, while using Snapchat, we have noticed a useful feature that lets you find any sound play near you. If you are a music lover like me, you may be surprised that Snapchat can help you find a song.

Before Snapchat’s song recognition feature, users must rely on song finder apps or Shazam to recognize a song playing nearby. Hence, if you are interested in knowing how to find a Song on Snapchat, continue reading the guide.

Find Song on Snapchat

Below, we have shared not one but three different methods that would help you find a Song on Snapchat. None of these methods require third-party app installation. So, let’s get started.

Note: We have used an Android smartphone to demonstrate the methods. iPhone users need to follow the same methods.

1. Find a Song from the Camera Screen

You can directly find a song on Snapchat right from the camera screen. The app identifies the song within seconds and provides you with an option to play it. Here’s what you need to do.

1. First, launch the Snapchat app on your Android or iPhone.

2. When the app opens, long press on the empty camera screen. You will see a pop-up; tap on the ‘Got it’ button.

long press on the empty camera screen

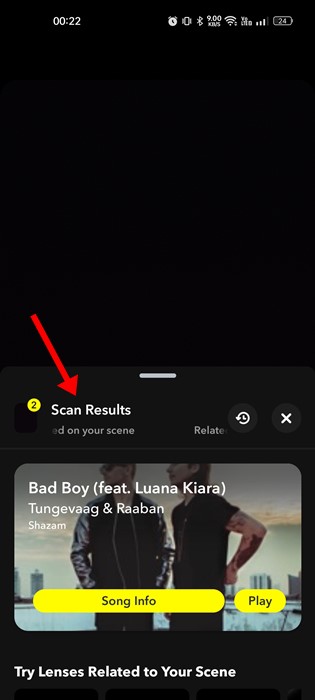
3. You need to put your phone near the song you want to identify. The Snapchat app will identify the song within a few seconds.

put your phone near the song

4. Once identified, tap on the Play button to play the song with Apple Music.

Play

That’s it! That’s how easy it is to find a song on Snapchat from the camera screen. It’s a great way to find songs on the phone without using any third-party song identification apps.

2. Find a Song on Snapchat with the Scan Button

The above one and this one are the same; this method includes manually finding songs on Snapchat with the Scan button. Here’s what you need to do.

1. First of all, launch the Snapchat app on your smartphone.

2. Next, tap on the camera screen once to show the available filters option.

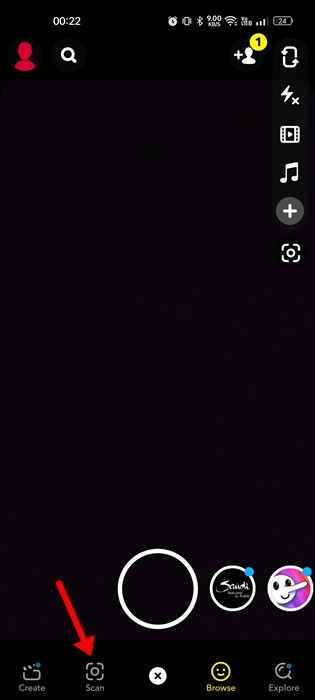
3. At the bottom, tap on the Scan button.

Scan

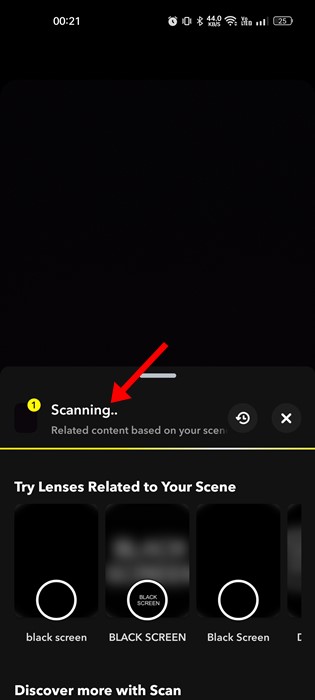
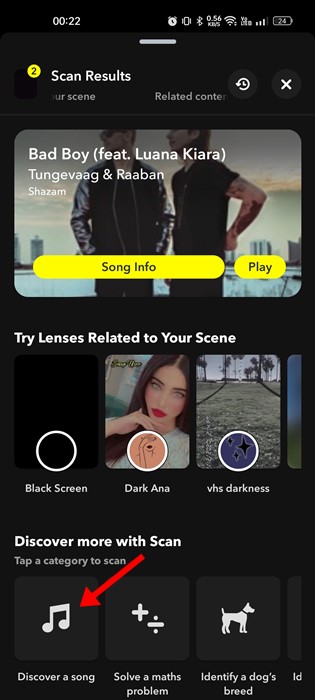
4. Expand the scanner by clicking on the little bar at the bottom.

5. From the list of options, select ‘Discover a song‘.

Discover a song

6. Now, you need to place your smartphone near the song.

place your smartphone near the song

That’s it! The Snapchat app will immediately work to identify the song playing near you. Like the above method, this one will also provide you an option to play the identified song in Apple Music.

3. Find a Song in Snapchat’s Music Library

Like Facebook and Instagram, Snapchat also maintains its music library. While the music library of Snapchat is not as huge as Facebook’s, you will still find the most popular songs.

This method won’t help you find the song playing nearby, as it requires manual searching of the song. So, you should already know the song’s title to use this method. Here’s what you need to do.

1. First, launch the Snapchat app on your Android or iPhone.

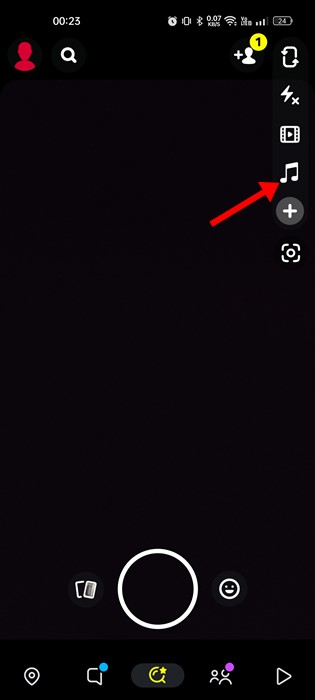
2. When the app opens, tap on the music icon at the top-right corner of the screen.

tap on the music icon

3. Tapping on the music icon will instantly open the music library of Snapchat.

music library of Snapchat

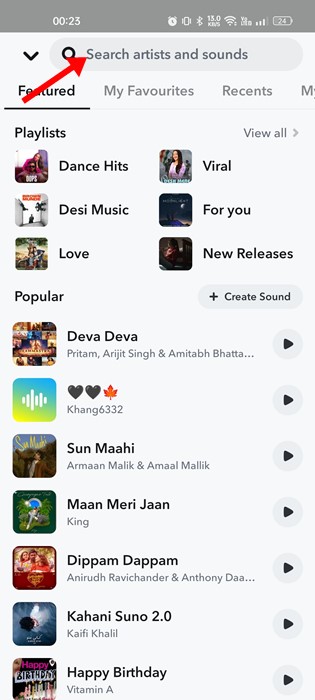
4. You need to use Snapchat’s search bar to find the song you want to use.

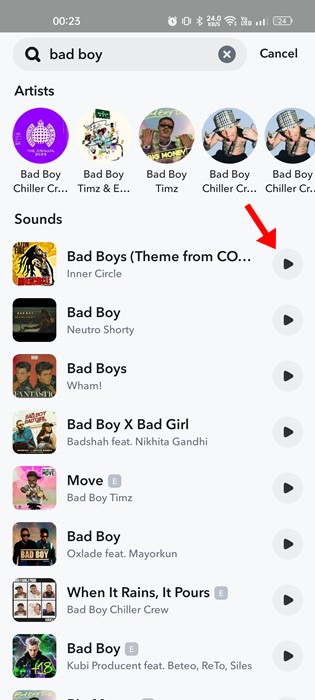
5. Simply search the title of the song. When the song appears, tap on the Play icon to hear the song’s snippet or title to add the song to your snap.

tap on the Play icon

That’s it! This is how you can find a song on Snapchat from its music library.

Also read: 10 Best Snapchat Saver Apps

So, these are the three best ways to find a song on Snapchat. All of the methods we have shared require no additional app installation. If you need more help finding a song on Snapchat, let us know in the comments. Also, if the article helped you, make sure to share it with your friends as well.

The post How to Find Song on Snapchat in 2023 appeared first on TechViral.


from TechViral https://ift.tt/A8yc3xU

Tech War: Biden moves to halt US exports to Huawei, reports say

Washington has been tightening its rules on exports of US technology to China for several years.

from BBC News - Technology https://ift.tt/JMUHI83

Green projects are boosting UK growth - CBI report

Projects aimed at lowering carbon emissions are boosting growth in poorer parts of the country.

from BBC News - Technology https://ift.tt/GUlMdNZ

Fix Facebook Pictures Not Loading? (10 Best Ways)

Fix Facebook Pictures Not Loading

Facebook has become more important than ever, and it’s something you will always want to be working. However, like every other social networking platform, Facebook can sometimes run into problems.

A massive site like Facebook can run into problems occasionally. And when it does, you may be prevented from using the app’s most important features.

We are talking about Facebook because recently, a few users have messaged us asking why ‘Facebook not loading pictures’. If you are facing the same problem, or you are the one who has asked the question, continue reading the guide.

Below, we have discussed the most prominent reasons why Facebook fails to load pictures. The problem can appear on both desktop & mobile, and there are certain things you can do to fix the issue.

Why Facebook Pictures Not Loading?

Facebook may fail to load pictures due to various reasons. Below are some of the most prominent reasons why Facebook Pictures fails to load.

  • Slow or No internet connectivity.
  • The picture has been removed.
  • The servers of Facebook are down.
  • Outdated Facebook app cache.
  • Incorrect Data Usage Settings.
  • Corrupted App Installation Data.
  • Data Saver Mode on Facebook.

So, these are some of the most prominent reasons behind Facebook pictures not loading issues.

10 Best Ways to Fix Facebook Pictures Not Loading

Now that you know all the possible reasons for Facebook pictures not loading issue, you should resolve it. Below, we have shared some best methods to resolve the issue.

1. Check Your Internet Connectivity

Check Your Internet Connectivity

Be it ethernet, WiFi, or Mobile data, you need to ensure that your internet connection is working. Even if it works, you need to check whether the internet connection is stable.

A drop in internet connection often leads to media not loading on Facebook problem. Not only Facebook, but you may also experience similar issues even on other social networking sites like Twitter, Instagram, etc.

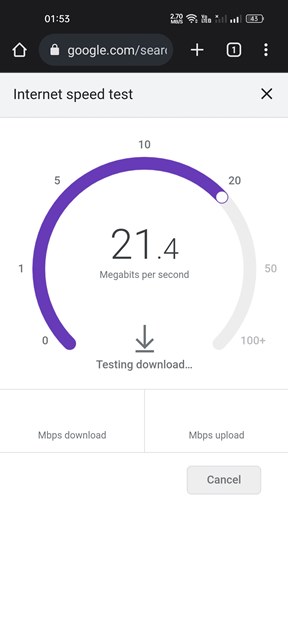
Hence, you need to open your web browser and visit fast.com to confirm whether your device has an active internet connection.

2. Check if Servers of Facebook are down

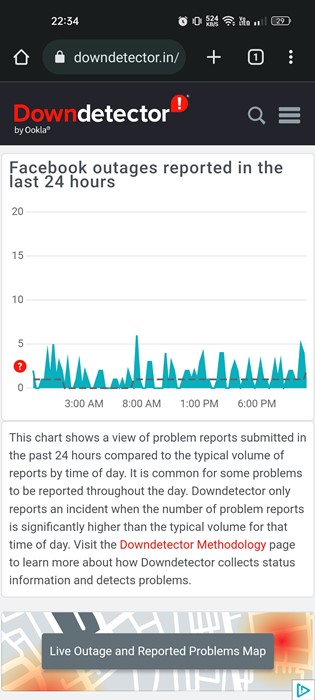
Check if Facebook's servers were down

Server outage is another major reason Facebook fails to load pictures. If you are experiencing pictures not loading on Facebook problem on both desktop & mobile, there’s a higher probability that the servers are down.

When the servers of Facebook are down, you won’t be able to use most of the platform’s features. You won’t be able to view the images, play videos, check post comments, etc.

So, before trying the next methods, visit the Facebook Server Status page at Downdetector. The site will tell you whether there’s a problem with Facebook’s servers.

3. The Admin has Removed the Picture

If Facebook is not loading the picture shared on a particular group, chances are that the Admin has removed it.

A group admin on Facebook can remove whatever group members share. So, if an admin thinks that the picture violates the rules of the Group, they can remove it immediately.

So, you must ensure that the admin has kept the picture you’re trying to view. You can contact the admin and ask for the picture.

4. Check the Facebook Data Usage Settings

If photos are loading as black boxes, empty boxes, or broken images, you need to check if you have images enabled in your phone’s mobile web browser settings. Here’s what you need to do.

1. First, open the web browser on your mobile and sign in to your Facebook account.

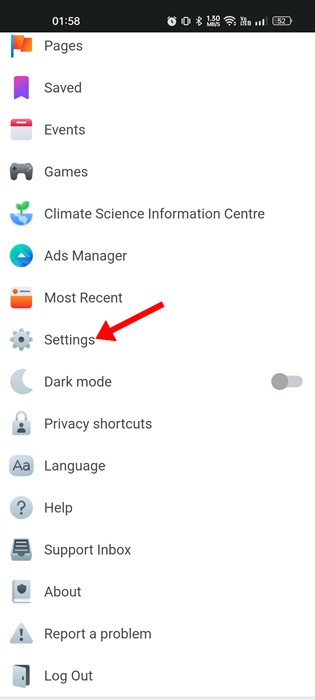
2. Next, tap on the hamburger menu at the top-right corner.

hamburger menu

3. On the next screen, scroll down to the bottom and tap ‘Settings‘.

Settings

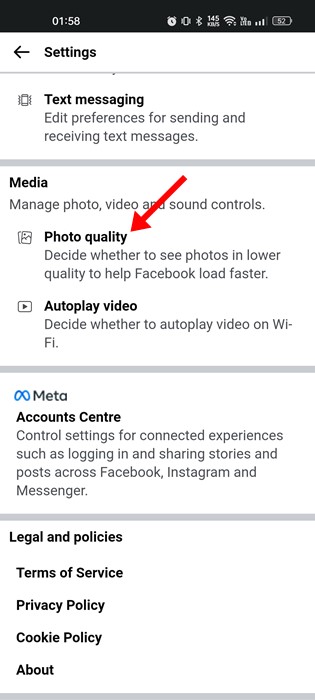
4. On Settings, scroll to Media and tap on Photo quality.

Photo quality

5. Now, you will find three options for Photo Quality: High, Medium, and Low.

6. If the Photo Quality is set to ‘Low’, you won’t see the photos. So, make sure to set it in ‘Medium‘, or ‘High‘.

Medium

That’s it! This is how you can change the Facebook Data Usage settings to resolve Facebook not loading pictures problem.

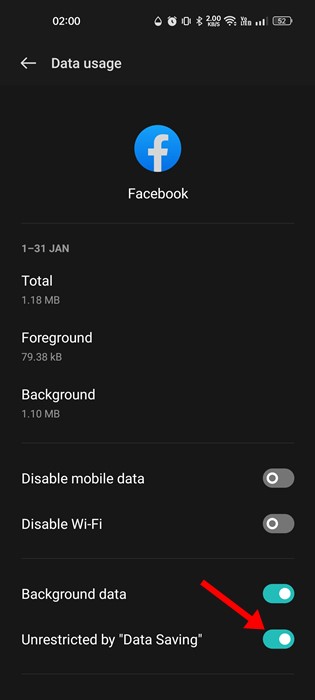
5. Enable Unrestricted Data Usage for Facebook App

Unrestricted Data Usage is a feature of the Android smartphone that allows your phone to use mobile/WiFi data even when the data saver is turned on. If the Facebook app has restricted data usage enabled, the pictures will fail to load or load in low quality.

Hence, you must give the Facebook app unrestricted data usage even when the data saver is turned on. Here’s what you need to do.

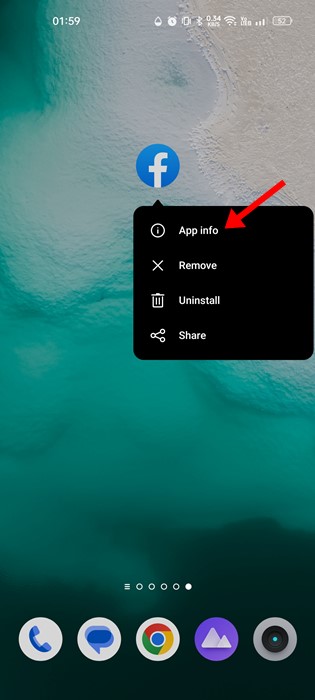
1. First of all, long press on the Facebook app icon on the home screen and select ‘App Info‘.

App Info

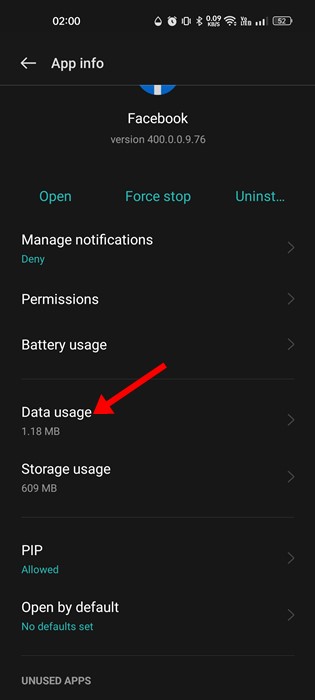
2. On the App Info screen for Facebook, tap on Data Usage.

Data Usage

3. Toggle on the ‘Unrestricted Data Usage‘ option on the Data Usage.

Unrestricted Data Usage

That’s it! This is how you can give Facebook an Unrestricted Data Usage option on Android smartphones.

6. Check the Facebook Posts in a Browser

If certain pictures in a Facebook post are not showing in the Facebook app, you need to check those posts in a web browser.

You can use a mobile web browser like Google Chrome to check your Facebook post. This will open the mobile version of Facebook. Alternatively, you can check those posts in a desktop web browser.

7. Clear the Facebook App Cache

Corrupted or outdated cache files can sometimes trigger problems like pictures not loading on Facebook. So, you can clear the Facebook app cache to resolve this problem. Here’s what you need to do.

1. First, long press on the Facebook app icon on your home screen and select ‘App Info‘.

App Info

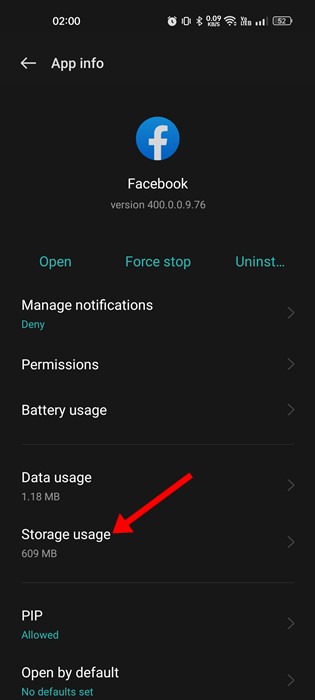
2. On the App Info screen, tap on Storage Usage.

Storage Usage

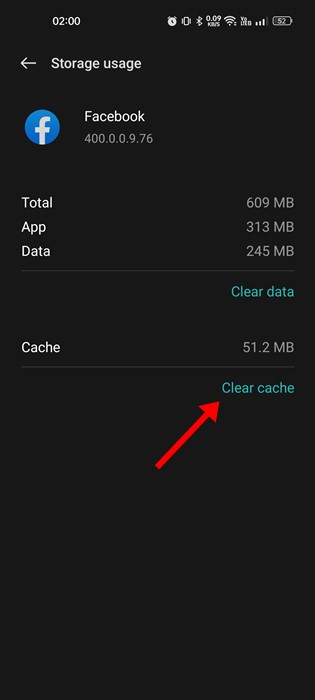
3. On the Storage Usage screen, tap on Clear Cache.

Clear Cache

That’s it! After clearing the Facebook app cache, open the app and check the post again. This time the pictures would load properly.

8. Close all VPN/Proxy Connections

You are using a VPN/Proxy

Using VPN and Proxy connections often leads to media not loading problems on Facebook. This is because when you connect to a VPN, the app tries to connect to a different server.

When a connection to the server fails or experiences any problem, images fail to load. Not only the images but the comments on posts won’t load as well. So, disconnect VPN or Proxy connection and check the picture again.

9. Update the Facebook App

Update the Facebook App

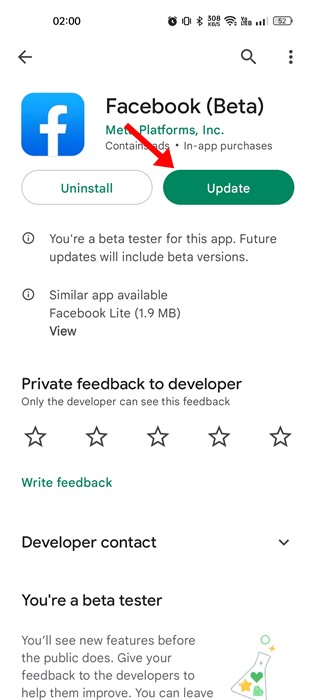
The version of the Facebook app you are using may have a bug that’s preventing images from loading properly.

You can eliminate such bugs by updating your Facebook app. To update the Facebook app, open the Google Play Store, search for Facebook, and tap on the Update button.

On iPhone, you need to rely on the Apple App Store to update your Facebook app. Once updated, open the Facebook app again and check the post.

10. Disable Ad Blocker/Extensions

If you are using a desktop web browser to access Facebook, such as Google Chrome, you need to disable the ad blocker or any other extension that you’ve recently installed.

Few malicious extensions can conflict with the functionality of Facebook. Hence, you need to disable extensions manually one by one.

If you are using the Facebook app and experiencing problems while viewing pictures, you need to switch to the Google DNS server.

Also read: How To Download Facebook Videos Without Any Tool

So, these are some of the best ways to fix Facebook Not Loading pictures. If you need more help fixing Facebook pictures not loading problem, let us know in the comments. Also, if the article helped you, make sure to share it with your friends.

The post Fix Facebook Pictures Not Loading? (10 Best Ways) appeared first on TechViral.


from TechViral https://ift.tt/NR9SQmi

JD Sports says 10 million customers hit by cyber attack.

The sportswear chain says stored data relating to its customers might be at risk following the attack.

from BBC News - Technology https://ift.tt/pPzOM7Q

Sunday, January 29, 2023

How to Fix ‘Shell Infrastructure Host’ High CPU Usage (6 Methods)

How to Fix 'Shell Infrastructure Host' High CPU Usage

Pro Windows users have a habit of checking Task Manager at regular intervals. They check it whenever they feel their computer is slow or to find out which processes are using up the resources.

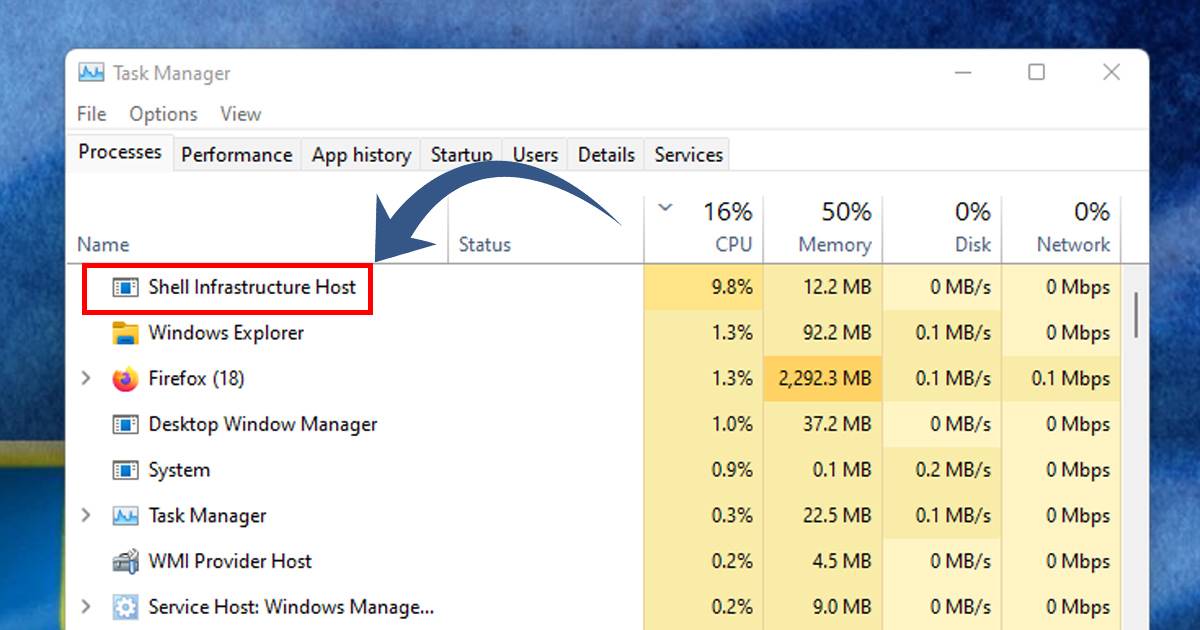
Upon a deeper look into the Task Manager, many Windows users have found ‘Shell Infrastructure Host’ running and raising the bars for CPU and Memory usage. So, if you are a Windows user and noticed the same process causing high CPU and Memory usage, continue reading the article.

In this article, we will discuss what exactly is ‘Shell Infrastructure Host‘ is and why it raises the CPU and Memory Usage when running in the background. Also, we will be discussing a few best methods to fix Shell Infrastructure Host high CPU and Memory Usage problems. Let’s check out.

What is ‘Shell Infrastructure Host’ on Task Manager?

The Shell Infrastructure Host is a very important Windows Process, and it’s running in the background for a very important reason.

The ‘Shell Infrastructure Host’, also known as sihost.exe, is a system process that handles various visual aspects of the operating system.

Your desktop background, pop-up notifications, the appearance of the taskbar, and a few other parts of the graphical user interface are handled by the Shell Infrastructure Host process in Windows.

If you are using a stable build of the Windows operating system, the Shell Infrastructure Host process is likely to run in the background and consume a small amount of Memory and CPU usage. However, sometimes due to specific problems, the same process can raise the CPU & RAM usage and freeze your computer.

Fix Shell Infrastructure Host High CPU Usage?

Well, if you are experiencing problems due to Shell Infrastructure Host high CPU usage, you can make certain changes to your computer to resolve the issue. Here are the best ways to fix the Shell Infrastructure Host high CPU usage problem.

1. Restart your computer

Restart your computer

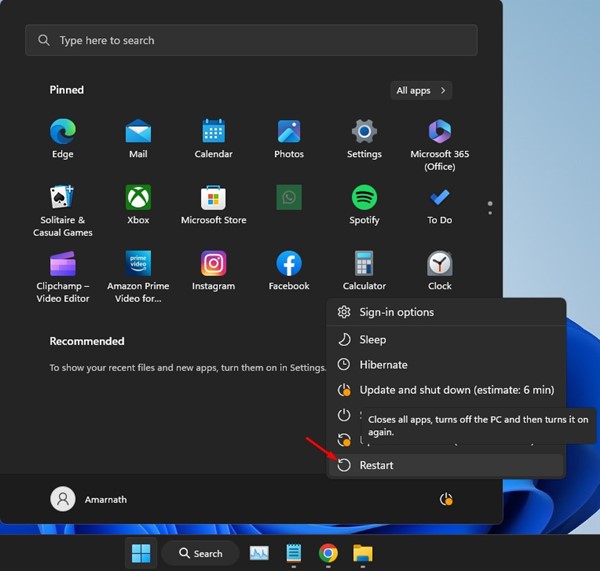
Before trying anything else, you first need to restart your Windows computer. Restarting can sometimes resolve the most complicated problems of your computer; this includes system processes raising the CPU and RAM resource consumption.

Some apps may prevent the Shell Infrastructure Host from functioning, resulting in high CPU and RAM resources. So, before making any changes, make sure to restart your computer.

To restart your Windows PC, click on the Windows Start button, the Power menu, and select Restart. This would restart your Windows computer.

2. Run the System Maintenance Troubleshooter

System Maintenance Troubleshooter has a few links with the Shell Infrastructure Host. Hence, you can run it to resolve the high CPU and Memory usage caused by the same process. Here’s what you need to do.

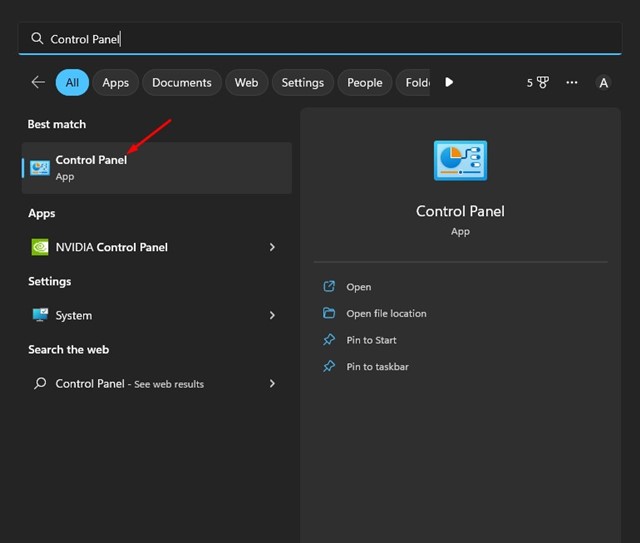
1. First, click on Windows Search and type in Control Panel. Next, open the Control Panel app from the list.

Control Panel

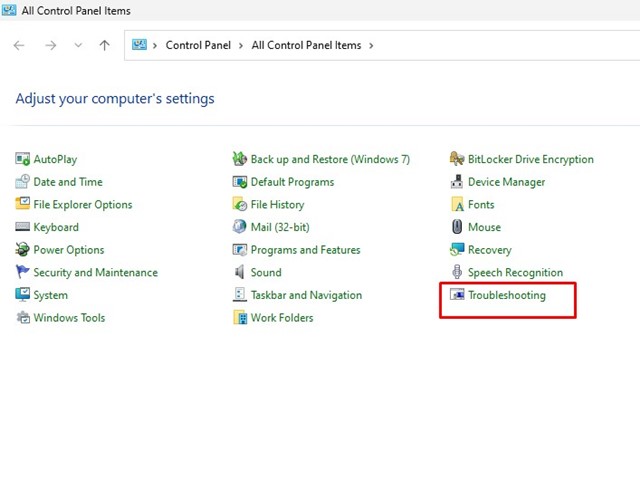
2. When the Control Panel opens, click on Troubleshooting.

Troubleshooting

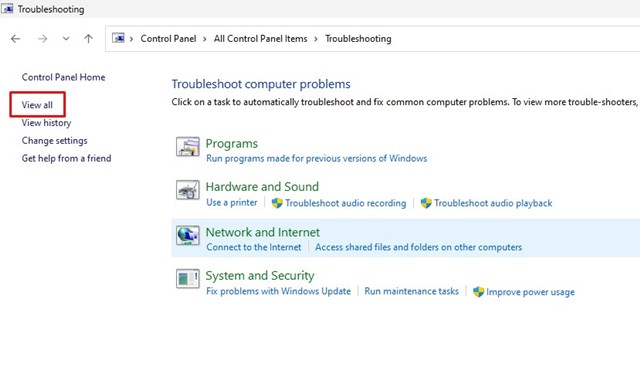
3. On the Troubleshooting screen, click the View all button on the left pane.

View all

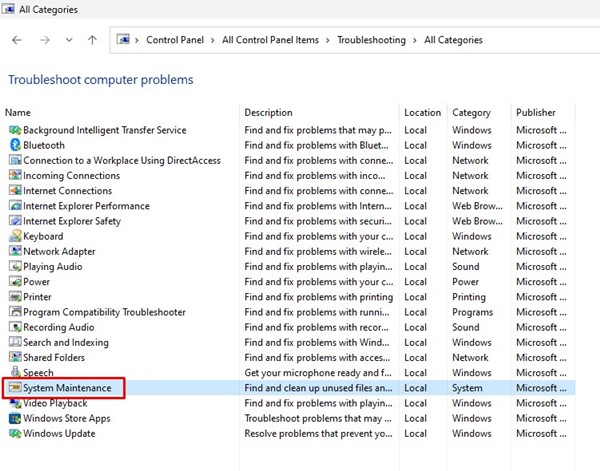
4. Now, you will see a list of all available troubleshooters. Find and click on System Maintenance.

System Maintenance

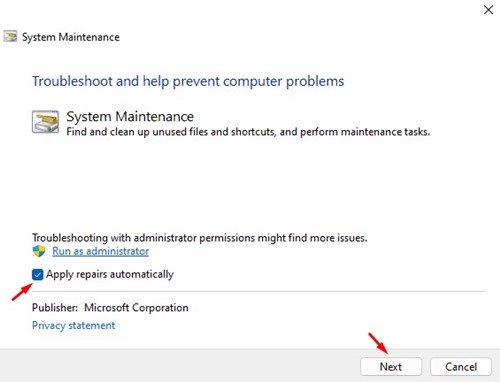
5. On the next prompt, check the ‘Apply repairs automatically‘ prompt and click on the Next button.

Apply repairs automatically

That’s it! You just need to follow the on-screen instructions to complete the system maintenance troubleshooting part.

3. Check for Program Conflicting with the Process

You can boot your computer into safe mode and check whether the ‘Shell Infrastructure Host’ process is still causing high CPU or Memory usage. If there’s no such issue in a clean boot or Safe mode, you must find the problematic third-party software.

It’s pretty easy to find all installed software in Windows; you can access the Control Panel and remove all suspicious programs. Alternatively, you can look closely at the Task Manager to find programs running in the background without your consent.

If you find any apps that shouldn’t be on your computer, it’s recommended to uninstall them.

4. Run an Antimalware Scan

Windows Defender is a great security program that ships with Windows 10/11. You can use it to run a full antimalware scan on your system. There are various ways to scan with Windows Security; here’s the easiest one.

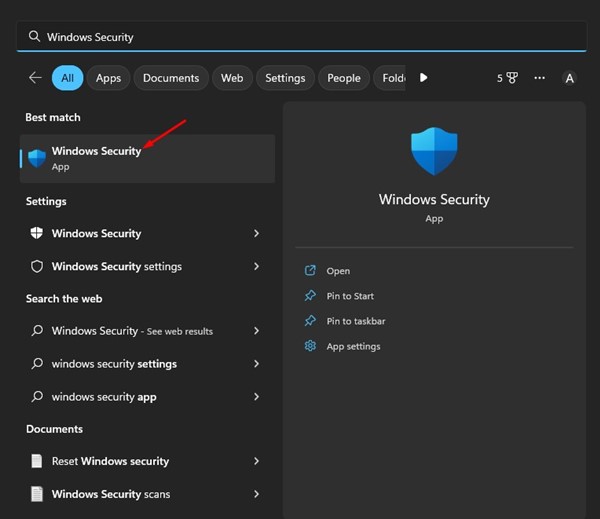
1. Click on Windows Search and type Windows Security. Next, open the Windows Security app from the list.

Windows Security

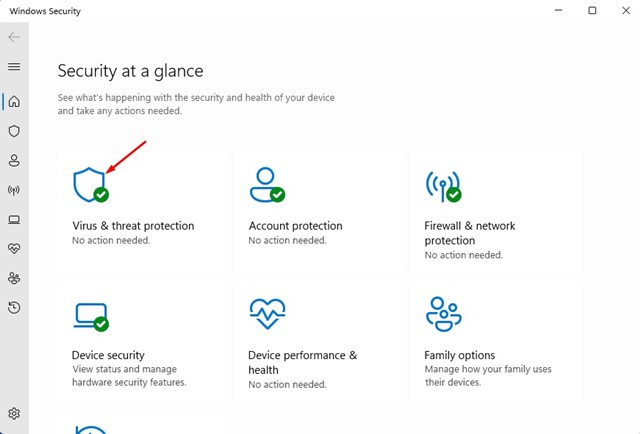
2. When the Windows Security app opens, click on the Virus & threat protection tab.

Virus & threat protection


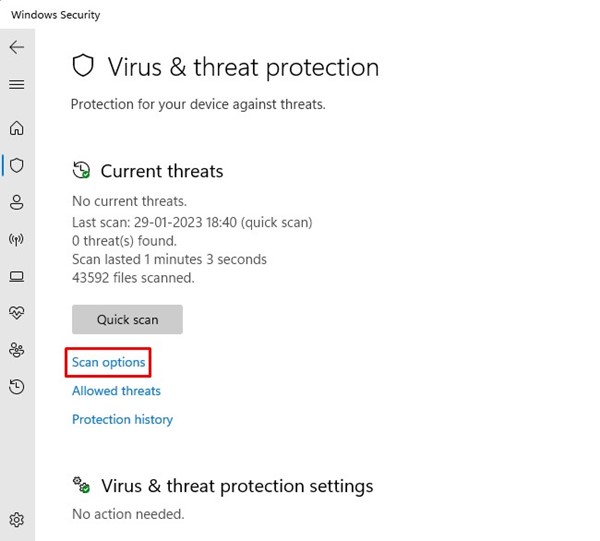
3. On the right side, click on the Scan options.

Scan options

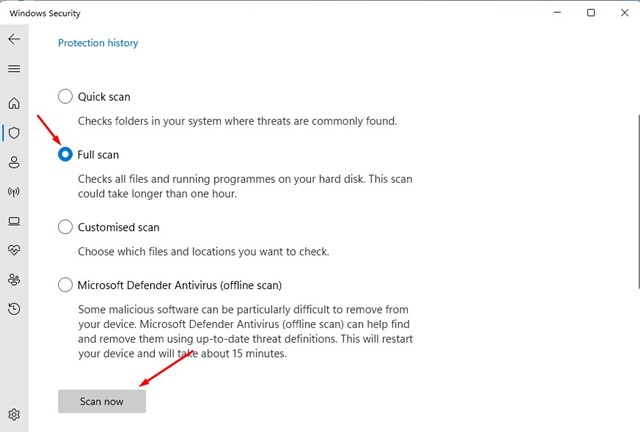
4. On the Scan options, select ‘Full Scan‘ and click on the Scan Now button.

Full Scan

That’s it! This will run a full scan on your system. The full scan option will check all files and running programs on your hard disk. However, the scan could take up to one hour to complete.

5. Run the SFC/DISM Command

Another best way to resolve ‘Shell Infrastructure Host’ high CPU usage is by running the SFC, and DISM commands. Both commands are designed to resolve problems associated with corrupted system files. Here’s what you need to do.

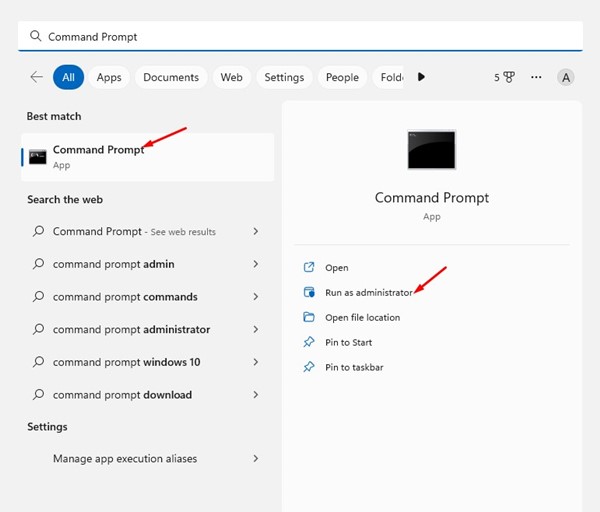
1. Click on Windows Search and type in CMD. Next, right-click the Command Prompt and select ‘Run as administrator‘.

Run as administrator

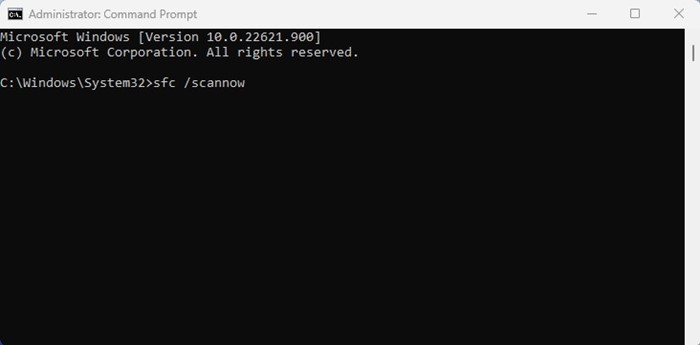
2. When the command prompt opens, type in sfc /scannow and press the Enter button.

sfc /scannow

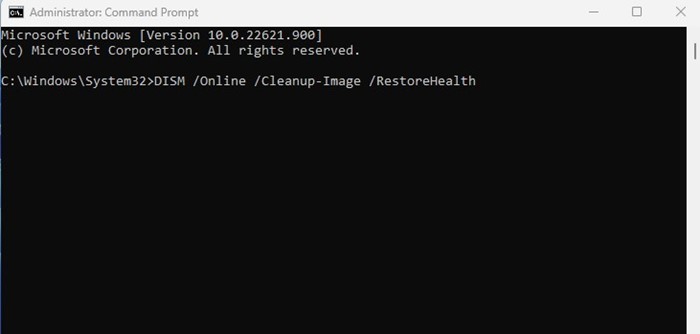
3. If the SFC command returns an error, you need to execute this command:

DISM /Online /Cleanup-Image /RestoreHealth

paste the given command

That’s it! The DISM command may take a few minutes to complete. You must wait until the command finishes fixing all your corrupted system files.

6. Update your Windows Operating System

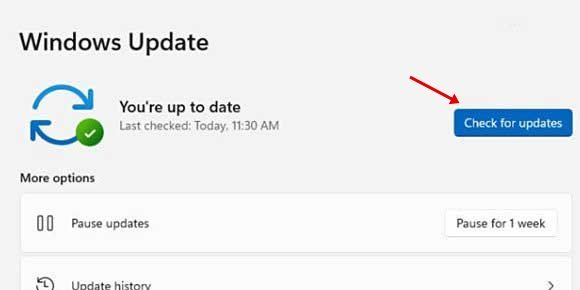
Check for updates

If nothing worked for you, updating your Windows operating system is the remaining option. Updating Windows will likely rule out bugs or glitches that may conflict with the Shell Infrastructure host process.

Also, it’s always a good idea to keep your system updated to enjoy the new features and enhanced security & privacy options. To update Windows, open Settings > Windows Update > Check for Update.

Windows 10/11 will automatically check for updates. If it finds any updates available for your computer, it will install them automatically.

Also read: How to Fix CxUIUSvc Service High CPU & RAM Usage (5 Ways)

So, these are the few best methods to resolve ‘Shell Infrastructure Host’ high CPU usage on Windows computers. If you need more help fixing the sihost.exe high CPU usage, let us know in the comments below. Also, if the article helped you, share it with your friends.

The post How to Fix ‘Shell Infrastructure Host’ High CPU Usage (6 Methods) appeared first on TechViral.


from TechViral https://ift.tt/2kC7mZg

Apple Watch Ultra 2’s Leak Hints Price Hike & Display Changes

Apple Watch Ultra 2 Leak Hints Price Hike & Display Changes

Apple’s upcoming Watch Ultra 2’s latest leak from a renowned source has noted some of the new details regarding its pricing and display changes.

Last year at the WWDC event, the company launched its new high-end and more potent watch, which is called Apple Watch Ultra, and now Apple is working on its next generation.

And this next generation of Watch Ultra is expected to be more rugged than the predecessor as it is its main priority, so let’s discuss this latest leak’s all details below.

Apple Watch Ultra 2: All Leak Details

Apple Watch Ultra 2: All Leak Details

This leak report came from DSCC (Display Supply Chain Consultants) website (via Forbes), and according to it, the next Apple Watch Ultra will retain a different display technology and a larger display, which will also impact its retail price.

Recently, many reports came out that reported; Apple is switching its iPhone, MacBook, and Watch’s display technology from OLED to MicroLED, which doesn’t require a backlight.

Besides, the report has also mentioned that there is a higher chance that Apple will go with a 2.1-inch display for this Ultra Watch series’ next generation, which will be a huge upgrade as the first generation’s screen size was 1.9 inches.

Those changes in the display of the Apple Watch Ultra 2 will require more production costs, so Apple will definitely go with increasing its retail price.

But currently, there are no hints about its pricing and how much Apple will increase as the predecessor’s starting price was $799 and with that price point, it was already the most expensive watch from Apple.

And about its release date, the DSCC mentioned that we would see Apple Watch Ultra 2’s launch in spring 2025, and this same release timeline was hinted by Mark Gurman in Bloomberg’s weekly newsletter.

While there is no official word from Apple on what the new watch will include but as these leaks and rumors came from Display Supply Chain so, there are higher chances of these implementations.

The post Apple Watch Ultra 2’s Leak Hints Price Hike & Display Changes appeared first on TechViral.


from TechViral https://ift.tt/7S1LydH

10 Best Free Sleep Sound Apps for Android in 2023

Best Free Sleep Sound Apps for Android

Things can go haywire if we don’t get enough sleep at night. Sleep is essential to our mental and physical health, but it can be tough to get adequate sleep time in our busy schedules.

Even if we manage to get time, the stress factors can still keep us open-eyed at night. Actually, improper sleep can do more harm to your body than you think. Over time, it impacts your immune system, which may lead to various health issues.

Now, if you have insomnia, we have something useful to share. You can use free sleep sound apps for Android to beat insomnia or stress. These apps are basically stress busters that can help you sleep faster.

Free Sleep Sound Apps for Android

Sleep sounds have numerous health benefits; they calm your mind and balance your heartbeat. A calm mind, along with a resting heart rate, is the perfect combo to beat insomnia. So, let’s check out the best sleep sound apps for Android.

1. Atmosphere

Atmosphere

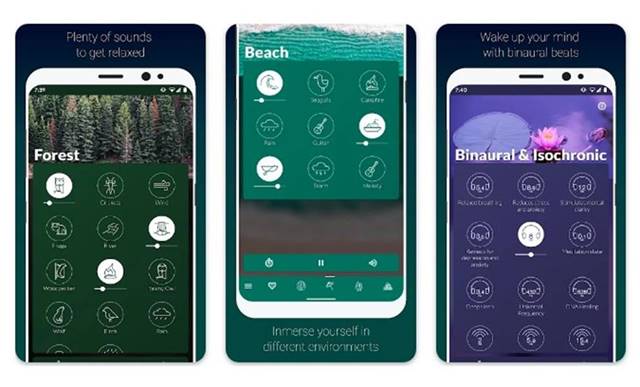
Atmosphere has been a favorite app for millions of Android users to fall asleep. It’s fundamentally a sleep-sound app for Android that lets you relax and calm your mind.

With Atmosphere, you can enjoy a wide range of relaxing sleep sounds to relieve stress and beat anxiety and insomnia.

While the app is free to download and use, you would have to pay to unlock all sleep sounds. The relaxing sleep sounds were divided into various categories: Sleep, Meditation, Yoga, Environments, Home Underwater, Beach, Forest, etc.

Along with it, you also get a dedicated section for binaural beats and isochronic tones. The sounds available in these two sections will help you free your mind and soul.

2. Sleep Sounds – relaxing sounds

Sleep Sounds - relaxing sounds

Sleep Sounds – relaxing sounds is a free Android app for insomnia users. If you have Insomnia, life may be difficult for you. You may face difficulty waking up or feel tired all day.

While sleep sounds are not a permanent cure for insomnia, they will surely help you relieve the symptoms. The app brings a collection of sleep sounds that can help you relax and mind and body.

A wide variety of sleep sounds are available on the app, like sounds of nature, rain, meditation, beach, etc. Some of the sleep sounds available on this app can even improve your mood and lift up your spirit.

The app is free to download and use, but some in-app items were hidden behind a paywall. The app works without internet connectivity.

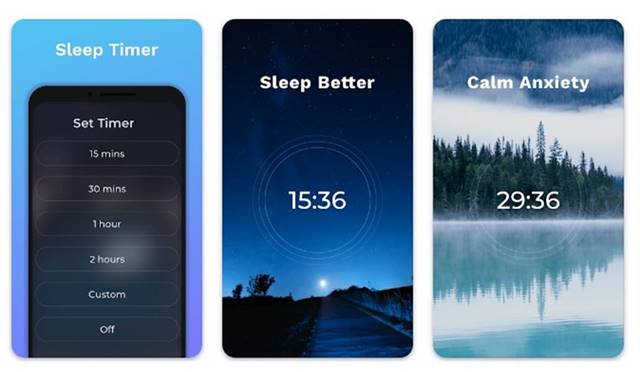
3. BetterSleep

BetterSleep

BetterSleep is slightly different from all other apps listed in the article. It’s an Android app that claims to improve sleep with sleep tracking.

The app also provides free premium sleep sounds to improve your sleep quality. The Google Play Store listing for BetterSleep claims that the app is recommended by leading doctors, neuropsychologists, and sleep experts, but such huge claims need proper proof.

If we talk about the features, yes, you can use BetterSleep to track your sleep and understand your sleep pattern. To improve your sleep quality or to beat insomnia, you get many premium Nature, Water, Binaural, Isochronic brainwaves, and Meditation sounds for free.

Besides that, BetterSleep provides a few breathing techniques that can clear your mind and help you relax. Overall, BetterSleep is a great sleep sound app you shouldn’t miss.

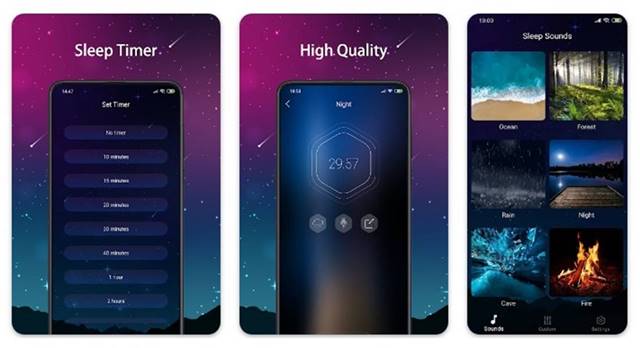
4. White Noise – Sleep Sounds

White Noise - Sleep Sounds

White Noise – Sleep Sounds is a great Android app to relieve stress and anxiety. This one brings sleep sounds that can help you defeat poor sleep quality.

At the time of writing, White Noise – Sleep Sounds provides you with over 50 high-quality sleep sounds. This includes the sound of thunder, white noise, rain on a car window, light rain, summer rain, rain on leaves, etc.

White Noise – Sleep Sounds isn’t very complicated to use because it has limited features. It heavily targets users who need better quality sleep and help with concentrating. Most of the app’s features are already unlocked in the free version.

You even get an option to make your sleep sound by mixing the available ones. You need to play the sound, set a timer, and fall asleep.

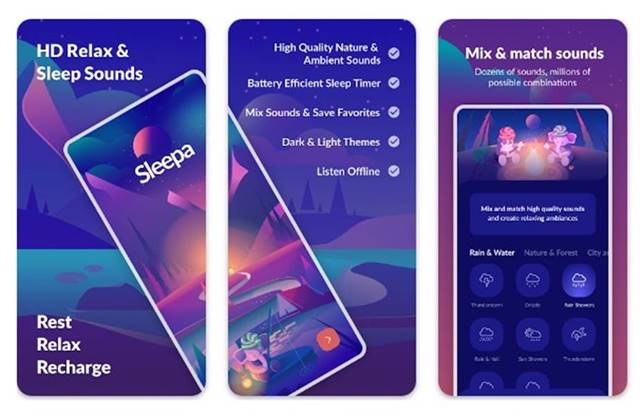
5. Sleepa

Sleepa

Sleepa is one of the oldest free sleep sound apps for Android. It’s a great app for relaxing sounds and ambiance to improve sleep quality or beat insomnia.

Even people who don’t suffer from insomnia may find this app useful for relaxation. This is because it brings the three most popular types of white noise for relaxation and sleep. This includes White noise, Pink Noise, and Brown Noise.

If we talk about the sleep sound, the app brings carefully picked high-quality 40+ sounds. The sounds are divided into different categories: rain, nature, city, meditation, ASMR, Lullabies, etc.

6. Ambience

Ambience

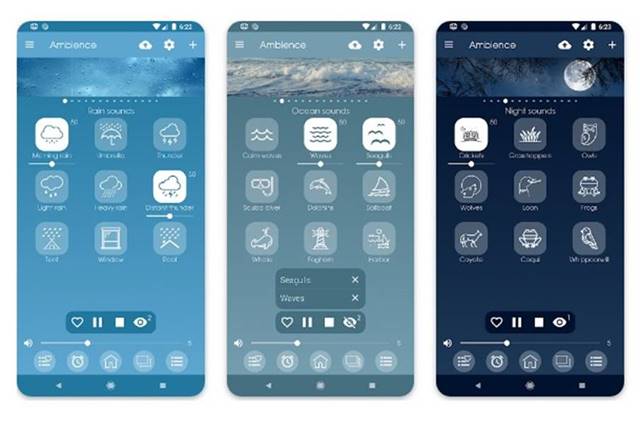
Ambience may not be as popular as the other apps on the list, but it still has more relaxing sounds than any other app.

The free version of Ambience provides you with over 100 high-quality relaxing sounds. You will find relaxing sounds for all your mood.

There are many different types of rain sounds, ocean sounds, water sounds, night sounds, wind and fire sounds, relaxing music, etc. You also get White, Pink, and Brown noise.

Another best feature of Ambience is that it lets you mix different sounds to obtain your ideal relaxed ambiance. Overall, Ambience is a great app to beat insomnia and fall asleep faster.

7. Calm

Calm

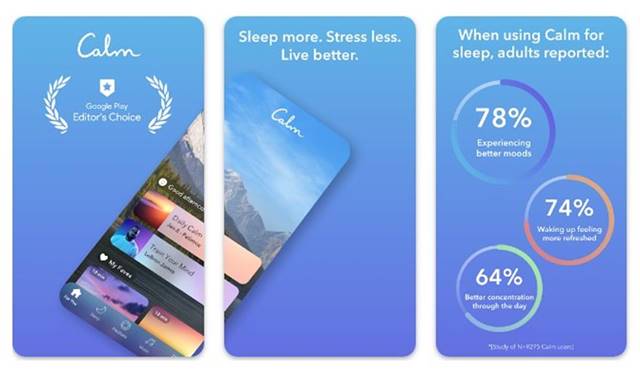
Calm is possibly the most popular Android app on the list for sleeping, meditation, and relaxing. It’s a full-fledged relaxation app for Android that can help you manage stress, balance your mood, and sleep better.

The app offers a wide range of features like guided meditation, sleep stories, soundscapes, breathwork, and stretching exercises. All of these things will help you improve your sleep quality and health.

If we talk about sleep sounds, the app does bring a wide range of relaxing music and soundscapes. The list of features continues; you also have sleep stories, mindfulness programs, etc. Overall, Calm is a great Android sleep sound app that you should take advantage of.

8. Balance: Meditation & Sleep

Balance Meditation & Sleep

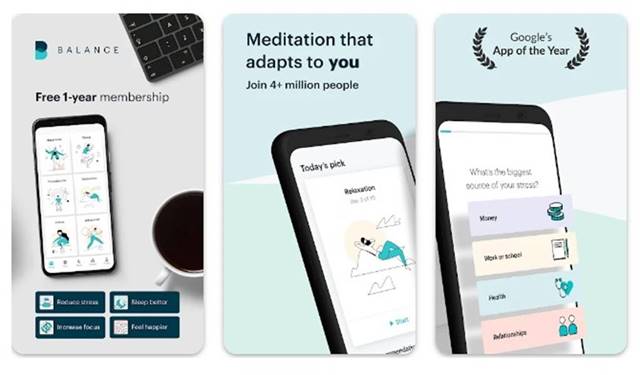
Balance: Meditation & Sleep is an app that can calm your mind, improve your stress level, and help you sleep better at night. It’s basically an app that can help you practice meditation techniques.

As an additive, you have some features to keep your mind clear and help you sleep well at night. The sleep well features of Balance: Meditation & Sleep includes sleep meditations, sleep sounds, and Wind down activity.

The app’s key focus is meditation; that’s why we have listed it way down here. You can create your own personalized guided meditation or choose an available option.

Most of the useful meditation techniques were locked behind a paywall, but you can pick from various plans available at different prices and duration.

9. Tide

Tide

If you are into sleep sounds, at some point, you may want to learn meditation as well. Meditation is the art of mastering your mind and keeping it calm and focused.

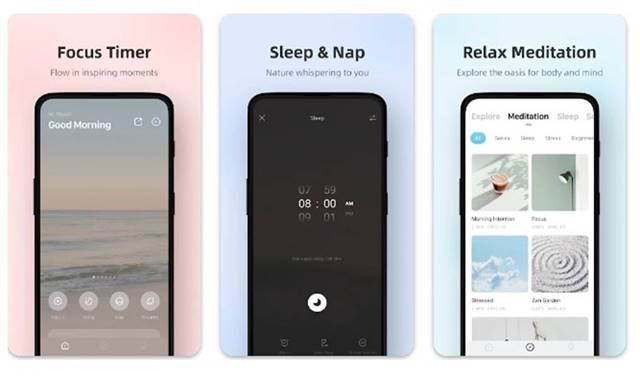
Everyone should practice meditation daily, as it is a natural stress booster. And the best way to get started is by using the Tide – Sleep & Meditation app. Tide is an app that aims to help people suffering from sleep problems.

It brings nature sounds and well-selected sounds of nature that can help you forget your day-to-day life stress. You also get relaxation meditations that can help you focus better.

The app also allows you to record each calm and peaceful moment. Overall, Tide is a great Android app for sleep and meditation.

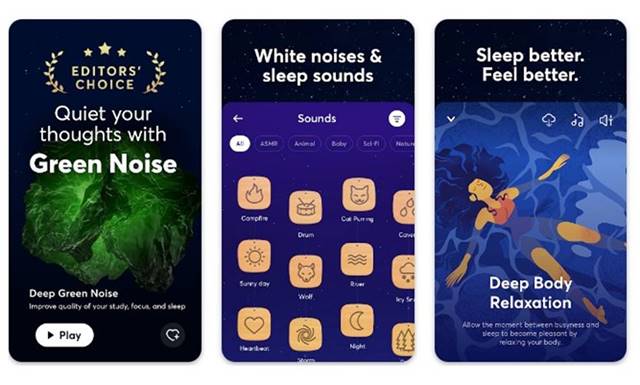
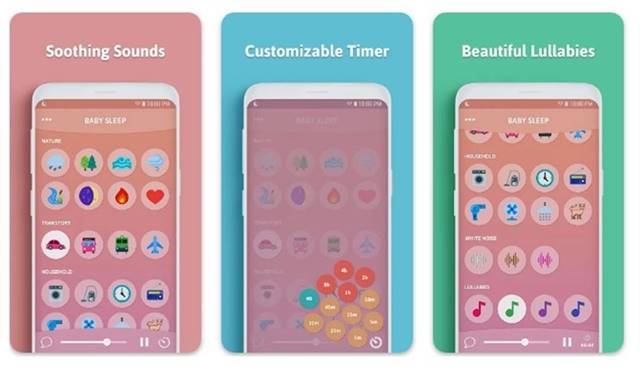
10. Baby Sleep – White Noise

Baby Sleep - White Noise

While the app is designed for babies, it can also be used by adults. It’s a simple white noise app for Android that calms your body and mind.

The white noise available on the app can reduce stress and help you sleep faster. At the time of writing, the app contains various white noise sounds such as Rain, Forest, Ocean, Wind, River, Night, Fire, Shower, Plane, Brown Noise, Pink Noise, etc.

Most of the sounds on the app are unlocked on the free version, but some require purchase. Overall, Baby Sleep – White Noise is a great sleep sound app for Android.

So, these are some of the best free sleep sound apps for Android smartphones. If you know of other sleep sound apps, let us know in the comments below. Also, if the article helped you, make sure to share it with your friends.

The post 10 Best Free Sleep Sound Apps for Android in 2023 appeared first on TechViral.


from TechViral https://ift.tt/T6Mvf4i