It had been due to return as an in-person event in Los Angeles for the first time in four years in June.
from BBC News - Technology https://ift.tt/sIqWH68
Friday, March 31, 2023
York student uses AI chatbot to get parking fine revoked
The 22-year-old turned to a chatbot to give her a "professional" letter to appeal her parking fine.
from BBC News - Technology https://ift.tt/vQWEZKt
from BBC News - Technology https://ift.tt/vQWEZKt
How to Download Twitter Videos (All Devices + Methods)

Twitter is a great platform to connect with celebrities, companies, and businesses, and it offers many amazing features and allows video/GIF sharing.
Until now, we have shared many guides on Twitter. For example, we have already shared a detailed guide on how to download GIFs from Twitter.
After reading that guide, many Twitter users have messaged us asking about downloading Twitter videos. Hence, if you are also looking for solutions to download Twitter videos, continue reading the article.
Download Twitter Videos (All Devices + Methods)
Below, we have shared all the best ways to download videos from Twitter on your Android, iPhone, and desktop. Let’s get started.
1. How to Download Videos from Twitter Android
Android users can download Twitter videos on their smartphones using several third-party apps. Here’s the easiest way to download videos from Twitter Android.
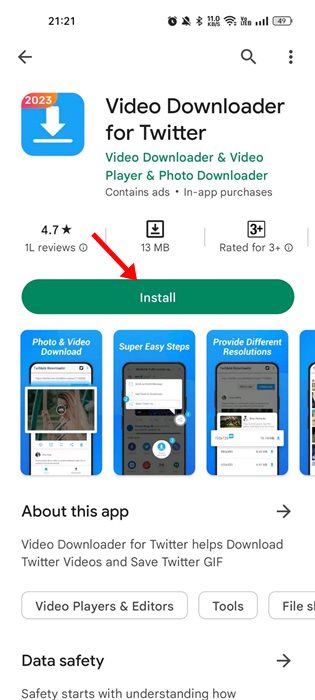
1. Head to the Google Play Store and download & install the TwiMate Downloader app on your Android.
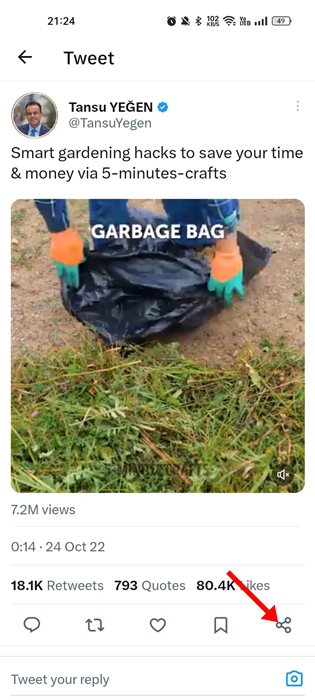
2. Open the official Twitter app and navigate to the video you want to download. Tap on the share button at the bottom.
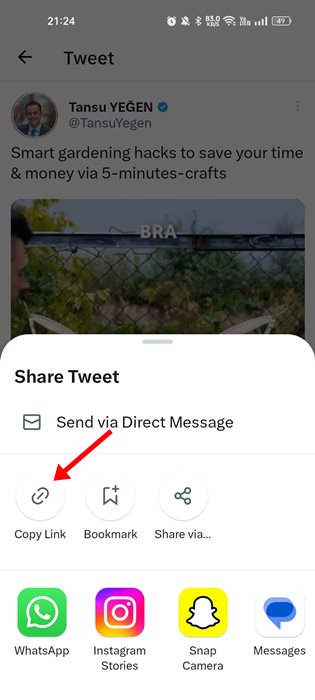
3. On the Share menu, tap the ‘Copy Link‘ option.
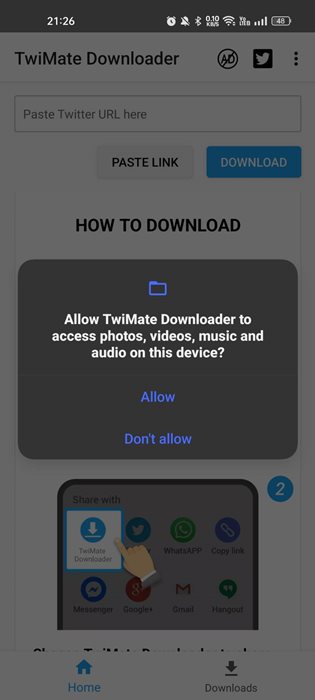
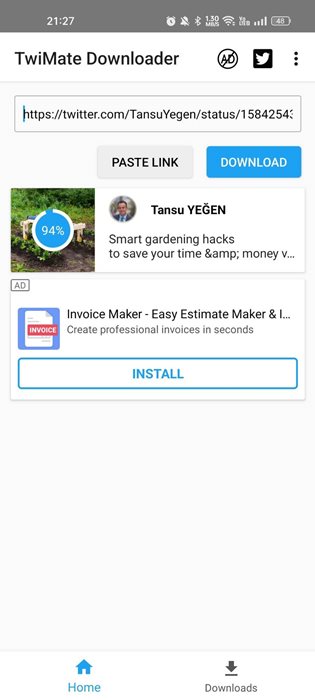
4. Now open the TwiMate Downloader app and grant all permissions.
5. On the Paste Twitter URL here field, paste the Twitter video URL you’ve copied and click the Download button.
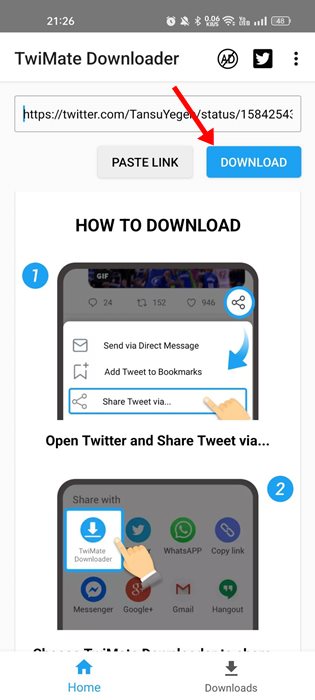
6. On the Download prompt, click the ‘Download‘ button.
7. Now, you must wait until the video downloads on your device. Once downloaded, you will find the video on your phone’s Gallery app.
That’s it! That’s how easy it is to download videos from Twitter Android.
2. How to Download Twitter Videos on iPhone
iPhone users also have a few options to download Twitter videos. The best and easiest option is to use third-party apps for downloading Twitter videos on iPhone.
There’s an app available on the Apple App Store known as TweetSave that saves Twitter videos on your iPhone. To use the app, you need to follow the steps below.
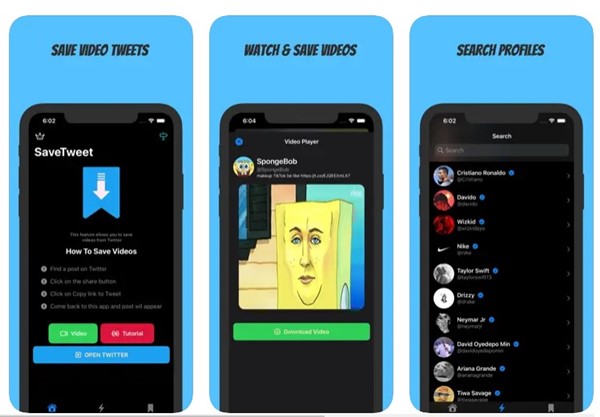
- Download & install TweetSave on your iPhone.
- Once installed, open Twitter and find the video you want to save.
- Tap on the Share button and select ‘Copy Tweet Link’.
- Now return to the TweetSave app and wait until the video shows up.
When the Video shows up, you will get the option to download it.
Other ways to download Twitter videos on iPhone?
There’s not much available for iPhone to download videos from Twitter. However, you can use the iOS native screen recorder or utilize video downloader websites to download Twitter videos on your iPhone.
Online Twitter video downloader websites require no installation and can download videos quickly. The downloaded Twitter videos will appear on the Files app on your iPhone.
3. How to Download Twitter Videos on PC?
Downloading Twitter videos on a PC is pretty easy. You can use online video downloaders or video downloader software to download your favorite videos from the Twitter website. Below, we have shared some simple steps to download Twitter videos on a PC.
Download Twitter videos from the Savefrom website
SaveFrom is a website allowing you to download videos from various social networking sites. You can use it to download videos from Twitter on PC. For that, follow the steps shared below.
1. Open your favorite web browser and visit the en.savefrom.net website. Next, click on the Twitter video downloader.
2. Now, you will be asked to paste the video link. Copy the Twitter video URL you want to download and paste it on this site. Once done, click on the Download button.
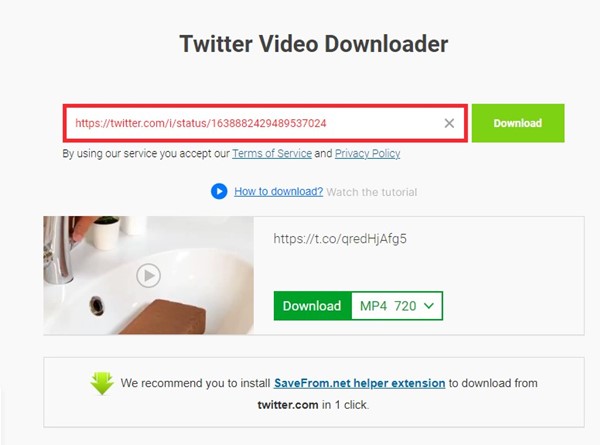
3. Now SaveFrom website will fetch the Twitter videos.
4. After fetching the video, you will get various video download options. Click the drop-down beside the Download button to select the video quality.

That’s it! The video will start downloading on your web browser. You can find the video in the Downloads folder on your PC.
4. Twitter video downloader Chrome
If you are looking for an option to download Twitter videos from the Chrome browser, you need to use Chrome extensions. Twitter video downloader Chrome extensions work well in downloading videos. Here’s the best extension to download Twitter videos.
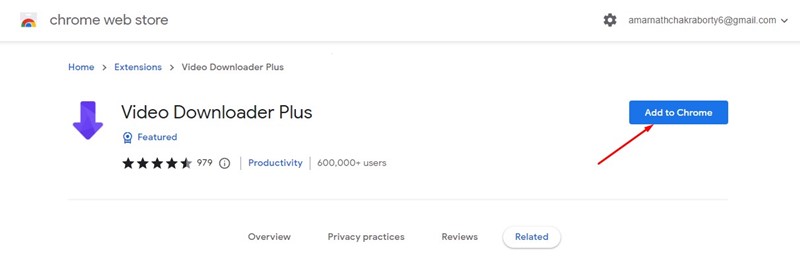
1. Open the Google Chrome browser and visit this Video Downloader Plus Chrome extension page.
2. Next, click on the ‘Add to Chrome‘ button.
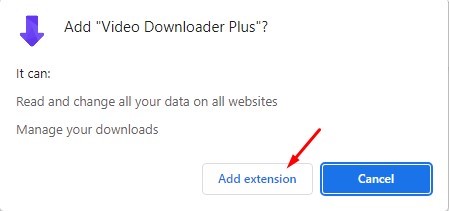
3. On the confirmation prompt, click the ‘Add extension‘ button.
4. Once added, you will find the Video Downloader Plus extension icon on the extension manager of Chrome.
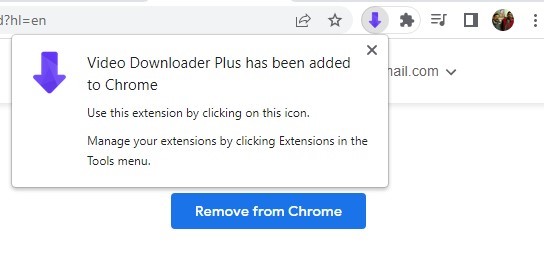
5. Now open Twitter and play the video you want to download. Next, click on the Video Downloader Plus extension icon.

6. The extension will detect the video and allow you to download it.
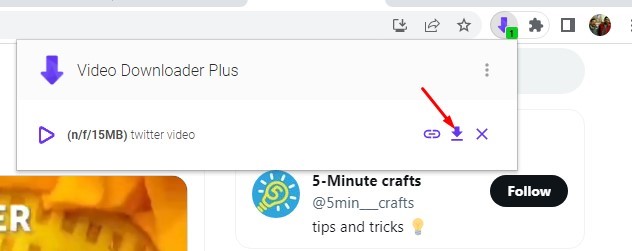
That’s it! The video will be downloaded to the Downloads folder of your computer.
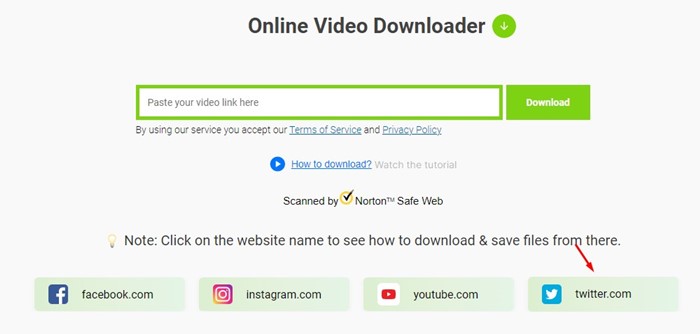
5. Best Online Twitter Video Downloaders
Most Online video downloaders work with the Twitter website. This means you can use any video downloader website to download your favorite Twitter videos.
We have already shared an article listing the best online video downloaders. Check out that guide and pick the online video downloader that supports Twitter.
Twitter online video downloaders don’t require any installation; they download the videos on the Downloads folder of your PC.
So, these are the few best ways to download Twitter videos. We have shared steps for downloading Twitter videos on Android, iPhone, PC, and Chrome. Let us know if you need more help saving Twitter videos in the comments. Also, if the article helped you, make sure to share it with your friends.
The post How to Download Twitter Videos (All Devices + Methods) appeared first on TechViral.
from TechViral https://ift.tt/eF2GqUx
ChatGPT banned in Italy over privacy concerns
The country's data-protection regulator has serious privacy concerns over the technology.
from BBC News - Technology https://ift.tt/lZ2d9P1
from BBC News - Technology https://ift.tt/lZ2d9P1
Thursday, March 30, 2023
US-China chip war: Japan plans to restrict some equipment exports
The measures, which are planned to take effect in July, follow similar moves by the US and the Netherlands.
from BBC News - Technology https://ift.tt/sP4qIen
from BBC News - Technology https://ift.tt/sP4qIen
How to Open XPS Files in Windows 10 (Best Methods)
When Windows Vista was released, Microsoft introduced the XPS format, an alternative to PDF. XPS file format is not new but has never gained much traction.
So, XPS (XML Paper Specification) files are Microsoft’s competitor to Adobe’s PDF files. Although the XPS file format is less popular than PDF, it’s still used today.
Since XPS never came out as a successful file format, Microsoft has decided to abandon it and has removed the default XPS file viewer from Windows 10 in the April 2018 update.
Also read: How to Change Wallpaper in Windows 11 Without Activation
Best Methods to Open XPS Files in Windows 10
However, if you still deal with XPS format or have a file saved in XPS format, you can revive the default XPS file viewer of Windows 10. Hence, this article will share a step-by-step guide on viewing XPS files and documents on Windows 10 computers. Let’s check out.
1) Enable the XPS Viewer
In this method, we will revive the old XPS file viewer of Windows 10. Follow some simple steps below to enable XPS viewer on Windows 10.
1. First, click on the Start button and select Settings.
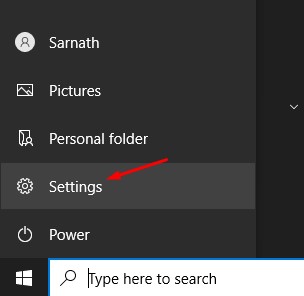
2. On the Settings page, click on the Apps option.
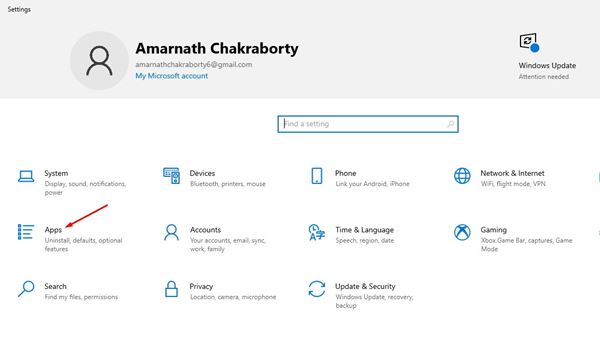
3. Click on the Apps & Features option on the left pane.
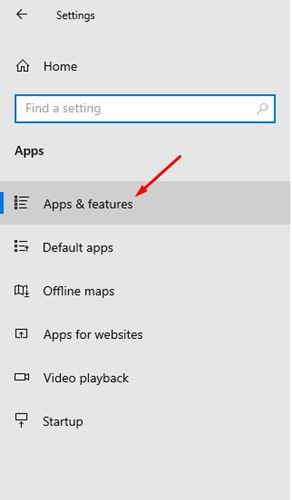
4. Now, click on the Optional Features on the right pane.

5. Click the (+) button behind the Add a feature option.
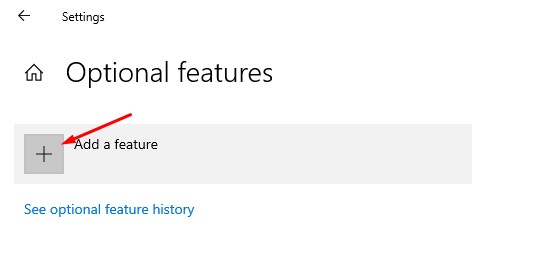
6. On the Add, a feature screen, type in XPS Viewer.
7. Select the XPS viewer from the list and click the Install button.
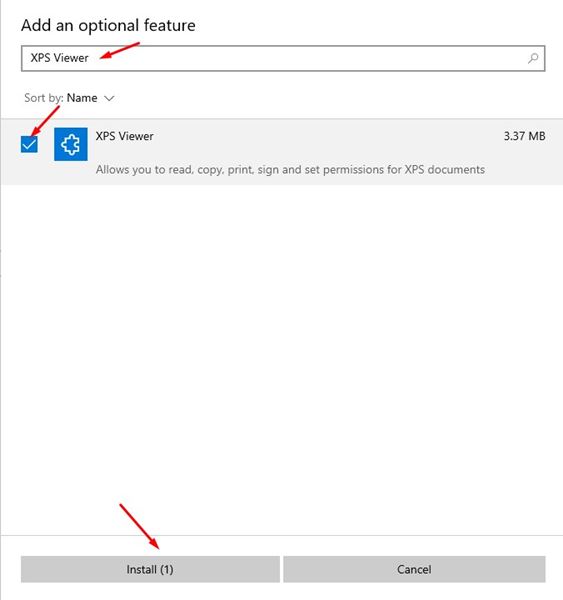
That’s it! You are done. XPS Viewer will be installed on your PC. You can now directly open XPS documents on your Windows 10.
2) Install XPS Viewer from RUN Command
You need to implement this method if you cannot access Windows 10’s settings page. We will use the RUN Dialog box on Windows 10 to install the XPS viewer application.
1. First of all, open Windows search and type in Run. Open the Run dialog box from the list.
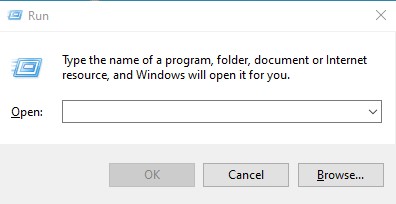
2. On the Run dialog box, type in xpsrchvw and enter.
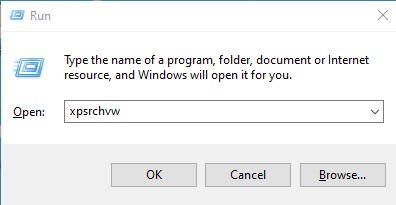
That’s it! You are done. The above command will activate the XPS viewer of your Windows 10 PC. You can now directly open the XPS files on your system.
3) Convert XPS files to PDF format
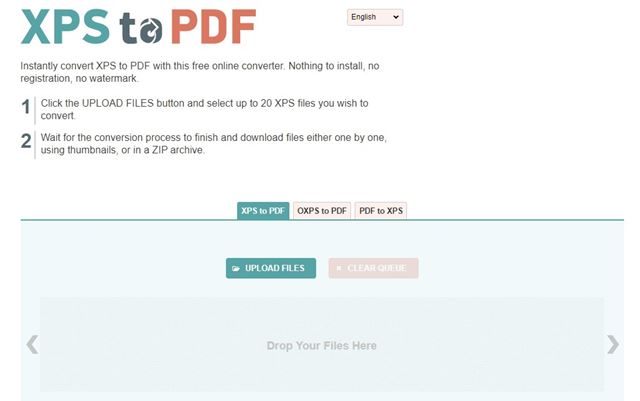
Another best method to open an XPS file on an unsupported operating system is by converting it into PDF format. If you have Adobe Reader installed on your PC, you can convert the XPS files into PDF format to open via Adobe Reader.
You can use online PDF converter websites to convert XPS files into PDF format. Search for Convert XPS into PDF on Google, and you will find several websites.
You can use any website to convert your XPS files and documents into PDF format. Once converted, you can use Adobe Reader or any PDF viewer app to view the converted files.
Use XPS Viewer Online
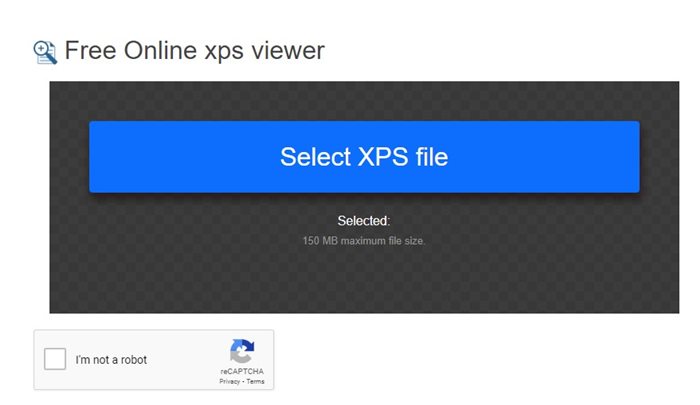
If you have access to the internet, you can use the XPS Viewer Online to open the XPS files. The good thing about online XPS viewers is that they work with every web browser and device.
Let’s say; you have an XPS file on your mobile; you can use your favorite web browser to access the online XPS viewer and then read your XPS Files.
There’s no shortage of Online XPS Viewers; you just need to pick the right web app. Then, you can search on Google ‘XPS Viewer Online’ and select the one that fits best for your purpose.
Also Read: How to Update Drivers on Windows 11
So, this guide is all about viewing XPS files in Windows 10. I hope this article helped you! Please share it with your friends also. If you have any doubts about this, let us know in the comment box below.
The post How to Open XPS Files in Windows 10 (Best Methods) appeared first on TechViral.
from TechViral https://ift.tt/FmLn6TS
How to Upload Photos On Instagram Without Cropping

Instagram is the best photo-sharing site out there. It’s a site that allows you to share photos, videos, and reels, and communicate with others. Instagram is a top-rated site, and almost everyone uses it right now.
If you are an active Instagram user or an influencer, you might know that the site supports the maximum aspect ratio of 4:5 on portrait posts. Instagram automatically crops images that exceed the maximum aspect ratio.
Instagram cropping multiple photos
Well, Instagram does this cropping for some fair reasons – The 4:5 limit for image posts prevents users from publishing massive posts, which could obstruct the entire feed. Since you can’t bypass the restriction, you must look for ways to adjust your vertical picture within the 4:5 aspect ratio.
How to Pin Instagram Posts to Your Profile
Steps to Fit a Whole Picture On Instagram (Without Crop)
Hence, if you are looking for ways to upload photos on Instagram without cropping, you might find this guide helpful. Below, we have shared the two best and simple ways to fit an entire image on Instagram without cropping. Let’s check out.
1) Fit Whole Picture via Instagram App
The Instagram app provides you an option to post long pictures on Instagram without crop. Here’s how to use the Instagram app to make your photos fit the post preview Window.
1. First, open the Instagram app on your Android device.
2. Next, tap the (+) button at the top-right corner and select Post.
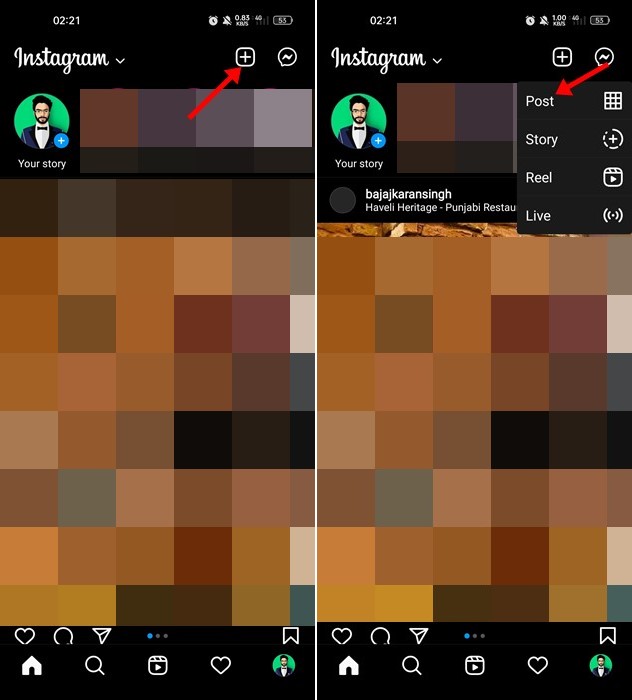
3. Now select the post that you want to share. You will find an Expand icon in the lower-left corner of the Post picker.
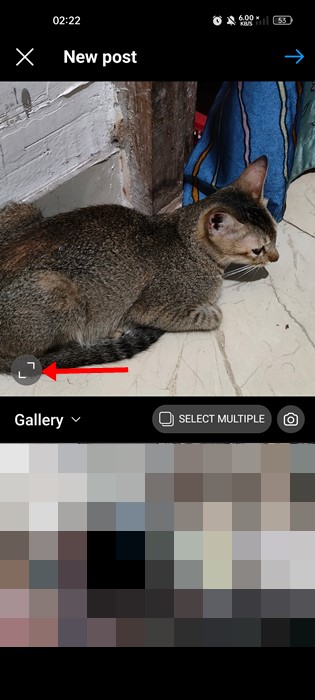
4. Tapping the expand icon will adjust the photo per the 4:5 aspect ratio. The picture will have a white or black border around it if needed.
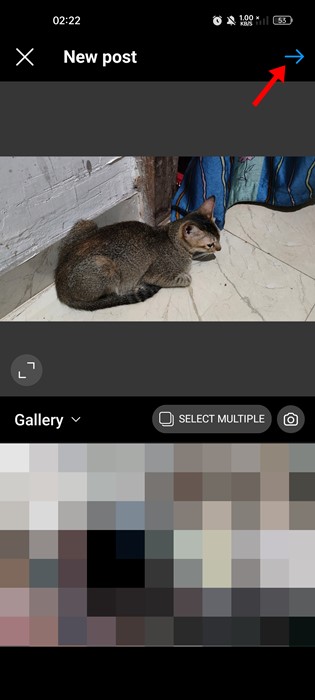
That’s it! Now you can share the post on your Instagram feed. The full photo will appear on your Instagram feed without cropping.
2) How to Resize Photos manually for Instagram
Here we are going to resize the photo for Instagram. You can use a third-party photo resizer app to adjust your photo within the 4:5 ratio. First, you need to follow some of the simple steps we have shared below.
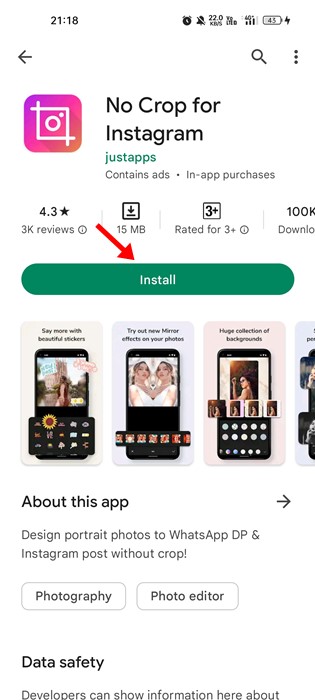
1. First of all, download & install the No Crop for Instagram app on your Android device.
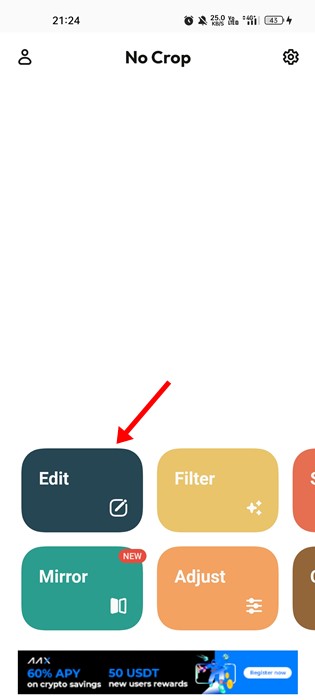
2. Once downloaded, open the app and tap the Edit icon on the main screen.
3. Now select the photo that you want to share without cropping. The photo will have a blurred background. Once selected, the app will reduce the photo size to adjust the aspect ratio.

4. Once done, your photo is ready to share. However, you can also utilize the app’s editing tools before sharing. For example, you can tap on the Background icon and select the background of your choice.
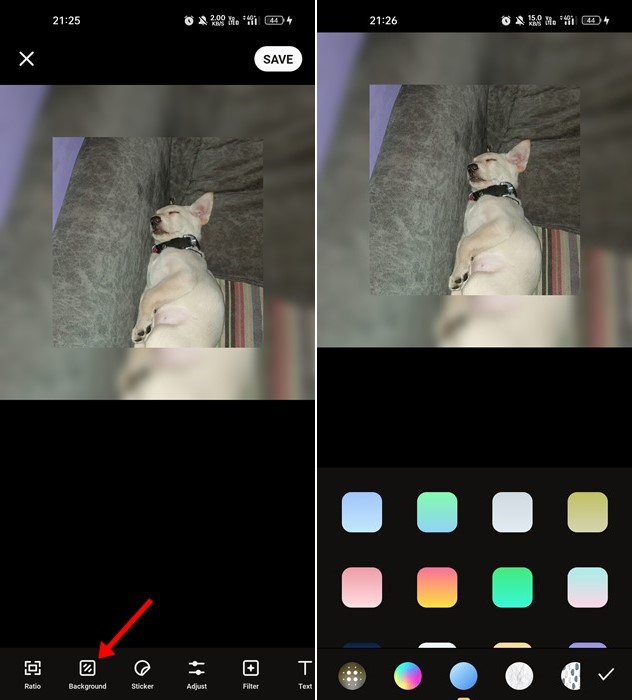
5. After making all adjustments, tap on the Save button at the top-right corner of the screen.
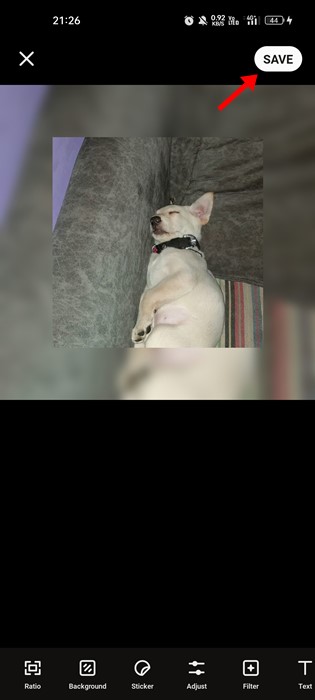
That’s it! The picture will be saved to your phone’s gallery without cropping. Now open Instagram and share the edited image.
Other Apps to post full pictures on Instagram?
There are plenty of other apps to post full pictures on Instagram. Below, we have shared the two best apps to post full pictures on Instagram.
1. No Crop & Square for Instagram
No Crop & Square for Instagram is a top-rated Android app available on the Google Play Store that lets you post full-sized pics on Instagram without any cropping.
With No Crop & Square for Instagram, you can post full-sized photos on Instagram, rotate, flip, and resize photos, add templates, make your own collage function, etc.
2. InstaSize Photo Editor+Resizer
InstaSize Photo Editor+Resizer is a very popular Android app that’s already used by million of users. You get a full-fledged photo editor + resizer with this app.
You can use this app to edit and resize your Instagram photos. Apart from adjusting your photos to fit on Instagram, it also offers photo editing features like filters, a collage maker, etc.
How to Recover Deleted Instagram Photos & Videos
So, these are the two best & easiest ways to fit a whole picture on Instagram. You can also use other image resizer apps to fit a whole picture on Instagram. If you know of any other ways to share a photo without cropping, let us know in the comments below.
The post How to Upload Photos On Instagram Without Cropping appeared first on TechViral.
from TechViral https://ift.tt/mjx0UEi
10 Best Snapchat Saver Apps for Android in 2023
Snapchat is undoubtedly the best photo and video-sharing app out there. It’s an app known for its unique photo and video filters.
If you are an active Snapchat user, you may know that the app records when you take a screenshot and notifies the other person. This thing is done to protect the privacy of the uploader.
Whether you capture a screenshot of a chat, story, or video, the Snapchat app will notify the uploader to make them aware. While it’s a great privacy protection feature, many users may still want to take screenshots on Snapchat without them knowing.
If you want to save snaps from Snapchat without them knowing, you need to start using the Snapchat Saver app. Snapchat saver apps for Android are a mix of screenshot tools and video recorders. But, they follow a different concept to capture the objects displayed on the screen.
10 Best SnapchaTopt Saver Apps
Snapchat Saver apps can easily capture screenshots or record snaps without notifying the other user. So, let’s check out the best Snapchat saver apps for Android.
1. SaveStory
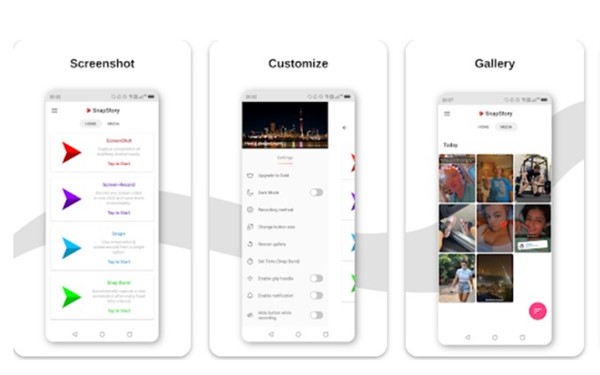
SaveStory is both a video recorder and a screenshot tool for Android. The app lets you capture screenshots of any app, and you also have the option to record the screen.
The good thing about SaveStory is that it works fine on both rooted and non-rooted Android smartphones and sends no notification when a screenshot is captured.
It also has a feature that allows you to set continuous screenshots. With this feature, the app automatically captures a series of screenshots within a few seconds.
The app can also record the internal audio if your device runs on Android 10 or above. Overall, SaveStory is a great Snapchat saver app for Android.
2. Private Screenshots
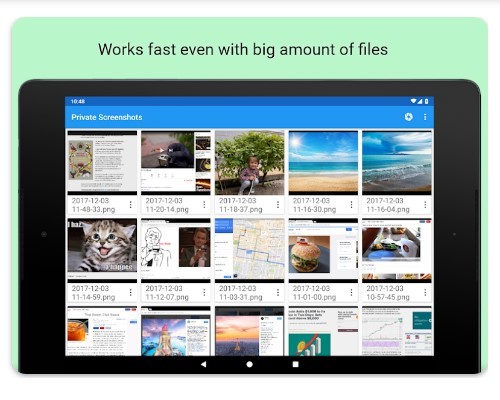
Private Screenshots app for Android can capture screenshots without notifying the end person. The good thing about Private Screenshots is that it works will all sorts of apps that detect screenshots you made from conversations.
However, Private Screenshots don’t work with protected apps like Netflix, Tor Provider, Banking apps, etc. You will get a black screen if you try to capture screenshots in protected apps.
After capturing a screenshot, Private Screenshots saves the files into a hidden directory, and it doesn’t broadcast any message about new screenshots.
The concept of Private Screenshots is different; instead of capturing the screenshot directly, it launches a presentation mode on your device and then captures the whole screen. In this way, the apps can’t detect that a screenshot has been taken.
3. ShotSaver
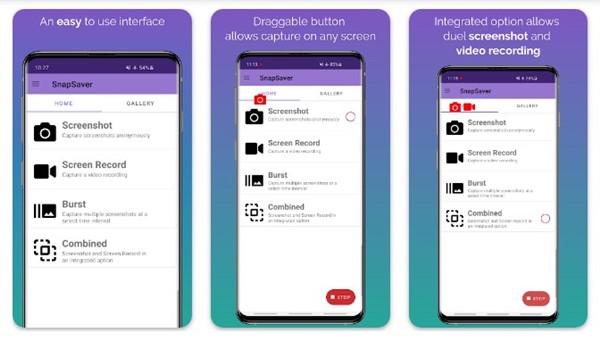
ShotSaver is another great Snapchat saver app for Android that allows you to take screenshots and record screen anonymously. While the app works fine on older versions of Snapchat, it sometimes fails to capture a screenshot on the latest version of Snapchat.
The most prominent part of ShotSaver is its easy-to-use interface. The user interface looks clean and suits well with Android’s material design.
Another unique feature of ShotSaver is the ability to capture screenshots & record screens in the same session. You don’t need to log in or create an account to use this app, and it works with Snapchat chats.
The other person is not notified when you capture a screenshot or record videos with ShotSaver. You can view the captured images/videos from the Gallery app of your Android.
4. Screenshot Easy
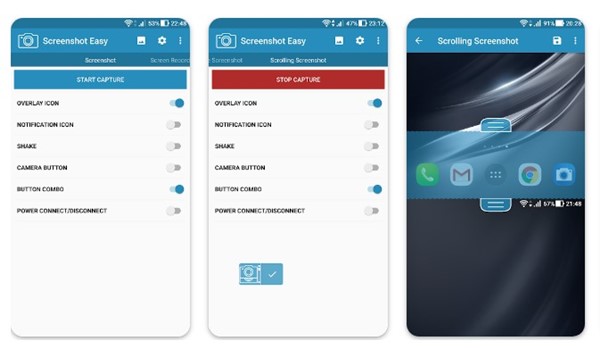
Screenshot Easy is a full-fledged and simple-to-use screenshot tool for Android devices. It lets you take a screenshot on your smartphone the easy way.
It also has a screen recording feature that records everything displayed on the screen. You also can capture full-page screenshots, scrolling screenshots, screenshots in high quality, etc.
The app also provides you with multiple ways to capture screenshots. For example, you can add a screen capture option to the Notification panel, enable the shake-to-capture feature, add an overlay icon for screen recording/screenshot, etc.
However, you should note that this app will send a notification if you try to capture a screenshot or record screen on Snapchat. It’s just a simple screen capture app for Android that can be used to save Snapchat stories or snap.
5. AZ Recorder

AZ Recorder is a very popular screen recorder app for Android that can record your screen at better quality. It’s a high-quality screen recorder with the ability to capture internal audio.
It has many unique features that make the app more useful. You can use this app to capture screenshots as well. And you also get a video editor for editing the screen captures.
AZ Recorder is perfect if you want to save a Snapchat story without any watermark. Yes, the app will notify the other user that you have captured a screenshot, but if you are okay with it, it’s one of the best apps you will ever use.
The app works with all sorts of social networking and instant messaging apps such as WhatsApp, Telegram, Snapchat, Instagram, etc.
6. AirDroid Cast
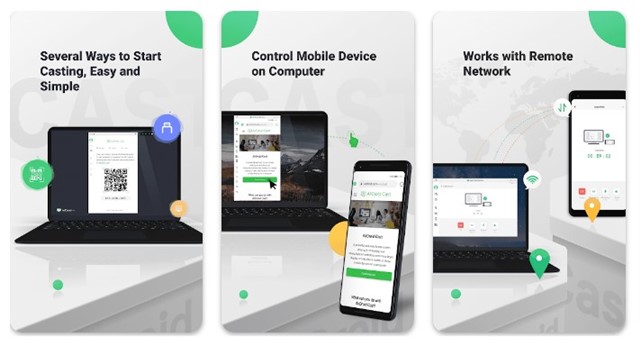
AirDroid Cast is a screen mirroring app, but it’s an odd one on the list. If you want to save a Snapchat story or capture a screenshot without letting the other one know, the best option is to mirror the phone screen to a PC and then use the PC’s screen recorder to capture the screen.
The goal is to mirror your Android screen to a PC with AirDroid Cast and then record the PC screen. This way, you will record your PC’s screen, not the Snapchat app. This won’t notify the other person that you have captured the screenshot.
The AirDroid Cast is a powerful and easy-to-use screen-sharing & controlling tool that allows sharing mobile screens to Windows or macOS.
7. ApowerMirror

ApowerMirror follows the same concept as AirDroid Cast. It’s a screen mirroring app with more features than AirDroid Cast.
The app facilitates wireless screen mirroring, and you can use it to cast Android to a PC, MAC, or even Smart TV with audio.
The goal here remains the same, you mirror your Android screen to a PC and then record the PC screen. This way, you will be recording the PC screen, preventing Snapchat from notifying the other user.
The app is completely free to download and use; it supports mirroring 4 devices simultaneously without any delay.
8. SnapScreenshot Tool
SnapScreenshot Tool is a screenshot utility designed for apps that notifies other people when you capture a screenshot. The app is fully compatible with Snapchat, and it will let you capture screenshots on the app anonymously.
However, you should note that the app won’t work with protected apps like Netflix, Banking apps, etc. You will get a blank screen if you attempt to capture screenshots of protected apps.
To capture while using apps, SnapScreenshot Tool provides a floating camera button that sticks to the screen. You need to tap on the floating camera button to take the screenshot.
9. Apowersoft Screen Recorder
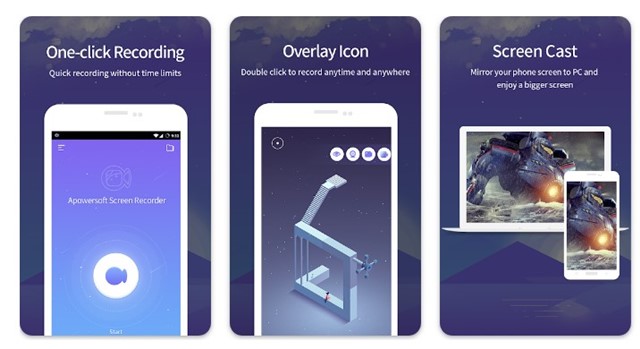
If you are looking for a Snapchat saver app and don’t care if the app sends notifications to the end user, you may find Apowersoft Screen Recorder very helpful.
Apowersoft Screen Recorder is one of the best and easy to use screen recorder apps that can record your entire Android screen in high quality.
Apowersoft Screen Recorder also has a screencasting feature that lets you cast your mobile screen to a computer. If you don’t want to notify the other user about the screen capture, just cast your phone screen to the computer and record the computer screen.
Some of the key features of the Apowersoft Screen Recorder include recording screen with internal audio, front camera recording, flexible overlay icon, video editing features, etc.
10. SnapGrab

Due to some reasons, SnapGrab has been taken down from the Google Play Store. However, you can still download it from third-party app stores.
SnapGrab is a private screenshot app that’s designed especially for Snapchat. You can install this app to Save Snapchat pictures and videos without notifying the end user.
Everything is good in the app, from the user interface to the features. The app doesn’t put a watermark on your recorded videos or screenshots.
However, since the app is no longer available on the Google Play Store, you must be very careful while downloading it from third-party app stores. Make sure to pick a reliable third-party app store to download the app for Android.
How to screenshot Snapchat chat without them knowing?
Apart from the Snapchat Saver, there are other ways to screenshot Snapchat Chat without them knowing.
You can use emulators to run Snapchat on a PC and then capture screenshots, record using the mirror feature of Android, use Google Assistant, etc.
We have shared a detailed guide on how to take screenshots on Snapchat Without them knowing. In that guide, we have shared all possible ways to take Snapchat screenshots without notification.
So, these are some of the best Snapchat saver apps for Android that you can use today. If you want to suggest any other similar apps, let us know in the comments. Also, if the article helped you, share it with your friends.
The post 10 Best Snapchat Saver Apps for Android in 2023 appeared first on TechViral.
from TechViral https://ift.tt/mhPJaiD
Enable Memory Saver in Google Chrome (Reduce RAM Usage)

Google Chrome is a very useful web browser with all features you may need, but it has a major drawback. Chrome is more resource hungry than any other web browser, slowing down your PC.
While you can modify a few settings on Google Chrome to prevent it from hogging up your RAM and CPU resources, those weren’t a full-proof solution.
The full-proof solution to prevent Chrome high CPU usage problem is by using Chrome alternatives. Chrome alternatives like Microsoft Edge and Firefox offer similar features but don’t slow down your device.
We are talking about Chrome’s resource-hungry nature because the browser recently got a new feature that can save your Memory usage. And in this article, we are going to discuss the same feature.
Memory Saver Mode on Google Chrome
If you use the latest version of Google Chrome, you can enable and use the Memory Saver Mode. The Memory Saver mode is available on Chrome version 108.0.5359.124 or newer.
The Memory Saver Mode is a new Chrome feature that frees memory from inactive tabs. Let’s say you have one Chrome tab playing a YouTube video, but you’re not actively using it; it can free up the memory from that tab.
Once you enable the Memory Saver mode on the Chrome browser, you will give the active tabs and other apps more computer resources and keep Chrome fast. And your inactive tabs will become active again as you switch back to them.
This feature is less marketed but significantly reduces Memory Consumption while using Chrome.
According to the users who tested this feature, the Chrome browser consumed almost 30% less memory in the Memory Saver mode.
How to Enable the Memory Saver Mode on Chrome?
The feature is already available on the latest version of Chrome. You will find a new Performance tab on the Chrome Settings page.
On the Performance settings, you have to enable the Memory Saver mode. If you don’t find the new feature, manually enable it from the Chrome experiment page. Here’s what you need to do.
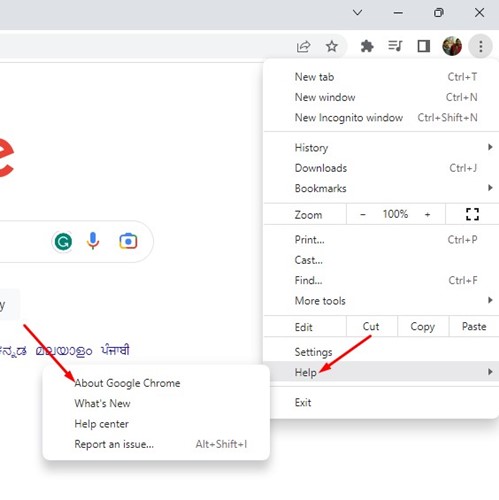
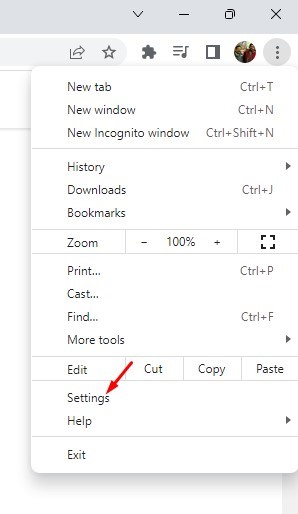
1. First, update the Google Chrome browser if you haven’t yet. Click on the three dots to update and select Help > About Google Chrome.
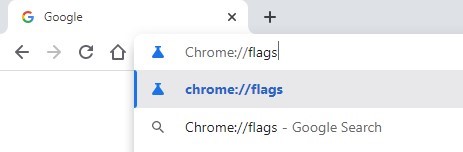
2. After updating Chrome, paste this URL on the address bar and press Enter.
Chrome://flags
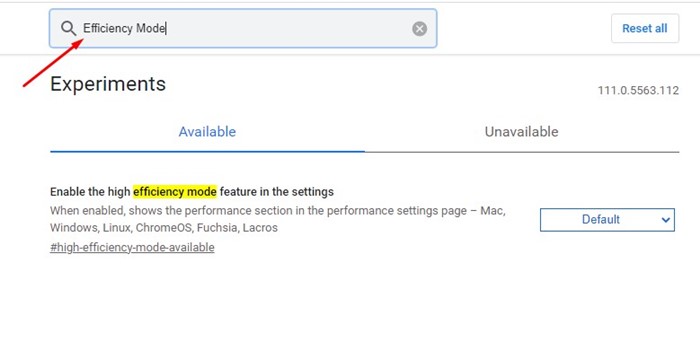
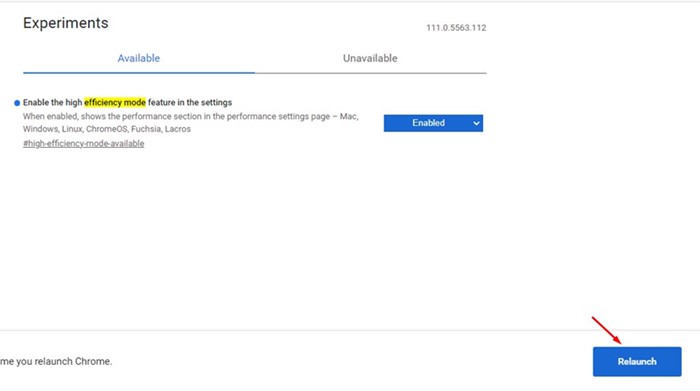
3. On the Chrome Experiments page, search for ‘High Efficiency Mode‘
4. Next, click the drop-down for the ‘Enable the High Efficiency Mode feature in the settings‘ flag and select ‘Enabled‘.
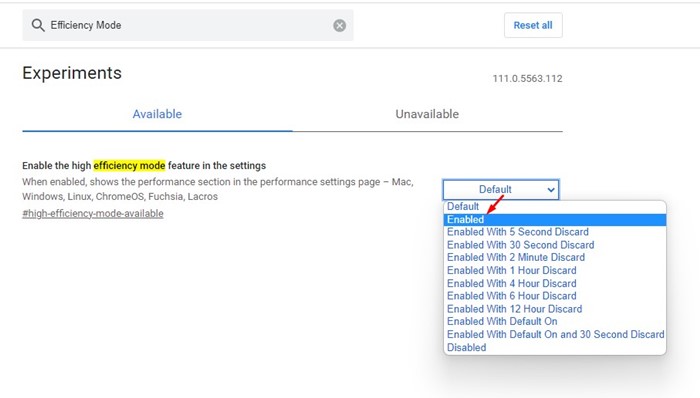
5. After making the changes, click the Relaunch button at the bottom right corner.
That’s it! This will enable the High-Efficiency Mode feature on the Settings page of Google Chrome.
How to Use Memory Saver Mode on Google Chrome?
Once you enable the High-Efficiency Mode Settings on Chrome, you must follow these steps to use the Memory Saver mode.
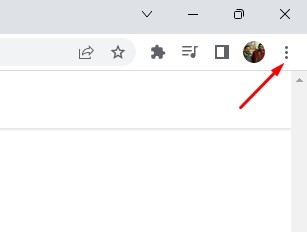
1. Open the Google Chrome browser and click on the three dots in the top-right corner.
2. Select ‘Settings‘ from the list of options that appears.
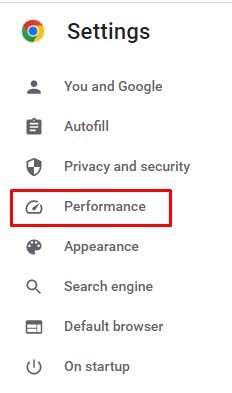
3. On the right side, switch to the Performance tab.
4. On the right side, turn on the toggle for ‘Memory Saver‘.
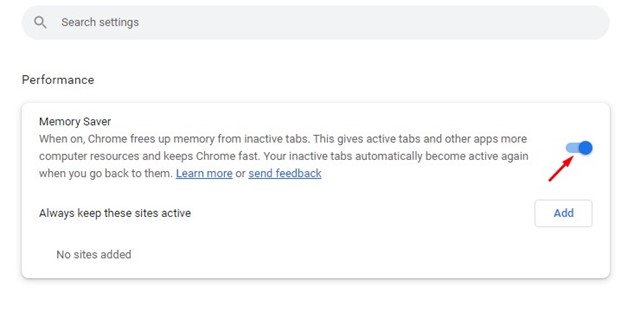
5. If you use a laptop, you will also find an ‘Energy Saver‘ mode. You can enable it to reduce battery consumption.
That’s it! This is how you can turn on Memory Saver mode on Google Chrome.
How to Always Keep Sites Active on Google Chrome?
The Memory Saver mode for the Google Chrome browser also allows you to manually add sites to keep active. The sites you add to this list will remain active even when the Memory Saver is turned on.
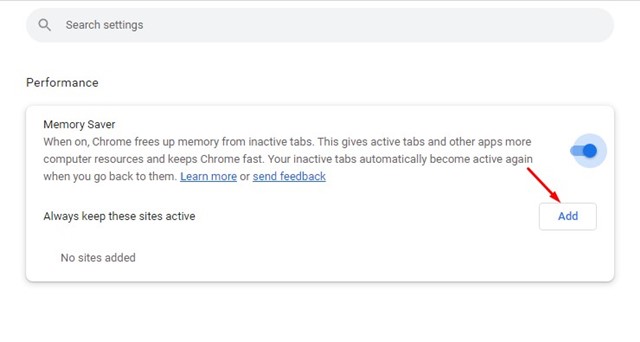
1. Open Google Chrome and move to the Performance settings.
2. On the Performance Settings, click the ‘Add‘ button beside ‘Always keep these sites active’.
3. Add the site URL you wish to keep active while using the Memory Saver mode.
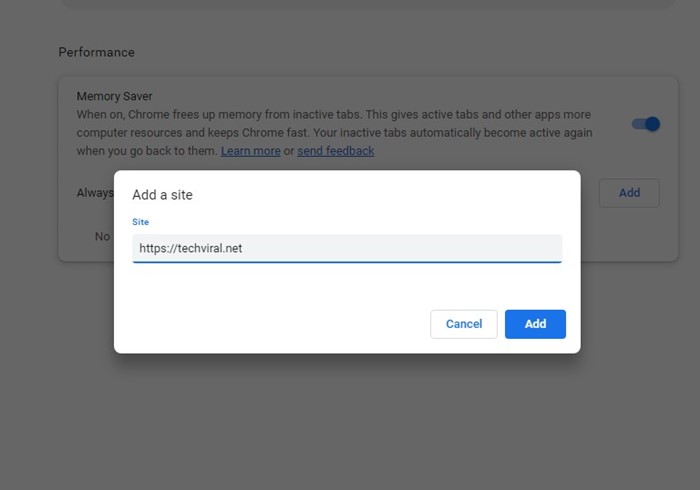
4. You need to repeat the steps for all sites you want to keep active all the time.
That’s it! This is how you can always keep sites active on Google Chrome while using the Memory Saver mode.
Other Ways to Reduce Google Chrome High Memory Usage?
Memory Saver mode was recently introduced; before this, users relied on other ways to reduce Google Chrome high memory & CPU Usage.
We have shared a detailed guide on how to reduce Google Chrome High Memory usage. In that article, we explained eight ways to reduce RAM usage while using the Chrome browser.
The new Memory Saver and Energy Saver mode of Google Chrome could be useful, especially if you have a mid-end computer/laptop. If you need more help enabling Memory Saver on Google Chrome, let us know in the comments below. Also, if the article helped you, make sure to share it with your friends.
The post Enable Memory Saver in Google Chrome (Reduce RAM Usage) appeared first on TechViral.
from TechViral https://ift.tt/UImLFRW
Subscribe to:
Posts (Atom)