Showing posts with label Blogger Tips. Show all posts

Sunday, April 10, 2016

Latest Custom Robots.txt file settings in Blogger for SEO

Custom Robots.txt for blogger
Today I will show you How to Enable Custom Robot.txt File in Blogger for better SEO and search engine results?

Blogger now lets you edit your blog's robots.txt file. What are Robots.txt files, robots files are plain text files which instruct the search engines what to not index. Robot.txt is a way to tell search engines whether they are allow to index a page in the search result or not. The bots are automatic, and before they could access your site, they check the Robot.txt file to make sure whether they are allowed to crawl this page or not.

How to Enable Custom Robots.txt in Blogger


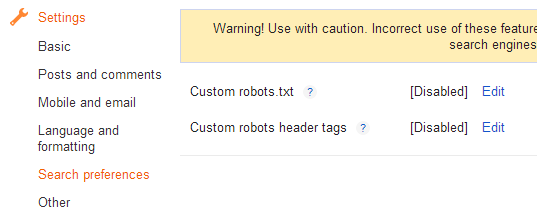
1. Blogger Dashboard >> Select Blog >> Select Settings tab >> Search Preferences

Robots.txt

2. Click on Edit in front of Custom robots.txt
3. Click on Yes and proceed to next step.
3. Next a box comes up and paste following given code.

User-agent: Mediapartners-Google
Disallow:

User-agent: *
Disallow: /search
Allow: /
Sitemap: http://YOURBLOGURL.blogspot.com/sitemap.xml
4. and finally click on Save Changes button to save code.

I hope this tip would help you. If you are having any issue regarding crawling then, feel free to leave your questions in the comments below and I would try to help you in solving them.

Saturday, May 2, 2015

How To Make Extra Money With Infolinks

How To Make Money With Infolinks
Make money with infolinks. Infolink is a online advertising company. Infolinks is one the best advertising platform after Google ad-sense for make money online. If you have a blog or website infolinks is the best for make money using text advertising ads, you no need to have any additional space for use it.

You can earn money very easily if you have good number of visitors then you just signup infolinks and start money earning. You can log-in this site as a publisher and advertiser. Basically blog and website owner use publisher account. Advertiser account use different type of organization for advertising online to selling their product and services via infolinks.

How To Earn Money With Infolinks


Infolinks provides you link ads within text content as well as pop up ads and link units. If you have some text over your website/blog then It will easily accept your site into their network and you�ll start making money online today. The earning is all depends on your traffic and visitors, the more visitors you have the more you�ll earn. Moreover, you can add as many sites as you want to Infolinks account.

Infolinks Criteria: 

Your site must have text content
Your site must comply with Infolinks policies
Your site must have original content

How to add my site with Infolinks

At 1st you join infolinks as a publisher then click your account like under the screen shot, and add your site. Infolinks take some time to approval your site for advertising.


After approval your site then you just integrate your blog or website for advertising text ads in your blog or website post. You can integrate very simply just click integrate then select your site type and copy the integration code and paste this code in your blog or website template just before </body> tag option. Now see the screen shot how to integrate your site with infolinks.

How to Integrate your site with Infolinks


When integration complete then you also use customize  option. Infolinks permits you to modify the actions of the Infolinks script on your Blog or web pages. By using the Advanced Integration Wizard, you can simply modify the configurations of your account to completely maximize your revenues with Infolinks ads. Now See under the screen shot how look
text ads.

Use Infolinks Affiliate Program for money making

Do you know infolinks affiliate program? In my view many blog or website owner don't know the infolinks affiliate program, because infolinks was not showing any information in Infolinks website about there affiliate program. Now if you like to use affiliate program then you must have an active publisher account. If you have active publisher account then you can see a tab in your infolinks account.You can earn money by infolinks publisher referral program.

The new publisher referral program is plain and simple: Refer new publishers to Infolinks and earn 10% of their revenue for 12 months.

As part of the new program, each Infolinks publisher has his own personal referral tab where you can get your own unique referral URL, see real-time sites sign up reporting as well as download a large amount of engaging banners to place on your site.

Join Infolinks here !

Saturday, November 15, 2014

SEO Meta Tags for Every Post in Blogger

SEO Meta Tags for Blogger Post
SEO Meta Tags are most important and useful for our blog's SEO. Meta tags are added to tell search engines what that page is all about. Most important meta tags are the Title and Description of a page. Only these two tags are included in search engines results with site link obviously. As blogs and sites have more than one pages i.e., a blogger blog normally have following pages. Blog home page , post pages, static pages, Labels and archives.

So we cannot use same meta tags for all our pages. Because every page have different content with unique Title and Description. So it is our duty to add different meta tags that perfectly defines our pages to the Search Engines if we want to rank high in the search results.

If we use same meta tags to all of our blog posts, our blog search engine rankings and traffic will be decreased. But, if we add different unique meta tags to different Blog posts, it will make the search engines to know more about our individual blog posts and make them crawl and index our pages better and it also improves our Search engine rankings for sure :)

Well this is the importance of unique meta tags for unique pages. Now lets learn about adding them in your site.

Add Meta Tags for Every Post in Blogger

There are many ways to do this. I'll write each step but the first one is my favourite and I recommend you to apply this method.

Step 1.  Change your blogger settings

Login to Blogger Dashboard >> Select Blog >> Select Settings tab >> Search Preferences

Now Enable search description to Yes.

Write your blog description in the box, it should be limited to 150 characters. Click on Save Changes Button.

Now whenever you create a new post, there will be option for Search Description on the right side. You can write a brief description of every post you are writing. 
(This option will be visible after changing search description setting to �Yes� as described above).

Now we just have to add following code in HTML to add these in our blog.

Go to Blogger Dashboard >> Click Template tab >> Click Edit HTML

Find the following code [Tip: Ctrl+F]
<head>
After/under this line paste the following code.
           <!-- Meta Tags ~  blogtipsuk.com  -->
 <b:if cond='data:blog.metaDescription != &quot;&quot;'>
<meta expr:content='data:blog.metaDescription' name='description'/>
</b:if>
 <title><data:blog.pageName/> - <data:blog.pageTitle/></title>
               <!-- /Meta Tags ~   blogtipsuk.com  -->
Now Save Template. Your blog posts will now have Title and Description that you wrote while creating your post.

Step 2. Add blogger pages HTML codes

This step is a little tricky. Why? Because you have to add the HTML codes of blogger pages one by one. Just see the code below that can be used to add meta tag for your blog home page URL.

Go to Blogger Dashboard >> Click Template tab >> Click Edit HTML
Find the following code [Tip: Ctrl+F]
<head>
After/under this line paste the following code.
<b:if cond='data:blog.url == data:blog.homepageUrl'>
 <meta content='Your Blog Description' name='description'/>
<title>Your Blog Title</title> </b:if>
Your blog homepage will now have Title and Description that you wrote in this code in place of RED color. Now Save Template. 
You can add other page codes as well see full codes here HTML codes for all blogger pages

Step 3. Add meta tags with URLs

You can add meta tags with specific URLs as well. Just write your desires URL and give that URL specific Title and Description. 

Go to Blogger Dashboard >> Click Template tab >> Click Edit HTML
Find the following code [Tip: Ctrl+F]
<head>
After/under this line paste the following code.
<b:if cond='data:blog.url == &quot;Write URL of page&quot;'>
 <meta content='Your page Description' name='description'/>
<title>Your page Title</title> </b:if>
Your blog page will now have Title and Description that you wrote in this code in place of RED color. Now Save Template.

Remember some points


1. Apply only one method. Because writing multiple tags will be of no use. 
2. Google and all other Search Engine Bots only take those meta tags in their system which come on top the site i.e., if you have multiple title tags then only one title will be taken by bots which in on the most top.
3. You can see your HTML code by pressing [CTRL + U] , just open your blog link and press CTRL + U this will open your blogs page source. and your html site will open.

Need any assistance, don't hesitate to comment down. Have a good day!

Saturday, August 9, 2014

Buy or Sell Ad spaces in new Low Traffic Blogger/Blogspot

Buy or Sell Ad spaces in Low Traffic blogs
I see many bloggers and website owners that they sell ad spaces on there blog/website like renting a house and they earn a decent amount from that.I also like this method because in this method you don't need any kind of clicks or worry that how to increase CTR.

By selling ad spaces directly to your clients you will earn decent money of your choice because you are the admin of your site and blog. By selling ad spaces you also need a decent traffic to fulfill the requirement of advertiser but if your site contains a low traffic and cannot fulfill the advertisers need then the main problem is how to make money in a low traffic blog by selling ad spaces.

Best BuySellAds.com Alternatives for Low traffic sites

As we know that Buysellads is one of the famous site and best sites for publishers to put there ad spaces for renting.But we all know that buysellads have such requirement that they need minimum 50K Monthly Impressions.But your site contains only 500 to 1000 Daily visits and monthly impressions are 10k to 20k then you don't need to worry more there are some sites that will provide advertisers our site ad space and advertiser will directly contact you.I Recommended Buysellads for those sites whose monthly impressions are over 50,000 to 70,000. So here is a list of sites that can be called as Best BuySellAds.com Alternatives.

How to sell ad spaces in Low traffic blogs?

If you have a low traffic blog and still want to sell your Adspaces then you can use the below given websites.

1.  BlogAds.com is serving publishers from year 2002.Blogads represents thousands of premiere blogs like PerezHilton, DailyKos, Wonkette and Cute Overload.It allows you to choose your own prices,Accept or reject Ads,Phone and email publisher support,Advertsers can purhcase Adspaces directly,70%+ of revenue goes to the publishers.

2.  AdSella.com makes your task lot more easier.Simply set your listing,price and paste a line of code to your blog and just wait for your adspace to sell.It�s completely free and quite easy as well.Advertisers will contact your directly.Adsella gives you 80% of your revenue which is quite nice for low traffic blogs.

3.  According to me Puxee.com is the best alternative of BuySellAds.com for low traffic blogs.It provides you the easiest way to sell Advertising spaces on your blog.It pays through Paypal and shares 75% of the total revenue.As an administrator of your blog,you always keep control over your Adspace.

4.  Advertisespace.com is another best alternative of BuysellAds for low traffic blogs.It allows you to set your own price for a variety of adspaces.All un-sold inventory can be syndicated to their impact network to instantly generate revenue for you until your individually priced Adzones are sold.They provide javascript codes for the Ads which ensures that the loading speed of your blog remains same.

5.  PublicityClerks.com is another BuySellAds alternative.This site was launched in the year 2012 and is very popular now.Major advantage of using this site is,it accepts a blog which has only 5000 visits per month which means low traffic blogs.Just give it a try.

In this post I tell you that how to sell Ad spaces in Low Traffic Blogs. Hope that you will like my tutorial.
Tell me your opinions and feedback in comments below. Have a good day!

Thursday, August 7, 2014

Use stylish Mouse Pointers in Blogger/Blogspot

use Mouse Cursor in Blogger
Hello Friends, in today's tutorial I am going to tell you how to install a beautiful mouse cursor in your blogger blog with a very simple HTML code. Make your blog look beautiful with stylish mouse cursor and back to top button.

Mouse Cursor:

In computing, a pointer or mouse cursor (as part of a personal computer WIMP style of interaction) is a graphical image on the computer monitor or other display device. The pointer echoes movements of the pointing device, commonly a mouse or touchpad, and signals the point where actions of the user take place. It can be used to select and move other graphical user interface elements, and is distinct from the cursor, which responds to keyboard input. The cursor may also be repositioned using the pointer.
You would also like to add:  Emotion Smileys for Blogger Comments

Mostly people, especially new blogger want to make their blog more beautiful and shiny. There are many tricks have been shared on the internet about this issue. But the one I'm going to share, is the easiest method to add a mouse cursor in your blog. Let's now come straight to the solution.

How To Change Mouse Cursor In Blogger

Follow the steps below to do this

  • Log-in to your blog
  • Template >> HTML >> Proceed
  • Search For this code ]]></b:skin> (tip: Use CTRL+F)
  • Now Just above/before ]]></b:skin> insert following code

body{
cursor: url(IMAGE LINK), auto;
}
Now Save your template and view your blog.
Replace IMAGE LINK with the image link of your mouse pointer image.

Tell me in comments if this worked for you. In case of any error comment down I will try to solve your problem. Have a good day ahead!

Friday, August 1, 2014

Add Emoticons Smileys in Blogger Comments

Add Smileys in Blogger Comments
Emoticons/Smileys are a great way of making discussions more interesting and fun, so it's a pity that Blogger don't support them. In this tutorial, I will show you some simple steps on how to add some very cool emoticons called Kolobok to your Blogger/Blogspot comments, so that you and your blog visitors will be able to have an enjoyable time together.

UPDATE: Now available for threaded commenting system too!

How To Add Kolobok Smileys Emotions to Blogger Comments
Step 1.  Log in to your Blogger account and go to Template - Edit HTML

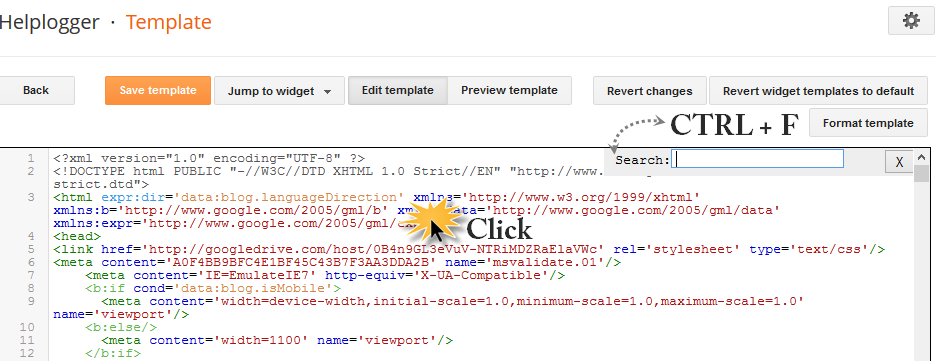
Step 2.  Click anywhere inside the code area and press the CTRL + F keys to open the search box

open the search box in blogger HTML

Step 3.  Search (CTRL + F) for this tag:
</body>

Step 4.  Copy and paste just above it, this code:

a) For previous commenting system with comments that have no reply function:
<!--kolobok-smileys-->
<script src='http://helplogger.googlecode.com/svn/trunk/[helplogger.blogspot.com]smileys.js' type='text/javascript'/>
<!--kolobok-smileys-->
b) For threaded commenting system with comments that have the reply function:
<script src='https://helplogger.googlecode.com/svn/trunk/kolobok threaded.js' type='text/javascript'/>
Note: ignore steps 5-8 if you are using threaded comments!

Step 5.  Now find this code snippet:
<b:loop values='data:post.comments' var='comment'>
Step 6.  Paste the following code just above it:
<div id='smileys'>
Step 7.  Find the following code (look carefully, it should be somewhere below the code from step 5)
</b:loop>
Step 8.  Paste the following tag just after it:
</div>
Step 9.  Now find this code:
a) For previous commenting system:
<data:blogTeamBlogMessage/>
Note: if you'll find it like 4 times, stop to the 2nd one!

b) For threaded commenting system:
<div class='post-footer-line post-footer-line-3'>

Step 10.  And add this code just after it:
<b:if cond='data:blog.pageType == &quot;item&quot;'><script type='text/javascript'>
//<![CDATA[
function moreSmilies() {
    document.getElementById('smiley-more').style.display = 'inline';
    document.getElementById('smiley-toggle').innerHTML = '<a href="javascript:lessSmilies()"><div style="font-size:small; font-weight:bold;color:#000000;">Hide Emoticons</div></a>';
}
function lessSmilies() {
    document.getElementById('smiley-more').style.display = 'none';
    document.getElementById('smiley-toggle').innerHTML = '<a href="javascript:moreSmilies()"><div style="font-size:small; font-weight:bold;">Show Emoticons</div></a>';
}
//]]>
</script>
<div class='emoticons'>
<a href="http://www.blogtipsuk.com/2014/08/add-emoticons-smileys-in-blogger-comments.html" ><img alt="Emoticons Smileys for Blogger Comments" title="Add these Smileys in your site" border="0" src="https://blogger.googleusercontent.com/img/b/R29vZ2xl/AVvXsEiDmllr9nOSfao1qljIRgkfbDNnuTM4x0QHq9XEOYobVNKXVFsnAKaBeQ4lrE-tVy4gUvUllcyM5bGY4bsG3jzmAwGkersSeh6uJ-aJeD-u_169-eJ2RmORgsjm1h3dXhdgz7hgfnPWSVoJ/s1600/Add+in+your+Site.jpg" height="20" width="100" /></a>
<span id='smiley-more' style='display: none;'>
<img src='https://blogger.googleusercontent.com/img/b/R29vZ2xl/AVvXsEh1zjBfunCN8Kin9SRlvlQb2XMtx6gEOwpJkh15nBVRS7E5l7HjKcFHXUwiLz3GRNbvIIw2VBW_d5ZZtlLfC38z-U-4XpZcFg6fI2rKx6O4WStwa8a8-WNvLimHvPAFdsVSJ2SAn6L_FJw/s1600/smile3.gif'/>:)
<img src='https://blogger.googleusercontent.com/img/b/R29vZ2xl/AVvXsEjWdFidwySYMHeXNYqYoQlvSG7J6arxL_x1qFQzpUWnABfT8l3BUSOlL1ShH-lewqiWP5G2sfGA8euzK78tmzJa44orPqRB1bJpvTcqbE8fJSBN0hQLTYosNLY_9OIxOQnTLRijXlqsWUQ/s1600/sad.gif'/>:(
<img src='https://blogger.googleusercontent.com/img/b/R29vZ2xl/AVvXsEi6B49TwelRiByli3-ldLDB9-O_gJ5kmvTxqDMG9PkDEcmaY0DAyQmcPFNCNL_tCFjyydbpfD9HCr1JS8WmLQ-JRhRoqdsLYHi1Rpc7KjyVg6i5V0Lp6VHm6I5mw_cw3exwTc2HldbF4jg/s1600/taunt.gif'/>:))
<img src='https://blogger.googleusercontent.com/img/b/R29vZ2xl/AVvXsEjLlfaCDGqhMkpu_LdFPL6QmhppoONoCJ-G_duZ5EqUF99118y6aGt7ibqKWdx5_bcfhlMji-79NVuoZSHDjGL0uHHmFyU1jZrHCGgnSYoNUPS2zPs3qf7pFsWTQNbVP25SSuSZgOzb2CE/s1600/cry2.gif'/>:((
<img src='https://blogger.googleusercontent.com/img/b/R29vZ2xl/AVvXsEiuNRbQ_e6BjB4mnB4fUTD-UvXnuuC4AnWEsyXqYqrQsuHPDTiTl6-12G0jAbwhW1597cLefenBkSvJ421-63t1ndw2UfV2JItJCDokRRH4CJuH8JtDQ13sBaWAob8_qCR7NFfzZ5QAync/s1600/rofl.gif'/>=))
<img src='https://blogger.googleusercontent.com/img/b/R29vZ2xl/AVvXsEj8AlS74q9JaUUAJqofU7KAnvwtSzZtujJWfS4UzK8coTIayc1tbgevftwMsEq5tjNCzbaYwwxYZQOqAJkH_-wl1sBmzNnZ1eaw5SVPN9jV0omRyTgyZncLTA0c-s3BMRruAhiR70t0rkU/s1600/suicide.gif'/>=D&gt;
<img src='https://blogger.googleusercontent.com/img/b/R29vZ2xl/AVvXsEin2sGqnYVffk8c24-VASKp9uUoxqmfIY72vU2IERNaPnfMOCaKmafDhNJq5UESHihxPcWmexSANvS_iWG887qys4LGTNQ4t7PNCV8TDRh9N3tLhtUKSLgAfe_GNiWC1c5ux0Qq96quGjE/s1600/biggrin.gif'/>:D
<img src='https://blogger.googleusercontent.com/img/b/R29vZ2xl/AVvXsEgODRyluB6QGL2JAVLZBv3KDmM0Z2N-hCX7qMkiKFfePQ1UwBIb4X-zH1p5NnrM2IB6mcvuiUXPXJH0PmrP1RW04kDLBQz4akmzWR_85pIDFkN1BP7hR8EeHCOY4LZ1D8OudJXTPjjaFJI/s1600/tongue.gif'/>:P
<img src='https://blogger.googleusercontent.com/img/b/R29vZ2xl/AVvXsEgM65y3Nrb5TG-PAv-f7bOtlxF7IYQi7CnSEoxdKU-aAZZw1ELVALbD6RFoEPMZ5JkhNLPsxVJ1-WWKI0SoUamU29JqAlm2TUSa5AmnQpax_V1HjMWeB_x0ek1DBX8dkfq80OOOxn3LfIU/s1600/shock.gif'/>:-O
<img src='https://blogger.googleusercontent.com/img/b/R29vZ2xl/AVvXsEg8X9CqOHdvsgEGXB0wxZUdJ6UBKQY5f3YqRCD8azO9ajmL5xjcEPz8-XuZOuBtaT4b8pbNRc7rmqSkH8CNvpjrICjbLqKwelLlRRuB__YbWUtGUUsXi59Vhl2JECMGxrgK926lhKjq4eE/s1600/think.gif'/>:-?
<img src='https://blogger.googleusercontent.com/img/b/R29vZ2xl/AVvXsEjh9JACyMilyWdkq1iORRRhiFcBkr4EYvbzGZMV1GIuzS5cu-OO5BBcI8ivE7rcnlqghCXx24UTnVz4mkGp9Pkqqb-Oji37qN38CHtzMfP4cFdUvQy-WuH6m6L7wuk9DSatrOTPs3VJojQ/s1600/unsure.gif'/>:-SS
<img src='https://blogger.googleusercontent.com/img/b/R29vZ2xl/AVvXsEjDo7zoHF0b18t8_7eD2xImVREpCI20cytHZptjOrAWCyCPly5OJxiWhbI4xi_I4o6-dhFENYIWxAIvys_qziLEZ3MVLcPWjo4m0d7NrxePq7PcHGCCJEgh6Bd18P0cl4o_Xz3rnk86qzw/s1600/flowers1.gif'/>:-f
<img src='https://blogger.googleusercontent.com/img/b/R29vZ2xl/AVvXsEhiBhr38Js3PSN62b3-CdzW2EPnZ6Nnoy9VVkgY6Ck6AprhMY64UfmHssrIRikfOZStqOf1-_ldbITJBdXC7pSceFCx2Hq2bCSbnoxIhbXrlyUJRoSK5X1EAcPHs80oM6xPVfjeb4HtQcw/s1600/doh.gif'/>d(
<img src='https://blogger.googleusercontent.com/img/b/R29vZ2xl/AVvXsEhFRMoX8IOQfy4pADd2ri-CUccTmc7zQwlJurEsLb4zGbnpO-r9IR3hWlFD_9GfSWKumRLwcQTxemlyThuLzNdT4mfAKIahKST8FZQBZz-QUUESywS2rl8YgjkfxssRX9uEqua3ax5-eZQ/s1600/air_kiss.gif'/>:-*
<img src='https://blogger.googleusercontent.com/img/b/R29vZ2xl/AVvXsEhzz0pllrAfPkDnnPhMJUAXaUiF3tDlbya-5TmdXi8LIuJYE4hbWxGfDG4KMNFZDiwjcQldpsl0sRlt8M2WA-QqLGSs6addusNot84I5YP-2HHY6R4av5cUQg4NmK8UCKCGyOx6DMSLA9A/s1600/threaten.gif'/>b-(
<img src='https://blogger.googleusercontent.com/img/b/R29vZ2xl/AVvXsEjmWx7cIfvAP5tmI6QNc9FKEqiRg0SVb28h-BImAlRzNZE10plj4o1mjMKlcm_gsMub5sURMNt4ofEezePSV5vCFzat0uzzgEm_7PZMfoZFltzAsJ6_iAIlLB5wTnXZvY5T8b4yow_FNoQ/s1600/help.gif'/>h-(
<img src='https://blogger.googleusercontent.com/img/b/R29vZ2xl/AVvXsEiuGPDhI6DEMgY_oO-gMvP8DpU_2pEVhJh34eG9fpRWdssu-TsmRkW2pTg9Q6QD9mslG6dP6xLC6BWvM9UeKe4P8yXOQH_NZN3E4Ao1bWaR3Q4Zx6CiJgUSKHFdN3a2suL3eLZrwG168xQ/s1600/good.gif'/>g-)
<img src='https://blogger.googleusercontent.com/img/b/R29vZ2xl/AVvXsEjcdap34WKwZXX9DW4vL6jvjYyCkeuj7RRxEdTXO37EBUHVAeP39yvL8PwMcUTWkMBijkL5KJy83El_It7lzHURyw56Aqc1FZ-exJLQC9oGSONvV2_ALeUim3Y4lptQyR5KQWK-gdcB-Ys/s1600/beee.gif'/>5-p
<img src='https://blogger.googleusercontent.com/img/b/R29vZ2xl/AVvXsEisKBNgV0HbZhyphenhyphencGbRYrkWI8f6mlZPIdsEw-Ow3hPlrU3hAgXa-DxoO5m_V6xNquPV1iQyL3SYeLUFW6P6i6I1csPuWO5fl2VDnagU6zVr2L2QOOG7pV0vhC3OF-FpSV-CxB5Ol3uAybxw/s1600/yahoo.gif'/>y-)
<img src='https://blogger.googleusercontent.com/img/b/R29vZ2xl/AVvXsEgXTKx_kWJSrn-uGQS-GEoyaXxf-W425hgL9N28IGC-k7lvecliHFov3HDJ_5hdmVkO2mvWOutakwpDp8OiTkXWiNLceDQXPIXa7YGsSVOwkqhl7wYjtU3N2ch0TcpheeukqXW3LM01vOc/s1600/crazy.gif'/>c-)
<img src='https://blogger.googleusercontent.com/img/b/R29vZ2xl/AVvXsEhPu98FOFtc043LfXPLNKoAwKNmXp2fyQ7bXLYTqNxHHSWy3bTXe4sh7YihBiDJ5MoWMdUHNHlbDw9Gmv4kcq56S9lbRow2SFxbyaWxrtCuO9OzhGR8obcabTiFTMJkm07ZIyg5CFjWtTg/s1600/spiteful.gif'/>s-)
<img src='https://blogger.googleusercontent.com/img/b/R29vZ2xl/AVvXsEgKdEyjAL2GDJpIzJ9NNOZJnHxCx9FK5uCDwwmxitOqgLbjY_oQl0e9VkzusQqoHkILHaOyqqthosXjHvdoMsGZkmoH7xQ5sh9zm3uHOUW_AvHdGeCNzsXhDfXYdFqWwJER8zPur_uBxWY/s1600/drinks.gif'/>d-)
<img src='https://blogger.googleusercontent.com/img/b/R29vZ2xl/AVvXsEi4b1nURvPslB6IESYpCZQeK-xJeC85I_PdKbPL5zA_3u_L89rCUuNh_I1BLyAlLfQLPbsyWBEm1lqGVIw5yIODM7Nq-acvDGWTiYaOsFJFu_SPDjolAwuO6t1WE_qB6M9hCf94GyRXTRg/s1600/cheer.gif'/>w-)
<img src='https://blogger.googleusercontent.com/img/b/R29vZ2xl/AVvXsEh677RC1AmEcIuoLvJ1ImAiujU1kGSv7JbIYxvs_Fwr5cQ3rnOvlaTPSA8h0_vPwzfSgfPSQuSXWvBxW2Yg_nkrIDwdP6VPXMTUygPJfuHmmiaI2uwNO4LcM_fVuUgFcQZch78slw1nlqI/s1600/hi+2.gif'/>:-h
<img src='https://blogger.googleusercontent.com/img/b/R29vZ2xl/AVvXsEh70YEfXa9u-hrFuMlWolLHrIxto1jRaX71NEoP8UwC0i8JOlc9MjW7IrsDSySF4dFYEbh3MeQuzgXmKr_rgjs3gj-Jgdtxhbr6A_75oeZQkxw_-Rf8TJrwtdzQvUYCZPZkxrNR02AKEiw/s1600/give_heart.gif'/>:X
</span>
<span id='smiley-toggle'><a href='javascript:moreSmilies()'><div style='font-size:small;font-weight:bold;'>Show Emoticons <img src='https://blogger.googleusercontent.com/img/b/R29vZ2xl/AVvXsEh1zjBfunCN8Kin9SRlvlQb2XMtx6gEOwpJkh15nBVRS7E5l7HjKcFHXUwiLz3GRNbvIIw2VBW_d5ZZtlLfC38z-U-4XpZcFg6fI2rKx6O4WStwa8a8-WNvLimHvPAFdsVSJ2SAn6L_FJw/s1600/smile3.gif'/></div></a></span>
</div></b:if>
Note: Ignore steps 11-12 if you are using threaded comments!


Step 11.  Finally, find this code
]]></b:skin>
Step 12.  Add this one below, just above ]]></b:skin>
.emoticons {-moz-background-clip: -moz-initial;-moz-background-origin: -moz-initial;-moz-background-inline-policy: -moz-initial;text-align: left;width:400px;}
.emoticons a, .emoticons a:hover {margin-left: 20px;text-decoration:none;}
Note: if you want to change the size of the emoticon container, edit the red code.

Step 13.  Save the Template and you're done. Enjoy!

Sunday, July 13, 2014

Hide or Show a Widget on some Pages Blogger

show and hide blogger widgets
Hi Bloggers, you may have noticed, all the widgets/gadgets you add to your blog, will be displayed on all the pages by default, including the homepage as well. And I'm sure very few know that AdSense could disable your account in case you've put ad units inside the content of your contact or privacy policy pages. Therefore, hiding certain elements inside your blog pages is not only a matter of design, but it is also a requirement.

Today I'll show you the easiest and simple ways to show or hide any widget in your blog to show on pages you like. So let's start.

To hide (or show) widgets in particular posts, static pages, homepage or archive pages, you can use these conditional tags.

How to Hide or Show a Widget on some Pages Blogger


Step 1. Go to Blogger's Dashboard > Layout and name the HTML/Javascript gadgets that you have already added. Doing this, it will be easier for you to identify the widgets that you have in your Blogger's template. Give it a unique title so that it does not match with any of the titles of any other widgets already added.

Step 2. Next thing to do is to go to Template and click on Edit HTML

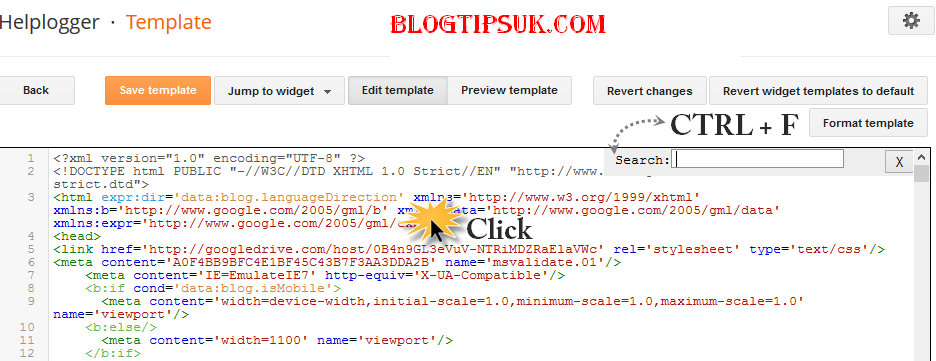
Step 3. Click anywhere inside the code area and press the CTRL + F keys to open the search box

blogger template, ctrl + f, search box

Step 4. Find the HTML of your widget by typing the widget's name in the search box - hit Enter.

Let's say that the title for one of your widgets is "Recent Posts". After searching for the widget's name, You will find a similar code in my template:
<b:widget id='HTML1' locked='false' title='Recent Posts' type='HTML'>
<b:includable id='main'>
<!-- only display title if it's non-empty -->
<b:if cond='data:title != ""'>
<h2 class='title'><data:title/></h2>
</b:if>
<div class='widget-content'>
<data:content/>
</div>
<b:include name='quickedit'/>
</b:includable>
</b:widget>  
This code represents the widget/gadget that you have added in the Page Elements location (Layout).


Step 5. After you've found your widget's code, add the following conditional tags marked with red just below and above to hide the widget from specific pages or posts in Blogger. For instance, in case you want:

To show the widget only in Homepage:

<b:widget id='HTML1' locked='false' title='Recent Posts' type='HTML'>
<b:includable id='main'>
<b:if cond='data:blog.url == data:blog.homepageUrl'>
<!-- only display title if it's non-empty -->
<b:if cond='data:title != ""'>
<h2 class='title'><data:title/></h2>
</b:if>
<div class='widget-content'>
<data:content/>
</div>

<b:include name='quickedit'/>
</b:if>
</b:includable>
</b:widget>

To show Blogger widget only in post pages 

<b:widget id='HTML1' locked='false' title='Recent Posts' type='HTML'>
<b:includable id='main'>
<b:if cond='data:blog.pageType == "item"'>
<!-- only display title if it's non-empty -->
<b:if cond='data:title != ""'>
<h2 class='title'><data:title/></h2>
</b:if>
<div class='widget-content'>
<data:content/>
</div>

<b:include name='quickedit'/>
</b:if>
</b:includable>
</b:widget>

To hide Blogger widget in post pages

<b:widget id='HTML1' locked='false' title='Recent Posts' type='HTML'>
<b:includable id='main'>
<b:if cond='data:blog.pageType!= "item"'>
<!-- only display title if it's non-empty -->
<b:if cond='data:title != ""'>
<h2 class='title'><data:title/></h2>
</b:if>
<div class='widget-content'>
<data:content/>
</div>

<b:include name='quickedit'/>
</b:if>
</b:includable>
</b:widget>

To show the widget in a specific page

<b:widget id='HTML1' locked='false' title='Recent Posts' type='HTML'>
<b:includable id='main'>
<b:if cond='data:blog.url == "URL of the page"'>
<!-- only display title if it's non-empty -->
<b:if cond='data:title != ""'>
<h2 class='title'><data:title/></h2>
</b:if>
<div class='widget-content'>
<data:content/>
</div>

<b:include name='quickedit'/>
</b:if>
</b:includable>
</b:widget>

Note: Replace URL of the page with the address of the page in which you want the widget to appear

To hide a widget only in a particular page

<b:widget id='HTML1' locked='false' title='Recent Posts' type='HTML'>
<b:includable id='main'>
<b:if cond='data:blog.url != "URL of the page"'>
<!-- only display title if it's non-empty -->
<b:if cond='data:title != ""'>
<h2 class='title'><data:title/></h2>
</b:if>
<div class='widget-content'>
<data:content/>
</div>

<b:include name='quickedit'/>
</b:if>
</b:includable>
</b:widget> 

To show widgets only in static pages

<b:widget id='HTML1' locked='false' title='Recent Posts' type='HTML'>
<b:includable id='main'>
<b:if cond='data:blog.pageType == "static_page"'>
<!-- only display title if it's non-empty -->
<b:if cond='data:title != ""'>
<h2 class='title'><data:title/></h2>
</b:if>
<div class='widget-content'>
<data:content/>
</div>

<b:include name='quickedit'/>
</b:if>
</b:includable>
</b:widget> 
To hide widgets in Static Pages
<b:widget id='HTML1' locked='false' title='Recent Posts' type='HTML'>
<b:includable id='main'>
<b:if cond='data:blog.pageType != "static_page"'>
<!-- only display title if it's non-empty -->
<b:if cond='data:title != ""'>
<h2 class='title'><data:title/></h2>
</b:if>
<div class='widget-content'>
<data:content/>
</div>

<b:include name='quickedit'/>
</b:if>
</b:includable>
</b:widget> 

To show widgets only in Archive Pages

 <b:widget id='HTML1' locked='false' title='Recent Posts' type='HTML'>
<b:includable id='main'>
<b:if cond='data:blog.pageType == "archive"'>
<!-- only display title if it's non-empty -->
<b:if cond='data:title != ""'>
<h2 class='title'><data:title/></h2>
</b:if>
<div class='widget-content'>
<data:content/>
</div>

<b:include name='quickedit'/>
</b:if>
</b:includable>
</b:widget> 
Note:  Pay attention each time you're adding a new address which should end up with .com, otherwise it may not work.

Step 6. After you have added the conditional tags, Save Template and view your blog.

Summary:

1.  See which widget you are willing to hide or show in some pages.
2.  Give that widget a Title in you Blogger Layout.
3.  Search it in your HTML code and use the above tags.

That's it!  Have a Good Day :)

Tuesday, April 15, 2014

Highlight Author Comments in Blogger websites with CSS

Change Author Comments Color Style
Hi friends, you surely have seen on many blogs and websites whenever an Admin of the blog or website make a reply to your comments, its comment's color and style is changed from other comments. These admin styled Comments are the best way to make good relationship with blog visitors or Followers.
So do you have a blog and your blog is getting good traffic then your blog will also be getting many comments, that may be positive or negative related to your blog website content.


 If you want to highlight your comments in your blog website, then here is the trick to do that and make your comments stylish,colorful and recognizable to others.Here I am going to share the trick to highlight Author Comments in Threaded comments and this trick also work in basic commenting system. This is coded using simple CSS and Jquery.

How To change Author Comments style In Blogger

Learn how to change blogger admin comments style and color in blogger template using CSS and Jquery for better interaction with your blog's users in easy steps.

Step 1.  Login to Blogger >> Go to Dashboard >> Template >> Edit Html

Step 2.  Find </body> and copy the following code above it [Tip: Ctrl+F]
<script type="text/javascript">
    $(function() {
      function highlight(){
        $(&#39;.user.blog-author,.ssyby&#39;).closest(&#39;.comment-block&#39;)
          .css(&#39;border&#39;, &#39;1px solid #e1e1e1&#39;)
          .css(&#39;background&#39;,&#39;#f1f1f1 url(&quot;https://blogger.googleusercontent.com/img/b/R29vZ2xl/AVvXsEgUCwe_QieE5CTKyqafaxfCjqNUBipAAmS415-nA_0R3MMAZj42LZPSAOhCCa_2ooO0-Hnse_Ljk1nr30JCAobEnEjk1fHCvybfuDxzb0DJ2M4sD6MNJTcIaVhmHizPwV8qzzKb1-yzEZ4/s1600/admin_comment1.png&quot;) no-repeat bottom right&#39;)
          .css(&#39;padding&#39;, &#39;10px&#39;);
          }
          $(document).bind(&#39;ready scroll click&#39;, highlight);
   });</script><a style="display:none" href="http://www.blogtipsuk.com" >Blogger seo tips</a>
Step 3.  Change red color bolded text according to your choice for border of the author comment.

Step 4.  Now save your template and you are done.

Congratulations you are done. If you enjoyed this article please like and share.

Monday, April 14, 2014

Install Scrolling "Back To Top" Button for Blogger/Blogspot

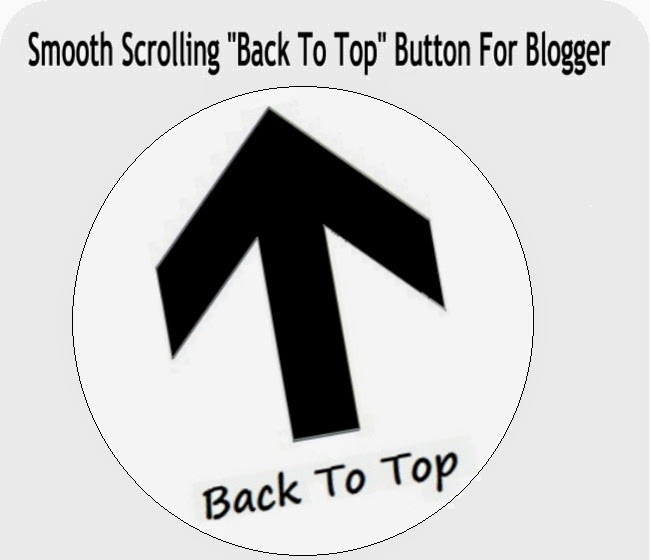
"Back To Top" Button
You surely have seen on many blogs and websites a  "Back To Top" Button in the sidebar at the bottom of the page that shows an image when clicked, it takes the user to top of your blog website. Animated back to top button in blogger website is one of the best Jquery style animated widget that looks good and also visitors enjoy easy site navigation scroll to top.

The best thing about this button is that it appears only when the user scrolls down the page and disappears as he scrolls up, and also one more feature of this script you can add your own image that you like as the back to top button.

Exactly same type of Back to Top Button in being used in our site. Probably one of the best Back to Top Button.

You would also like to use:  Sharing Buttons for websites in Blogger.

Add Smooth Scrolling "Back To Top" Button Widget to Blogger Jquery

Step 1.  Log in to your Blogger Dashboard, then go to Layout and click on Add a Gadget link
Step 2.  From the pop-up window, scroll down and choose HTML/JavaScript.
Step 3.  Select & Copy the code below and paste it into the new HTML/JavaScript:
<script src='http://ajax.googleapis.com/ajax/libs/jqueryui/1.8.23/jquery-ui.min.js' type='text/javascript'></script>
<script type="text/javascript">
var scrolltotop={
//Modified by www.blogtipsuk.com more JQuery Scroll to Top Design
//startline: Integer. Number of pixels from top of doc scrollbar is scrolled before showing control
//scrollto: Keyword (Integer, or "Scroll_to_Element_ID"). How far to scroll document up when control is clicked on (0=top).
setting: {startline:100, scrollto: 0, scrollduration:1000, fadeduration:[500, 100]},
controlHTML: '<img src="IMAGE LINK" />', //HTML for control, which is auto wrapped in DIV w/ ID="topcontrol"
controlattrs: {offsetx:5, offsety:5}, //offset of control relative to right/ bottom of window corner
anchorkeyword: '#top', //Enter href value of HTML anchors on the page that should also act as "Scroll Up" links
state: {isvisible:false, shouldvisible:false},
scrollup:function(){
if (!this.cssfixedsupport) //if control is positioned using JavaScript
this.$control.css({opacity:0}) //hide control immediately after clicking it
var dest=isNaN(this.setting.scrollto)? this.setting.scrollto : parseInt(this.setting.scrollto)
if (typeof dest=="string" && jQuery('#'+dest).length==1) //check element set by string exists
dest=jQuery('#'+dest).offset().top
else
dest=0
this.$body.animate({scrollTop: dest}, this.setting.scrollduration);
},
keepfixed:function(){
var $window=jQuery(window)
var controlx=$window.scrollLeft() + $window.width() - this.$control.width() - this.controlattrs.offsetx
var controly=$window.scrollTop() + $window.height() - this.$control.height() - this.controlattrs.offsety
this.$control.css({left:controlx+'px', top:controly+'px'})
},
togglecontrol:function(){
var scrolltop=jQuery(window).scrollTop()
if (!this.cssfixedsupport)
this.keepfixed()
this.state.shouldvisible=(scrolltop>=this.setting.startline)? true : false
if (this.state.shouldvisible && !this.state.isvisible){
this.$control.stop().animate({opacity:1}, this.setting.fadeduration[0])
this.state.isvisible=true
}
else if (this.state.shouldvisible==false && this.state.isvisible){
this.$control.stop().animate({opacity:0}, this.setting.fadeduration[1])
this.state.isvisible=false
}
},
init:function(){
jQuery(document).ready(function($){
var mainobj=scrolltotop
var iebrws=document.all
mainobj.cssfixedsupport=!iebrws || iebrws && document.compatMode=="CSS1Compat" && window.XMLHttpRequest //not IE or IE7+ browsers in standards mode
mainobj.$body=(window.opera)? (document.compatMode=="CSS1Compat"? $('html') : $('body')) : $('html,body')
 mainobj.$control=$('<div id="topcontrol">'+mainobj.controlHTML+'</div>')
.css({position:mainobj.cssfixedsupport? 'fixed' : 'absolute', bottom:mainobj.controlattrs.offsety, right:mainobj.controlattrs.offsetx, opacity:0, cursor:'pointer'})
.attr({title:'Scroll to Top'})
.click(function(){mainobj.scrollup(); return false})
.appendTo('body')
if (document.all && !window.XMLHttpRequest && mainobj.$control.text()!='') //loose check for IE6 and below, plus whether control contains any text
mainobj.$control.css({width:mainobj.$control.width()}) //IE6- seems to require an explicit width on a DIV containing text
mainobj.togglecontrol()
$('a[href="' + mainobj.anchorkeyword +'"]').click(function(){
mainobj.scrollup()
return false
})
$(window).bind('scroll resize', function(e){
mainobj.togglecontrol()
})
})
}
}
scrolltotop.init()
</script>


Step 4.  Replace IMAGE LINK with the image link of your back to top button.We have collected some back to top buttons for your ease. If you want to add image link then right click any button below and select "Copy image URL" and add this link:

Collection of Back to Top buttons

back to topback to topback to topback to topback to topback to topback to top

Step 5.  Save the Widget and drag it near the footer or any bottom position.
Step 6.  View your blogger website to see Smooth Scrolling "Back To Top" Button.

Related Posts reduces bounce rate

Want some other widgets for blog designs or need any help regarding this post, then you can comment below. I will try to answer as soon as possible. Enjoy your day!

Thursday, April 3, 2014

Add Floating Sliding Facebook LikeBox Widget in Blogger

Facebook LikeBox Widget
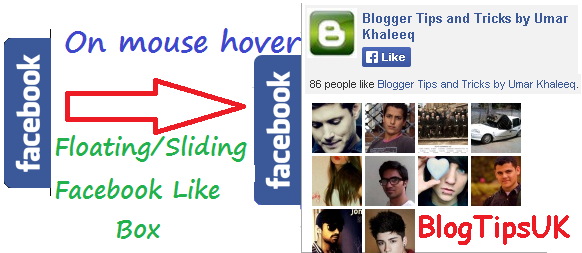
Blogging has become a trend now a days online. Every blogger want there blog attractive and stylish so they always add new and more beautiful widgets in there blogs.Today I am going to share a very easy and simple way to put a sliding Facebook like box which is called Sliding Facebook Like Box or Floating Facebook Like Box.The widget works as a fb image remains in a fixed position on the right hand side of your site.  When you hover over the blue facebook image, the like box will then slide and reveal itself using jquery.
Simple when you take your mouse on facebook image , like box will then appear.

Add Facebook Floating Like Box Widget in your blogger websites
The process of adding this widget to your blog is simplest. You need just to follow below steps:

1. Open Blogger
2. Go to Layout
3. Add a Gadget
4. Add HTML/JavaScript
5. Copy the below code and Save
<!--Floating Facebook Widget by http://bloggerseotipstraining.blogspot.com/ START-->
<script type="text/javascript"> /*<![CDATA[*/ jQuery(document).ready(function() {jQuery(".blogtipsuk").hover(function() {jQuery(this).stop().animate({right: "0"}, "medium");}, function() {jQuery(this).stop().animate({right: "-250"}, "medium");}, 500);}); /*]]>*/ </script> <style type="text/css"> .blogtipsuk{background: url("https://blogger.googleusercontent.com/img/b/R29vZ2xl/AVvXsEix0P0BqL-WwJFfYAmG0alCSaqBgn0IQ9xf4IKUd_TAkUplGRjCCTE6Or6BGssWwR7Fji3kSnKFc7tMA6allM2qXrskhLyvo4C0VjCw-YbUqXLCD631SZVjPrIkPZDxa6_96ZAmO6ywA_QX/") no-repeat scroll left center transparent !important; float: right;height: 270px;padding: 0 5px 0 46px;width: 245px;z-index:  99999;position:fixed;right:-250px;top:20%;} .blogtipsuk div{ padding: 0; margin-right:-8px; border:4px solid  #3b5998; background:#fafafa;} .blogtipsuk span{bottom: 4px;font: 8px "lucida grande",tahoma,verdana,arial,sans-serif;position: absolute;right: 6px;text-align: right;z-index: 99999;} .blogtipsuk span a{color: gray;text-decoration:none;} .blogtipsuk span a:hover{text-decoration:underline;} } </style><!--Brought to you by http://bloggerseotipstraining.blogspot.com/--><div class="blogtipsuk" style="">
<!--http://bloggerseotipstraining.blogspot.com/2014/04/add-stylish-facebook-floating-like-box-widget-to-blogger.html--><div>
<!-- http://bloggerseotipstraining.blogspot.com/2014/04/add-stylish-facebook-floating-like-box-widget-to-blogger.html--> <iframe src="http://www.facebook.com/plugins/likebox.php?href=Write URL of Facebook Page&width=245&colorscheme=light&show_faces=true&border_color=white&connections=9&stream=false&header=false&height=270" scrolling="no" frameborder="0" scrolling="no" style="border: white; overflow: hidden; height: 270px; width: 245px;background:#fafafa;color:000;"><!--Brought to you by www.BlogTipsUK.com--></iframe><!--Brought to you by http://bloggerseotipstraining.blogspot.com/--><span><!--Brought to you by http://bloggerseotipstraining.blogspot.com/--><b:if cond='data:blog.url == data:blog.homepageUrl'><center>
<a style="color:#a8a8a8;font-size:8px;" href="http://www.blogtipsuk.com">New Blogger Tips</a> - <a style="color:#a8a8a8;font-size:8px;" href="http://bloggerseotipstraining.blogspot.com/2014/04/add-stylish-facebook-floating-like-box-widget-to-blogger.html">Floating Facebook LikeBox in website</a></center></b:if>
</span></div>
</div>
<!--Floating Facebook Widget by http://bloggerseotipstraining.blogspot.com/ END-->
6. Save Arrangement 

Customization

1. The floating is set to right side of your blog, if you want set it for left side of your blog then simply change the bolded float:right property to float:left
2. Change Write URL of Facebook Page with your own facebook page URL.

Note:
If the floating facebook like box widget is not working properly after step 1, then you need to add jquery to your site. 
Follow the instructions below. 
1. Go to Design>Edit HTML
2. Search for <head> and just below it paste the following JQuery code. 
<script src='https://ajax.googleapis.com/ajax/libs/jquery/1.6.1/jquery.min.js' type='text/javascript'/>


Friday, March 28, 2014

Related Posts Widget for Blogger/Blogspot with Images

Related Posts Widget for Blogger
How to add Related Posts Widget to Blogger

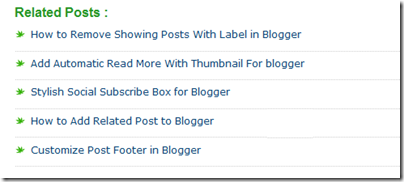
Related posts Widget will generate the list of linked or connected posts . This Widget can be added either in homepage (under each posts) or inside the post. By placing this related posts Widget, there is chance to spread the other similar posts to visitors and they may have a tendency to take that post from the list, it will reduce the bounce rate of your blog and will keep your visitors from suddenly quit from your blog. Let's see how to add related posts widget to your Blogger site.


How to add Related Posts Widget to Blogger

Step 1. Log in to your Blogger Dashboard, then go to Template and click Edit HTML.
Step 2. Find below text from search (Ctrl + F)
]]></b:skin>

Step 3. Copy and paste the given code above this line.

<!--BlogTipsUK Related Posts with thumbnails Start-->
#related-posts {
float:center;
text-transform:none;
height:100%;
min-height:100%;
padding-top:5px;
padding-left:5px;
}
#related-posts h2{
font-size: 18px;
letter-spacing: 2px;
font-weight: bold;
text-transform: none;
color: #5D5D5D;
font-family: Arial Narrow;
margin-bottom: 0.75em;
margin-top: 0em;
padding-top: 0em;
}
#related-posts a{
border-right: 1px dotted #DDDDDD;
color:#5D5D5D;
}
#related-posts a:hover{
color:black;
background-color:#EDEDEF;
}

<!--BlogTipsUK Related Posts with thumbnails End-->

Step 4.  Copy and paste the below code where you want to show the related posts.
<b:if cond='data:blog.pageType == &quot;item&quot;'>
<div id='related-posts'>
<b:loop values='data:post.labels' var='label'>
<b:if cond='data:label.isLast != &quot;true&quot;'>
</b:if>
<script expr:src='&quot;/feeds/posts/default/-/&quot; + data:label.name + &quot;?alt=json-in-script&amp;callback=related_results_labels_thumbs&amp;max-results=6&quot;' type='text/javascript'/></b:loop>
<script type='text/javascript'>
removeRelatedDuplicates_thumbs();
printRelatedLabels_thumbs(&quot;<data:post.url/>&quot;);
</script>
</div><div style='clear:both'/>
</b:if>
<b:if cond='data:blog.url == data:blog.homepageUrl'><b:if cond='data:post.isFirstPost'>
<a href='http://www.blogtipsuk.com/2014/03/related-posts-widget-images-for-blogger-blogspot.html' >Related Posts</a></b:if></b:if>

Change red color to change number of posts displayed in widget.

Step 5.  Find below text from search (Ctrl + F)

</head>

Step 6.  Copy and paste the below code above this line.
<script type='text/javascript'>
var defaultnoimage="https://blogger.googleusercontent.com/img/b/R29vZ2xl/AVvXsEimI2V376_pyeMfXA0X0ff94j1qoPpFNVUkc16rXib3esevhUnUJBgHJqRX8-tLo2hc6nt_Go98yxDf63mvt4RTH4Dtnqfx4iULJiUHwS_6YV6Keerkra63CNrmqDFoHw9EvQlvho0-8Rc/s400/noimage.png";
var maxresults=6;
var splittercolor="#DDDDDD";
var relatedpoststitle="Related Posts";
</script>
<script src='https://googledrive.com/host/0Bxhkdxy8J6szQ2tCNUJJdllKVVk/' type='text/javascript'></script>

Change the red value to show number of posts. Change the green color to change color of splitter line between posts. Change the blue color to change Name of title.

 I hope this article will help you.We have just ?added a Related Posts Widget to Blogger. If so please like and share our blog. You can check here more Exciting Blogger Widgets.

Thursday, March 13, 2014

How to Earn Money from new Blogger blogs or Blogging

Earn Money from Blogging
Today I�ll teach you some easy ways to earn online money from writing free blogs. This post contains all the ways for online earning with blogs and will help you to know all the basic aspects of blogging. People think internet is a place to become rich in days without much effort but in my opinion 1st simple rule of success is hardworking with some knowledge.

Following this rule Blogging is not a process to become rich in days but it is a long term process with hard word and passion. According to a survey only 9% bloggers are able to make more than 100$ a month. There are many bloggers who cannot even go to 100$ in their entire blogging career. But let me tell you It is possible to make money blogging, but it takes time and a lot of hard work.

Before working blogging online following points must be kept in mind.

You must know:
  • Basic computer skills.
  • Basic internet surfing knowledge.
  • You must understand and write English.

Starting a Blog at Blogger.com for Online Earning

First step is starting a free blog online. There are many online websites which offers free online blogging space. But my recommendation is at blogger.com. Due to wide range of easy and salient features of blogger.com blogs is the best free blogging platform online. How to start a free blog

Following points should be kept in mind before making a blog online:
  • Think of a topic to write about, something you like most or have prior knowledge about.
  • Make title of your blog and write posts about that topic (of your choice).
  • Blog style matters, make your blog look beautiful by applying blogger templates of your choice.
  • Choose attractive blogger templates at Btemplates , Deluxe Templates

Get more Traffic to your Blog by SEO 

Now that you have started writing blog of your choice. But think yourself who is visiting your blog, I mean what number of people are actually reading your blog. So it is time to get some traffic to your blog. By traffic I mean a lot of people (like in thousands). This will lead you to a successful blogger. To get so much heavy traffic to your blog, firstly you have to do SEO of your blog, on-page SEO and off-page SEO both are very necessary to bring organic traffic to your blog. It tells search engines what your site really is about, according to which your blog will be showed to the required traffic who actually wants to read it.

Also make your blog a place worth visiting. I mean blog design should be simple but look attractive. And content on your blog should also be informative and constructive. Read these basic Tips to increase blog traffic

If you do not know anything about SEO, then do not worry. You can ask me for Blogger SEO Services at very low cost.

Put Ads on your blog to earn money online

After doing SEO and writing good content on your blog. You will need some advertising sites to put ads on your blog to earn online income. These sites give you codes for their ads to put on your site and give you commision when somebody click on these ads. Following are some of the best ads publishing sites from which you can earn money by displaying their ads on your newly started low traffic blog. See a list of Best Earning Sites for Blogger.

My Recommendations:

  • When you start a blog, try to write at least 3-4 articles(posts).
  • Then do the SEO of your blog. (or hire me for blogger SEO )
  • Now its time to test your writing skills. Try to write as many articles as you can (at the most 20-40).
  • After 2 months, you will be getting around 1000+ visitors per day.
  • Its time now to put ads on your blog.
  • See a list of Best Earning Sites for Blogger.

Tuesday, March 11, 2014

Increase Traffic to new Blogs easily

Increase Blog Traffic easily
Friends today's post is about secrets on how to get more visitors/high traffic to your blog or website with easy steps. These steps include the very simple and easy steps which you implement in your blog site and get visitors from the best search engines like Google, Ask, Bing etc. This post contains beginners guide on how to get high traffic to your blog by SEO, Social Media sites, blog and post style etc.

How to increase organic traffic with SEO on blogger

The best technique to increase visitors to your blog is by doing SEO in your blogs. With basic SEO and some simple keywords research, you can make your website favorable for search engines and thousands of people will come to your site daily.

Beginners SEO:
Following are the some basic SEO tips which you must include in your blog to get your blog appear in search engines.

Firstly submit your blog in search engines, this will tell search engines about your new blog then their robots will take a look in your site and after a few days your site will start showing in search results.

Secondly include meta tags in your blog html. Title and description tags in all pages is the best way to tell search engines about your site content. Because search engines robots see your blog's title and description and these title and description tags are then shown in search results (for more info on title in search results see this).

Then you should change your Blogger settings for SEO. See following posts and edit accordingly.
If you don�t know anything about SEO, then do not worry. You can get free SEO for blogger here.

Advance SEO:

Blog Design helps in SEO

You must take care of these simple points before writing posts in your blog. The most important point in blogging is your blog style. Your blog should be simple with some graphics. It should load faster. Following points must be kept in mind regarding your blog style.

  • Blog style should be simple but look professional.
  • Blog loading time should be faster.
  • Blog content should be qualitative (posts should be informative for readers).
  • All posts should be relative to your blog title (main idea of your blog).
  • Use keywords in posts title and body (link to post)
  • Allow comments in your blog

Share blog posts to social media for more visitors

Share your blog posts on social media regularly on sites like Facebook and Twitter. Be active on social media sites , make a Facebook page and Twitter ID and share your blogger posts there. 
  • Make a Facebook page and share your posts daily.
  • Make twitter account and be regular there.
  • Comment on other blogs and introduce your blog there as well.

Need any help regarding Blogging, SEO and online earning comment down!
Friday, August 23, 2013

Create and Submit your Blog Sitemap to Google

Blog Sitemap
Friends today I'll tell you how to build an XML sitemap of your new blog for Google for better SEO. When you create this blogger sitemap and submit Blog to Google and other search engines , it will help the search engines to easily find,crawl and index all your blog posts. This site map usually means Google site map and will increase your search rankings and daily traffic.

How to create and submit your blog sitemap to Google


Let's submit your blog sitemap to Google search engines with these simple steps below:

Step 1.  Login to your Google account and open http://www.google.com/webmasters/tools

Step 2.  Add your blog to Google. Click on "ADD A SITE" button

Step 3.  Write your Blog URL address, then open it.

Step 4.  Click on  Sitemaps , then click ADD/TEST SITEMAP.

Step 5.  Now add below piece of code to that and click submit:

atom.xml?redirect=false&start-index=1&max-results=500
If your blog has more than 500 posts than also add this code

atom.xml?redirect=false&start-index=501&max-results=1000

As now your blog's all posts sitemap is submitted to Google.Google will check the sitemap and begin indexing your blog posts when it's determined the sitemap has no errors.

If you are having any trouble to submit sitemaps to Google search engine than ask in comments, and subscribe to my future posts by email to learn more blogging and SEO Tips.

Tuesday, July 16, 2013

Add Blog URL to Google Search Engine

Submit URL to Google
In today's post I will teach you how to submit your new blog URL to Google, Bing, Ask and Yahoo for free and get high traffic to your blog from these search engine submissions. When you add your blog URL, Search Engines will index your blog and enter or show in their search engine results page (SERP).

How to Submit Blog URL in Search Engines


Add URL to Google

Follow these steps to add your blog url in google search engine results for free.

Step 1.  Go to the following link: http://www.google.com/addurl/?continue=/addurl
Step 2.  Type in your URL, example: http://www.yoursite.com
Step 3.  Enter the captcha text shown in the box.
Step 4.  Now click Submit Request


Add URL to Bing and Yahoo

Follow these steps to add your blog url in Yahoo and Bing search engine results for free. 
Note: Bing and Yahoo are same search engines.

Step 1.  Go to the following link: http://www.bing.com/docs/submit.aspx
Step 2.  Type in your URL, example: http://www.yoursite.com
Step 3.  Enter the captcha text shown in the box.
Step 4.  Now click Submit

When you complete the above steps, submit your blog only once, after some days your blog will show in searches. Because it takes time for the search engines to index your pages. If you submit more than once, some search engines may consider this spamming which could result in not indexing your blog site at all.

Incoming search for:
google add url
add url to google
add url to google com
add url on google
add google url
google url add
add url google
add to google url
add a url to google
add my url to google
how to add url in google search for free

Tuesday, May 28, 2013

Custom Robots.txt file for Blogger/Blogspot blogs for SEO

Custom Robots.txt for blogger
Today I will show you How to Enable Custom Robot.txt File in Blogger for better SEO and search engine results?

Blogger now lets you edit your blog's robots.txt file. What are Robots.txt files, robots files are plain text files which instruct the search engines what to not index. Robot.txt is a way to tell search engines whether they are allow to index a page in the search result or not. The bots are automatic, and before they could access your site, they check the Robot.txt file to make sure whether they are allowed to crawl this page or not.

How to Enable Custom Robots.txt in Blogger


1. Blogger Dashboard >> Select Blog >> Select Settings tab >> Search Preferences

Robots.txt

2. Click on Edit in front of Custom robots.txt
3. Click on Yes and proceed to next step.
3. Next a box comes up and paste following given code.

User-agent: Mediapartners-Google
Disallow:

User-agent: *
Disallow: /search
Allow: /
Sitemap: http://YOURBLOGURL.blogspot.com/feeds/posts/default?orderby=UPDATED
4. and finally click on Save Changes button to save code.

I hope this tip would help you. If you are having any issue regarding crawling then, feel free to leave your questions in the comments below and I would try to help you in solving them.

Saturday, May 11, 2013

How to remove Blogger Navigation Bar?

Blogger Navigation Bar

In every blog there is a blogger default navigation bar (nav bar) of the above style. This nav bar make your blog look less professional. These navigation bars can be removed using a simple CSS one line code.

Also read: Remove Subscribe to: Posts (Atom) Link on Blogger

Removing Blogger Deafult Nav Bar


Apply these steps to remove the Blogger Navigation bar / Blogger Nav Bar.
Steps:

  • Log-in to your blog
  • Template >> HTML >> Proceed
  • Search For this code  ]]></b:skin>   (tip: Use CTRL+F)
  • Now Just above/before  ]]></b:skin>   insert following code

#navbar-iframe,#navbar { display: none !important; }

Save your template and view your blog. Blogger Navigation Bar will no longer be there.

Wednesday, May 1, 2013

Add SEO Meta Tags (Title and Description) in Blogger

SEO Meta Tags:

SEO Meta Tags:


Meta tags is a important things for SEO (Search Engine Optimization). The <meta> tag provides metadata about the HTML document. Meta tags will not be displayed on the page, but will be machine parsable. Meta elements are typically used to specify page description, keywords, author of the document, last modified, and other metadata. The metadata can be used by browsers (how to display content or reload page), search engines (keywords), or other web services. Google bots read meta tags of a site or blog and give these tags (title,keywords and description) information to google search engine, according to these tags your blog is showed in google search engine results pages (SERP's).

Meta Tags are most important and most useful for our blog's SEO. Also see updated post on Meta Tags

Put SEO Meta Tags in Blogger Template

Learn how to put Meta Tags in blogger template for better ranking in search engine results with easy steps.


Step 1.
Login to Blogger >> Go to Dashboard >> Template >> Edit Html

Step 2.
Find the following code [Tip: Ctrl+F]
<head>
This will be mostly on the main page of the template coding.


Step 3.
After/under this line paste the following code.
           <!-- Meta Tags ~  blogtipsuk.com  -->
 <meta content='Your Blog Description' name='description'/>
 <meta content='Keyword1,Keyword2,Keyword3' name='keywords'/>
 <meta content='Author Name' name='Author'/>
 <meta content='Author Email Address' name='Email'/>
 <meta content='all' name='robots'/>
 <meta content='index, follow' name='robots'/>
 <meta content='Language Name' name='language'/>
 <meta content='Country Name' name='country'/>
 <meta content='blogger' name='generator'/>
               <!-- /Meta Tags ~   blogtipsuk.com  -->

Step 4.
Change red color bolded text according to your choice.

Note:  write keywords in separate commas  i.e., write comma after every word.

Step 5.
Now save your template and you are done, your blog is optimized for SEO and Google will show your site/blog in search results

SEO Meta Tags in Google Search Engine Results Pages


Your Blog's Title and Description Tag will look like this in Google Search.

Title and Description Meta Tags