Sunday, July 13, 2014

Hide or Show a Widget on some Pages Blogger

show and hide blogger widgets
Hi Bloggers, you may have noticed, all the widgets/gadgets you add to your blog, will be displayed on all the pages by default, including the homepage as well. And I'm sure very few know that AdSense could disable your account in case you've put ad units inside the content of your contact or privacy policy pages. Therefore, hiding certain elements inside your blog pages is not only a matter of design, but it is also a requirement.

Today I'll show you the easiest and simple ways to show or hide any widget in your blog to show on pages you like. So let's start.

To hide (or show) widgets in particular posts, static pages, homepage or archive pages, you can use these conditional tags.

How to Hide or Show a Widget on some Pages Blogger


Step 1. Go to Blogger's Dashboard > Layout and name the HTML/Javascript gadgets that you have already added. Doing this, it will be easier for you to identify the widgets that you have in your Blogger's template. Give it a unique title so that it does not match with any of the titles of any other widgets already added.

Step 2. Next thing to do is to go to Template and click on Edit HTML

Step 3. Click anywhere inside the code area and press the CTRL + F keys to open the search box
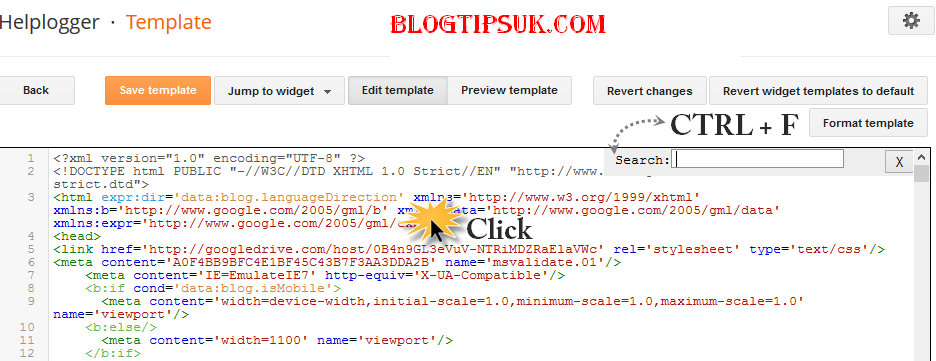
blogger template, ctrl + f, search box

Step 4. Find the HTML of your widget by typing the widget's name in the search box - hit Enter.

Let's say that the title for one of your widgets is "Recent Posts". After searching for the widget's name, You will find a similar code in my template:
<b:widget id='HTML1' locked='false' title='Recent Posts' type='HTML'>
<b:includable id='main'>
<!-- only display title if it's non-empty -->
<b:if cond='data:title != ""'>
<h2 class='title'><data:title/></h2>
</b:if>
<div class='widget-content'>
<data:content/>
</div>
<b:include name='quickedit'/>
</b:includable>
</b:widget>  
This code represents the widget/gadget that you have added in the Page Elements location (Layout).


Step 5. After you've found your widget's code, add the following conditional tags marked with red just below and above to hide the widget from specific pages or posts in Blogger. For instance, in case you want:

To show the widget only in Homepage:

<b:widget id='HTML1' locked='false' title='Recent Posts' type='HTML'>
<b:includable id='main'>
<b:if cond='data:blog.url == data:blog.homepageUrl'>
<!-- only display title if it's non-empty -->
<b:if cond='data:title != ""'>
<h2 class='title'><data:title/></h2>
</b:if>
<div class='widget-content'>
<data:content/>
</div>

<b:include name='quickedit'/>
</b:if>
</b:includable>
</b:widget>

To show Blogger widget only in post pages 

<b:widget id='HTML1' locked='false' title='Recent Posts' type='HTML'>
<b:includable id='main'>
<b:if cond='data:blog.pageType == "item"'>
<!-- only display title if it's non-empty -->
<b:if cond='data:title != ""'>
<h2 class='title'><data:title/></h2>
</b:if>
<div class='widget-content'>
<data:content/>
</div>

<b:include name='quickedit'/>
</b:if>
</b:includable>
</b:widget>

To hide Blogger widget in post pages

<b:widget id='HTML1' locked='false' title='Recent Posts' type='HTML'>
<b:includable id='main'>
<b:if cond='data:blog.pageType!= "item"'>
<!-- only display title if it's non-empty -->
<b:if cond='data:title != ""'>
<h2 class='title'><data:title/></h2>
</b:if>
<div class='widget-content'>
<data:content/>
</div>

<b:include name='quickedit'/>
</b:if>
</b:includable>
</b:widget>

To show the widget in a specific page

<b:widget id='HTML1' locked='false' title='Recent Posts' type='HTML'>
<b:includable id='main'>
<b:if cond='data:blog.url == "URL of the page"'>
<!-- only display title if it's non-empty -->
<b:if cond='data:title != ""'>
<h2 class='title'><data:title/></h2>
</b:if>
<div class='widget-content'>
<data:content/>
</div>

<b:include name='quickedit'/>
</b:if>
</b:includable>
</b:widget>

Note: Replace URL of the page with the address of the page in which you want the widget to appear

To hide a widget only in a particular page

<b:widget id='HTML1' locked='false' title='Recent Posts' type='HTML'>
<b:includable id='main'>
<b:if cond='data:blog.url != "URL of the page"'>
<!-- only display title if it's non-empty -->
<b:if cond='data:title != ""'>
<h2 class='title'><data:title/></h2>
</b:if>
<div class='widget-content'>
<data:content/>
</div>

<b:include name='quickedit'/>
</b:if>
</b:includable>
</b:widget> 

To show widgets only in static pages

<b:widget id='HTML1' locked='false' title='Recent Posts' type='HTML'>
<b:includable id='main'>
<b:if cond='data:blog.pageType == "static_page"'>
<!-- only display title if it's non-empty -->
<b:if cond='data:title != ""'>
<h2 class='title'><data:title/></h2>
</b:if>
<div class='widget-content'>
<data:content/>
</div>

<b:include name='quickedit'/>
</b:if>
</b:includable>
</b:widget> 
To hide widgets in Static Pages
<b:widget id='HTML1' locked='false' title='Recent Posts' type='HTML'>
<b:includable id='main'>
<b:if cond='data:blog.pageType != "static_page"'>
<!-- only display title if it's non-empty -->
<b:if cond='data:title != ""'>
<h2 class='title'><data:title/></h2>
</b:if>
<div class='widget-content'>
<data:content/>
</div>

<b:include name='quickedit'/>
</b:if>
</b:includable>
</b:widget> 

To show widgets only in Archive Pages

 <b:widget id='HTML1' locked='false' title='Recent Posts' type='HTML'>
<b:includable id='main'>
<b:if cond='data:blog.pageType == "archive"'>
<!-- only display title if it's non-empty -->
<b:if cond='data:title != ""'>
<h2 class='title'><data:title/></h2>
</b:if>
<div class='widget-content'>
<data:content/>
</div>

<b:include name='quickedit'/>
</b:if>
</b:includable>
</b:widget> 
Note:  Pay attention each time you're adding a new address which should end up with .com, otherwise it may not work.

Step 6. After you have added the conditional tags, Save Template and view your blog.

Summary:

1.  See which widget you are willing to hide or show in some pages.
2.  Give that widget a Title in you Blogger Layout.
3.  Search it in your HTML code and use the above tags.

That's it!  Have a Good Day :)

Friday, June 13, 2014

Google Panda 4.0 Algorithm Update


Google�s Matt Cutts declared on Twitter the release of Google Panda 4.0 Update. Google's Panda update is meant to prevent sites with poor quality content from operating their way into Google�s search results. Panda 4.0 should be a significant update to the particular formula versus simply an information refresh.

Meaning, Google has created changes to however Panda identifies sites and has released a replacement version of the formula .


Google Panda 4.0 Algorithm Update


Google Panda 4.0 update affects different languages to different degrees. In English for instance, the impact is ~7.5% of queries that area unit affected to a degree that a every day user may notice. 

The Panda rule, that was designed to help boost great-quality content sites whereas pushing down low-quality content sites within the search results, has constantly targeted low-quality content sites so as to produce searchers with the most effective search results.

Wednesday, June 11, 2014

Free On Page SEO for Blogger/Blogspot blogs

Get Free on-page SEO for Blogger
Hello from BlogTipsUK.com to all the new beginner bloggers who are facing problems establishing their blogs. Beginners work a lot in writing content but face problems like doing basic SEO of their blogs to get traffic naturally from Search Engines.

We believe good Content without good traffic is nothing. Basic SEO is the best source for getting organic traffic from search engines. So today I am going to share a simple task from BlogTipsUK.com , by doing which you can earn a simple reward that is free on-page SEO for your blog from our SEO analyst and professional blogger, Umar Khaleeq.

Note: You must Join BlogTipsUK.com socially to earn rewards. Every blog will be picked for SEO by owner's choice.

Follow these simple steps. and read the note at the end of post for the terms of the task.

Step 1.  Join BlogTipsUK.com

You must Join BlogTipsUK.com socially to earn rewards.


Step 2.  Join these sites under our Referral Link

By joining these all sites will help you to start earning money online with your blog and eventually will help us too if you join with my links. See a complete list of sites that work best for bloggers to earn money online. if you need any help regarding any site, comment on the respected post.
(this is optional)

Step 3.  Apply all our Widgets in your blog

Apply all our 100% working Best Blogger widgets in your blog without any changing. These widgets will help your blog in many ways. All widgets are stylish and loads fast. Here is the list:
1.  Social Media Floating Widget
2.  Recent Posts Widget
3.  Related Posts Widget
4.  Sliding Facebook Like Box Widget
5.  Facebook comment box in blogger (this is optional)

Step 4.  BackLinks

Enter any one link in a blog post of your choice. Remember only one link is required in any one of your blog's post. (in a post not in sidebar). These two links are mentioned below:

1.  <a href="http://www.blogtipsuk.com/2014/03/increase-traffic-visitors-to-blog-easily.html" rel="dofollow">Increase blog traffic</a>
2.  <a href="http://www.blogtipsuk.com/2014/03/earn-money-from-blogger-blogs-blogging.html" rel="dofollow">earn money from blogging</a>

After doing all the above procedures, please post your blog's link on our facebook page. I will try to reply you as soon as possible. When a blog is picked for on-page SEO, you just need to select a template and I�ll fully optimized it for better SEO. Which will results in better ranking and increases your blog's traffic from all the search engines. Else you can also see our blog's SEO section for more help and info on traffic and SEO.

Reward Terms

1. You must join our site socially e.g., on facebook, twitter and subscribe us by email.
2. You must complete all the steps given above to qualify for free SEO.
3. Optional points are not required for getting rewards.
4. After doing all the steps, leave your blog link on our FB page, which I will review and reply you.
5. Finally, You'll need to select a template and I�ll fully optimized it for better SEO.

Have a Good Day ahead! Keep Smiling.

Monday, April 28, 2014

Google+ Page For Webmasters

Google has recently launched GoogleWebmasters Google+ page.This page is about latest news and announcements .Join this page to get tips on making site search engine friendly. Google will use this page to post announcements, events, tips, quizzes and other resources to help webmasters like you make great sites that can be found in Google Search.


Follow at google.com/+GoogleWebmasters


Tuesday, April 15, 2014

Highlight Author Comments in Blogger websites with CSS

Change Author Comments Color Style
Hi friends, you surely have seen on many blogs and websites whenever an Admin of the blog or website make a reply to your comments, its comment's color and style is changed from other comments. These admin styled Comments are the best way to make good relationship with blog visitors or Followers.
So do you have a blog and your blog is getting good traffic then your blog will also be getting many comments, that may be positive or negative related to your blog website content.


 If you want to highlight your comments in your blog website, then here is the trick to do that and make your comments stylish,colorful and recognizable to others.Here I am going to share the trick to highlight Author Comments in Threaded comments and this trick also work in basic commenting system. This is coded using simple CSS and Jquery.

How To change Author Comments style In Blogger

Learn how to change blogger admin comments style and color in blogger template using CSS and Jquery for better interaction with your blog's users in easy steps.

Step 1.  Login to Blogger >> Go to Dashboard >> Template >> Edit Html

Step 2.  Find </body> and copy the following code above it [Tip: Ctrl+F]
<script type="text/javascript">
    $(function() {
      function highlight(){
        $(&#39;.user.blog-author,.ssyby&#39;).closest(&#39;.comment-block&#39;)
          .css(&#39;border&#39;, &#39;1px solid #e1e1e1&#39;)
          .css(&#39;background&#39;,&#39;#f1f1f1 url(&quot;https://blogger.googleusercontent.com/img/b/R29vZ2xl/AVvXsEgUCwe_QieE5CTKyqafaxfCjqNUBipAAmS415-nA_0R3MMAZj42LZPSAOhCCa_2ooO0-Hnse_Ljk1nr30JCAobEnEjk1fHCvybfuDxzb0DJ2M4sD6MNJTcIaVhmHizPwV8qzzKb1-yzEZ4/s1600/admin_comment1.png&quot;) no-repeat bottom right&#39;)
          .css(&#39;padding&#39;, &#39;10px&#39;);
          }
          $(document).bind(&#39;ready scroll click&#39;, highlight);
   });</script><a style="display:none" href="http://www.blogtipsuk.com" >Blogger seo tips</a>
Step 3.  Change red color bolded text according to your choice for border of the author comment.

Step 4.  Now save your template and you are done.

Congratulations you are done. If you enjoyed this article please like and share.

Monday, April 14, 2014

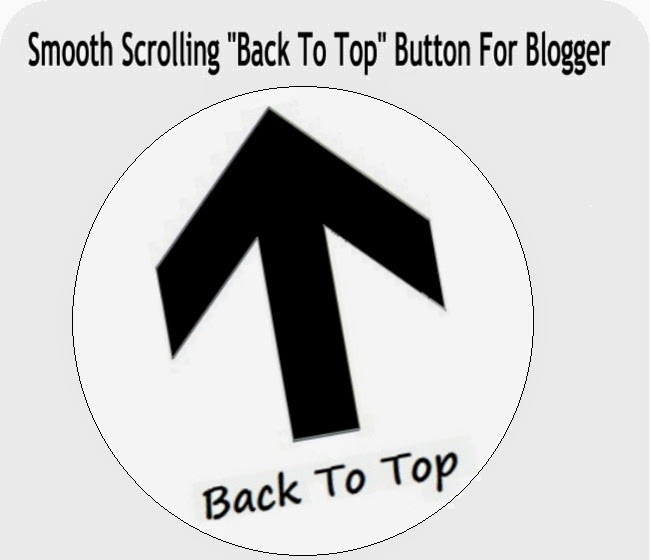
Install Scrolling "Back To Top" Button for Blogger/Blogspot

"Back To Top" Button
You surely have seen on many blogs and websites a  "Back To Top" Button in the sidebar at the bottom of the page that shows an image when clicked, it takes the user to top of your blog website. Animated back to top button in blogger website is one of the best Jquery style animated widget that looks good and also visitors enjoy easy site navigation scroll to top.

The best thing about this button is that it appears only when the user scrolls down the page and disappears as he scrolls up, and also one more feature of this script you can add your own image that you like as the back to top button.

Exactly same type of Back to Top Button in being used in our site. Probably one of the best Back to Top Button.

You would also like to use:  Sharing Buttons for websites in Blogger.

Add Smooth Scrolling "Back To Top" Button Widget to Blogger Jquery

Step 1.  Log in to your Blogger Dashboard, then go to Layout and click on Add a Gadget link
Step 2.  From the pop-up window, scroll down and choose HTML/JavaScript.
Step 3.  Select & Copy the code below and paste it into the new HTML/JavaScript:
<script src='http://ajax.googleapis.com/ajax/libs/jqueryui/1.8.23/jquery-ui.min.js' type='text/javascript'></script>
<script type="text/javascript">
var scrolltotop={
//Modified by www.blogtipsuk.com more JQuery Scroll to Top Design
//startline: Integer. Number of pixels from top of doc scrollbar is scrolled before showing control
//scrollto: Keyword (Integer, or "Scroll_to_Element_ID"). How far to scroll document up when control is clicked on (0=top).
setting: {startline:100, scrollto: 0, scrollduration:1000, fadeduration:[500, 100]},
controlHTML: '<img src="IMAGE LINK" />', //HTML for control, which is auto wrapped in DIV w/ ID="topcontrol"
controlattrs: {offsetx:5, offsety:5}, //offset of control relative to right/ bottom of window corner
anchorkeyword: '#top', //Enter href value of HTML anchors on the page that should also act as "Scroll Up" links
state: {isvisible:false, shouldvisible:false},
scrollup:function(){
if (!this.cssfixedsupport) //if control is positioned using JavaScript
this.$control.css({opacity:0}) //hide control immediately after clicking it
var dest=isNaN(this.setting.scrollto)? this.setting.scrollto : parseInt(this.setting.scrollto)
if (typeof dest=="string" && jQuery('#'+dest).length==1) //check element set by string exists
dest=jQuery('#'+dest).offset().top
else
dest=0
this.$body.animate({scrollTop: dest}, this.setting.scrollduration);
},
keepfixed:function(){
var $window=jQuery(window)
var controlx=$window.scrollLeft() + $window.width() - this.$control.width() - this.controlattrs.offsetx
var controly=$window.scrollTop() + $window.height() - this.$control.height() - this.controlattrs.offsety
this.$control.css({left:controlx+'px', top:controly+'px'})
},
togglecontrol:function(){
var scrolltop=jQuery(window).scrollTop()
if (!this.cssfixedsupport)
this.keepfixed()
this.state.shouldvisible=(scrolltop>=this.setting.startline)? true : false
if (this.state.shouldvisible && !this.state.isvisible){
this.$control.stop().animate({opacity:1}, this.setting.fadeduration[0])
this.state.isvisible=true
}
else if (this.state.shouldvisible==false && this.state.isvisible){
this.$control.stop().animate({opacity:0}, this.setting.fadeduration[1])
this.state.isvisible=false
}
},
init:function(){
jQuery(document).ready(function($){
var mainobj=scrolltotop
var iebrws=document.all
mainobj.cssfixedsupport=!iebrws || iebrws && document.compatMode=="CSS1Compat" && window.XMLHttpRequest //not IE or IE7+ browsers in standards mode
mainobj.$body=(window.opera)? (document.compatMode=="CSS1Compat"? $('html') : $('body')) : $('html,body')
 mainobj.$control=$('<div id="topcontrol">'+mainobj.controlHTML+'</div>')
.css({position:mainobj.cssfixedsupport? 'fixed' : 'absolute', bottom:mainobj.controlattrs.offsety, right:mainobj.controlattrs.offsetx, opacity:0, cursor:'pointer'})
.attr({title:'Scroll to Top'})
.click(function(){mainobj.scrollup(); return false})
.appendTo('body')
if (document.all && !window.XMLHttpRequest && mainobj.$control.text()!='') //loose check for IE6 and below, plus whether control contains any text
mainobj.$control.css({width:mainobj.$control.width()}) //IE6- seems to require an explicit width on a DIV containing text
mainobj.togglecontrol()
$('a[href="' + mainobj.anchorkeyword +'"]').click(function(){
mainobj.scrollup()
return false
})
$(window).bind('scroll resize', function(e){
mainobj.togglecontrol()
})
})
}
}
scrolltotop.init()
</script>


Step 4.  Replace IMAGE LINK with the image link of your back to top button.We have collected some back to top buttons for your ease. If you want to add image link then right click any button below and select "Copy image URL" and add this link:

Collection of Back to Top buttons

back to topback to topback to topback to topback to topback to topback to top

Step 5.  Save the Widget and drag it near the footer or any bottom position.
Step 6.  View your blogger website to see Smooth Scrolling "Back To Top" Button.

Related Posts reduces bounce rate

Want some other widgets for blog designs or need any help regarding this post, then you can comment below. I will try to answer as soon as possible. Enjoy your day!

Thursday, April 3, 2014

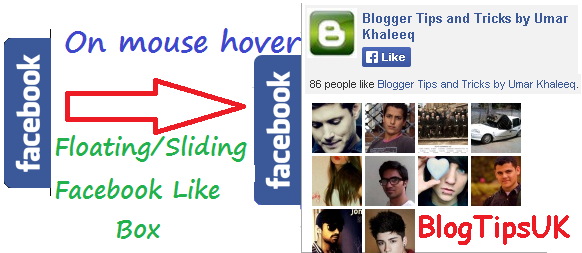
Add Floating Sliding Facebook LikeBox Widget in Blogger

Facebook LikeBox Widget
Blogging has become a trend now a days online. Every blogger want there blog attractive and stylish so they always add new and more beautiful widgets in there blogs.Today I am going to share a very easy and simple way to put a sliding Facebook like box which is called Sliding Facebook Like Box or Floating Facebook Like Box.The widget works as a fb image remains in a fixed position on the right hand side of your site.  When you hover over the blue facebook image, the like box will then slide and reveal itself using jquery.
Simple when you take your mouse on facebook image , like box will then appear.

Add Facebook Floating Like Box Widget in your blogger websites
The process of adding this widget to your blog is simplest. You need just to follow below steps:

1. Open Blogger
2. Go to Layout
3. Add a Gadget
4. Add HTML/JavaScript
5. Copy the below code and Save
<!--Floating Facebook Widget by http://bloggerseotipstraining.blogspot.com/ START-->
<script type="text/javascript"> /*<![CDATA[*/ jQuery(document).ready(function() {jQuery(".blogtipsuk").hover(function() {jQuery(this).stop().animate({right: "0"}, "medium");}, function() {jQuery(this).stop().animate({right: "-250"}, "medium");}, 500);}); /*]]>*/ </script> <style type="text/css"> .blogtipsuk{background: url("https://blogger.googleusercontent.com/img/b/R29vZ2xl/AVvXsEix0P0BqL-WwJFfYAmG0alCSaqBgn0IQ9xf4IKUd_TAkUplGRjCCTE6Or6BGssWwR7Fji3kSnKFc7tMA6allM2qXrskhLyvo4C0VjCw-YbUqXLCD631SZVjPrIkPZDxa6_96ZAmO6ywA_QX/") no-repeat scroll left center transparent !important; float: right;height: 270px;padding: 0 5px 0 46px;width: 245px;z-index:  99999;position:fixed;right:-250px;top:20%;} .blogtipsuk div{ padding: 0; margin-right:-8px; border:4px solid  #3b5998; background:#fafafa;} .blogtipsuk span{bottom: 4px;font: 8px "lucida grande",tahoma,verdana,arial,sans-serif;position: absolute;right: 6px;text-align: right;z-index: 99999;} .blogtipsuk span a{color: gray;text-decoration:none;} .blogtipsuk span a:hover{text-decoration:underline;} } </style><!--Brought to you by http://bloggerseotipstraining.blogspot.com/--><div class="blogtipsuk" style="">
<!--http://bloggerseotipstraining.blogspot.com/2014/04/add-stylish-facebook-floating-like-box-widget-to-blogger.html--><div>
<!-- http://bloggerseotipstraining.blogspot.com/2014/04/add-stylish-facebook-floating-like-box-widget-to-blogger.html--> <iframe src="http://www.facebook.com/plugins/likebox.php?href=Write URL of Facebook Page&width=245&colorscheme=light&show_faces=true&border_color=white&connections=9&stream=false&header=false&height=270" scrolling="no" frameborder="0" scrolling="no" style="border: white; overflow: hidden; height: 270px; width: 245px;background:#fafafa;color:000;"><!--Brought to you by www.BlogTipsUK.com--></iframe><!--Brought to you by http://bloggerseotipstraining.blogspot.com/--><span><!--Brought to you by http://bloggerseotipstraining.blogspot.com/--><b:if cond='data:blog.url == data:blog.homepageUrl'><center>
<a style="color:#a8a8a8;font-size:8px;" href="http://www.blogtipsuk.com">New Blogger Tips</a> - <a style="color:#a8a8a8;font-size:8px;" href="http://bloggerseotipstraining.blogspot.com/2014/04/add-stylish-facebook-floating-like-box-widget-to-blogger.html">Floating Facebook LikeBox in website</a></center></b:if>
</span></div>
</div>
<!--Floating Facebook Widget by http://bloggerseotipstraining.blogspot.com/ END-->
6. Save Arrangement 

Customization

1. The floating is set to right side of your blog, if you want set it for left side of your blog then simply change the bolded float:right property to float:left
2. Change Write URL of Facebook Page with your own facebook page URL.

Note:
If the floating facebook like box widget is not working properly after step 1, then you need to add jquery to your site. 
Follow the instructions below. 
1. Go to Design>Edit HTML
2. Search for <head> and just below it paste the following JQuery code. 
<script src='https://ajax.googleapis.com/ajax/libs/jquery/1.6.1/jquery.min.js' type='text/javascript'/>