
When it comes to the desktop operating system, Microsoft’s Windows 10 usually steals the show. Compared to the previous version of Windows, Windows 10 provides users far more features. Not only features, but the entire interface of Windows 10 is different.
If you have been using Windows 10 for a while, then you might know that the operating system has a lock screen that greets with stunning wallpapers whenever we turn on our laptop or computer. Well, it’s an important security feature, but it also increases the startup time.
Some users find the Windows 10 lock screen as a waste. Well, if you also want to disable the lock screen and Windows and directly want to reach the actual sign-in screen, then this article is for you. In this article, we are going to share a few best methods to disable the lock screen in Windows 10.
How to Disable the Lock Screen in Windows 10
Before exploring the methods, please keep in mind that you can only disable the lock screen as long as you are running the Creator updates or latest build of Windows 10. So, let’s check out the best methods to disable the lock screen in Windows 10 computer.
#1 Using the Registry Editor
Well, in this method, we are going to use the Registry Editor to disable the lock screen in Windows 10. So, follow some of the simple steps given below to disable the lock screen.
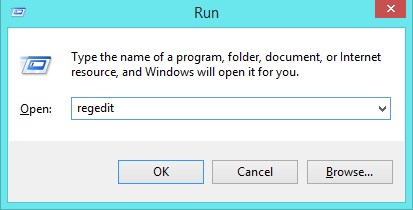
Step 1. First of all, press Win+R button on your keyboard and then type regedit and press enter.
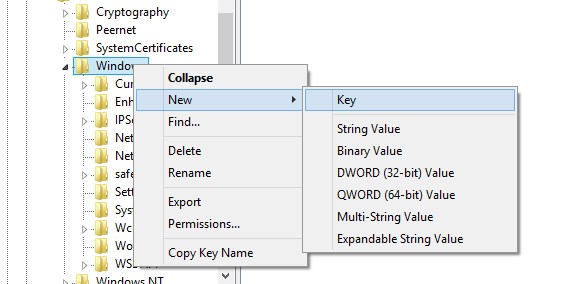
Step 2. There you need to browse to directory HKEY_LOCAL_MACHINE\SOFTWARE\Policies\Microsoft\Windows.
Step 3. There you need to right-click on the directory named “Windows” and then select Key -> New to create new key there.
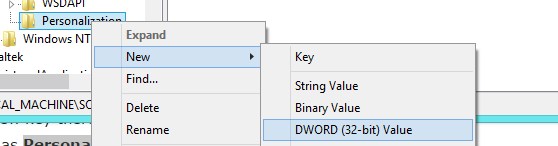
Step 4. Rename the key as Personalization. Right-click on the newly created folder and then select new and then select DWORD (32-bit) Value.
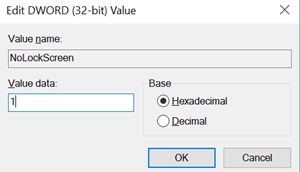
Step 5. Rename this folder with the name NoLockScreen. Now double click on the file and change its value to 1.
That’s it, you are done! Now just restart your computer and you won’t see the lock screen anymore.
Also Read: How to Set Notification Priorities for Apps in Windows 10 Action Center
#2 Renaming the Lock Screen App Folder
Well, if you don’t want to manually edit the registry file, then you can try this method. However, this method doesn’t work on every Windows 10 build.
Step 1. First of all navigate to folder C:\Windows\SystemApps.
Step 2. Now there you will see the folder named Microsoft.LockApp_cw5n1h2txyewy right click on that folder and select rename.
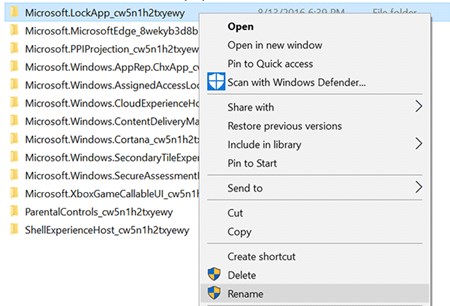
Step 3. Now you can just add .off after the name of the folder to disable the lock screen.
That’s it, you are done! This is how you can rename the lock screen app folder to disable the Windows 10 lock screen.
Also Read: How To Install & Move Windows 10 Apps To an SD Card
#3 Using Group Policy Editor
You can also use Local Group Policy Editor to disable the lock screen in Windows 10 computer. To do that, follow some of the simple steps given below.
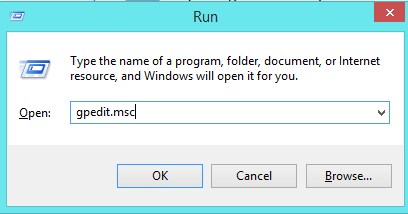
Step 1. First of all press Win+R button and then type gpedit.msc and press enter.
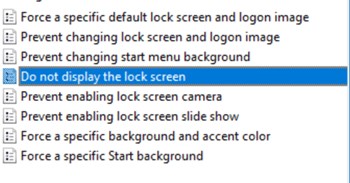
Step 2. Now you need to navigate to folder Computer Configuration\Administrative Templates\Control Panel\Personalization. Now double click on the option “Do not display the lock screen”
Step 3. Now there select the option Enabled and click on apply changes.
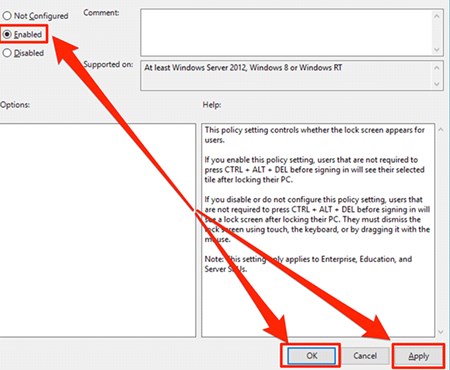
That’s it, you are done! This is how you can use the Local Group Policy editor to bypass the lock screen in Windows 10.
So the above discussion is all about How to Disable the Lock Screen in Windows 10. With this method, you can easily disable the Windows lock screen and directly get into your PC. I hope you like the guide, do share with others too. Leave a comment below if you have any related queries with this.
The post How to Disable the Lock Screen in Windows 10 appeared first on Tech Viral.
from Tech Viral https://ift.tt/2OdUcDm
No comments:
Post a Comment