Showing posts with label Tech Viral. Show all posts

Monday, July 4, 2022

How to Fix the ‘Scan Drive for Errors’ Notification on Windows 11

How to Fix the 'Scan Drive for Errors' Notification on Windows 11

Windows 11 is a very new desktop operating system, and it’s still under testing. And if you are using Windows 11, you might already be dealing with many problems. You will get more BSOD errors or driver incompatibility issues if you use the Dev or Beta builds of Windows 11.

Although you can fix most Windows 11 problems, the drive errors can stress you out. Recently, many Windows 11 users have reported getting an unusual ‘Scan drive for errors’ notification by the Security and Maintenance component.

The ‘Scan drive for errors’ notification doesn’t pinpoint any specific drive you should check, nor does it tell anything about the problem. Therefore, you need to try different troubleshooting methods to find & fix the problematic drive.

Also Read: How to Find Available Memory Slots on Windows 11

3 Best Ways to Fix the ‘Scan Drive for Errors’ Notification on Windows 11

So, if you constantly get the ‘Scan drive for errors’ notification on your Windows 11 computer, you have landed on the right page. Below, we have shared a few best ways to fix the Scan drive for error in Windows 11. Let’s get started.

1) Run the CHKDSK Scan via CMD

To fix all types of hard drive-related problems, you need to run the CHKDSK scan. There are multiple ways to run the chkdsk command; the easiest is using the command prompt. Here’s how to run the Chkdsk command via Command Prompt.

1. Click on the Windows 11 search and type in Command Prompt. Next, right-click on the Command Prompt and select Run as administrator.
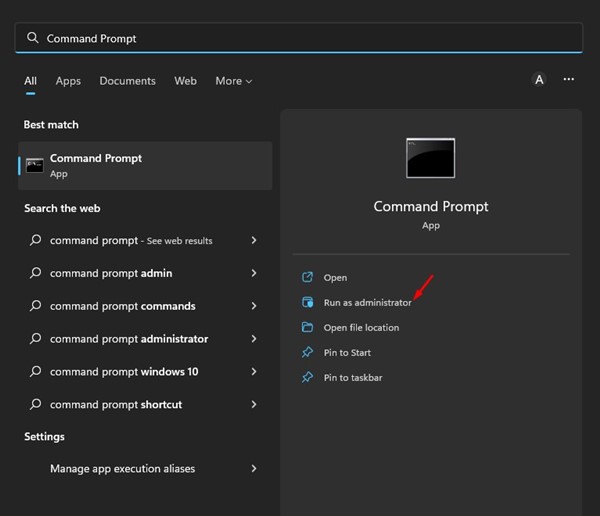
Run as administrator

2. On the Command prompt window, execute the command:

chkdsk /x:
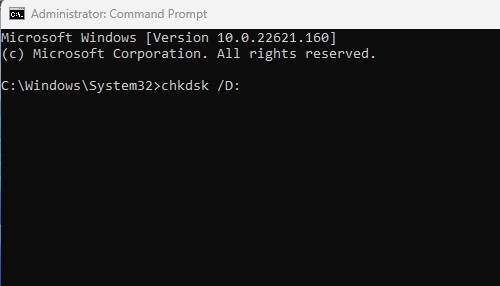
chkdsk /x:

Important: Replace x with the name of the drive you want to scan.

3. Now, wait for a few seconds until the scan completes. Once completed, you need to scan the hard drive for bad sectors. For that, execute the command:

chkdsk /r x:
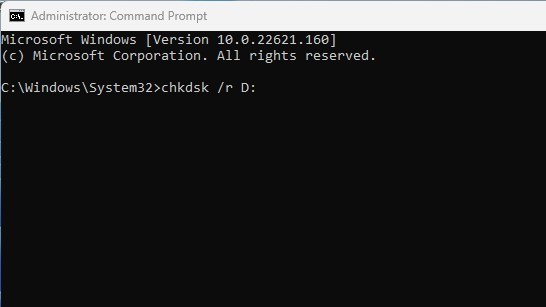
chkdsk /r x:

Important: Replace x with the name of the drive you want to scan.

That’s it. This will force check disk utility to find and fix any drive-related problems on your Windows 11 computer.

2) Run the Check Disk utility via File Explorer

If you found the command prompt method complicated, you can run the CHKDSK utility right from the File Explorer of Windows 11. For that, follow some of the simple steps we have shared below.

1. First, open File Explorer on your Windows 11 PC.

2. Now, right-click on the drive you want to scan and select Properties.
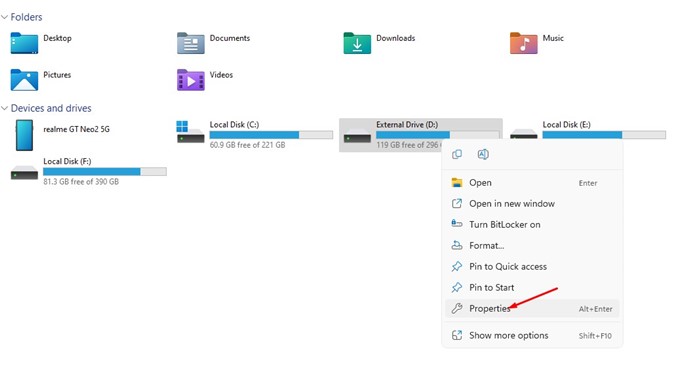
Properties

3. On the Drive Properties, switch to the Tools tab as shown below.
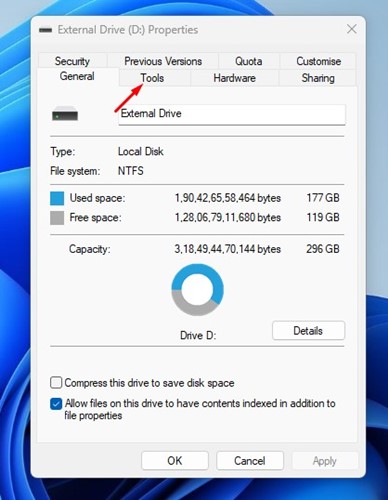
Tools

4. Underneath Error-checking, click on the Check button.
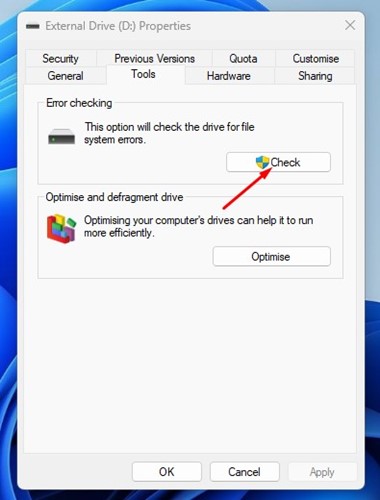
Check

That’s it. This will run the check disk utility on your Windows 11 computer. You need to wait for a few seconds until the scan completes. Once completed, restart your computer.

3) Run Antivirus/Malware Scan

Sometimes, malware or viruses also create problems with hard disk drive workability. Hence, if the chkdsk command fails to fix your problem, you must run a full antivirus scan.
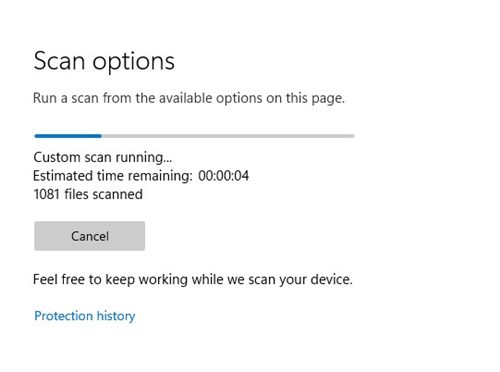
Windows Security app

If you don’t have an antivirus program, you can use the Windows Security app to run a full virus scan. Or else, you can download & install third-party antivirus software to find and remove viruses, malware, PUPs, and keyloggers from your PC.

4) Run a SMART Test

Well, with the S.M.A.R.T test, you will be able to know whether your hard drive is dying. S.M.A.R.T stands for Self Monitoring, Analysis, and Reporting Technology, and it tells you about the condition of your hard drive. Here’s how to run the SMART test in Windows 11.

1. Click on the Windows 11 search and type in Command Prompt. Right-click on the Command Prompt and select Run as administrator.

Run as administrator

2. On the Command Prompt, type in the command and hit the Enter button.

wmic diskdrive get status
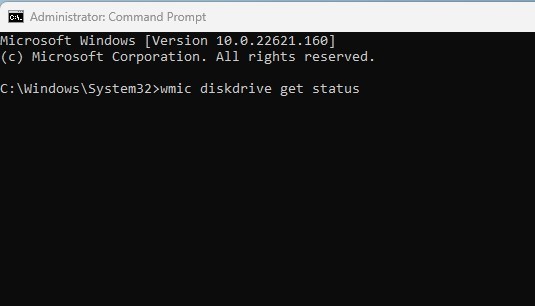
wmic diskdrive get status

3. The SMART test will return with a Status result. If the status shows Ok, your hard drive has no problem. However, if it returns with BAD or Unknown status, it indicates a failing hard drive.
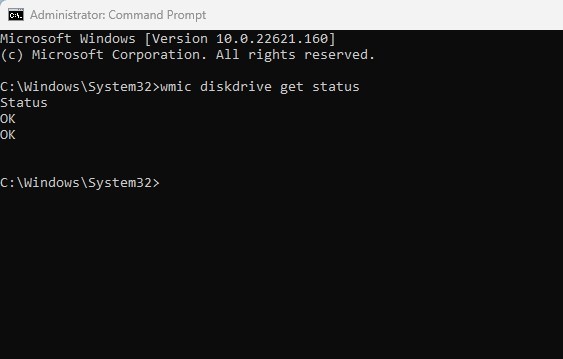
That’s it. This is how you can run the SMART test in Windows 11. If you got the BAD or Unknown in the SMART test, you need to get your hard drive checked by a professional.

5) Perform a system restore

If Windows 11 still throws a ‘Scan Drive for Errors’ notification after following all the above methods, you need to perform a system restore.

System Restore will probably replace the corrupted system files & incorrect settings, which might fix the problem for you. However, you can perform a system restore only if you’ve set up automatic system restore points.

If your Windows 11 PC already has a system restore point, you must follow these steps.

1. Click on the Windows 11 search and type in Recovery.
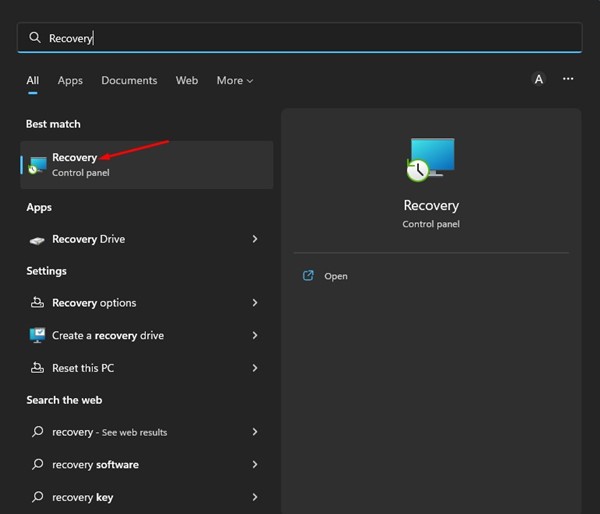
Recovery

2. On the Recovery app, click on the Open System Restore link.
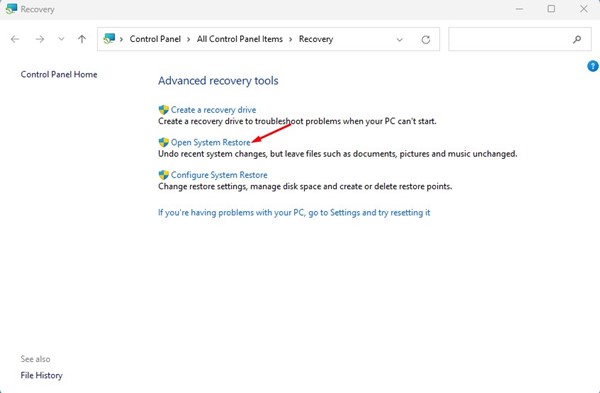
Open System Restore

3. On the System Restore Window, select the Restore point you want to use.
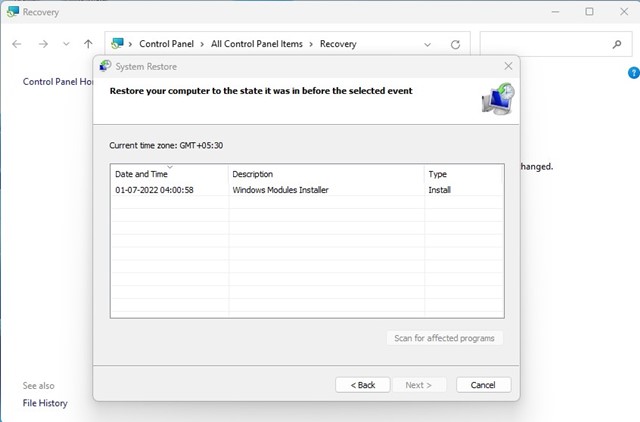
select the Restore point

4. On the next screen, click on the Finish button.

That’s it. This will roll back your Windows 11 to the back date.

Also Read: How to Schedule Automatic System Restore Points in Windows 11

So, these are some of the best ways to fix the ‘Scan Drive for Errors’ notification on Windows 11. If you know any other ways to fix the problem, let us know in the comment box below.

The post How to Fix the ‘Scan Drive for Errors’ Notification on Windows 11 appeared first on Tech Viral.


from Tech Viral https://ift.tt/hidpmHn

Air Pods Pro 2 Reportedly Not Featuring Heart Rate or Body Temperature

Air Pods Pro 2 Reportedly Not Featuring Heart Rate or Body Temperature

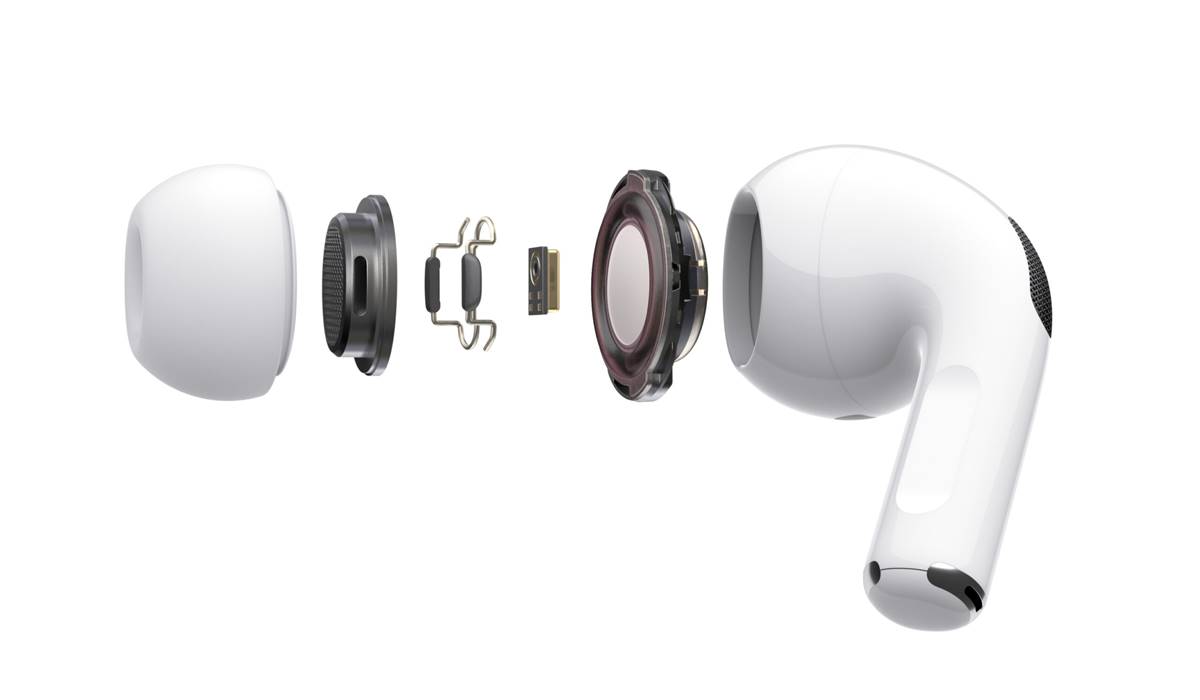
Apple’s upcoming AirPods Pro 2’s rumored features are expected to arrive for the first time in AirPods, such as Heart Rate or Body Temperature detection features with tiny Airpods that will place in your ears.
But, Apple product’s detail leaker, Bloomberg’s Mark Gurman, believes there will not be such features as these, and AirPods Pro 2 will come with an enhancement to the audio system and its primary sensor.

Recently, Mark Gurman also provided some details regarding the new thermometer sensor that is coming in Apple Watch Series 8, and he claims this feature can detect your fever.

AirPods Pro 2 Would Come Without Health Features

AirPods Pro 2 Would Come Without Health Features

According to the latest edition of the Powerup newsletter from Mark Gurman on Bloomberg, the upcoming Apple AirPods Pro 2 would not have Heart Rate or Body Temperature detection features.

It all started when an earlier report from 52Audio suggested that the AirPods Pro 2 would have a Heart Rate sensor to detect your heart rate from your ears.

There is also another reason that proves it wouldn’t have detection features. When first Gurman reported the Apple Watch Series 8 would include temperature detection, he also stated it was hard for the company.

And for the smaller device, it will take more time to implement, so not for this year but surely in the future.

Besides, 52Audio also unveiled some details about the AirPods Pro 2, such as its chip H1 would have upgraded its SiP system and capability of noise cancellations with more enhancements.

And also Airpods 2 Pro case would have a tiny speaker to play a sound to find it. Earlier leaks also claim it would arrive with USB-C type charging.

We can’t confirm if these suggested specs & improvements are entirely accurate or not, but we are expecting them to get valid.

Gurman also indicated its launch date by saying, ‘Apple is gearing up to launch new AirPods Pro later this year,’ but then in the report, he kept it with ‘soon’ term.

The post Air Pods Pro 2 Reportedly Not Featuring Heart Rate or Body Temperature appeared first on Tech Viral.


from Tech Viral https://ift.tt/icVna5J

10 Best Weight Loss Apps For Your Android in 2022

10 Best Weight Loss Apps For Your Android in 2022

Since we are so busy with our everyday schedules, we usually neglect to care for our health properly. Doctors recommend that exercise, a proper diet, and watching your calorie intake are the three best ways to lose weight. However, it’s challenging to manage all these at once.

Thankfully, some of the best Android apps available on the Google Play Store can help you manage your health schedule. If you want to manage your health schedules more efficiently, those health management apps can do wonders.

Also Read: 10 Best Mind-Soothing Apps For Android To Beat Insomnia

List of 10 Best Weight Loss Apps For Your Android

Below, we will share some of the best Android weight loss apps that every overweight person must use.

1. Walking App

Walking App

You need to use this app if you don’t want to do heavy workouts to lose weight. Walking App is an Android app that brings fitness plans designed for weight loss. The app shows you a fitness plan which includes walking exercises & speed-up methods.

Apart from exploring the workout plan, you can use Walking App to track your walking habits, distance, running, and more. Overall, Walking App is a great weight loss app that you shouldn’t miss.

2. HealthifyMe

HealthifyMe

HealthifyMe is slightly different from all other apps listed in the article. It’s not an exercise or workout app; it’s a fitness app that provides weight loss diet plans.

With HealthifyMe, you can easily create a personalized diet plan to lose weight quickly. You can track your calorie intake, track your health data with a nutrition calculator, and more.

It also has a workout section that provides workout videos for both men & women. It also has breathing practices, stretching exercises, and more.

3. Couch to 5K

Couch to 5K

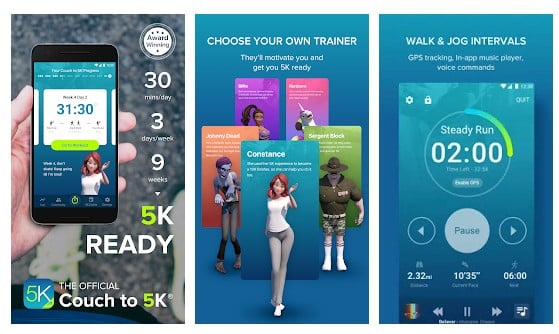
Couch to 5K is a top-rated and useful weight loss app available on the Google Play Store. The ultimate goal of Couch to 5K is to get you run. However, it does that in steps, taking about nine weeks to complete.

Not just that, but the app also provides a few training modes like zero to 10k, five to 10k, etc. So, depending upon your fitness level, you can choose the mode and start the training.

4. Lose Weight App for Men

Lose Weight App for Men

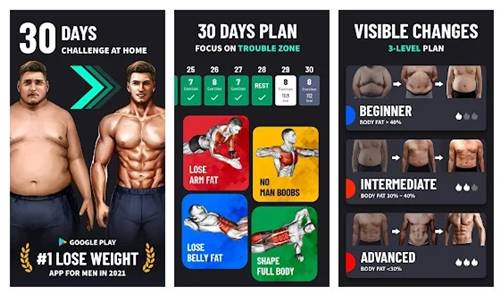
It’s a fitness app for Android, specially designed for men looking for ways to lose weight at home. Guess what? Lose Weight App for Men offers many effective fat-burning workouts to help you lose weight fast.

Lose Weight App for Men offers you 3 difficulty levels to get started. You can choose beginner, intermediate, and advanced modes to explore the exercises.

5. Runtastic Running & Fitness

Runtastic Running & Fitness

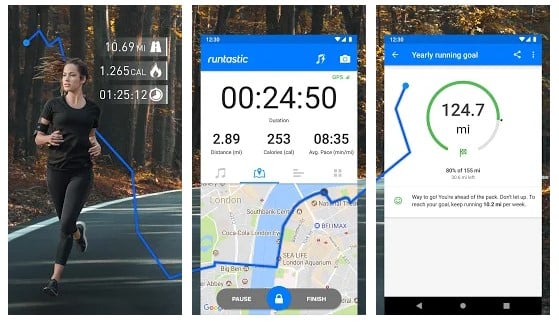
Runtastic – Run Tracker is a fantastic run tracking app for Android. With this app, you can track distance, time, speed, elevation, calories burned, and a few other stats through your smartphone.

It uses your phone’s built-in GPS service to track your fitness activities and provides all stats in one place.

6. Yoga-Go

Yoga-Go

As we all know how useful Yoga is in improving our overall health. Yoga-Go has solutions for all your mind and body problems. The app can help you lose weight, sleep better, get six-pack abs, and boost energy.

It’s a very effective weight loss app that combines customized fitness and weight loss plans that work.

7. MyFitnessPal

MyFitnessPal

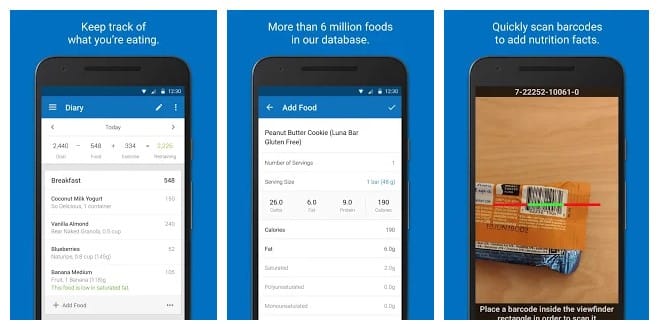
MyFitnessPal is an Android app that can help you lose weight, tone up, and get healthy. This calorie counter app helps you track your daily calorie intake.

Also, it can track other nutrients, cholesterol, vitamins, sugar, fiber, and more.

8. MyPlate Calorie Tracker

MyPlate

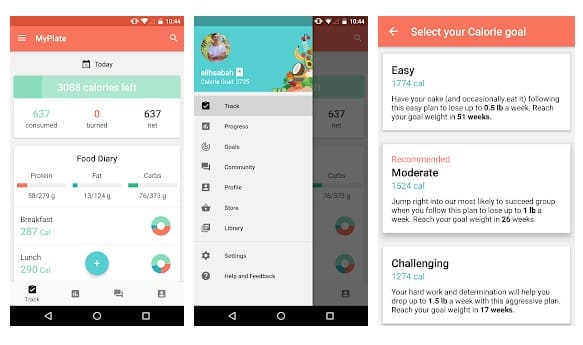
MyPlate Calorie Tracker from LiveStrong.com seems to be the most user-friendly option for losing weight quickly. This one is much similar to the MyFitnessPal app listed above. MyPlate Calorie Tracker has a comprehensive food database with over 2 million items.

You can use that database to determine which foods you eat contain the most calories. You can also keep track of your water intake, create custom goals, and track your progress with this app.

9. Yoga Daily Fitness

Yoga Daily Fitness

Over the past few years, Yoga is grown more and more popular. Do you know why? It’s because it works! Yoga Daily Fitness is an app that’s dedicated to yoga positions only.

Yoga Daily Fitness has many yoga positions for weight loss, which could help you lose weight. Not just that, but Yoga Daily Fitness also allows users to set up a Yoga Plan.

10. BetterMe

BetterMe Weight Loss Plan

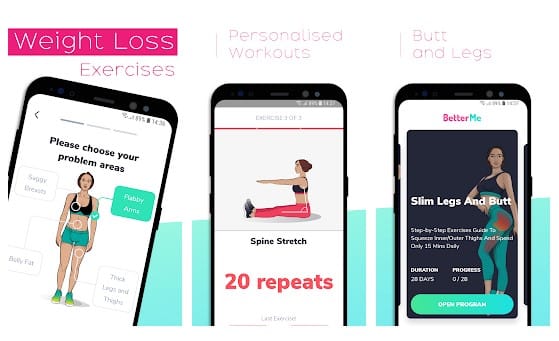
It doesn’t matter whether you are a beginner or a pro; BetterMe got you covered with various exercise sets for at-home or at-gym sessions.

BetterMe is a health & fitness app that provides you with fully customized weight loss plans. Apart from the exercises, it also offers you easy-to-follow meal plans.

These are the best Android apps to lose weight. Almost all apps we have shared are available on the Google Play Store and are free to download. If you know of any other such app, drop the app’s name in the comment box below.

The post 10 Best Weight Loss Apps For Your Android in 2022 appeared first on Tech Viral.


from Tech Viral https://ift.tt/YZNEQhU

10 Best Free WinRAR Alternatives for Windows in 2022

10 Best Free WinRAR Alternatives for Windows in 2022

We got to admit that we all deal with compressed files in our day-to-day life. File compression is one of the most used PC features for business and personal use. Regarding the file compression tools for Windows, plenty of choices are available on the internet.

However, we mostly rely on WinRAR to compress and decompress files. And why not, as WinRAR is one of the oldest file compression tools available right now, used by millions of users. However, WinRAR is a premium tool, and most users prefer free tools. Fortunately, there are many free WinRAR alternatives available on the internet that you can use to compress or decompress files.

Also Read: How to Crack WinRAR Password Protected Files In Simple Steps

List of 10 Best Free WinRAR Alternatives for Windows

The great thing about these free WinRAR alternatives is that they provide similar features. Here in this article, we will list down some of the best WinRAR alternatives you can use on your PC. So, let’s explore the list.

1. Zipware

Zipware

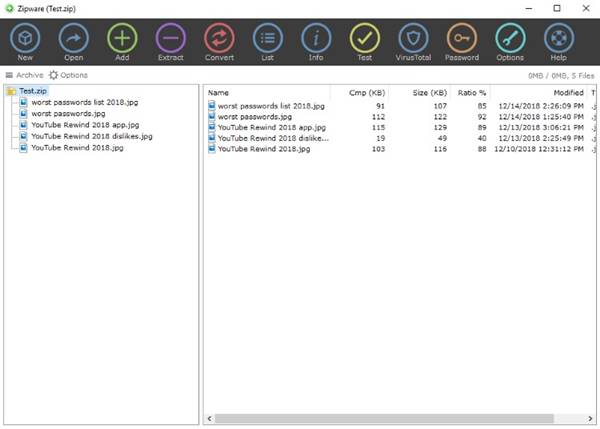
If you are looking for a simple and free WinRAR alternative for Windows, then look no other than Zipware. Zipware is a free zip software for Windows that supports almost all major archive formats.

With Zipware, you can easily extract ZIP, ZIPX, 7Z, RAR, RAR5, ISO, and other file types. Not only that, but you can even create a ZIP file. Zipware also allows users to create password-protected archives.

If we compare Zipware with WinRAR, Zipware is less popular, but far more powerful than WinRAR or other archive software. Although the tool officially supports up to Windows 10, it also runs fine even on latest Windows 11.

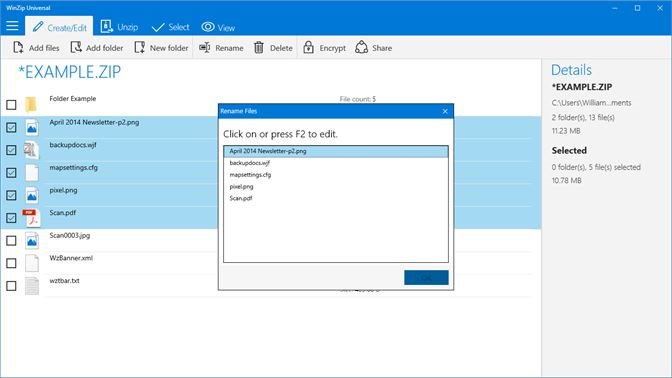
2. WinZip

WinZip

Although not as popular as WinRAR, WinZip is a mini-program to archive and compress files. It’s also the oldest file compression utility available on the web.

With WinZip, you can unzip all major file format liks ZIP, RAR, 7Z, TAR, GZIP, VHD, XZ, and more. This WinRAR alternative also provides you few file management features.

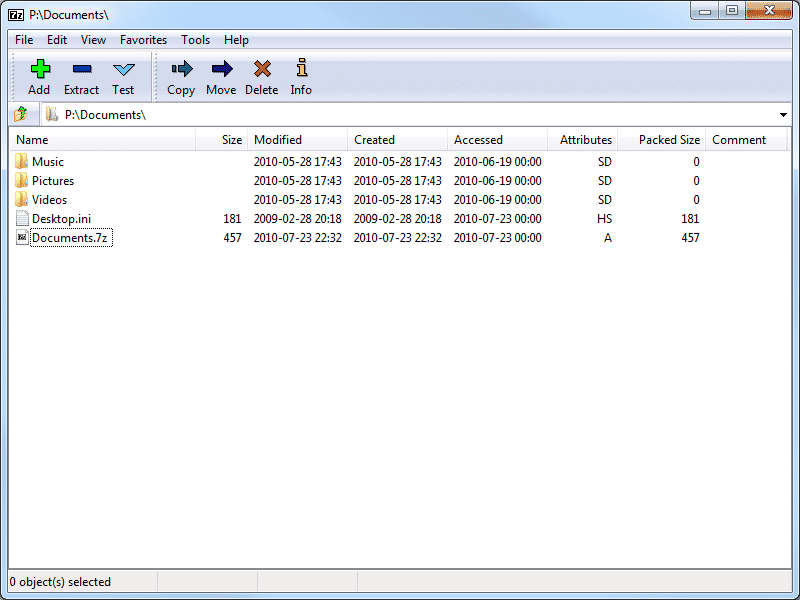
3. 7-Zip

WinRAR AlternativesUnlike Winrar, which forces users to purchase a license, 7-Zip is open-source and completely free to use. The most noticeable thing about 7-Zip is that it offers up to 10% better file compression ratio than any other tool.

7-Zip can quickly zip/unzip compressed file formats like 7z, ZIP, GZIP, RAR, TAR, etc. It’s available for Windows 7, Windows 8, Windows 10, and Windows 11 operating systems.

Compared to WinRAR, 7-zip is more lightweight and requires less space to install on a Windows device. Overall, 7-Zip is one of the best & most lightweight archive tools you can use on Windows.

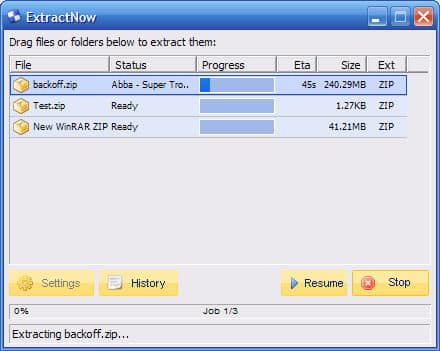
4. ExtractNow

ExtractNowIf you are searching for an easy-to-use file compression tool for Windows operating system, ExtractNow might be the best pick for you.

ExtractNow has a pretty neat interface, making the tool extremely easy to use. On the downside, ExtractNow can only be used to unpack files.

What makes ExtractNow different is its ability to extract multiple files simultaneously. ExtractNow is compatible with every version of Windows, including the latest – Windows 11.

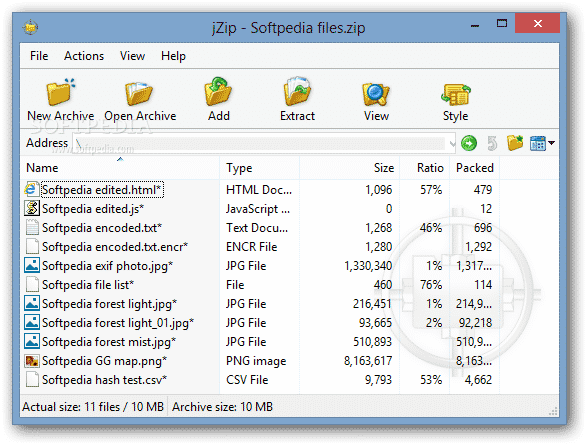
5. jZip

download archive utilityjZip is another best file compression tool on the list known for its interface. However, jZip adds an ask toolbar while installation, which is considered adware. So, make sure to uncheck the ‘add ask toolbar’ option during the installation.

Talking about the features, jZip offers better compression ratios than other tools. Not just that, but the tool has support for RAR, Zip, 7-Zip, TAR, and GZip format.

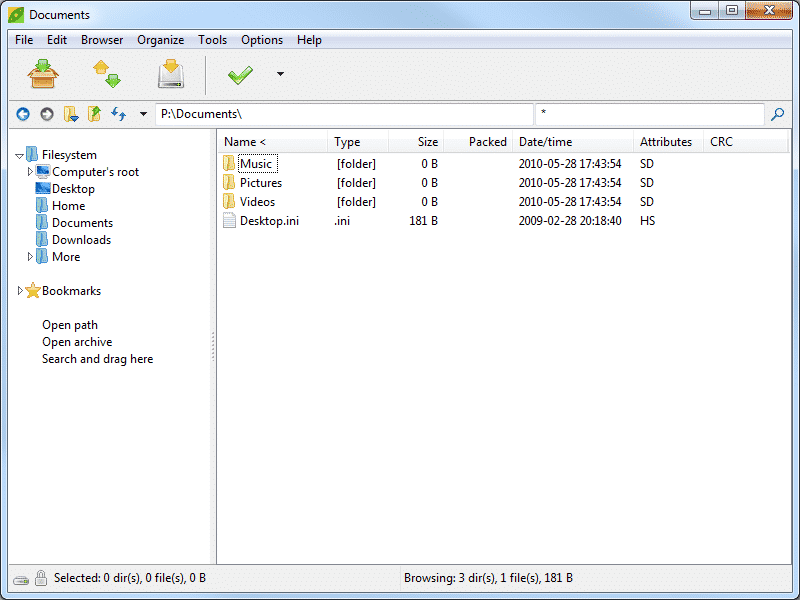
6. PeaZip

PeaZipPeaZip is another best WinRAR alternative on the list, which is free to use. The great thing about PeaZip is that apart from compression and decompressing the files, it also allows users to create encrypted zip files.

The interface of PeaZip is also fantastic, and it supports almost all major file compression formats.

Even though PeaZip is not as popular as WinRar, it still has a faster processing speed than any other file archive program. Apart from that, PeaZip offers all the features you look for in an archive tool.

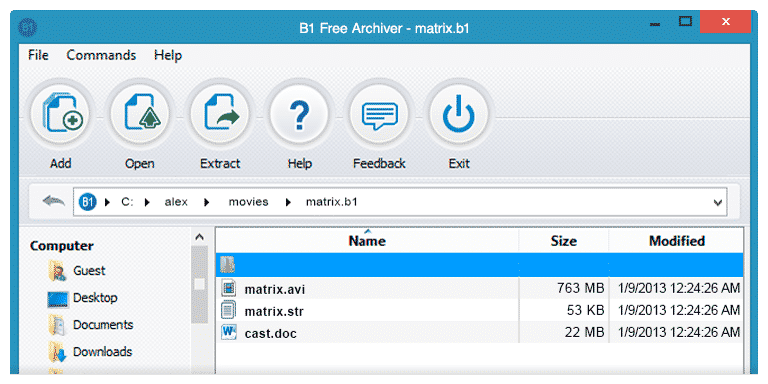
7. B1 Free Archiver

B1 Free ArchiverB1 Free Archiver seems to be the best and most advanced file compression tool for Windows 10. B1 Free Archiver supports more file formats than other file compression tools.

It supports important formats like b1, zip, rar, arj, xpi, jar, txz, and many more. However, during the installation, B1 Free Archiver attempts to install adware. So, be careful during the installation.

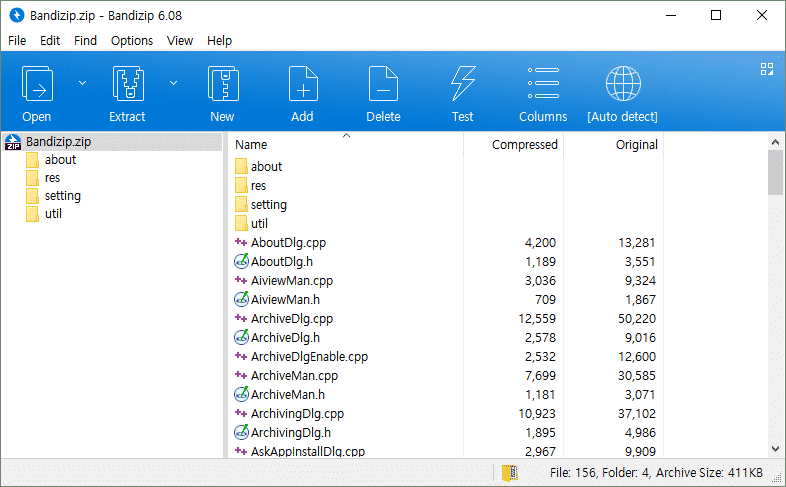
8. BandiZip

BandiZipIf you are searching for a powerful archiver that provides ultrafast processing speed and convenient features, look no other than BandiZip. The tool is entirely free to download & use and offers many advanced features.

What makes BandiZip different from others is that it supports multi-core compression. With multi-core support, BandiZip can fully use your CPU cores to provide you with faster compression speed.

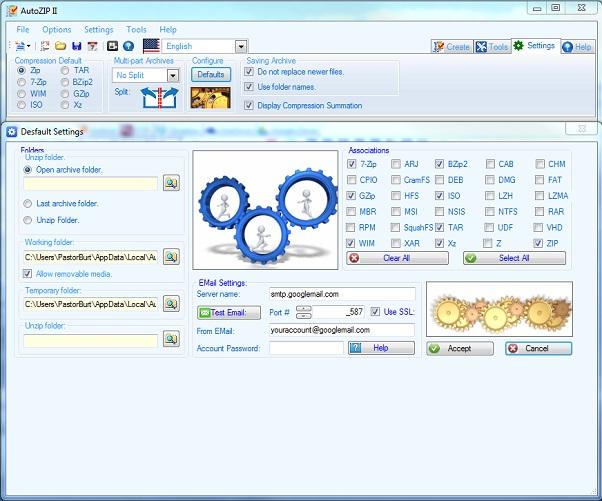
9. AutoZIP II

best file compression softwareIf you are looking for a file compression tool that’s very easy to use, then AutoZIP II might be the best option to choose.

The great thing about AutoZIP II is that it supports almost all major file compression formats. Not just that, but AutoZIP II can also be used to password-protect any zip files.

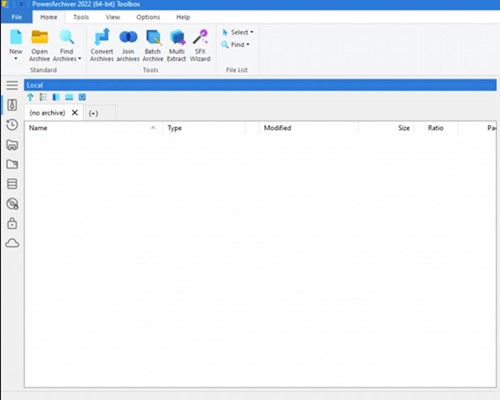
10. PowerArchiver

PowerArchiver

PowerArchiver is the last file compression utility on the list used mainly by professionals. This is an advanced file compression tool that shows taskbar progress.

It supports almost all file compression formats, and you can also password-protect your compressed files.

So, these are the best compression tools you can use on your Windows computer. Drop the name in the comment box below if you know other tools like these. I hope this article helped you! Please share it with your friends also!

The post 10 Best Free WinRAR Alternatives for Windows in 2022 appeared first on Tech Viral.


from Tech Viral https://ift.tt/k5RZ1Dz

How to Activate Steam Guard Mobile Authenticator in 2022

How to Activate Steam Guard Mobile Authenticator

Steam is indeed an excellent platform for downloading & playing games on PC. The platform has become very popular over the years and has become a go-to platform for millions of users to download & play games online.

While Steam is mainly a gaming platform, it still has many social networking features. For example, on the platform, you can add gaming friends, chat with them, exchange files, and more. Since it’s a social networking cum gaming platform, it has introduced a Two Factor Authentication security feature.

What is Two Factor Authentication?

Well, Two Factor Authentication or two-step verification is an extra layer of security that ensures that people trying to gain access to an online account are who they say they are.

Two-factor authentication requires an extra login process where you must enter the verification code sent to your phone number or email address. Only after verifying the code will you be able to regain access to your online account.

Steam has a two-factor authentication but is in a different name – Steam Guard. Steam Guard codes will be delivered to you via the Steam app on your phone or at your registered email address.

Also read: How to Change the Game Download Location in Steam Client

Steps to Enable Two Factor Authentication on Steam

To enable two-factor authentication or Steam Guard on your Steam account, follow some of the simple steps below.

1. Launch the Steam client on your computer and click on the Steam icon in the top-left corner.

click on the Steam icon

2. From the list of options, click on Settings.

Settings

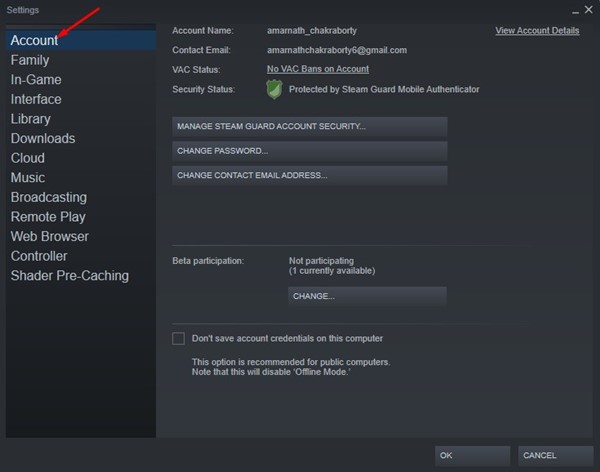
3. On the Settings window, click on the Account option on the left.

Account

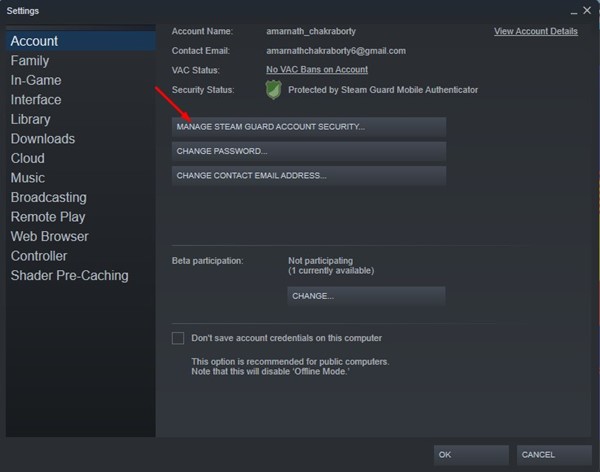
4. On the right, click on the Manage Steam Guard Account Security option.

Manage Steam Guard Account Security

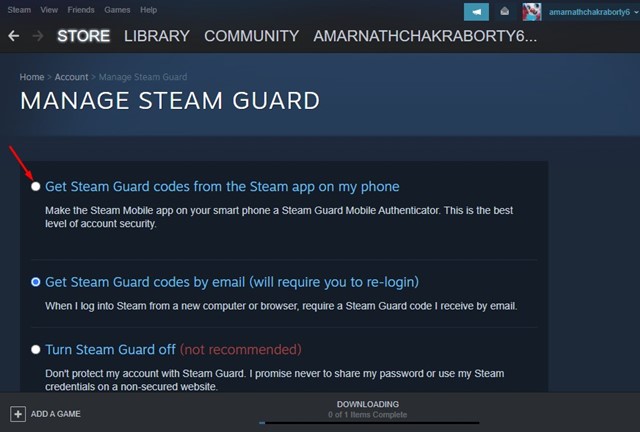
5. Select the ‘Get Steam Guard codes from the Steam app on my phone’ option on the Manage Steam Guard screen.

'Get Steam Guard codes from the Steam app on my phone'

6. Now, open the Steam app on your smartphone and tap on the hamburger menu at the top-left corner.

hamburger menu

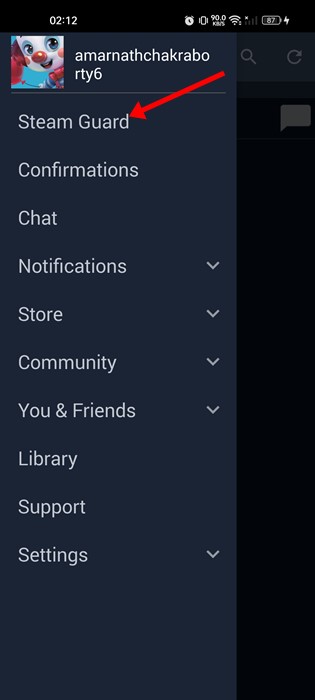
7. On the menu that appears tap on the Steam Guard.

Steam Guard

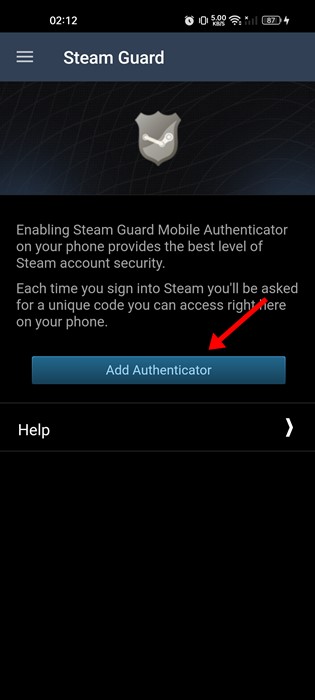
8. On the Steam Guard screen, tap on the Add authenticator button.

Add authenticator

9. Now, Steam will send you an SMS code to your registered phone number. You need to enter that code and tap on the Submit button.

SMS code to your registered phone number

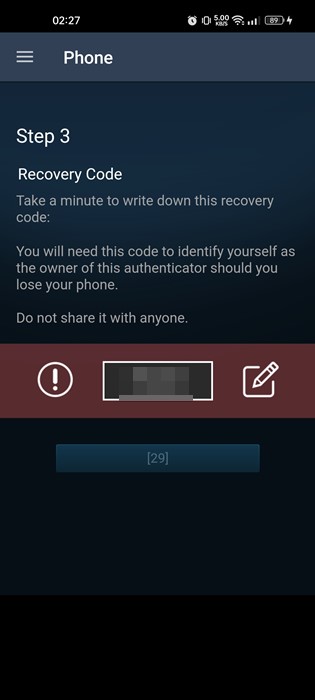
10. Now, Steam will provide you with a recovery code. You need to note it down and keep it safe.

recovery code

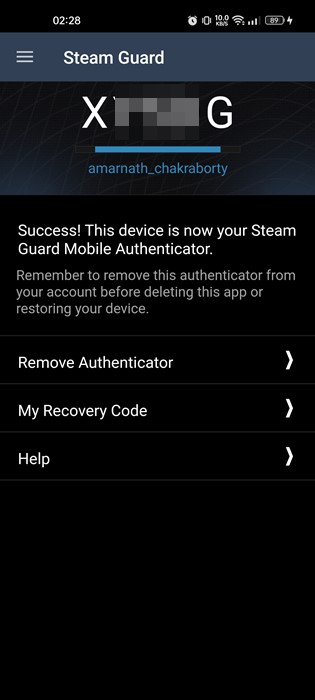
11. Once done, you will see a 5-digit code on the Steam Guard. This code will change automatically in just a few seconds.

5-digit code on the Steam Guard

That’s it! Now, whenever you try to log in to your Steam account from a new device, you will be asked to enter the Steam Guard code. You need to enter the code from the mobile device to access your account.

How to Get Steam Guard Codes via Email?

If you don’t use the mobile app, you can opt to get the Steam Guard Codes via email. If you select this option, Steam will send the verification codes to the registered email address. Here’s how to get two-factor authentication codes via email.

1. Launch the Steam desktop client and click on the Steam icon in the top left corner.

click on the Steam icon

2. From the list of options that appears, tap on

Settings

3. On the Settings window, switch to the Account tab on the left.

Account


4. On the right, click on the Manage Steam Guard Account Security.

Manage Steam Guard Account Security

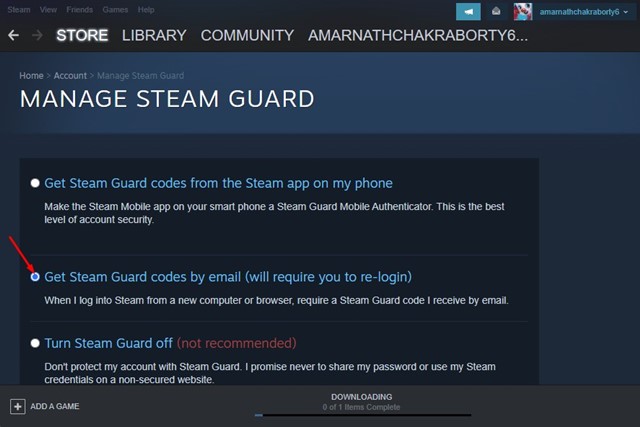
5. On the Manage Steam Guard page, select the ‘Get Steam Guard Codes by email’

'Get Steam Guard Codes by email'

That’s it! This is how you can get Steam Guard codes by email.

Also Read: How to Appear Offline on Steam

So, these are the two best ways to enable Steam Guard on your Steam account. The feature will protect your games, inventory, and Steam waller. If you need more help managing Steam Guard, let us know in the comments below.

The post How to Activate Steam Guard Mobile Authenticator in 2022 appeared first on Tech Viral.


from Tech Viral https://ift.tt/qfybhFC