Blogger has recently introduced search preferences tab in Blogger and continually introducing new features in it to help fellow bloggers do better SEO of their blogs. This will help bloggers to increase your blogs traffic and get better google search results rankings.
One of the new features introduced by blogger's developers is Custom Robots Header Tags.This tool plays great role in our blog's Search Engine Optimization. Using it properly helps us to gain more visitors from search engines and hence our blog page views will also increase.
Also the search engine will not accept the duplicate content form your site so you can avoid your site duplicate content with the custom robots header tags settings.
These are all the header tags used in blogger and their usage/meaning is defined below.
all: There are no restrictions for indexing or serving. This is default for all pages
noindex: Do not show this page in search results and do not show a "Cached" link in search results.
nofollow: Do not follow the links on this page
none: Equivalent to noindex, nofollow
noarchive: Do not show a "Cached" link in search results.
nosnippet: Do not show a snippet in the search results for this page
noodp: Do not use metadata from the Open Directory project (DMOZ) for titles or snippets shown for this page.
notranslate: Do not offer translation of this page in other languages in search results.
noimageindex: Do not index images on this page.
unavailable_after: [RFC-850 date/time]: Do not show this page in search results after the specified date/time. The date/time must be specified in the RFC 850 format. Example: 17 May 2012 15:00:00 PST
Step 1. Log in to your blogger account Dashboard and click on your blog.
Step 2. Go to Settings >> Search Preferences.
Step 3. Click on edit link in front of Custom Robots Header Tags and then click on Yes option.
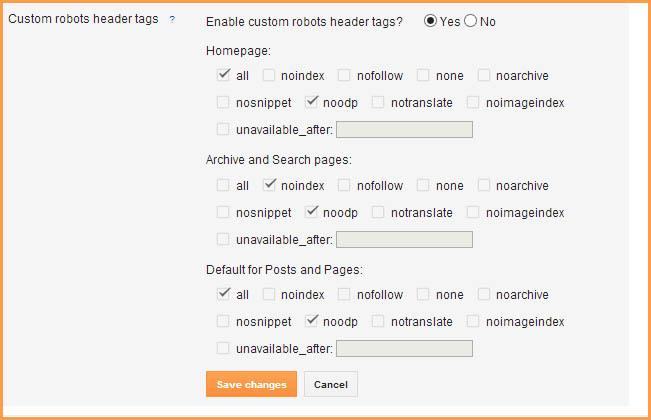
Step 4. Once you click on the Yes you will see many options. Simply tick on the options as shown in the below image.
Step 5. Now click on "Save changes" button and You are done!
That's all! If you have any doubt or need help about this post, please leave comment.
One of the new features introduced by blogger's developers is Custom Robots Header Tags.This tool plays great role in our blog's Search Engine Optimization. Using it properly helps us to gain more visitors from search engines and hence our blog page views will also increase.
Also the search engine will not accept the duplicate content form your site so you can avoid your site duplicate content with the custom robots header tags settings.
What are Custom Robots Header Tags ?
These are all the header tags used in blogger and their usage/meaning is defined below.
all: There are no restrictions for indexing or serving. This is default for all pages
noindex: Do not show this page in search results and do not show a "Cached" link in search results.
nofollow: Do not follow the links on this page
none: Equivalent to noindex, nofollow
noarchive: Do not show a "Cached" link in search results.
nosnippet: Do not show a snippet in the search results for this page
noodp: Do not use metadata from the Open Directory project (DMOZ) for titles or snippets shown for this page.
notranslate: Do not offer translation of this page in other languages in search results.
noimageindex: Do not index images on this page.
unavailable_after: [RFC-850 date/time]: Do not show this page in search results after the specified date/time. The date/time must be specified in the RFC 850 format. Example: 17 May 2012 15:00:00 PST
How to Enable Custom robots header tags in Blogger SEO
Follow these steps to enable Custom robots header tags in Blogger Blogs to increase your blog traffic and page views.Step 1. Log in to your blogger account Dashboard and click on your blog.
Step 2. Go to Settings >> Search Preferences.
Step 3. Click on edit link in front of Custom Robots Header Tags and then click on Yes option.
Step 4. Once you click on the Yes you will see many options. Simply tick on the options as shown in the below image.
Step 5. Now click on "Save changes" button and You are done!
That's all! If you have any doubt or need help about this post, please leave comment.
No comments:
Post a Comment