Sunday, January 31, 2021

How to Remove Your Facebook Profile from Google & Bing Searches

How to Remove Your Facebook Profile from Google & Bing Searches

Well, Facebook is right now the most used social networking platform. Although there are plenty of other social networking sites available on the web, it was Facebook that our friends & family members use. It also has more features than any other social networking site.

If you have been using Facebook for a while, you might know that the social networking giant allows search engines like Google, Bing to index your profile along with all other publicly available information.

If you are reading this article, you probably don’t know about such a thing, but Facebook does allow Google and Bing to index your data. However, if you are someone who takes privacy very seriously, you might want to disable such a feature.

Also Read: 10 Best Google Search Engine Alternatives

Steps to Remove Your Facebook Profile from Google & Bing Searches

It’s relatively easy to remove your Facebook profile from Google or Bing searches. In this article, we will share a step-by-step guide on how to remove your Facebook profile from search engine searches. So, let’s check out.

Step 1. First of all, login to your Facebook account.

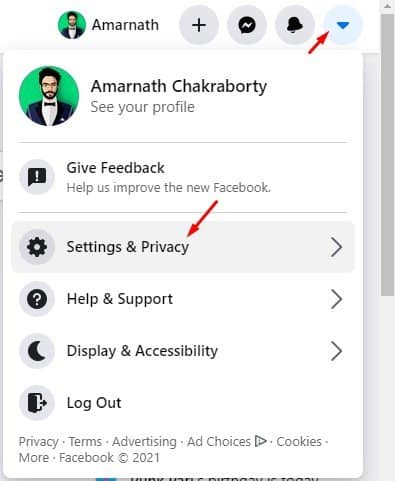
Step 2. Now click on the arrow button at the top-right corner and select ‘Settings & Privacy’

select 'Settings & Privacy'

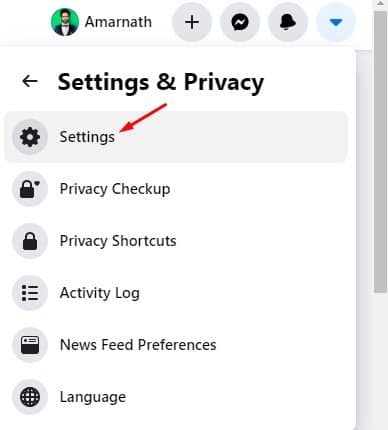
Step 3. Under the Settings & Privacy, click on the ‘Settings’ option.

click on the 'Settings' option

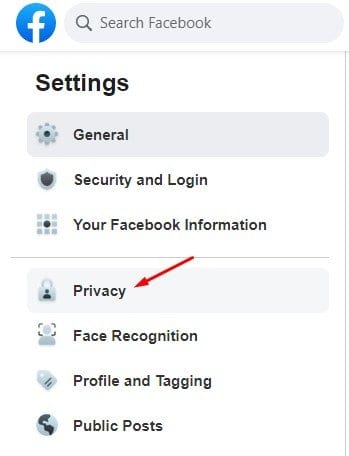
Step 4. Click on the ‘Privacy’ option on the left pane.

Click on the 'Privacy' option

Step 5. Now scroll down and find the ‘How People Find and contact you’ section.

find the 'How People Find and contact you' section

Step 6. Click on the ‘Edit’ button behind the ‘Do you want search engines outside of Facebook to link to your profile?’ option.

Click on the 'Edit' button

Step 7. Uncheck the ‘Allow search engines outside of Facebook to link to your Profile’ box.

Uncheck the option

Step 8. Now on the confirmation pop-up, click on the ‘Turn Off’ button.

click on the 'Turn Off' button

That’s it! You are done. This is how you can remove your Facebook profile from Google searches. Please note that the changes can take a few weeks or months to go into effect. Once the changes are made, the profile link will be delisted from the search engine results.

So, this article is all about how to remove your Facebook profile from Google Searches. I hope this article helped you! Please share it with your friends also. If you have any doubts related to this, let us know in the comment box below.

The post How to Remove Your Facebook Profile from Google & Bing Searches appeared first on TechViral.


from TechViral https://ift.tt/2MlEEzm

Silver surges as Reddit army turns to commodities

The investors that caused GameStop to surge are now turning their attention to silver.

from BBC News - Technology https://ift.tt/2MdHir2

Groundbreaking biofuel rocket could be 'Uber for space'

Stardust 1.0 has become the first commercial launch of a rocket powered by bio-derived fuel.

from BBC News - Technology https://ift.tt/39AFcu8

India protests: Internet cut to hunger-striking farmers in Delhi

Tensions are rising in Delhi where thousands of farmers are demanding agriculture reforms be repealed.

from BBC News - Technology https://ift.tt/2M9glER

TikTok singer Amy Hawkins, 110, becomes viral sensation

Almost 100,000 people have seen Amy Hawkins sing World War One song It's A Long Way to Tipperary.

from BBC News - Technology https://ift.tt/3ptCEmZ

'Harsh writing advice' memes take off on Twitter

Twitter users take time off their busy writing schedules to share helpful - or unhelpful - tips.

from BBC News - Technology https://ift.tt/3r9kZS7

'I was scammed out of £17,000 on Instagram'

Since the pandemic hit the UK, reports of investment scams targeting Instagram users have risen 50%.

from BBC News - Technology https://ift.tt/3j0BYmy

Home working increases cyber-security fears

IT experts say that with people working from home the risk of hacking has increased.

from BBC News - Technology https://ift.tt/39ClePH

How to Enable Picture-in-Picture mode in Mozilla Firefox Browser

How to Enable Picture-in-Picture mode in Mozilla Firefox Browser

A few days ago, we shared an article on enabling picture-in-picture mode in the Google Chrome web browser for desktop. After reading that article, many users asked the same for the Mozilla Firefox web browser. Since Firefox has an active user base, we have decided to share a detailed guide on how to enable PiP mode in Mozilla Firefox.

For those who don’t know, the Picture in Picture or PiP Mode basically changes the video configuration to fit into a small Window. Once enabled, it plays the video in a small controllable floating window. You can move and resize the floating window as per your desire to fit comfortably on the screen. The PiP mode even works when the main browser window is not active or minimized.

If we talk about the Picture-in-Picture mode of Firefox, it’s relatively easy to enable the feature on the web browser. Just make sure that you are using the latest version of the Firefox web browser.

Also Read: How to Enable Picture-in-Picture Mode On Google Chrome

Steps to Enable Picture-in-Picture mode in Mozilla Firefox Browser

So, in this article, we will share a step-by-step guide on how to enable Picture in Picture mode in the Mozilla Firefox web browser. Let’s check out.

Step 1. First of all, launch Mozilla Firefox on your Windows 10 computer.

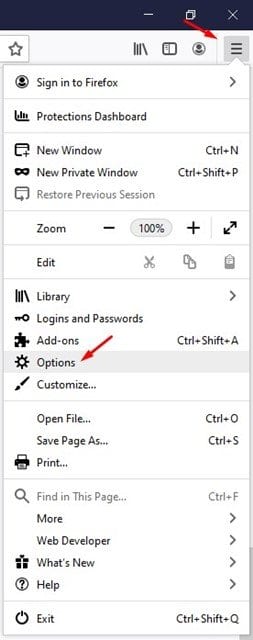
Step 2. Now, click on the three horizontal lines and select ‘Options’

click on the three horizontal lines and select 'Option'

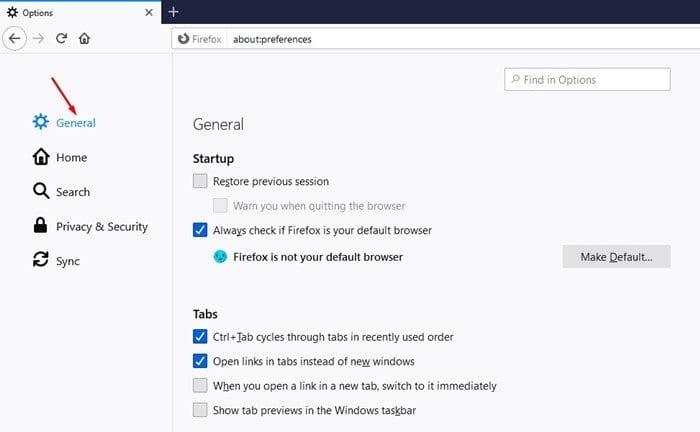
Step 3. On the Option, click on the ‘General’ tab.

click on the 'General' tab

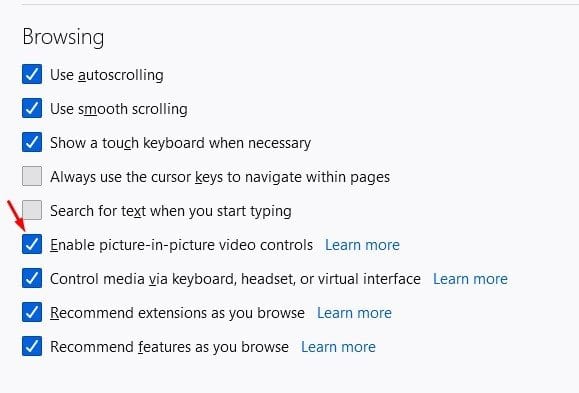
Step 4. Scroll to the ‘Browsing’ section and check the option ‘Enable picture-in-picture video controls.’

check the option 'Enable picture-in-picture video controls.'

Step 5. Once done, restart the web browser to apply the changes.

Step 6. After the restart, open a video website like YouTube and hover the mouse cursor over the video. You will see a PiP icon. Just click on it and the video will start to play in a small floating window.

PIP Mode

Note: In a few sites, the Picture-in-Picture mode might not work. However, it will work on most of the famous websites like YouTube, Vimeo, etc.

That’s it! You are done. This is how you can enable Picture-in-Picture mode in the Mozilla Firefox web browser. I hope this article helped you! Please share it with your friends also. If you have any doubts related to this, let us know in the comment box below.

The post How to Enable Picture-in-Picture mode in Mozilla Firefox Browser appeared first on TechViral.


from TechViral https://ift.tt/3j47ss0

10 Best Free Firewall Apps For Android in 2021

10 Best Free Firewall Apps For Android in 2021

Well, we are pretty sure that whenever you hear about the term ‘Mobile security,’ you think about the antivirus and anti-malware apps. There are tons of apps that comes under the ‘Mobile Security’ section, out of all those, Antivirus and Firewall are the most important ones.

On techviral, we have shared an article regarding the best Antivirus apps for Android, and today we will be discussing the best firewall apps. With firewall apps for Android, you can easily monitor all incoming and outgoing traffic between your smartphone and the web-based on predetermined security protocol.

Best Firewall Apps For Android (Updated)

In this article, we will share some of the best firewall apps for Android that you can use today. So, let’s check out the best firewall apps for Android.

1. NoRoot Firewall

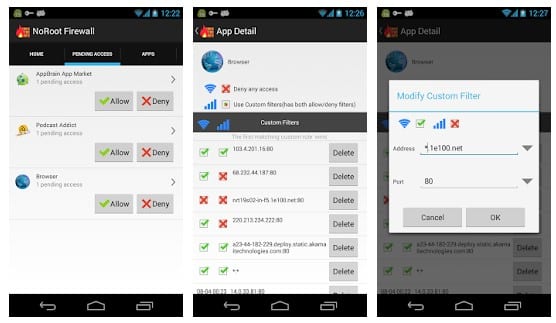
NoRoot FirewallNoRoot Firewall is by far the best firewall app for Android that we have ever used. Compared to other firewall apps, NoRoot Firewall is very easy to use, and it works on non-rooted devices also. The app offers hostname/domain name filtering options, fine-grained access controls, and a few other useful features. However, the app might not work with LTE because it doesn’t support IPv.

2. AFWall+

AFWall+If you have a rooted Android smartphone, you can use AFWall+ to control your device’s internet activities. Just like NoRoot Firewall, AFWall+ also allows users to control internet access on a per-app basis. Apart from all of these, AFWall+ also brings some additional features like connecting with the tasker to perform some predefined sets of tasks. So, it’s another best firewall app for Android which you can use.

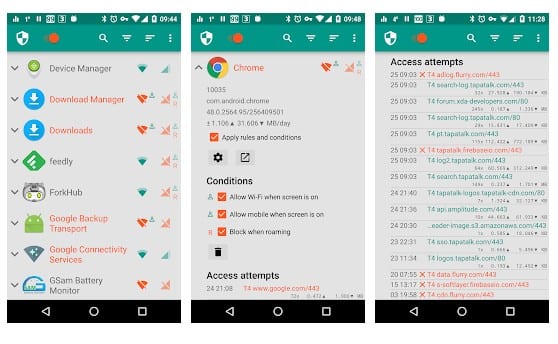
3. NetGuard

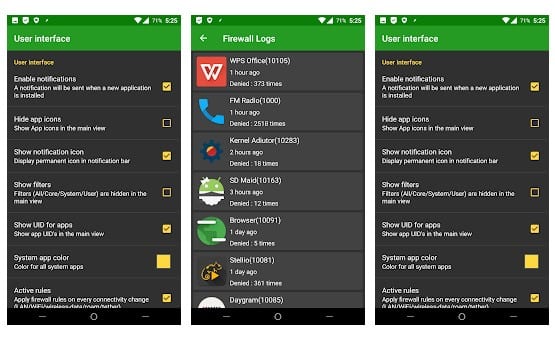
NetGuardJust like other firewall apps for Android, NetGuard also allows you to log outgoing and incoming traffic. Although the outgoing traffic log is limited to the premium version, the free version can monitor the incoming traffic. The app works on both rooted and non-rooted devices and provides simple and advanced ways to block access to the internet.

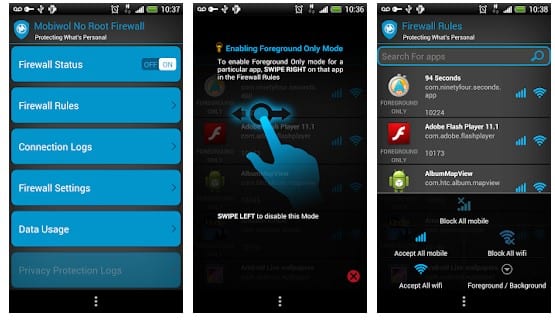
4. Mobiwol: NoRoot Firewall

Mobiwol: NoRoot FirewallIt is an advanced firewall app that you can have on your Android smartphone. The great thing about Mobiwol: NoRoot Firewall is that it shows you which app is consuming much of your internet data. So, Mobiwol: NoRoot Firewall is also one of the best app managers which you can use to figure out data consumption. So, if you find any app hogging your internet data, you can block them through Mobiwol: NoRoot Firewall.

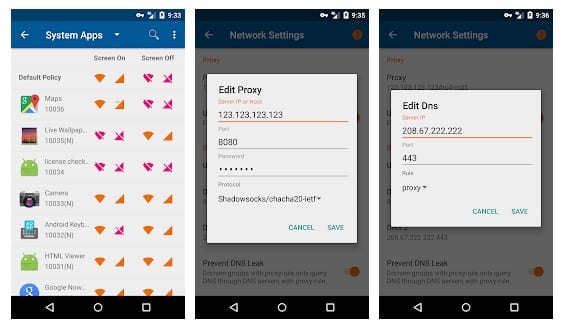
5. NetPatch Firewall

Well, NetPatch Firewall is a little bit different compared to all other firewall apps listed above. This is one sort of advanced firewall app which you can use to create the domain and IP groups, block any specific IP Addresses, etc. Almost all other NetPatch Firewall features remain the same as other apps, like blocking mobile data and WiFi individually on a per-app basis.

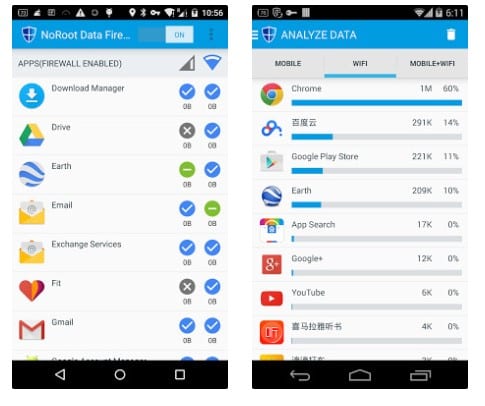
6. NoRoot Data Firewall

NoRoot Data Firewall is known for its blocking capabilities. The NoRoot Data Firewall interface is beyond amazing, and it can notify you whenever any blocked app tries to connect with the internet. Apart from all of these, NoRoot Data Firewall also got the ability to record all network interactions made by pre-installed apps.

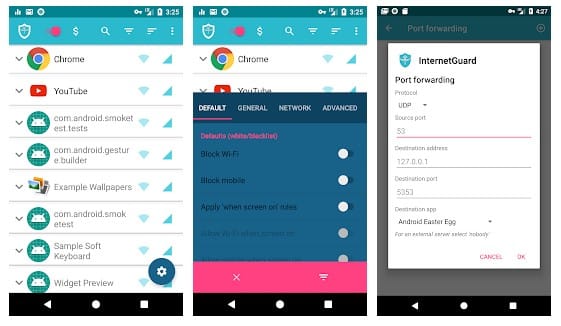
7. InternetGuard

InternetGuardInternetGuard is another top-rated Android firewall app on the list which works on both rooted and non-rooted Android devices. With this app, you can create custom profiles to block apps from using the internet while connected to WiFi or mobile data. Apart from that, it was the user-interface that makes the app stand out from the crowd.

8. VPN Safe Firewall

VPN Safe FirewallLike all other Firewall apps, VPN Safe Firewall also allows users to allow/block individual addresses per application. The great thing about VPN Safe Firewall is that it’s completely free, and it doesn’t need root access to block apps from using the internet.

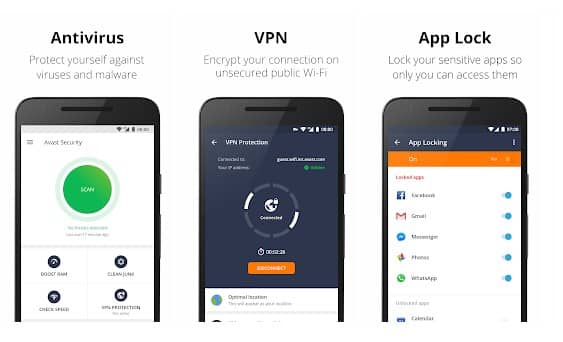
9. Avast Antivirus

Avast AntivirusIf you have a rooted Android smartphone, then you can use Avast Antivirus for complete all-around security. Avast Antivirus is a multipurpose app that serves as an Antivirus, App locker, call blocker, photo vault, VPN, Firewall. The firewall feature of Avast Antivirus needs root access, and it can restrict apps from using the internet.

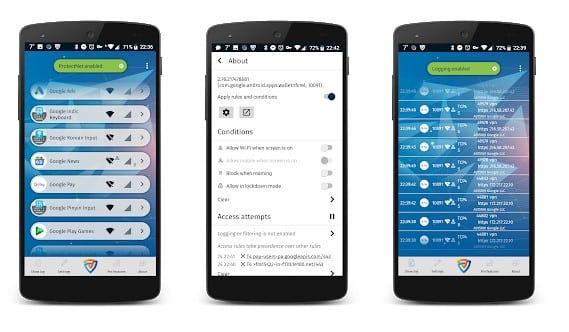
10. Protect Net

Protect Net

Protect Net is a relatively new Android firewall app available on the Google Play Store. The great thing about Protect Net is that it works on both rooted and non-rooted Android smartphone. Just like all other Android firewall apps, Protect Net also allows users to disable internet usage of both WiFi and Mobile data per-app basis. Protect Net relies upon VPN connection to restrict data usage.

So, these are the Best Firewall apps for Android which you can use today. If you feel that the list skips any essential app, please drop the name in the comment box below. If this article helped you, make sure to share it with others also.

The post 10 Best Free Firewall Apps For Android in 2021 appeared first on TechViral.


from TechViral https://ift.tt/2R5i0s1

10 Best UC Browser Alternative Web Browser For Android

10 Best UC Browser Alternative Web Browser For Android

Google Chrome is the best web browser when it comes to desktop computers and smartphones. However, it’s not the only web browser available on the web. If we talk about Google Chrome for Android, the web browser lacks few essential features like VPN, ad-blocker, etc.

Some other Android web browser like UC Browser has all necessary features, but it had been removed from the Google Play Store due to some security issues. UC Browser was caught stealing private user data and sending it to an unknown server in China.

Best UC Browser Alternatives For Android

After all such incidents, users’ trust in the UC browser has been shattered, and users are now looking for its alternatives. So, if you used to be a UC Browser user, then this post might help you. In this article, we are going to share some of the best UC Browser alternatives for Android.

1. Firefox Focus

Firefox FocusFirefox Focus has been around for a while now, and we believe it’s very underrated. By default, the web browser blocks a wide range of online trackers. This is a privacy-focused web browser that automatically erases your session details every time you close the app. The mechanism of Firefox Focus also makes the web browser fast.

Features:

  • The Android browser automatically blocks online trackers.
  • As soon as you leave the app, the history, password, and cookies were erased.
  • The web browser also removes ads from the web pages that you visit.
2. Via Browser

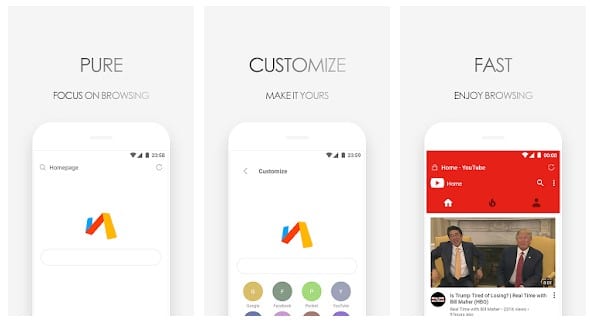
Via BrowserVia Browser is another best UC Browser alternative that you can use on your Android. The great thing about Via Browser is that it brings news and trending topics right on the homepage. Via Browser is also one of the best lightweight browsers you can use, and the browser works on a 2G mobile connection.

Features:

  • The web browser is designed for Minimalism. It consumes fewer resources.
  • Via Browser is highly customizable. It also lets you design your own browser homepage.
  • It offers lots of useful features like Data Saver, AdBlocker, Privacy Protect, etc.
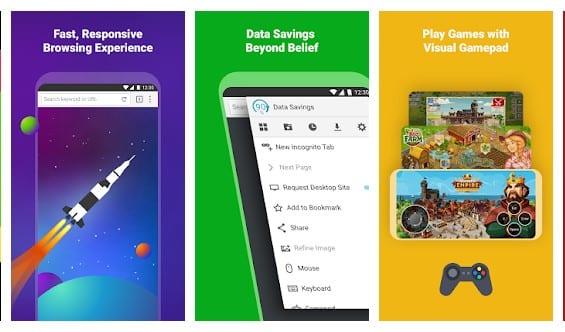
3. Puffin Web Browser

Puffin Web BrowserPuffin Web Browser is one of the top-rated Android web browser app available on the Google Play Store. Compared to other web browsers for Android, Puffin Web Browser offers more features. All web traffic from the Puffin app to the Puffin server are encrypted. Such high-level encryption eliminates web trackers, ads, and nearby hackers.

Features:

  • The web browser speeds up browsing by shifting the workload to the cloud servers.
  • It encrypts all traffic from the Puffin app to the server.
  • The web browser claims to save 90% of your bandwidth by using its compression algorithm.

4. Opera Browser

Opera BrowserWell, Opera Browser is much popular compared to all others listed above. Opera Browser for Android is frequently updated, and you will fall in love with its interface. The web browser for Android has all features that users usually need to enhance their browsing experience. From bookmarking to VPN, Opera Browser has it all.

Features:

  • It is one of the best, fast, and secure web browser for Android.
  • Opera Browser comes with a free built-in VPN to bypass restricted websites.
  • It also has a built-in ad blocker to remove ads from web pages.
  • The web browser also offers you fast downloading and file management features.
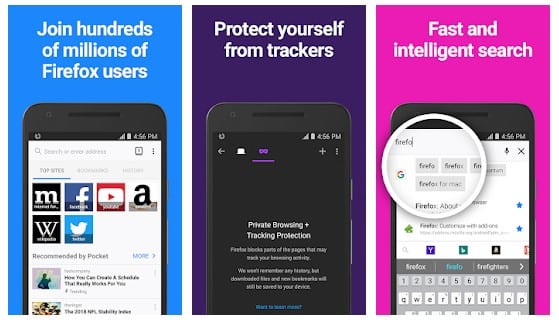
5. Firefox Browser fast & private

Firefox Browser fast & privateThe latest version of Firefox is dramatically redesigned to be faster, easy to use, customizable, and private. It offers some excellent browser features like Enhanced Tracking protection, private mode, etc., to block web trackers and ads. Some other features of Firefox include an ad blocker, dark mode, add-on support, etc.

Features:

  • The web browser offers lots of privacy protection features.
  • It automatically detects and blocks online trackers and ads.
  • It lets you send open tabs between mobile and desktop.

6. Brave Browser

Brave Browser

Well, Brave Browser is another top-rated Android web browser available on the Google Play Store. The great thing about Brave Browser is that it offers a variety of features, including ad-blocker, web trackers blocker, HTTPS everywhere, etc.

Features:

  • Brave is a private web browser with an adblocker.
  • The web browser uses some special compression algorithm to save data.
  • The brave web browser also offers a script blocker and 3rd party cookie blocker.
  • The browser also has a reward program that pays you to browse the internet.

7. Dolphin Browser

Dolphin BrowserIf you are looking for a lightweight feature that offers decent sets of features, then the Dolphin Browser might be the best pick for you. The great thing about Dolphin Browser is that it includes lots of features like theming, ad-block, incognito mode, tracker blocker, etc.

Features:

  • The web browser is flash supported. That means you can play online games based on Flash.
  • Dolphin browser has a built-in ad blocker, multiple tab bars, tracker blocker, incognito mode, etc.
  • It also has a video grabber that grabs the download link of any playing video.
  • Some other features include gesture support, multiple themes, Quick share options, etc.
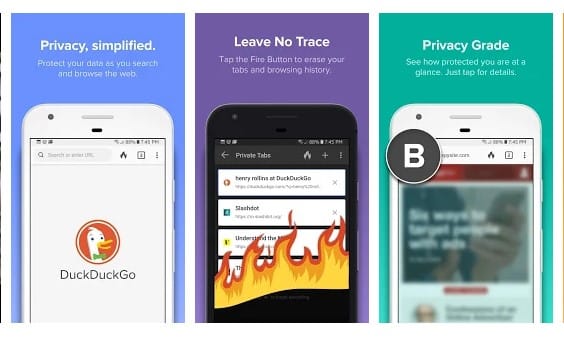
8. DuckDuckGo Privacy Browser

DuckDuckGo Privacy BrowserThe famous anonymous search engine also has a web browser app for Android. With DuckDuckGo Privacy Browser, you would get the privacy you deserve online. The great thing about DuckDuckGo Privacy Browser is that it blocks all advertisements, web trackers, etc. DuckDuckGo Privacy Browser doesn’t track your browsing activity.

Features:

  • This is the best privacy-focused web browser for Android.
  • The web browser lets you clear all your tabs and browsing data with one tap.
  • DuckDuckGo automatically blocks all hidden third-party trackers.
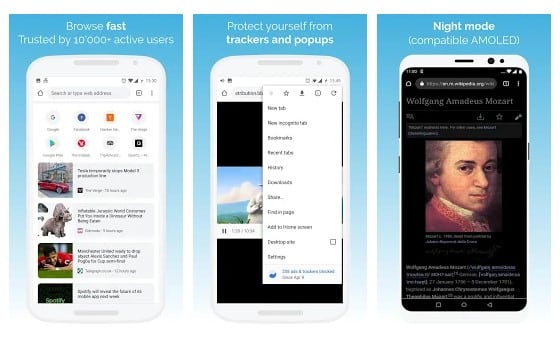
9. Kiwi Browser – Fast & Quiet

Kiwi Browser - Fast & QuietIt is one of the best and lightweight web browser that you can use on your Android smartphone. Guess what? Kiwi Browser – Fast & Quiet is based on Chromium and WebKit, the engine which powers Google Chrome.

Features:

  • Kiwi Web browser is based on Chromium.
  • The web browser has a very optimized rendering engine, which results in better browsing speed.
  • It automatically blocks all ads and trackers from the web pages.
  • Kiwi browser also has a super-strong pop-up blocker that really works.
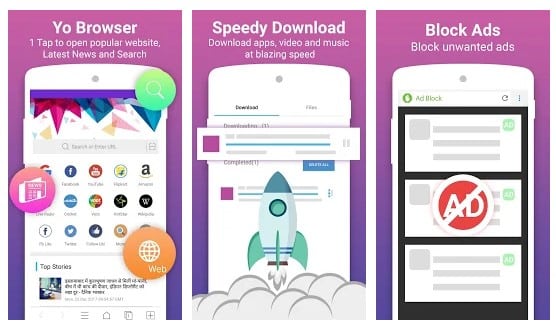
10. Yo Browser

Yo Browser

You won’t believe it, but the app needs less than 10MB of storage space to install on your smartphone. With Yo Browser, you can easily download videos, songs, etc. Not only that, but Yo Browser also has a night mode and a private mode as well.

Features:

  • The web browser is lightweight and needs less than 15 MB of space to install.
  • YoBrowser doesn’t store anything that belongs to you.
  • It has a night mode, private mode, etc.

So, these are the best UC Browser alternatives for Android. I hope this article helped you! Please share it with your friends also. If you know of any other such web browser like UC Browser, let us know in the comment box below.

The post 10 Best UC Browser Alternative Web Browser For Android appeared first on TechViral.


from TechViral https://ift.tt/2R7w98b

Saturday, January 30, 2021

How to Disable PowerShell in Windows 10 Computer

How to Disable PowerShell in Windows 10 Computer

Microsoft introduced a more powerful command-line shell than Command Prompt in Windows 7. The more powerful variant of Command Prompt is PowerShell, and it’s meant to perform advanced stuff. Since Powershell was introduced, it has become more prominent, and not it comes built-in with Windows 10 operating system.

Lots of people think that Command Prompt and Powershell are both the same. However, they are different, and the Powershell is more complicated than the traditional CMD. Also, Powershell is more powerful than CMD and could be dangerous if it lands in inexperienced hands.

So, if you have a shared computer or other family members or friends use your PC, it’s best to disable the PowerShell altogether. In this article, we will share a detailed guide on how to disable Powershell in Windows 10. Let’s check out.

Also Read: 5 Best Anti-Exploit Tools For Windows 10

Steps to Disable PowerShell in Windows 10 computer

Please note that there’s no direct option to disable Powershell. So, we need to access the Local Group Policy Editor to disable the Powershell. Playing with Local Group Policy could be risky, so follow the steps carefully.

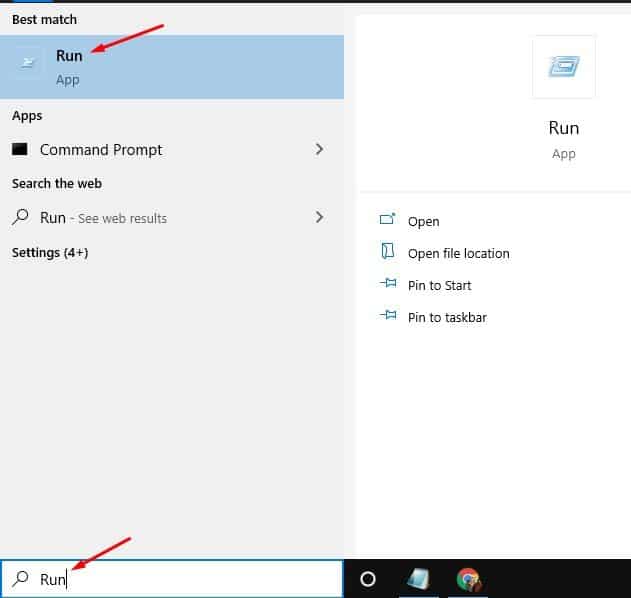
Step 1. First of all, press the Start button and search for ‘Run.’ Open the Run program from the list.

Open the Run program from the list.

Step 2. On the Run Dialog box, enter ‘gpedit.msc’ and hit enter button.

enter 'gpedit.msc' and hit enter button

Step 3. This will open the Local Group Policy editor. You need to navigate to the following path – User Configuration > Administrative Templates > System.

navigate to the following path

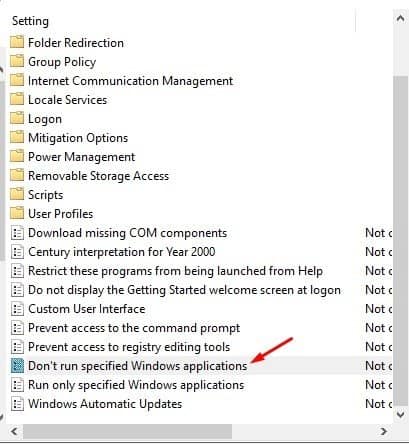
Step 4. On the right side pane, double click on the ‘Don’t run specified Windows application’ policy.

double click on the 'Don't run specified Windows application' policy

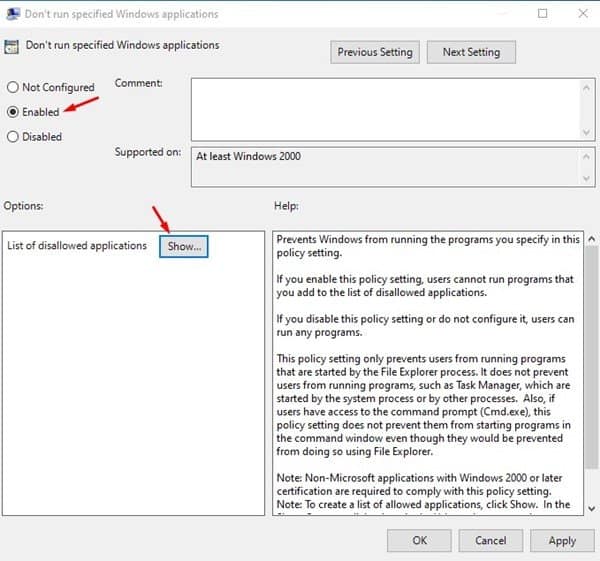
Step 5. On the next Window, select ‘Enabled’ and then under the option, click on the ‘Show’ button.

click on the 'Show' button

Step 6. Under the value, type ‘powershell.exe’ and then click on the ‘Ok’ button.

click on the 'Ok' button

That’s it! You are done. Now restart your Windows 10 computer to apply the changes. After the restart, you won’t be able to run Powershell. To run Powershell, just revert the changes you have made in Step no. 5 and Step no. 6.

So, this article is all about how to disable PowerShell on Windows 10 computer. I hope this article helped you! Please share it with your friends also. If you have any doubts related to this, let us know in the comment box below.

The post How to Disable PowerShell in Windows 10 Computer appeared first on TechViral.


from TechViral https://ift.tt/2MiGml3

Windows 10 Update: Run Multiple Android Apps on PC via Your Phone App

Windows 10 Update: Now You can Run Multiple Apps Simultaneously

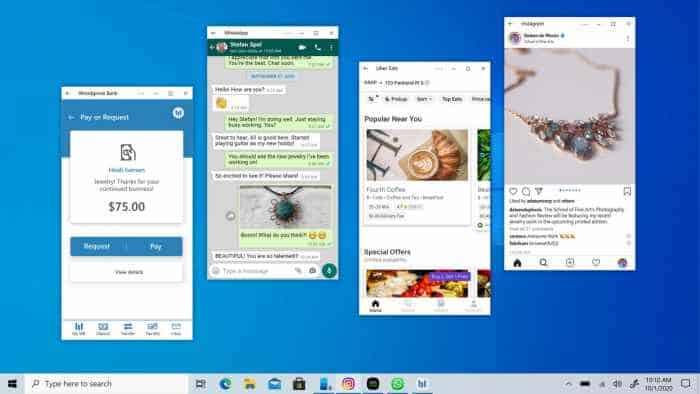
Microsoft is rolling out an update for Your Phone App in the Microsoft store where all the Windows 10 PC users can run more than one Android app at once. Every Windows 10 user can run multiple Android apps on a PC via the Your Phone App. To use this feature, you need to have a supported Samsung device.

Now You can Run Multiple Apps Simultaneously on Windows 10

Windows 10 Update: Now You can Run Multiple Apps Simultaneously

The function was announced last year in November 2020, and it was available for Windows Insiders. However, now, the company has decided to roll out the feature for all the Windows 10 users.

Your Phone app lets the user to stream apps from your phone to PC. Even, you can launch an Android app via Your Phone app on the PC and can pin them to a taskbar and Start menu.

As Windows 10 is getting support for using multiple apps at the same time, the system of operation remains the same. On your PC screen, you can display more than one window. Earlier, also we have told, that these functions only work on a few of the recent Samsung smartphones.

Requirements & Recommendations for Multi-App Feature

Most of the users are unhappy with this feature, as it supports only Samsung devices. Here are requirements and recommendations to use the Multi-app feature on your device.

  • You need Windows 10 May 2020 update or later.
  • Update windows to the latest version. (Check the update of Windows on your PC. Go to Settings>> Updates & Security>> Check for the Update.)
  • Your Phone app on PC must have 1.20102.132.0 or higher
  • The feature is available on few Samsung Devices only.
  • Your PC and Android device should have the same Wifi

List of Supported Samsung Devices to Multi-App feature

These are the supported Samsung devices that have linked to Windows integration:

  • Surface Duo
  • Samsung Galaxy Fold
  • Samsung Galaxy Note20 5G
  • Samsung Galaxy Note20 Ultra 5G
  • Samsung Galaxy S20
  • Samsung Galaxy S20+
  • Samsung Galaxy S20 FE
  • Samsung Galaxy S20 Ultra
  • Samsung Galaxy XCover Pro
  • Samsung Galaxy Z Flip
  • Samsung Galaxy Z Flip 5G
  • Samsung Galaxy Z Fold2 5G

Moreover, to run multiple apps, Android 11.0 is required on the Samsung phone and it should Link to Windows app version 1.20102.133.0.

As per the reports, it is said that the feature might not come to another device anytime soon, but it might come later. Microsoft said it’s searching for new ways to bring Your Phone app features to other devices apart from Samsung.

The post Windows 10 Update: Run Multiple Android Apps on PC via Your Phone App appeared first on TechViral.


from TechViral https://ift.tt/39vN2VN

How to “Turn On” Fingerprint Lock On Telegram

How to "Turn On" Fingerprint Lock On Telegram

As of now, there are plenty of instant messaging apps available for Android. Instant messaging apps like WhatsApp, Telegram, Signal, etc., not only allow you to exchange text messages, they even offer you some other communication features like voice calls, video calls, etc.

However, there’s always a competition between the three – WhatsApp, Telegram & Signal. We have already shared an article comparing the three leading instant messaging apps. For that, check out the article – WhatsApp vs Signal vs Telegram: Security & Features.

If you have used WhatsApp previously, you might know that the instant messaging app has a fingerprint unlock feature. With Fingerprint lock enabled, users will have to use the Fingerprint sensor to open the WhatsApp Android app. Telegram also has a similar feature, but it’s hidden under the settings.

Also Read: How to Transfer Chat history from WhatsApp to Telegram

Steps to “Turn On” Fingerprint Lock On Telegram

In this article, we will share a step-by-step guide on how to enable the fingerprint lock feature in Telegram for Android. Let’s check out.

Step 1. First of all, open the Telegram app on your device.

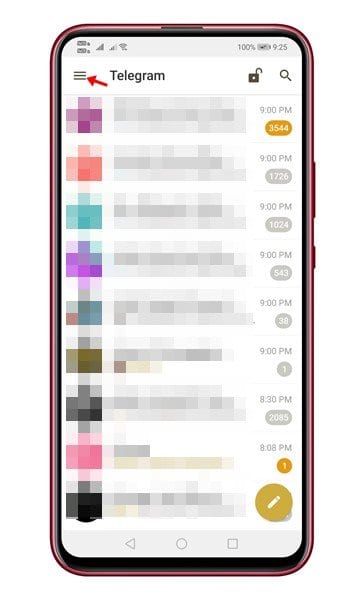
Step 2. Now tap on the three horizontal lines to open the menu page.

tap on the three horizontal lines

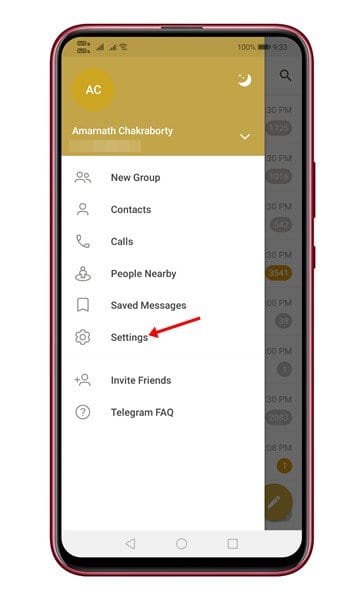
Step 3. From the list of options, tap on the ‘Settings.’

tap on the 'Settings.'

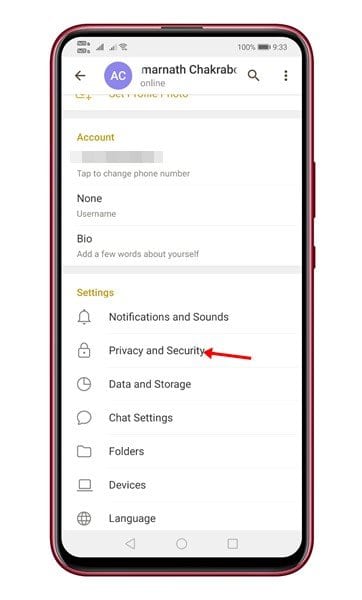
Step 4. Now scroll down and tap on the ‘Privacy and Security’ option.

tap on the 'Privacy and Security' option

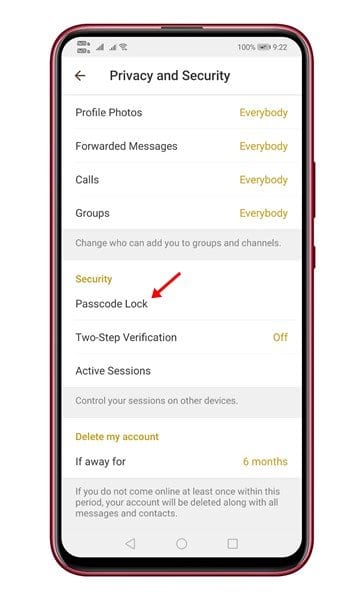
Step 5. Under the Security, tap on the ‘Passcode Lock’ option.

tap on the 'Passcode Lock' option


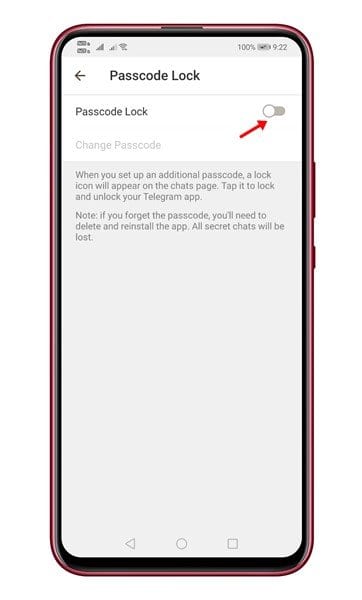
Step 6. Now enable the toggle for Passcode lock.

enable the toggle for Passcode lock

Step 7. On the next page, enter a passcode and confirm it.

enter a passcode and confirm it

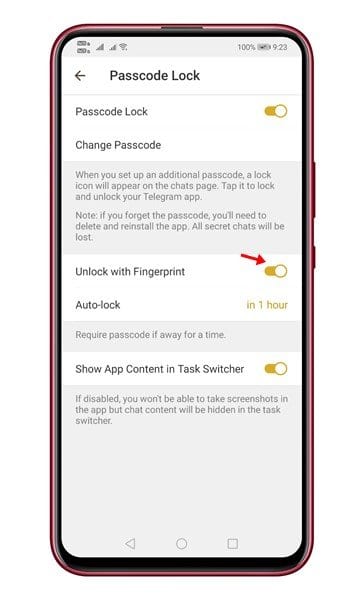
Step 8. Once enabled, scroll down and enable the ‘Unlock with fingerprint’ option. This will allow you to unlock the app via fingerprint.

enable the 'Unlock with fingerprint' option

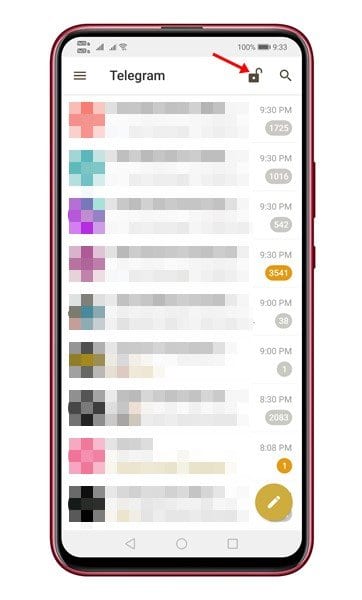
Step 9. Now move to the chat page of Telegram and tap on the open lock icon. This will lock the Telegram app. Once locked, you would need to use the Passcode or fingerprint to unlock the app.

tap on the open lock icon

That’s it! You are done. This is how you can enable the Fingerprint lock feature in Telegram for Android.

So, this article is all about how to enable fingerprint lock in Telegram for Android. I hope this article helped you! Please share it with your friends also. If you have any doubts related to this, let us know in the comment box below.

The post How to “Turn On” Fingerprint Lock On Telegram appeared first on TechViral.


from TechViral https://ift.tt/3ag5MaR