Let’s have a look at the method to Record Windows 10 Screen Using VLC Media Player using the simple inbuilt feature of the VLC player that will allow you to record the screenplay even in the background of VLC and then you can save it in any folder. So have a look at the complete guide discussed below to proceed.
Screen recording is the best way to capture anyone’s activity on a computer and by using the tools, you can capture each and everything that you did on a computer. Generally, for capturing screen, users use third-party tools in Windows but most of you must have a VLC media player installed in your Windows that you can actually use to record screen. Actually, this is a capture screen feature in the VLC player and you can use it with a single command that will let you access screen record in the Windows. And also the screen that will be captured will be of high quality and you can simply share that anywhere.
Well, there is one short story behind this method as I was working on one of the projects and there was a need to record the screen but my LAN was down so I researched on the internet on my mobile that is there any way by which I can record the screen without using any software then I got the way that VLC can also be used as a screen recorder and I was already having this player in my laptop. So I read the method and used it to record the screen and it was reliable and quick like all other third-party tools. So I’m here with the guide that can help you to do this as you might face the same issue anytime. So have a look at the complete guide discussed below to proceed.
Also Read: How to Fix the MBR (Master Boot Record) in Windows 10
How to Record Windows 10 Screen Using VLC Media Player
The method is quite simple and straight and you can use this by accessing just 3-4 settings in the VLC and I have shared the screenshots also so any non-technical guy can also implement this. So follow the below steps to proceed.
Also Read: How To Strictly Limit Visits to Time-Wasting Web Sites In Google Chrome
Steps to Record Windows 10 Screen Using VLC Media Player:
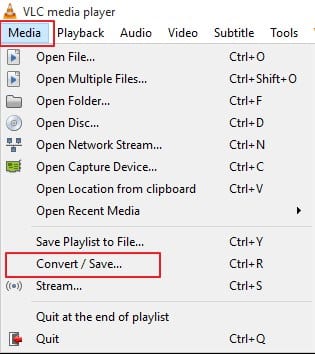
1. First of all launch VLC media player in your Windows and then select the option Media and then Convert/Save option there.

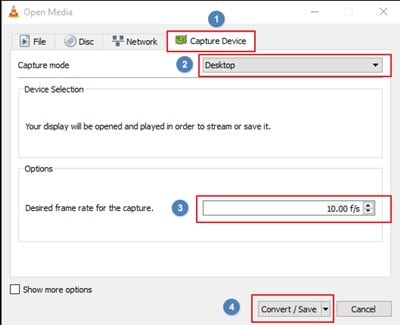
2. And there you need to select the tab Capture Device and now you will see the screen to capture that is Desktop and then you can adjust the “Desired frame rate to capture” and then simply click on convert option there.

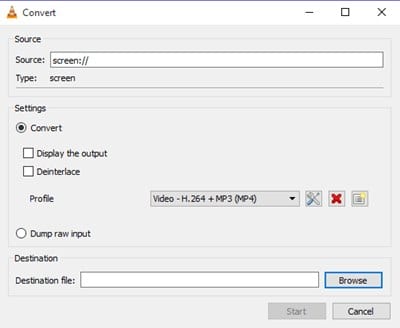
3. With the convert screen will appear and there you need to select the option Browse, And you need to select the destination folder where you want to store the captured data, make sure you choose some convenient path to get your files saved.
4. There you also set the quality that you want to record, high the quality selection big will be the size of the file. Please remember one thing here if you have low configuration PC then opt for medium quality otherwise video recording will get lag. So choose this accordingly.

5. Click on the Save button and recording will start and you will have a stop button whenever you want to stop it. Once the recording is done you can see the saved file in your destination folder.
Also Read: How To Unlock Windows PC From Android Fingerprint Scanner
So the above guide was all about Record Windows 10 Screen Using VLC Media Player, Use the method, and at any emergency time, you will have the way by which you can easily record the screen in your desired quality and that too without seeking for any third-party tool. Hope you like the guide, do share it with others too so that others can avail of this. Leave a comment below if you have any related queries with this as the Techviral team will be always there to assist you.
The post How to Record Windows 10 Screen Using VLC Media Player appeared first on Tech Viral.
from Tech Viral https://ift.tt/3isvAD9
No comments:
Post a Comment