
In 2020, Google introduced a new feature in its Canary build known as ‘Read Later.’ This is a bookmarking type feature that allows users to save articles for later reading. When you add webpages to the Reading List, the entire webpage gets saved, enabling you to read offline.
What is Reading List?
While the feature looks similar to the bookmarks that we have used in web browsers for years, it’s slightly different and does some extra things. When you save an article on the reading list, the web pages sync to your Google Account, allowing you to access them from your smartphone.
Unlike Bookmarking, the Reading List feature doesn’t require saving an article or story to a folder. You add the webpages to the reading list, and it gets saved there until you manually remove them. Let’s not forget the offline reading benefit, allowing users to read the webpages without an active internet connection.
The feature already exists on Chrome for desktop and Android, but many users don’t know about it. The feature is of great use, and it’s already available on the Stable build of Chrome for desktop. If you are using Chrome 89, your browser most probably has this feature enabled.
Also Read: How to Enable & Use Commander in Google Chrome Browser
Steps to Enable & Use Reading List in Google Chrome Browser
However, if you cannot find the new feature, you need to follow the steps given below. Below, we have shared a detailed guide on how to enable & use the ‘Reading List’ feature of the Chrome web browser. Let’s check out.
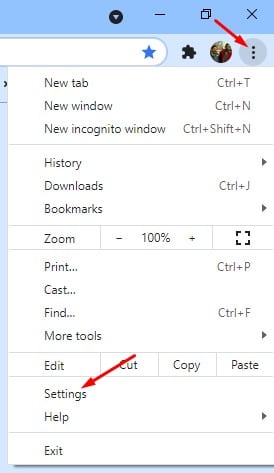
Step 1. First of all, open the Google Chrome browser on your computer and head to the Menu > Settings.
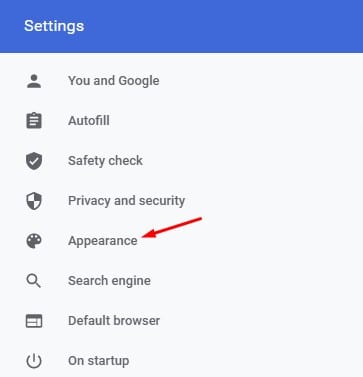
Step 2. On the Settings page, click on the ‘Appearance‘ tab.
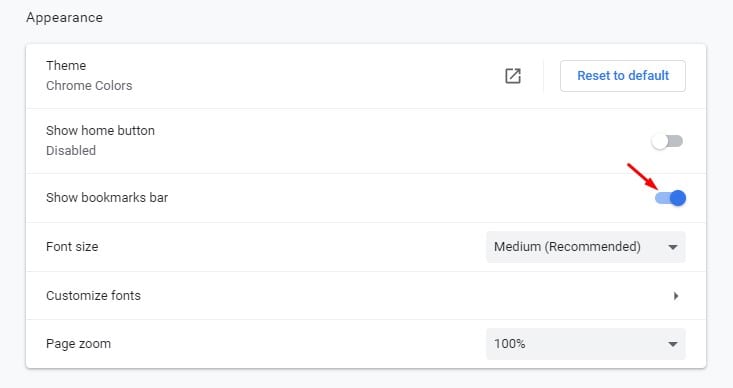
Step 3. Under the Appearance, scroll down and enable the ‘Show Bookmarks Bar’ option.
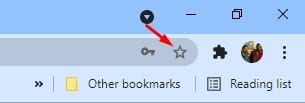
Step 4. This will enable the Bookmark bar. The reading list can be found on the right side of the Bookmarks bar.
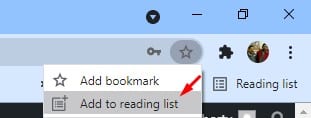
Step 6. To add webpages to the Reading list, open any webpage and click on the star (Bookmark) icon.
Step 7. You will find two options – Add Bookmark and Add to Reading List. To add the webpage to the reading list, select the ‘Add to reading list’ option.
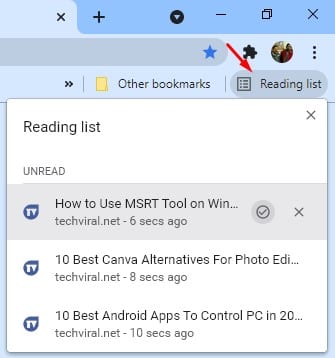
Step 8. To access the reading list, click on the ‘Reading List’ button. You will find all your saved articles in the list.
Step 9. The pages you have not yet read will appear under the ‘Unread‘ section.
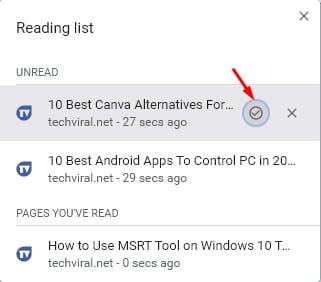
Step 10. To mark a page as read, click on the checkmark icon.
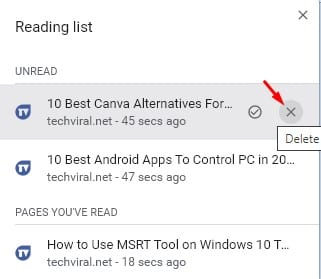
Step 11. To remove a webpage from the list, click on the cross (Delete) button.
That’s it! You are done. This is how you can enable and use the Reading List feature on Google Chrome.
This article is all about enabling and using the Reading List feature on the Chrome browser. I hope this article helped you! Please share it with your friends also. If you have any doubts about this, let us know in the comment box below.
The post How to Enable & Use Reading List in Google Chrome Browser appeared first on TechViral.
from TechViral https://ift.tt/3daKdKw
No comments:
Post a Comment