
Although, we have shared lots of tweaks on Registry files, playing with Registry without any knowledge can invite lots of problems. Messing around in the Windows registry can cause all kinds of issues, and it’s not something a beginner should be playing with.
If your laptop is used by others as well, then it would be best to disable access to the Windows registry. So, if you don’t want others to change settings on your Windows 10 device, then you need to block the registry access.
How to Disable Access to Windows Registry
In this article, we are going to share a working method that would help to prevent users from accessing the Registry. So, let’s check out how to disable access to the Windows registry.
1. Using Registry Editor
If you are using Windows 10 Pro edition, then you need to add a DisableRegistryTool key manually into the registry. Follow, some of the simple steps given below to disable access to the Windows registry.
Before getting started, make sure to make these changes first:
1) If you are going to disable registry access of a standard account, then temporarily change the account type to an administrator.

- Head to the Settings > Accounts.
- Click on the Family & other users.
- Under the Your Family or Other User, select the user account.
- Click on the ‘Change Account Type’ button and select ‘Administrator’
- Once done, click on the ‘Ok’ button.
2) Sign in to the user account in which you want to make the changes.
After making the above changes, you will be ready to edit the Regedit value. Follow some of the simple steps given below to disable access to the Windows Registry.
Editing The Registry
Once done with the above steps, you need to make a few changes to the Windows registry. Here’s what you need to do.
Step 1. First of all, open Windows search and search for ‘Regedit’. Press Enter to open the Registry editor.

Step 2. In the Registry Editor, navigate to the following path –
HKEY_CURRENT_USER\SOFTWARE\Microsoft\Windows\CurrentVersion\Policies\System
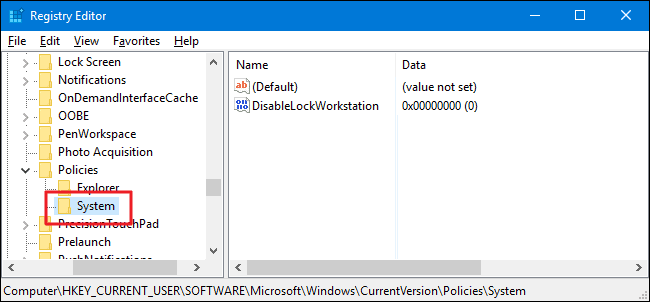
Step 3. Now right click on the black space, and select New > DWORD (32-bit).
Step 4. Name the new value ‘DisableRegistryTools’
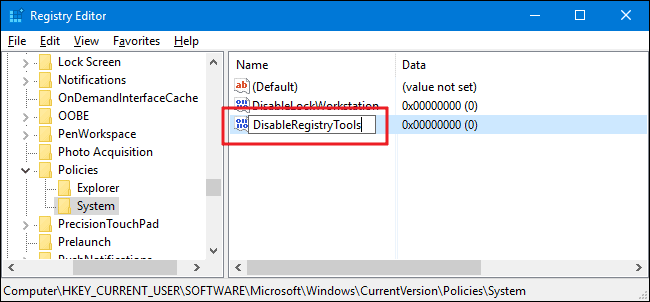
Step 5. Double click on the newly created key, and set the ‘Value Data’ to “1”. Once done, click on the ‘Ok’ button.
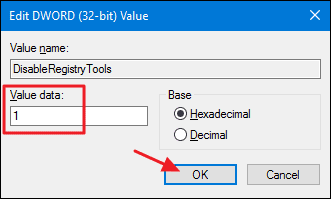
That’s it! You are done. This is how you can disable access to the Windows registry.
Using Local Group Policy Editor
To disable access to the Windows registry, users need to use the Local Group Policy Editor. However, users can only use this option if they are using Windows 10 Pro, Enterprise, or Education. So, let’s check out how to prevent users from accessing the Windows Registry.
Step 1. First of all, Press Windows Key + R to open the Run Dialog box.

Step 2. On the RUN Dialog box, type in gpedit.msc and hit Enter.

Step 3. This will open up the Local Group Policy Editor.
Step 4. Now on the Local Group Policy Editor, head to the User Configuration > Administrative Templates > System. Then double-click on the ‘Prevent access to registry editing tools’
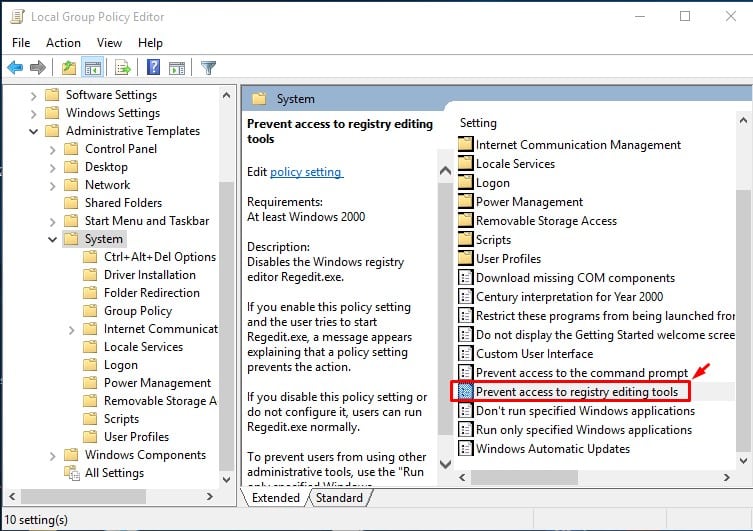
Step 5. In the next pop up, you need to select ‘Enable’ and then click on ‘Apply’ then on ‘Ok’
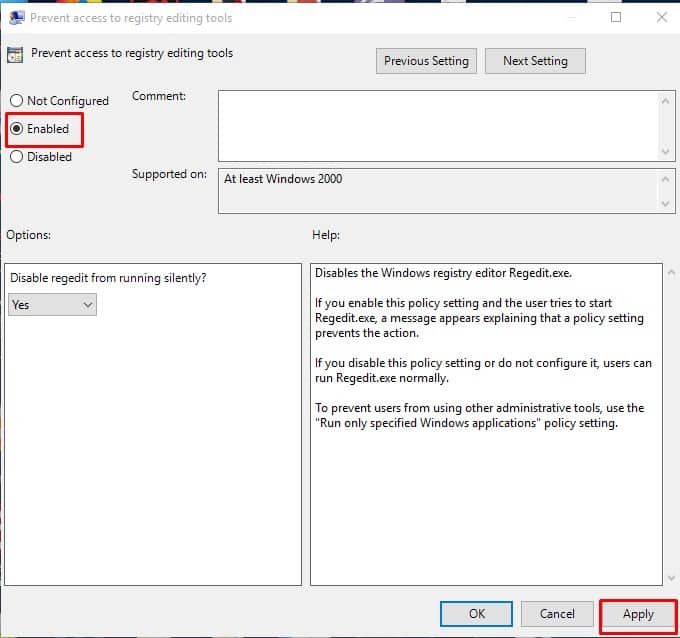
That’s it; you are done! Now if anyone tries to access the Windows Registry, they will get an error message ‘Registry editing has been disabled by your administrator’.
Conclusion
By following the above methods, one can easily disable access to Windows Registry. I hope this article helped you! Please share it with your friends also. If you have any doubts related to this, let us know in the comment box below.
The post How to Disable Access to Windows Registry appeared first on TechViral.
from TechViral https://ift.tt/3cxAUDy
No comments:
Post a Comment