The people behind Pikachu and friends finally comment on the wildly successful "Pokémon with guns".
from BBC News - Technology https://ift.tt/oNJqxue
Thursday, January 25, 2024

Wednesday, January 24, 2024
How to Launch Apps At Startup in Windows 11 (4 Methods)
On Techviral, we have already shared a detailed guide on stopping apps from starting at startup. However, what if you want to launch a specific set of apps during the startup process? Yes, loading too many apps in the startup can slow down the boot time, but you can run quite a few apps you mainly use without worrying about the slow boot.
So, if you are looking for ways to launch apps during startup on Windows 11, you are reading the right guide. In this article, we will share a step-by-step guide on launching apps during startup on Windows 11.
How to Launch Apps At Startup in Windows 11
Please note that there are quite a few ways to launch apps at startup on Windows 11, but we have listed the one that works and requires no registry editing. Let’s check out.
1. Launch apps at Startup via Settings
In this method, we will use the Windows 11 Settings apps to launch apps automatically at startup. To do that, you need to follow some of the simple steps shared below.
1. First, click the Windows 11 Start button and select Settings.
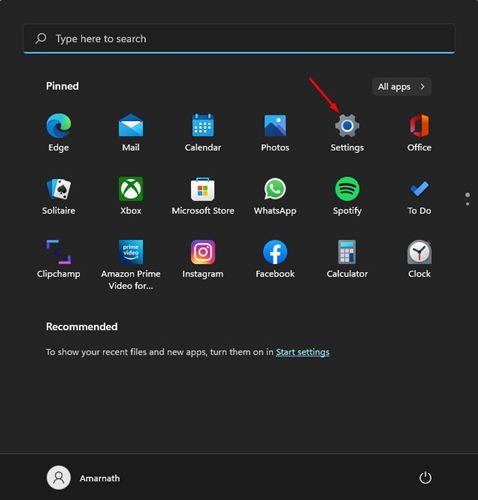
2. On the Settings app, click on the Apps section, as shown in the screenshot below.
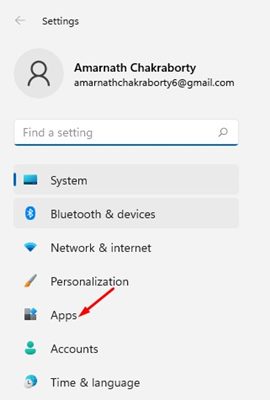
3. On the right pane, scroll down and click on the Startup section as shown below.
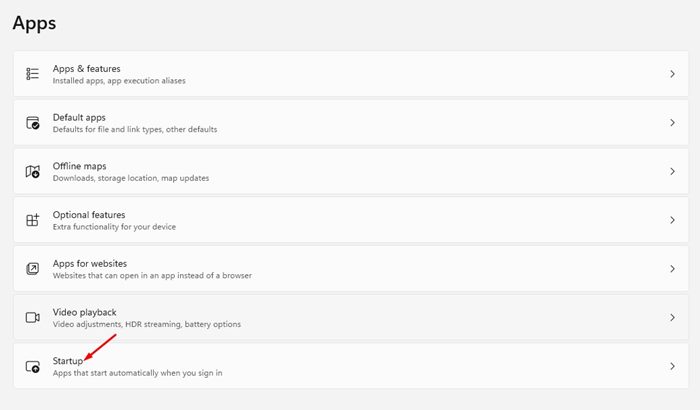
4. You will see a list of apps you can launch at startup. You need to go through the list of apps.
5. Simply turn on the apps you want to launch at startup automatically. Once done, restart your PC.
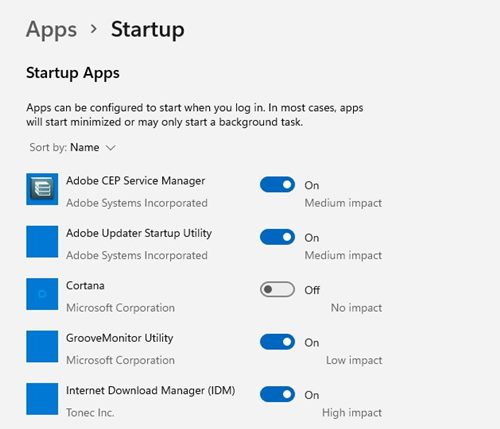
That’s it! You are done. This is how you can launch apps during startup on the Windows 11 operating system by making some changes to the Settings.
2. Launch Apps at Startup via Task Manager
In this method, we will utilize the Windows 11 Task Manager to launch apps at startup. Here are some of the simple steps you need to follow.
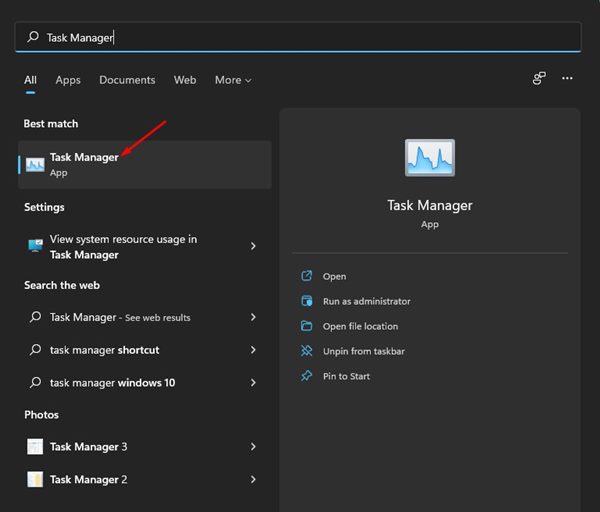
1. First, open Windows 11 Search and type in Task Manager. Next, open Task Manager from the list.
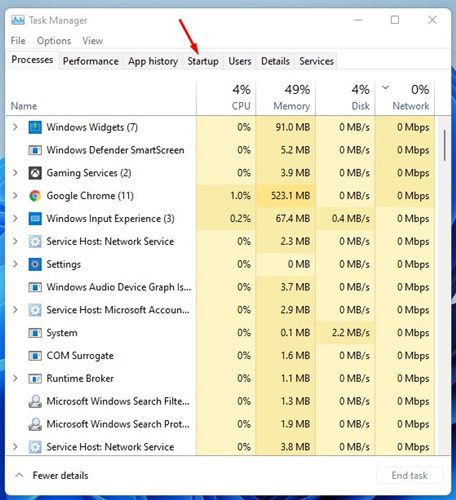
2. On the Task Manager, switch to the Startup tab, as shown in the screenshot below.
3. On the Startup page, right-click on the app which you want to launch at startup and select Enable.
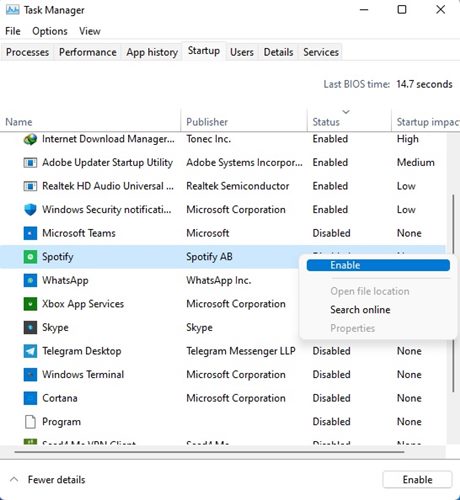
That’s it! You are done. This is how you can enable apps to launch at startup in Windows 11 via Task Manager.
3. Adding Apps to the Startup Folder
On Windows 11, you get another option to launch apps during startup. You can manually add apps to the startup folder to launch them at startup. Here’s what you need to do.
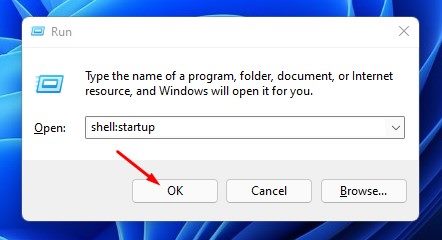
1. First, press the Windows Key + R button to open the RUN dialog box.
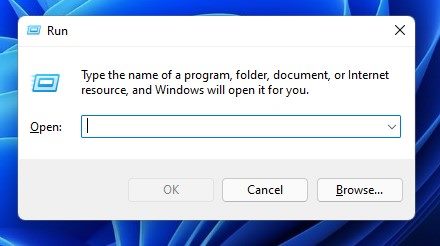
2. On the RUN Dialog box, type in shell:startup and press the Enter button.
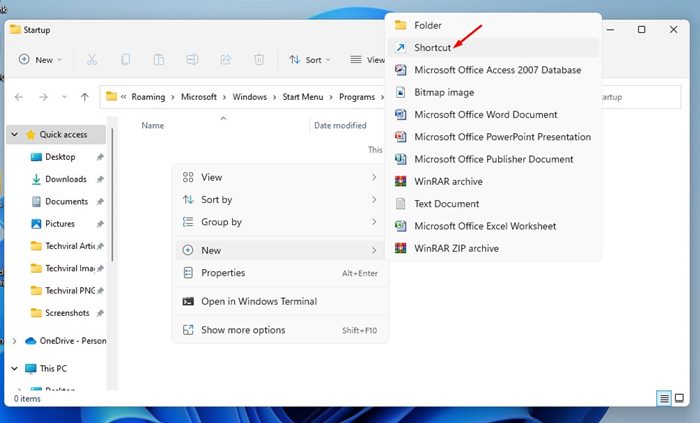
3. This will open the Startup folder on your File Explorer. Now right-click anywhere on the screen and select New > Shortcut.
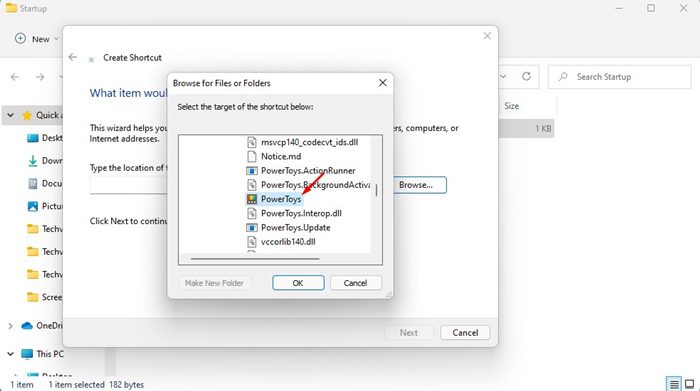
4. On the Type the location field, click the browse button and locate the .exe file of the program you want to launch. Next, click on the OK button.
5. Once done, click the Next button and type a name for this new shortcut. After assigning the name, click on the Finish button.
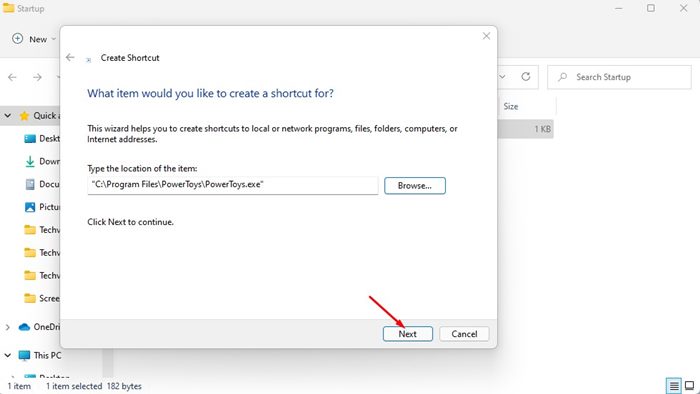
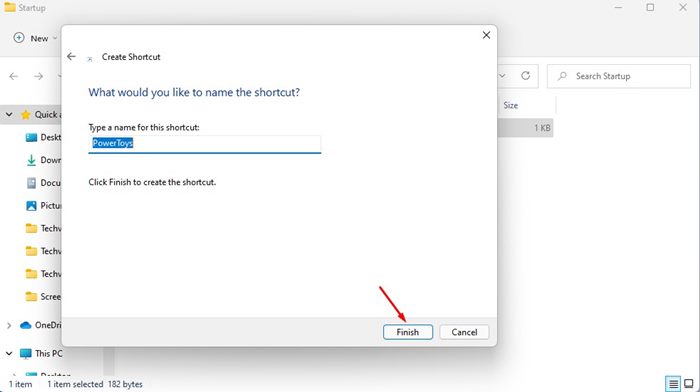
That’s it! You are done. You can add more apps to the Startup folder to launch them automatically at Startup.
4. Configure the Apps to Launch Automatically at Startup
Well, most apps available for Windows provide you an option to launch automatically at startup. So, you also have an option to configure an app to launch automatically at startup from the in-app settings.
The steps may vary depending on the app you’re using, but the option to launch at Startup usually resides on the General or Startup Settings of the app. Here’s an example to enable the Spotify app to launch at startup automatically.
1. Launch the Spotify app on your Windows computer.
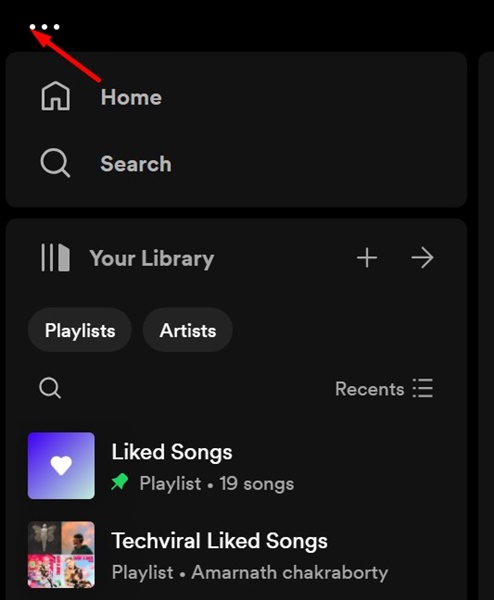
2. When the app opens, click on the three dots at the top left corner.
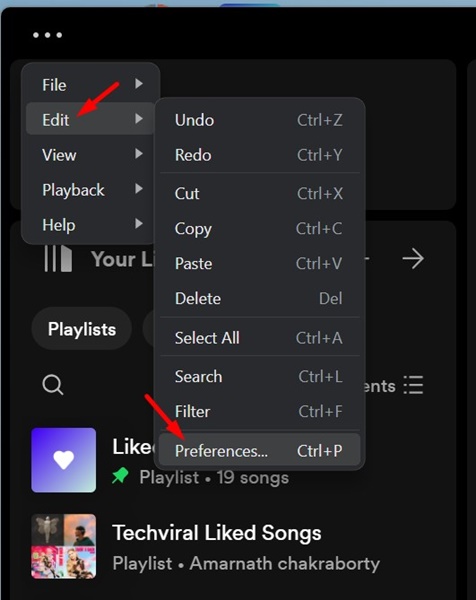
3. On the menu that appears, select Edit > Preferences.
4. On the Preferences, scroll down to the Startup and Window behavior. Next, click on the drop-down and select Yes.
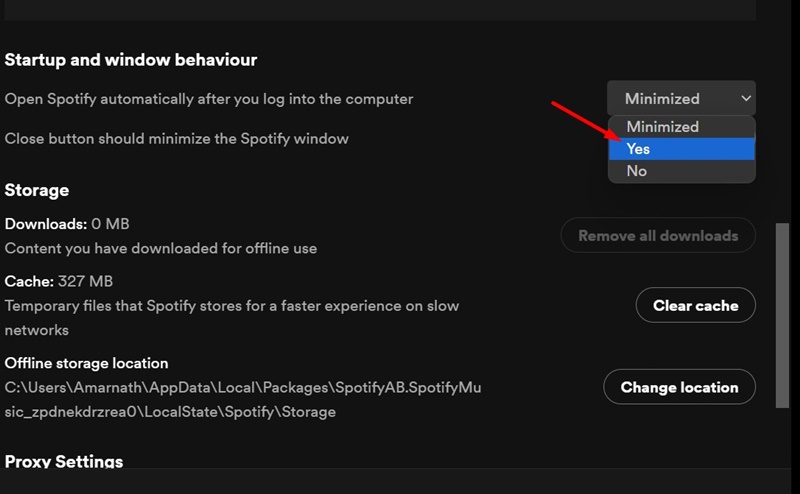
That’s it! Now, the app will launch automatically at startup. You need to find the same settings on whichever app you want to launch at startup.
Adding apps to the Startup folder on Windows 11 is pretty straightforward. You can follow these three methods to launch apps during Startup on Windows 11. I hope this article helped you! Please share it with your friends also. If you have any doubts about this, let us know in the comment box below.
The post How to Launch Apps At Startup in Windows 11 (4 Methods) appeared first on TechViral.
from TechViral https://ift.tt/W6ATrlq
Twitch announces new deal to pay streamers more
The streaming service, primarily used by gamers, will now give more money to its most popular users.
from BBC News - Technology https://ift.tt/e9P40Gj
from BBC News - Technology https://ift.tt/e9P40Gj
How to Set Up VPN on iPhone (iOS 17)
You may want to use a VPN service for various reasons. Let’s say you are browsing the web and suddenly come across a site that failed to open due to geo-restrictions. At that time, you can connect to a VPN app and switch servers to unblock the site.
Other reasons for using a VPN include creating a secure connection over the internet, masking the IP address, encrypting your data, and eliminating a wide range of trackers from the web page.
While VPN is good and available for all platforms, have you ever wondered what a VPN is and how it actually works?
What is a VPN?
VPN is basically a Virtual Private Network that masks your Internet Protocol (IP) address. It hides your IP address and makes tracking difficult.
Since it switches your device’s IP Address and makes it look like it’s from a different location, it can unlock various websites.
VPN for iPhone also does the same and ensures the guarding of your data. There are a few key things to consider while choosing a VPN service.
How to Choose the best VPN Service?
Purchasing a VPN service is pretty easy; you just go to the VPN provider’s website, purchase the VPN plan, download the app, and start using it on your device.
However, that isn’t all you should know before purchasing a VPN service. There are some crucial points a user needs to consider before purchasing any VPN service, like the Encryption Level, VPN speed & server availability, and more.
In one of our articles, we have mentioned all the important factors you should consider before purchasing a VPN service. You can check out that article here.
How to Connect VPN on iPhone (Apps)
Like Android, hundreds of VPN apps are also available for iPhones. You will find VPN apps on the Apple App Store; some are free, while others are premium.
If you want the best results, it’s recommended that you purchase a reputable premium VPN app to use on your iPhone. Below, we have shared the steps to use ProtonVPN on iPhone, which is free to download & use.
1. Open the Apple App Store on your iPhone.
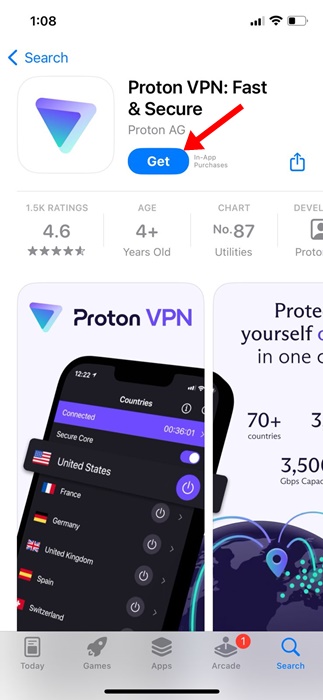
2. Now search for the VPN app you want to download & use. For example, we have used the ProtonVPN. Tap on Get to download the VPN app on your iPhone
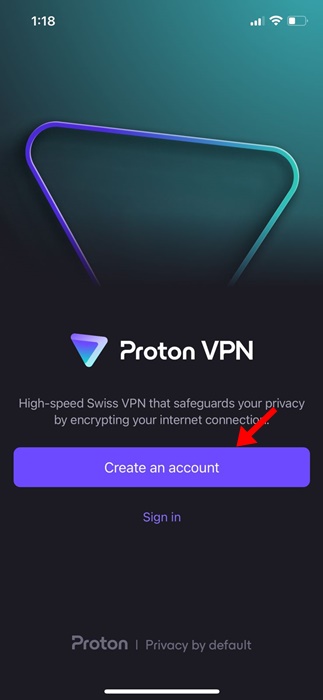
3. Now launch the VPN app on your iPhone. You will be asked to sign in to an account. If you have purchased a VPN plan, log in with the same account you used.
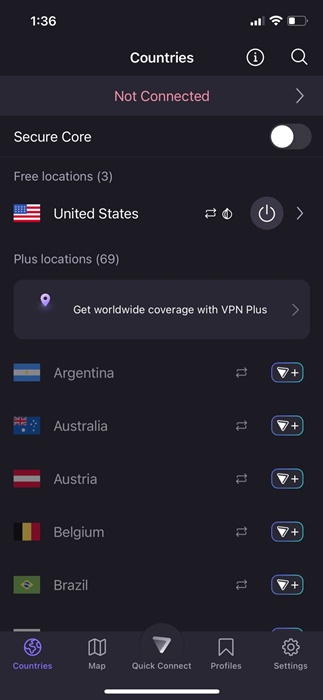
4. Once logged in, you can see the main interface of the ProtonVPN.
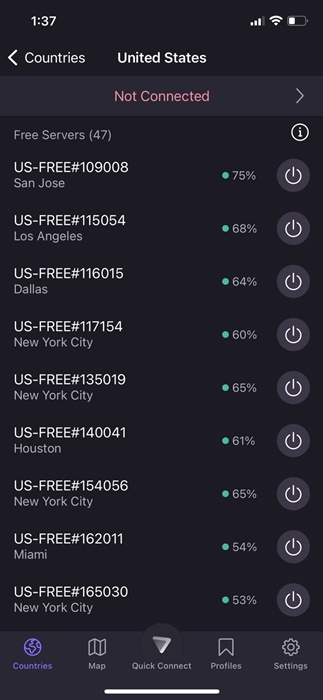
5. Select the server you want to connect to and tap Connect.
6. Now, the iPhone will ask you to add the VPN configuration. Tap on Allow.
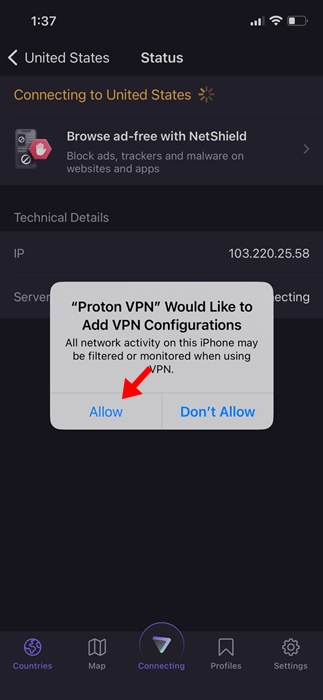
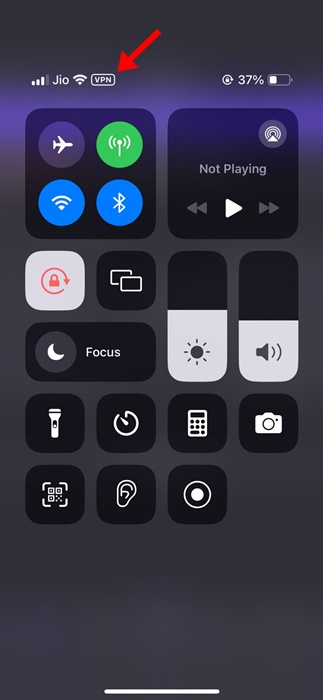
7. This will connect to the VPN server. You can confirm this by opening your iPhone’s Control Center. The VPN icon will appear at the top, below your network information.
8. To close the VPN Connection, tap on the Disconnect button.
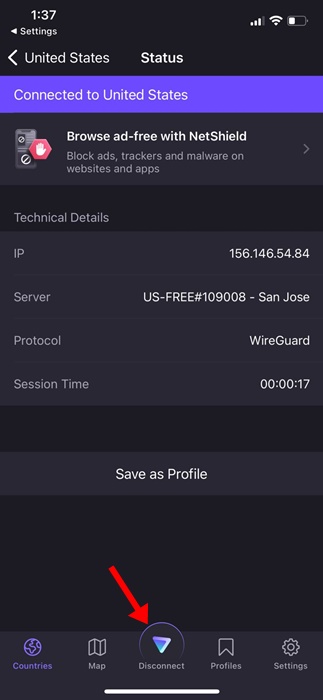
That’s it! This is how you can connect to a VPN on an iPhone with the help of a third-party app.
How to Manually Configure VPN on iPhone
While connecting through a mobile app is super easy, not all VPN providers have a dedicated app. If you have the VPN configuration, you can manually configure the VPN on an iPhone.
1. Open the Settings app on your iPhone.
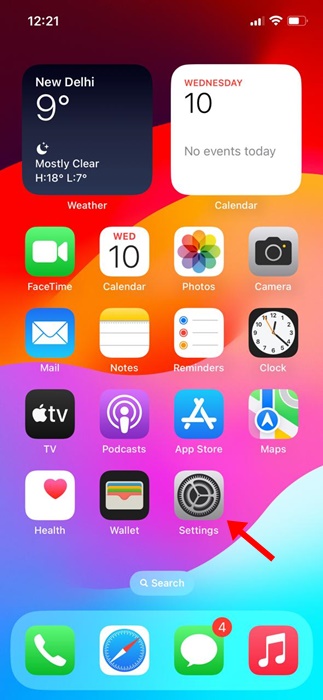
2. When the Settings app opens, tap on General.
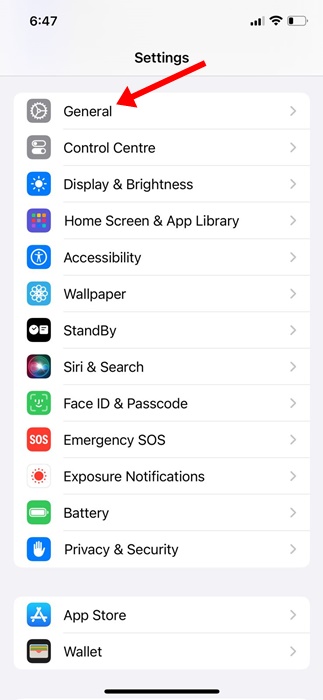
3. On the General screen, tap on the VPN & Device Management.
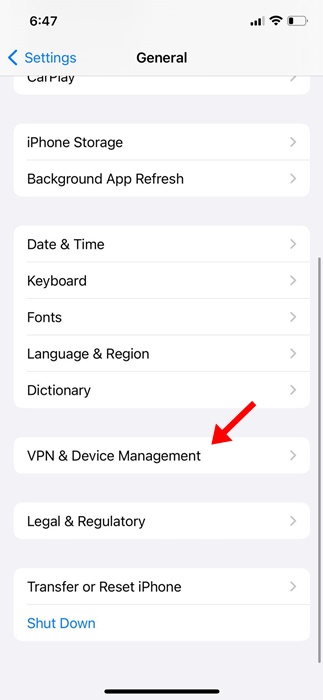
4. Next, tap on the VPN.
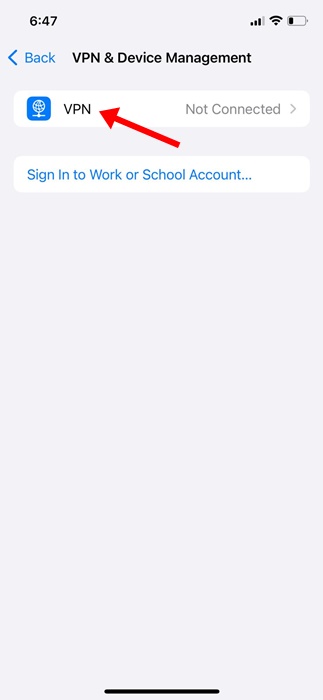
5. On the next screen, tap on the Add VPN Configuration.
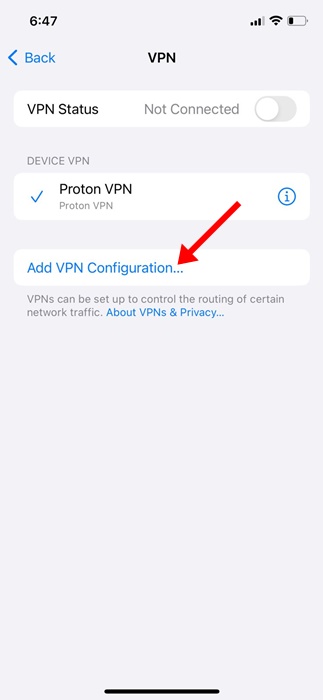
6. Now, choose the Type and fill in all details. You can grab these details from your favorite VPN provider’s website or contact support and ask for the configuration.
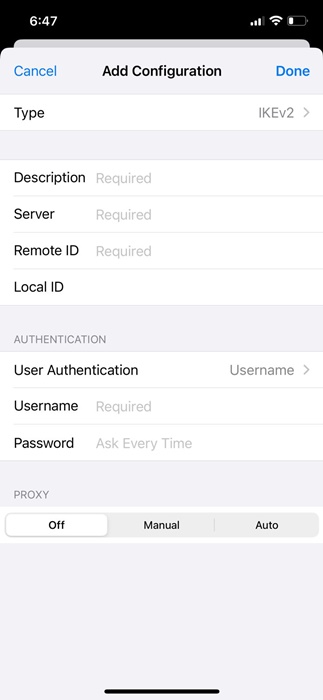
7. After filling in the required details, tap on Done.
8. Now select your newly configured VPN and enable the Status toggle. If everything you’ve entered is correct, you will be connected to the VPN without error.
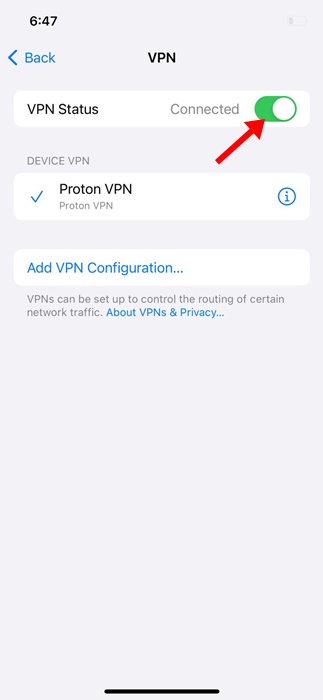
That’s it! This is how you can manually configure & connect to a VPN on an iPhone.
So, this guide is all about how to set up a VPN on an iPhone. Let us know if you need more help connecting to a VPN on your iPhone. Also, if you find this guide helpful, don’t forget to share it with your friends.
Also read: How to Take Scrolling Screenshots on iPhone
The post How to Set Up VPN on iPhone (iOS 17) appeared first on TechViral.
from TechViral https://ift.tt/AkX2vnH
Tuesday, January 23, 2024
How to Fix Windows 11 Updates Not Downloading (9 Methods)
Windows 11 updates are important, and they are released quite often. If you are using a Beta or Dev Builds of Windows 11, you shouldn’t miss any updates as they mostly contain bug fixes and new features.
However, the problem that Windows 11 users are facing now is ‘Updates Not Downloading’. Several Windows 11 users have reported that Windows 11 updates not downloading on their computers.
So, if you are a Windows 11 user dealing with the same problem, continue reading the article. Below, we have shared a few best ways to fix Windows 11 updates not downloading or installing issues.
Why is Windows 11 Update Not Downloading?
Windows 11 update issues are usually linked to internet connectivity and problematic system files. A few other things can trigger Windows 11 update problems as well.
We have listed some major reasons for the Windows 11 update not downloading.
- Bug or Glitch
- Your Internet is not working.
- Windows System Files are corrupted.
- Windows Services are disabled.
- You are using VPN/Proxy Server.
- Less Storage Space.
These major reasons lead to Windows 11 updates not downloading or installing.
How to Fix Windows 11 Updates Not Downloading Issue?
Now that you know all possible reasons for Windows 11 Updates Not downloading, you can troubleshoot the issue more effectively. Here’s how to fix the Windows 11 Updates Not Installing issue.
1. Restart your Windows 11 Computer
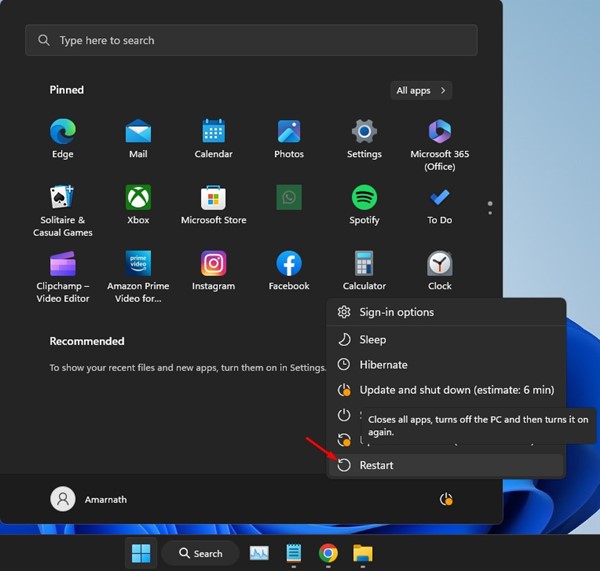
If you haven’t restarted your Windows 11 device for a while, it’s the perfect time to restart. Restarting will rule out the bugs and glitches preventing the Windows Update service from running.
Restarting the computer is the best way to eliminate temporary glitches and bugs. It will also refresh the memory and will restart the Windows Update Services.
So, click the Windows 11 Start Button, Power Menu, and select ‘Restart’. After the Restart, run the Windows Update again.
2. Check Your Internet Connection
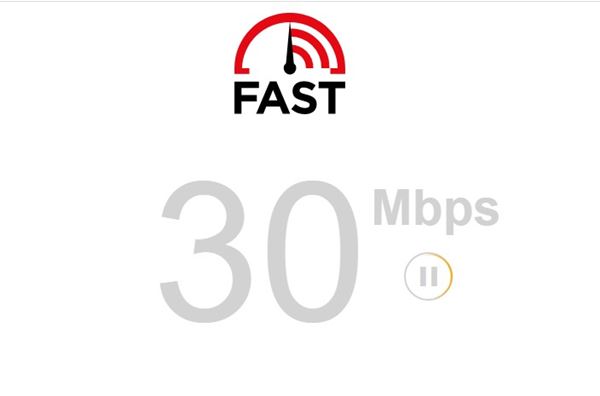
Well, an internet connection is required for downloading Windows Update. If your internet is unstable, the Windows Update tool will face problems downloading files from its servers.
So, if Windows 11 updates are not downloading on your device, you need to check for internet issues. You can use any speed test websites to determine your internet speed and stability.
3. Run the Windows Update Troubleshooter
Microsoft’s Windows 11 has an Update troubleshooter that scans and fixes every Windows Update service-related problem. You can run it to fix Windows 11 updates not downloading.
1. Click on Windows 11 Start Menu and select Settings.
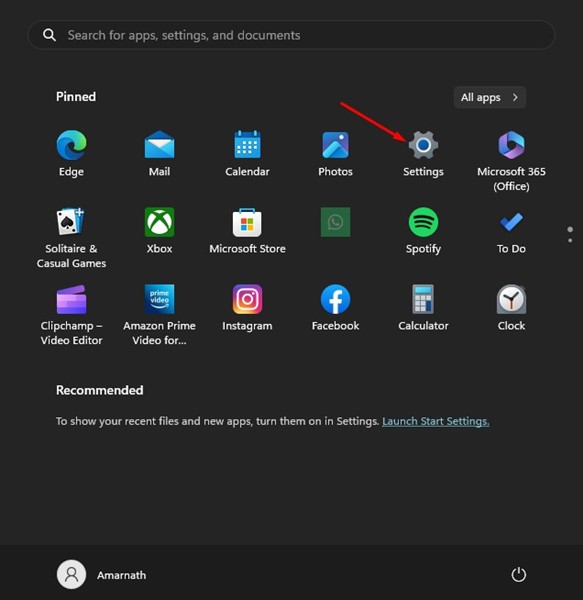
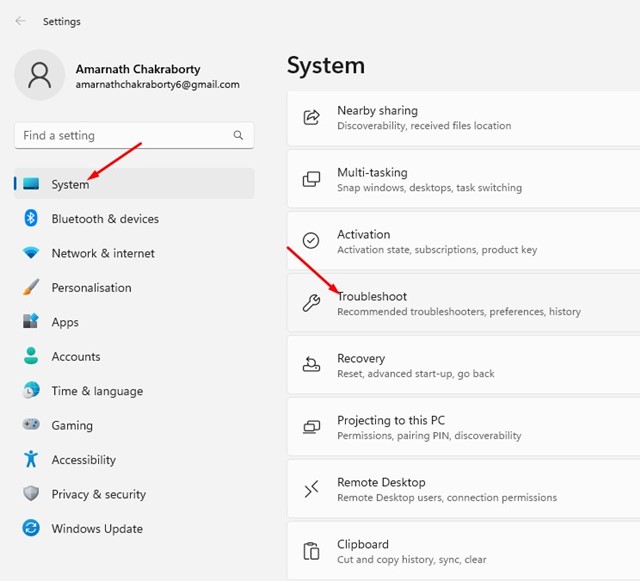
2. On Settings, switch to the System tab. On the right side, select Troubleshoot.
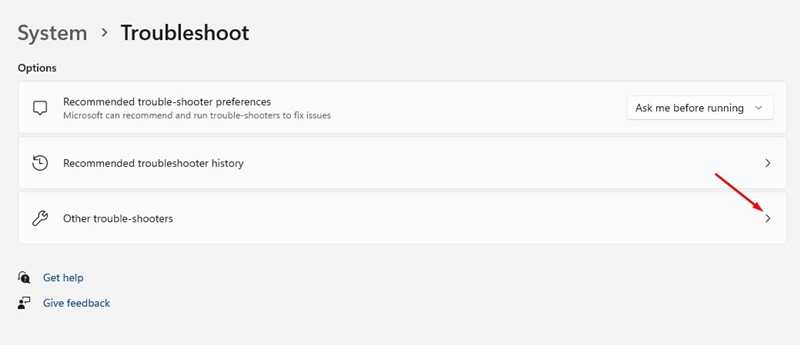
3. Next, on the Troubleshoot, click on the Other troubleshooters.
4. On the Other Troubleshooters, click the Run button beside the Windows Update.
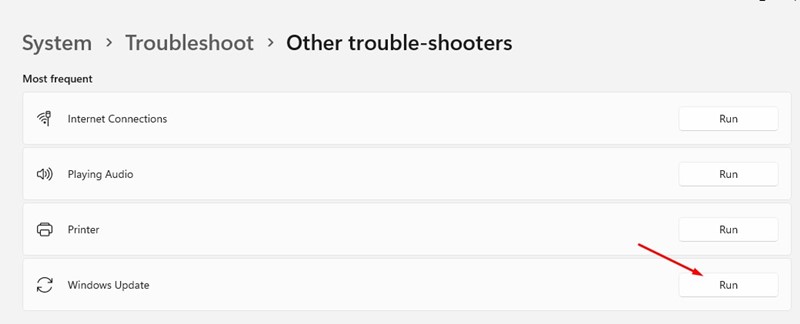
That’s it! This will run the Windows Update Troubleshooter. You need to follow the on-screen instructions to complete the troubleshooting process.
4. Enable the Windows Update Services
Malicious apps can sometimes turn off the Windows Update services. When the Windows Updater services are disabled, Windows 11 won’t check for updates.
Even if you manually run the Windows Update tool, it will fail to download the updates. So, you must ensure that the Windows Update Services are enabled and running.
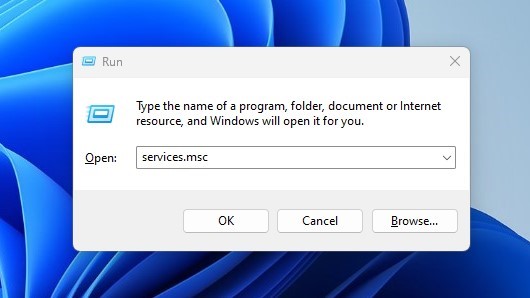
1. Press Windows Key + R to open the RUN dialog box. On the RUN dialog box, type services.msc and hit the Enter button.
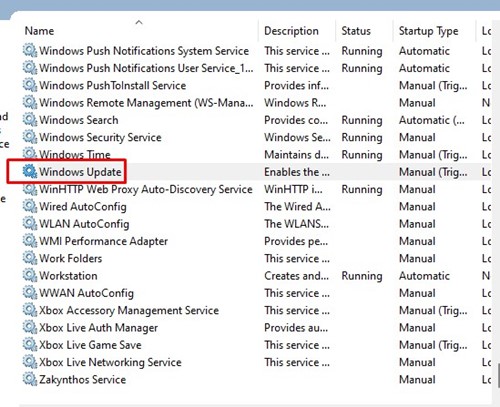
2. This will open the Services App. You need to find and double-click on the Windows Update service.
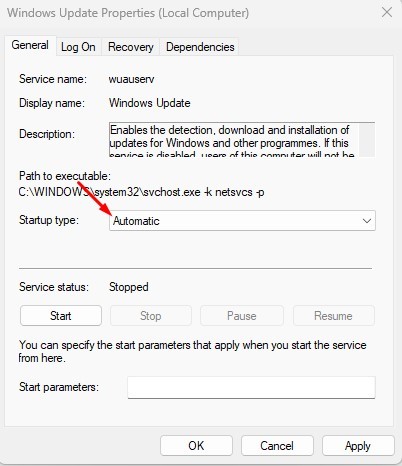
3. On the Windows Update Properties, select Automatic on the Startup type drop-down and click the Apply button.
4. Now, find and double click on the Background Intelligent Transfer Service.
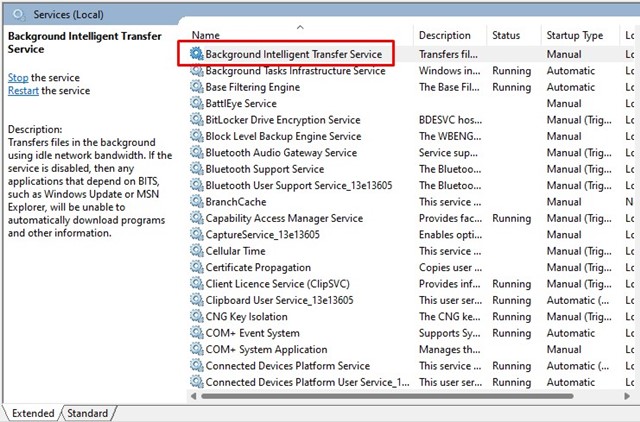
5. Next, on the Background Intelligent Transfer Service Properties, select Automatic on the Startup type and click the Apply button.
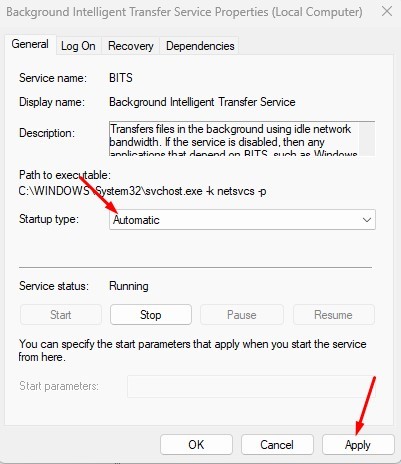
That’s it! After making the changes, restart your Windows computer.
5. Check Your Storage Space
Windows updates are often huge, and it’s recommended to have at least 20GB of free storage space to install the updates smoothly.
If you can download the updates but are getting errors while installing them, check the storage space.
Windows may fail to download or install the system updates if you have limited storage space. So, free up the storage space before downloading the Windows updates.
6. Disable Metered Connection
You may have set the WiFi as the metered connection. When you set any network as a Metered connection, you reduce data consumption. To reserve the WiFi data, Windows may stop searching for the available updates.
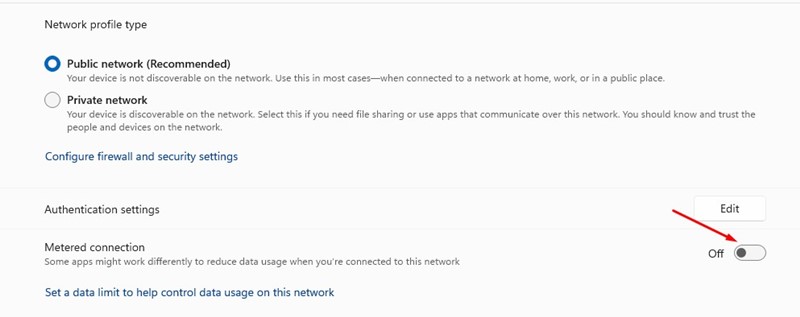
- You can fix the problem by disabling the metered connection. Here’s how to do it.
- Open Settings and switch to the Network & internet.
- On the right side, click on the WiFi/Ethernet.
- Next, select your connected WiFi/Ethernet and turn off the Metered Connection.
That’s it! This is how you can turn off the metered connection on a Windows 11 computer.
7. Delete Update Files from SoftwareDistribution Folder
SoftwareDistribution is a folder where Windows 11 stores all update files. Update files are stored in this folder and automatically installed on your set time and date.
If Windows 11 is not downloading or installing an update, you can try deleting the existing update from this folder to resolve the problem. Here’s what you need to do.
1. First, click on Windows 11 search and type in Services. Next, open the Services app from the list.
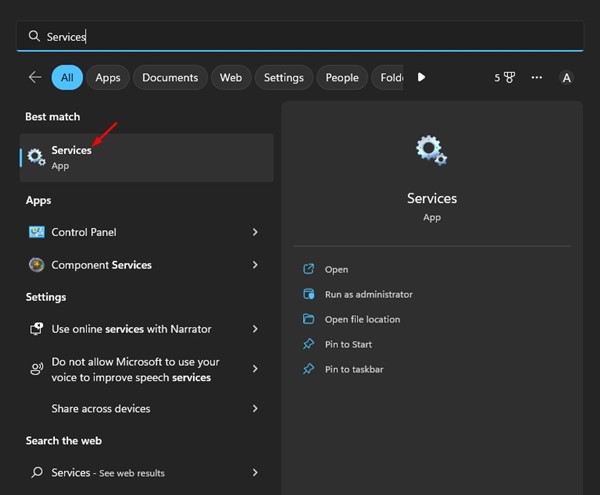
2. On the Services, right-click the Windows Update and select Stop.
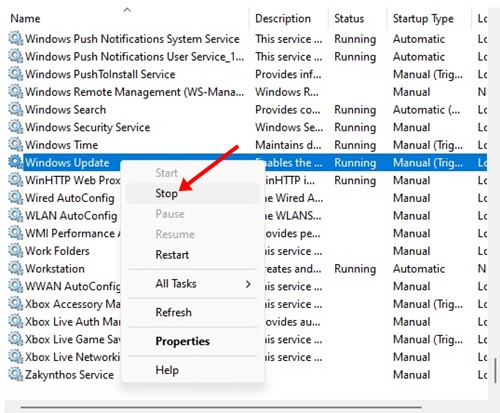
3. Now open the RUN dialog box (Windows Key + R), type the following path, and press Enter.
C:\Windows\SoftwareDistribution
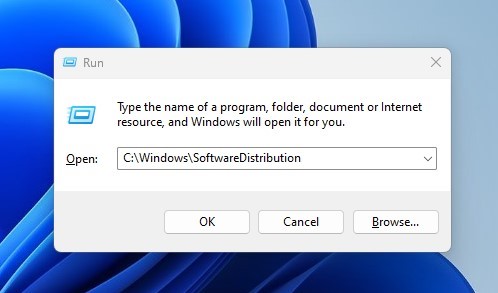
4. This will open the SoftwareDistribution folder.
5. Right-click on all files and select Delete.
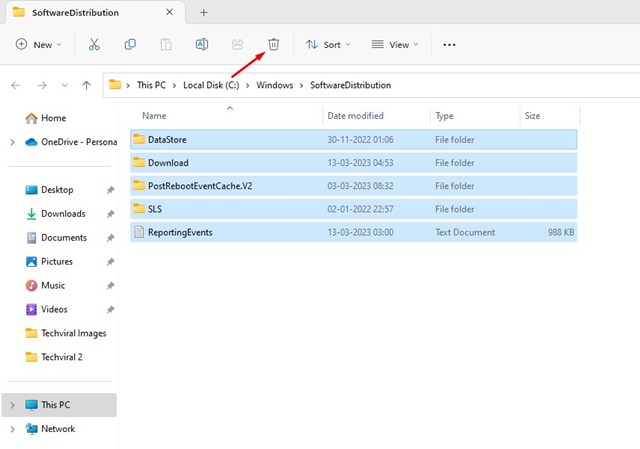
6. Now open Services again, right-click on the Windows Update, and select Start.
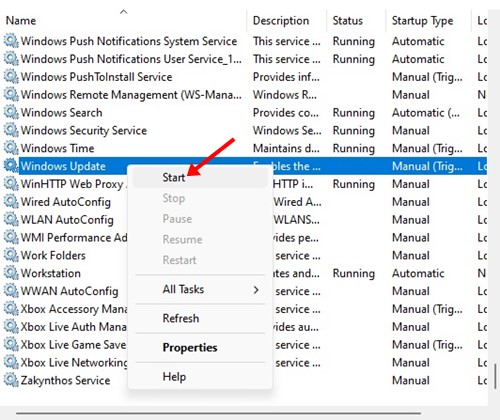
That’s it! After making the changes, make sure to restart your computer.
8. Temporarily Disable the Third-Party Security Program
On Windows 11, you don’t need a dedicated security program to get rid of viruses & malware. The built-in Windows Security app is good enough for security protection.
However, if you’re still using any third-party security program to protect your Windows 11 PC, it’s best to disable it for some time temporarily.
Third-party antivirus or security softwares often conflicts with the Windows update. So, if Windows 11 updates are not downloading, the security program may be preventing the Windows update services from functioning properly.
So, just disable any third-party antivirus or security program you’re using and run the Windows update tool again. After the update is completed, enable the security program again. This should solve the issue.
9. Run the System File Checker
System File Checker utility is designed to find and fix corrupted system files. It’s useful and easily fixes Windows 11 Updates Not Installing problems. Here’s what you need to do.
1. Click on Windows 11 search and type CMD. Right-click on the Command Prompt and select ‘Run as administrator’.
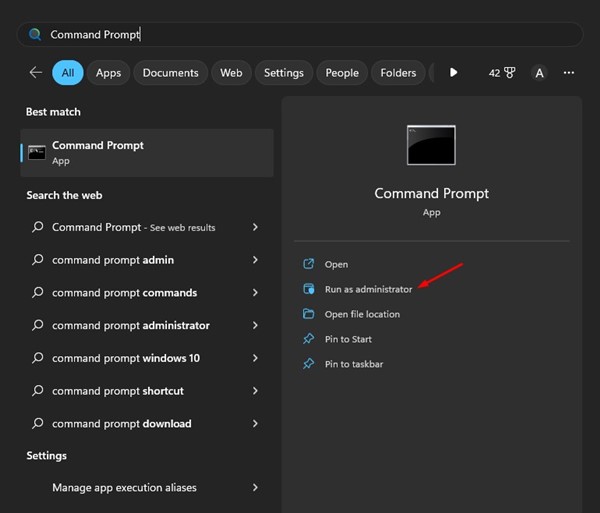
2. When the Command Prompt opens, paste the command and press Enter.
SFC /scannow
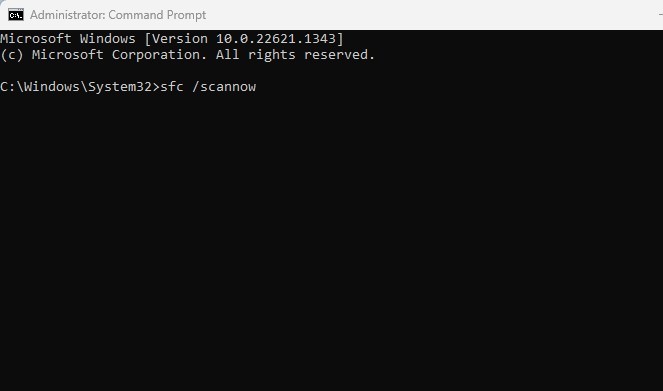
That’s it! This will run the System File Checker utility on your computer. You need to wait patiently for the scan to complete.
These are a few simple methods to fix Windows 11 updates not downloading or installing problems. We are sure these methods will help you install all Windows 11 updates easily. If the methods didn’t help you, you can raise a question on Microsoft Forum or roll back your OS version.
Also read: Windows 11 ISO Free Download Full Version
If you need more help resolving Windows 11 update issues, let us know in the comments below. Also, if the article helped you, share it with your friends.
The post How to Fix Windows 11 Updates Not Downloading (9 Methods) appeared first on TechViral.
from TechViral https://ift.tt/klYXf6m
How to Fix Can’t Log in to ChatGPT? (9 Best Ways)
Within the month of launch, ChatGPT received an overwhelming response and gained millions of users. The AI chatbot became viral on social networking sites, constantly making headlines in famous news portals.
Whether the AI Chatbot will sustain itself for long is yet to be seen, but it has many problems that need to be fixed. For example, many ChatGPT users have recently been facing problems logging into their accounts.
How to Fix Can’t Log in to ChatGPT
Users have reported that they cannot log in to ChatGPT and encounter various errors. So, if you can’t log in to ChatGPT, continue reading the article. Below, we have shared all working methods to fix ChatGPT login errors.
1. Make sure you are using the correct login credentials
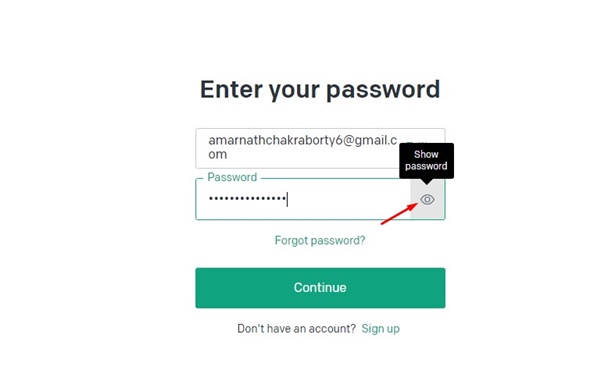
Before moving into the complex methods, ensure you’re entering the correct email address and password to sign in.
Like every other web service, ChatGPT also hides the password as you type, making it more prone to errors. You must check whether the caps lock/num lock is turned on/off.
You’ll get an error if you’re entering the wrong login details. Therefore, check for typos to fix can’t log in to ChatGPT issue.
2. Check if ChatGPT is Down
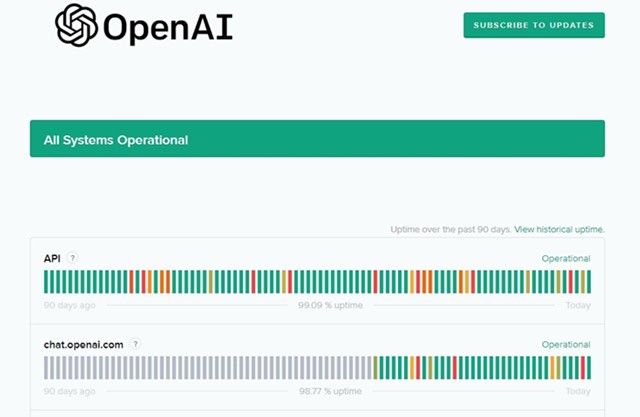
When the servers of OpenAI are down, you are prevented from signing in. Sometimes, you may get error messages as well.
Even if you manage to sign in to ChatGPT, you will face problems generating a response from the AI chatbot. So, before trying the next methods, confirm whether ChatGPT is facing any outages.
If the ChatGPT servers are down, you must wait until the servers are restored and become fully active. This may take an hour or two, so wait patiently or use other ChatGPT alternatives.
3. Ensure you are using the correct authentication method
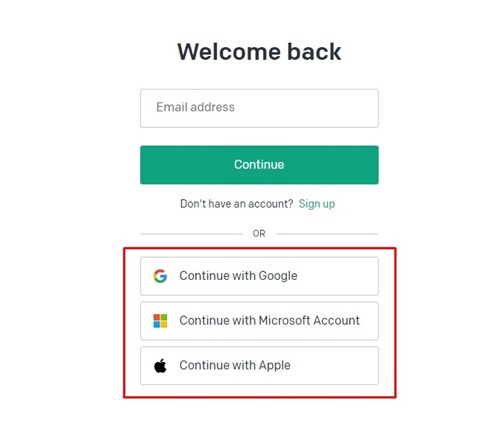
ChatGPT allows you to sign in with various authentication methods. For example, you can manually enter the email ID/password or sign in with Google, Microsoft Account, or Apple account.
Let’s say you have signed up using the ‘Continue with Microsoft Account’; you only need to try that method. Trying any other authentication method will prevent the sign-in and show you an error message.
4. Get Rid of the ‘Wrong Authentication Method’
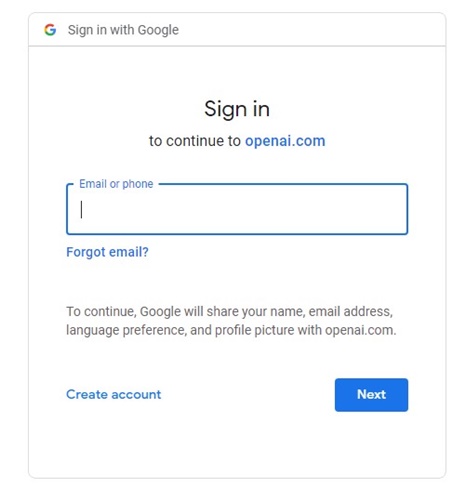
As mentioned in the above method, if you see the ‘Wrong authentication method’ error on the sign-in screen, you must ensure you’re using the authentication originally used to register for the ChatGPT account.
For example, if you have registered using Google Sign-in, use the same method to fix the ‘Wrong Authentication Method’ ChatGPT error.
5. Clear ChatGPT Saved Data
Clearing the ChatGPT saved data in your web browser is another best way to resolve ‘Can’t login to ChatGPT’ issue. Here’s how to clear the saved ChatGPT data on the Chrome browser.
1. Open the Google Chrome web browser and visit chat.openai.com.
2. Next, log in with your account. If you can’t log in, click the padlock icon next to the URL.
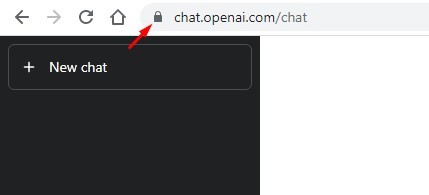
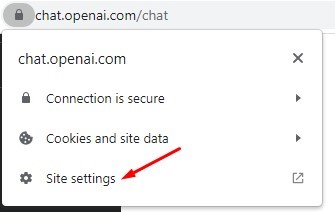
3. A list of options will appear; click Site Settings.
4. On the Site Settings for chat.openai.com, click the Clear data button under Usage.
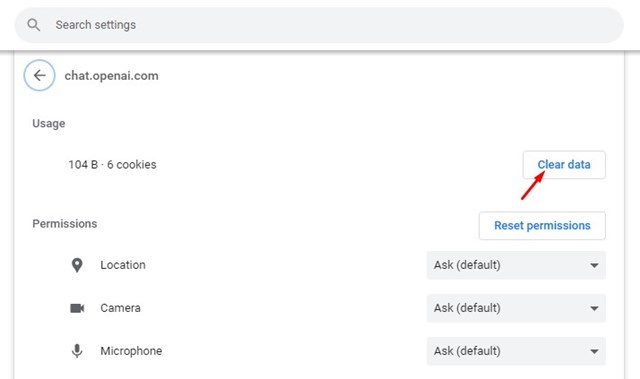
That’s it! That’s how easy it is to clear all saved ChatGPT data on your web browser.
6. Clear the Web Browser Cache
If clearing the ChatGPT saved data didn’t work, you can try clearing the web browser cache and cookies. Here’s how to clear the web browser cache & cookies in the Chrome browser.
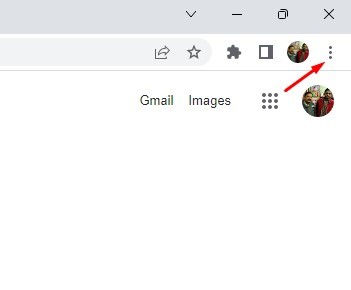
1. First, open Google Chrome and click on the three dots.
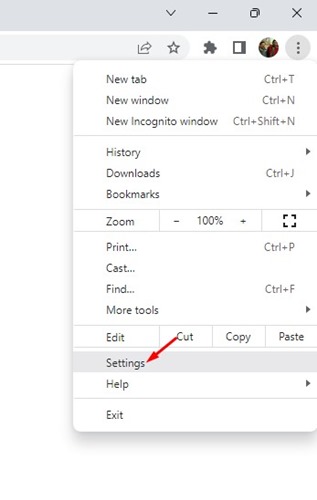
2. On the Chrome menu, click on the Settings.
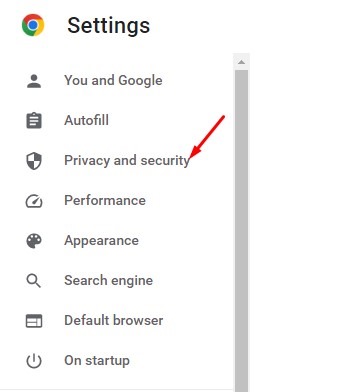
3. On the Settings screen, switch to the Privacy and security tab on the left sidebar.
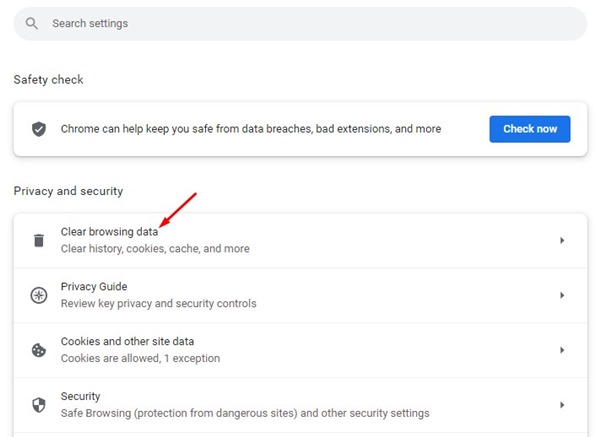
4. On the right pane, click on Clear browsing data.
5. Now switch to the Advanced tab and select All time on the Time Range dropdown. Then, check the Cookies and other site data, Cached images and files, and click the Clear data button.
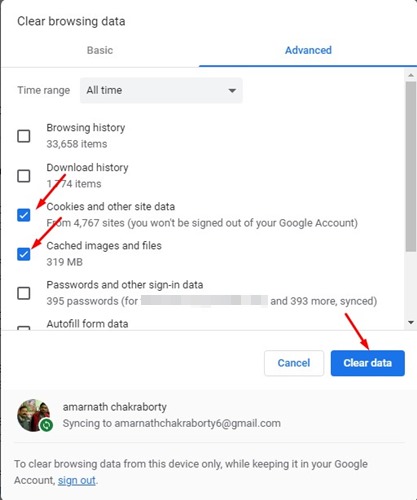
That’s it! This will clear the saved cache and cookies from your Chrome browser. Make sure to restart the web browser to apply the changes.
7. Login from a different browser

If nothing has worked for you to resolve the problem, the next best thing you can do is to log in to ChatGPT from a different browser or Incognito mode.
Every web browser now has a private browsing mode which you can use to log in to ChatGPT. Or else, if you’re using Chrome, you can switch to a different web browser like Edge or Firefox.
If you can log in to ChatGPT from a different web browser, you need to look for problems on your previous web browser. Alternatively, you can use the web browser that provides you access to ChatGPT.
8. Contact OpenAI’s Support Team
If nothing helps, and you still can’t log in to ChatGPT, it’s time to contact OpenAI’s support team.
ChatGPT is still being tested, and developers have a robust support system. So, you can message the support team and explain the issue.
If you want the support team to look into your problem, drop an email explaining your problem in detail to support@openai.com. If there’s any account-related problem, OpenAI’s team will look into it and will fix it.
9. Some other things you can try
The help page of OpenAI does mention a few other things you can do if you can’t log in to ChatGPT. Below, we have mentioned all the basic things you can do.
- Try to log in to ChatGPT in the browser’s Incognito mode.
- Disable all unnecessary extensions from your web browser.
- Try to access ChatGPT from a different network.
- Use another device to sign in to ChatGPT.
Also read: How to Turn Off Chat History in ChatGPT
ChatGPT is one of the excellent AI tools you can use today. And it has the potential to boost your productivity to some extent. The methods we have shared will surely help you fix the ‘Why can’t I log in to ChatGPT’ issue. If you find this guide helpful, share it with others facing problems while logging in to ChatGPT.
The post How to Fix Can’t Log in to ChatGPT? (9 Best Ways) appeared first on TechViral.
from TechViral https://ift.tt/8v3K4UA
Subscribe to:
Posts (Atom)