Sunday, February 28, 2021

How to Reset Network Settings On Android in 2021

How to Reset Network Settings On Android in 2021

Although Android is right now the best and most popular mobile operating system, it’s not without its flaws. Compared to any other mobile operating system, Android has more bugs. Network options have always been a troubled part of Android. Android users deal with problems like slow internet connection, WiFi not showing on Android, and more often or not.

Let’s admit, the internet is a vital thing today, and if our phone doesn’t connect to WiFi, we end up feeling cut off from the rest of the world. So, if you just found that your Android device isn’t connecting to WiFi, or if your internet speed is too slow, then you might expect a few helps here.

Your Android smartphone has an option known as ‘Reset Network Settings.’ The feature helps you to deal with WiFi networks, mobile data, and Bluetooth-related problems. Resetting the network settings on Android brings back all network-related settings to their original state.

Also Read: How To Add Network Speed indicator In Android Status Bar

Steps to Reset Network Settings On Android

However, one should reset their network settings if every other method fails to work out. If you reset your network settings on Android, you need to set up your WiFi, BlueTooth, VPN, Mobile Data all over again from scratch.

This article will share a detailed guide on how to reset network settings on an Android smartphone. Let’s check out.

Important: Please make sure to back up your WiFi network username/passwords, mobile data settings, and VPN settings before resetting the network settings. Once you reset, you will lose all those things.

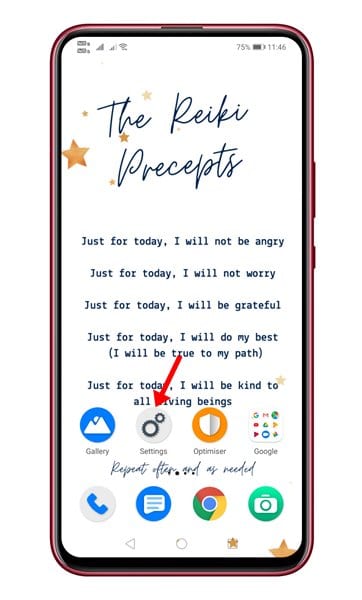
Step 1. First of all, open Settings on your Android smartphone.

open Settings on your Android

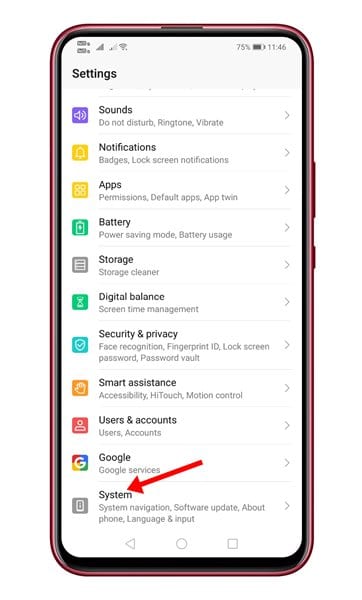
Step 2. On the Settings page, scroll down and tap on the system.’

tap on the 'System.'

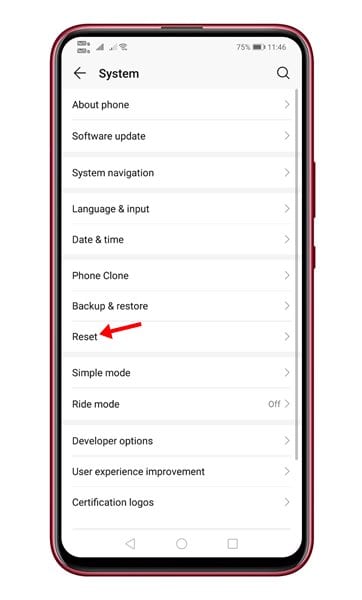
Step 3. On the System page, scroll down and tap on the ‘Reset’ option.

tap on the 'Reset' option

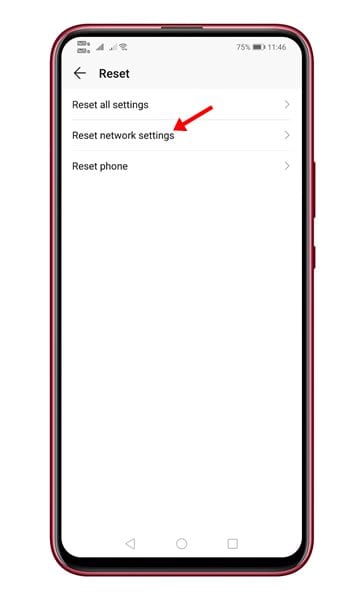
Step 4. On the next page, tap on the ‘Reset Network Settings’ option.

tap on the 'Reset Network Settings' option

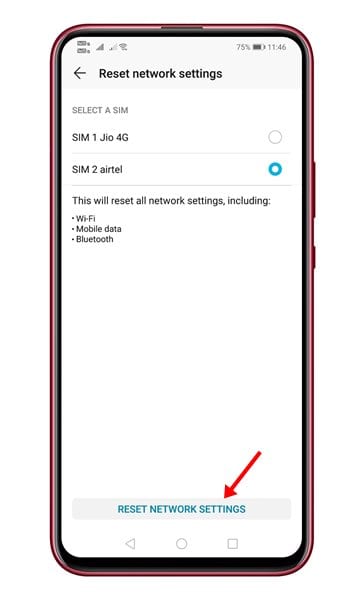
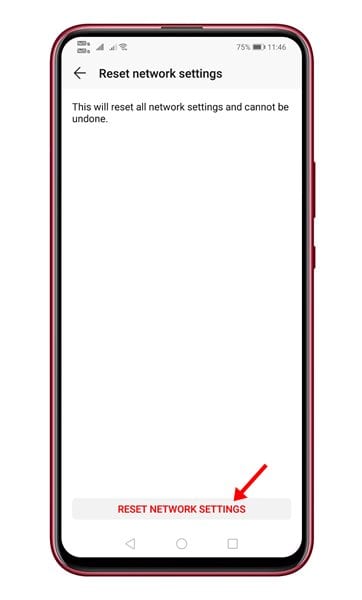
Step 5. Now tap on the ‘Reset Network Settings’ option located at the bottom of the screen.

tap on the 'Reset Network Settings' option

Step 6. On the confirmation page, tap on the ‘Reset Network Settings’ option again.

Confirm the action

Note: The Reset option might vary from device to device. This guide will give you an overall idea of how and where to find the reset network setting on Android. It’s usually under the System Settings or General Management page.

So, this article is all about how to reset network settings on Android. I hope this article helped you! Please share it with your friends also. If you have any doubts related to this, let us know in the comment box below.

The post How to Reset Network Settings On Android in 2021 appeared first on TechViral.


from TechViral https://ift.tt/37XoNyz
Military trials training for missions in virtual reality

BBC's Zoe Kleinman experiences software which creates virtual training simulations for the military.

from BBC News - Technology https://ift.tt/2NGkuRv

'Farms are going to need different kinds of robots'

A growing number of tech firms are helping farmers better look after their animals and crops.

from BBC News - Technology https://ift.tt/37YbgGZ

How to Make Google Auto-Delete your Web Activity & Location History

How to Make Google Auto-Delete your Web Activity & Location History

As of now, there are more than a hundred Google Services and tools out there. Most of us aren’t aware of every service and tool that the search giant offers. Whenever we hear the word ‘Google Products,’ we usually start to think of Google Search, Gmail, Google Maps, Google Chrome, YouTube, Android, etc.

If you are a regular user of Google Search, Gmail, Maps, or any other Google service, you might know that Google collects and remembers information about your activity. It has access to your web searches, Youtube search, location history, and more. Google uses this data to personalize your experience and to improve its ecosystem.

Although there’s no risk involved in sharing data with Google, if you want to be on the safe side, you can enable the ‘Auto-Delete’ feature for the Web & App activity and the Location History. This is a feature that tells Google to auto-delete your activity after three months.

Also Read: How To Trace Location Of A Person By Chatting on Facebook & WhatsApp

Steps to Make Google Auto-Delete your Web Activity & Location History

In this article, we will share a detailed guide on how to make Google Auto-Delete your web and location history. So, let’s check out.

Step 1. First of all, open the Google Chrome web browser on your desktop and head to the Activity Controls Page.


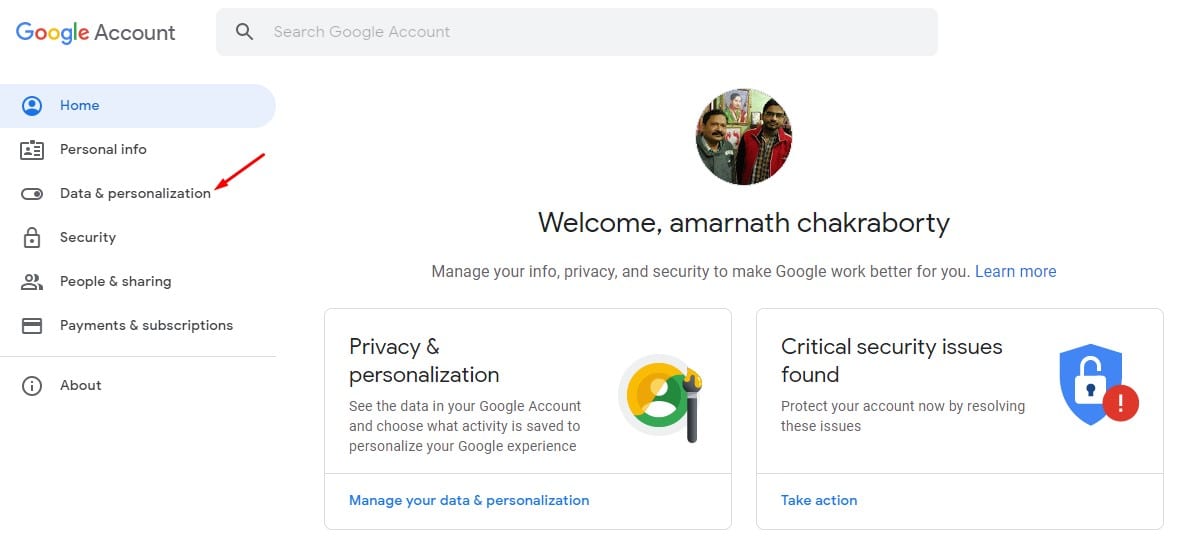
Step 2. On the Activity Control Page, click on the ‘Data & personalization’ option.

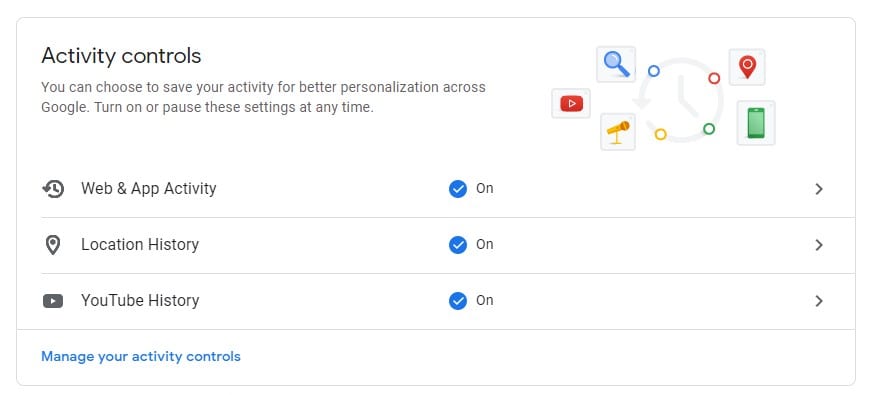
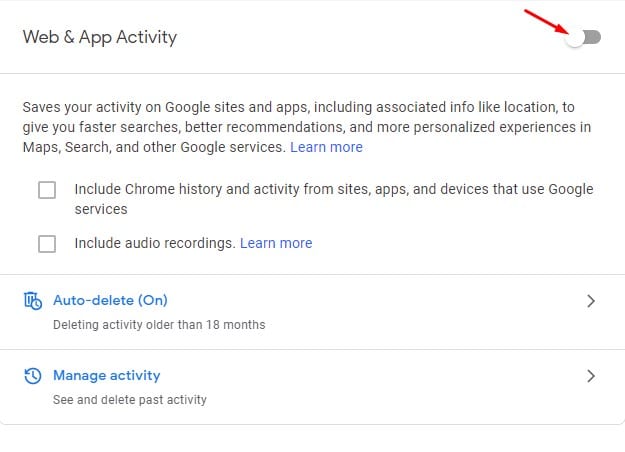
Step 3. Now on the Activity Controls, click on the ‘Web & App Activity’

Click on Web & App Activity


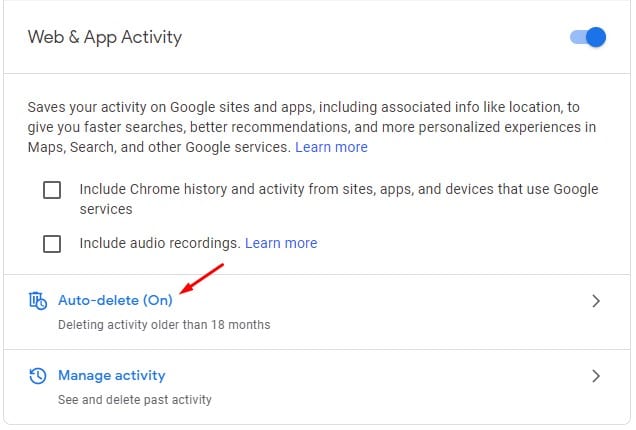
Step 4. Now scroll down and click on the ‘Auto-Delete’ option.

Click on the 'Auto-Delete' option

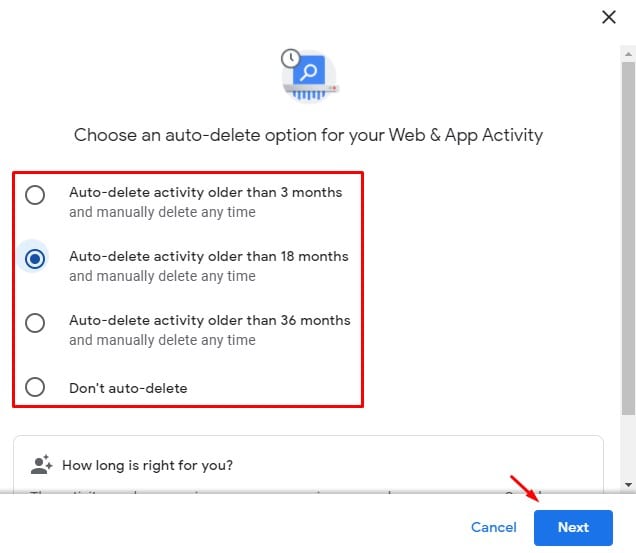
Step 5. You will be provided with many options. Just select the Auto-delete option and click on the ‘Next’ button.

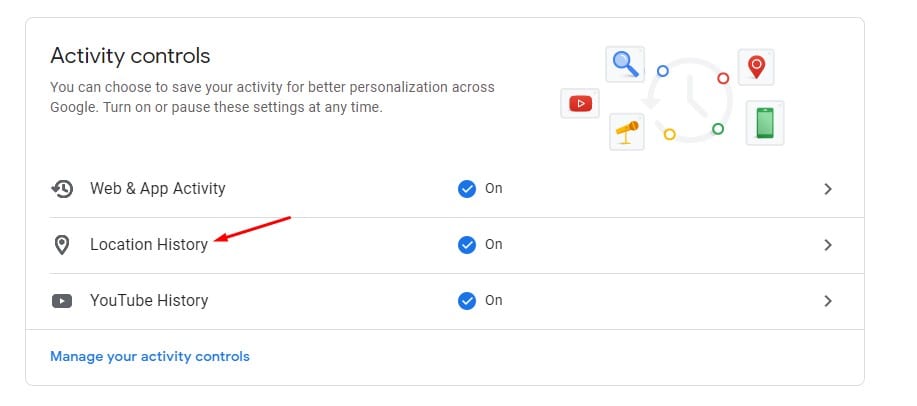
Step 6. Now go back and click on the ‘Location History’ option.

click on the 'Location History' option

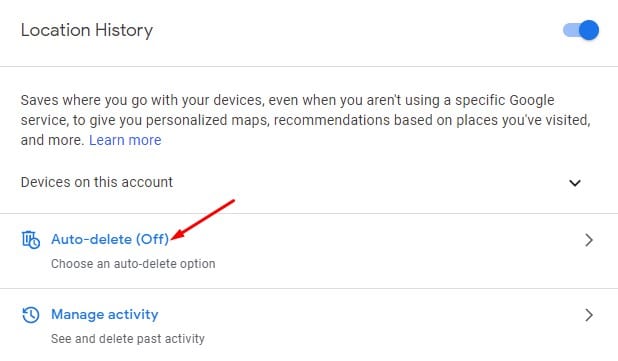
Step 7. Click on the ‘Auto-delete’ option and select when you want to delete the data.

Click on the 'Auto-delete' option

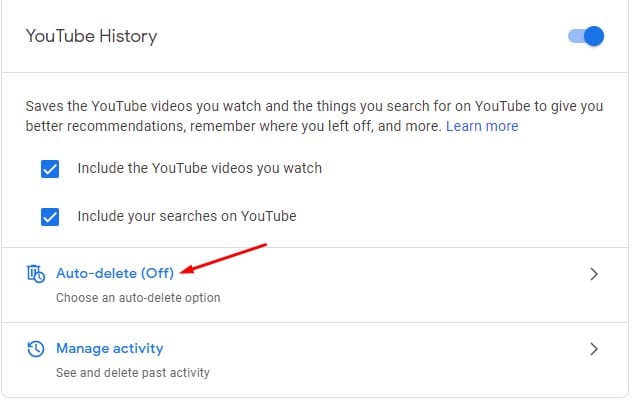
Step 8. You can do the same for YouTube History. For that, go back and select ‘YouTube History’. Next, click on the ‘Auto-Delete’ option and select when you want to delete the data.

Step 9. You can even disable the Web & App Activity, Location History, and YouTube History. For that, click on the required option and use the toggle button to disable the activity tracking altogether.

That’s it! You are done. This is how you can make google auto-delete your Web, Location, and YouTube history.

This article is all about making Google Auto Delete Your Web, App & Location History. I hope this article helped you! Please share it with your friends also. If you have any doubts related to this, let us know in the comment box below.

The post How to Make Google Auto-Delete your Web Activity & Location History appeared first on TechViral.


from TechViral https://ift.tt/3dVYb4O

10 Best Icon Generator Apps For Android in 2021

10 Best Icon Generator Apps For Android in 2021

If you have been using Android for a while, you might know that the operating system is all about customization. There are plenty of apps available on the Google Play Store that motivates users to customize Android like Skin Packs, Launchers apps, icon packs, etc.

If we talk about the icons, changing icons on Android is easy. You need to install a launcher app that supports custom icons. There are many icon packs available on the Google Play Store that give a unique touch to your smartphone.

List of Best Icon Generator Apps For Android

Lots of people make their own icons for apps, and you can do it too. In this article, we will share some of the best icon generator apps for Android that would help you create your own icons for apps and games. So, let’s check out.

1. Icon Pack Studio

Icon Pack Studio

Well, it’s not exactly an icon creator, but it’s more of an icon pack editor. With Icon Pack Studio, you can easily edit any existing icon packs. For example, the advanced icon editor of Icon Pack Studio allows you to resize or move any elements from custom icon packs. Apart from that, you can even create an icon pack from scratch with this app.

2. Simple Text

Simple Text

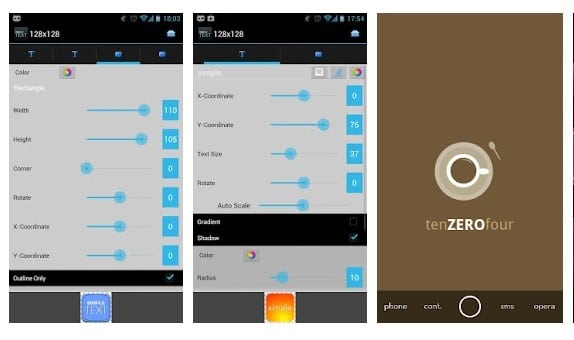
This app is for those searching for an app to make icons out of the text. With this app, you can easily create a bunch of text icons without using Photoshop. Some of the key features of Simple Text include Widget support, RGB color picker, Alpha transparency, adjustable background & foreground color, etc.

3. Iconic: Icon Maker

Iconic: Icon Maker

Well, if you are searching for an Android app to create icons or favicon for your apps or website, then Iconic: Icon Maker might be the best pick for you. Iconic: Icon Maker is free, and it has a wide range of features to create icons quickly and effortlessly. With Iconic, you can edit the pre-built icon design templates to create your own custom icons and use them in apps.

4. Logo Maker – Icon Maker

Logo Maker – Icon Maker

As the app’s name says, Logo Maker – Icon Maker is an app to create custom logos and custom icons. The app is pretty popular amongst Android users, and it has lots of ready-to-use templates, which makes the logo making an easy process. With this app, you can create business logos, cool icons, etc. The app offers over 100+ backgrounds, 3D rotation, Multiple textures & overlays.

5. Material Icon Maker

Material Icon Maker

This app is for those searching for an easy way to make material and minimal icons on Android. With Material Icon Maker, you can choose a template, import icon clipart, and start editing on the Material Icon Maker’s editor. What’s make the app useful is that it allows users to export the edited icons in PNG format.

6. Logo Maker Plus

Logo Maker Plus

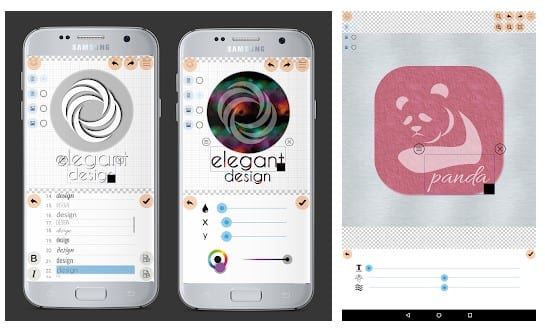
As you might have guessed with the name, Logo Maker Plus is an Android app that allows you to create original logos and designs right from your Android device. It provides every graphic element that you need to create a logo. Although it’s a logo maker app, it can be used to create icons as well. However, to create icons, you need to use additional apps to give the icon a circular shape. The great thing is that it provides you every necessary tool to create unique logos & icons.

7. Icon Maker

Icon Maker

If you are searching for ways to create amazing icons to use in apps or websites, look no other than Icon Maker. The app is entirely free to use, and it works offline as well. It offers you over 1000+ graphic elements to create an icon from scratch. After creating an icon, you can even save the template for future use. Overall, Icon Maker is an excellent app for creating icons on Android.

8. Canva

Canva

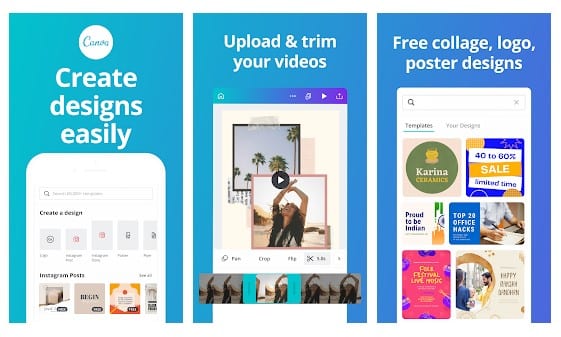
Well, Canva is a full-fledged graphic designing app available on the Google Play Store. It’s a versatile graphic design app, photo editor, video logo maker, poster maker, and video editor. With Canva, you can create eye-catchy logos in just a few minutes. If you know how to use the app, you can create awesome icons for apps or your website designs. The app is heavily popular amongst Android users, and it’s worth a try.

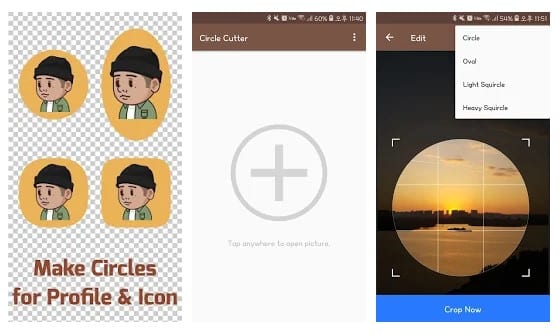
9. Circle Cutter

Circle Cutter

Well, it’s not an icon maker, nor an icon generator. This is an app that lets you crop your photos in a circle or circle-like shape. So, if you already have an image and want to convert it to a logo, you can use this app to give your pictures a circular shape. It supports circle, oval, squircle (icons found on Samsung Galaxy devices). Although the app is entirely free to use, it’s ad-supported. You can remove ads by purchasing the premium version of the app.

10. X Icon Editor

X Icon Editor

Well, it’s not exactly an icon maker app, but it’s something that can help you customize or change any application icon. The great thing about X Icon Editor is that it allows you to set your own photos to replace the application’s original icon. It also offers many icon-editing features like setting a color background, setting different corner radius, editing a new name for the app, and more.

So, these are some of the best icon generator apps for Android. If you know of any other such apps, let us know in the comment box below. I hope this article helped you! Please share it with your friends also.

The post 10 Best Icon Generator Apps For Android in 2021 appeared first on TechViral.


from TechViral https://ift.tt/2GuckUK

10 Sites Like Pinterest That You Should Check Out

10 Sites Like Pinterest That You Should Check Out

If we look around, we will find that image and video sharing websites like Pinterest, Instagram, etc., have been on the rise for the past few years. Talking about Pinterest, it’s a great platform to share images. What’s more interesting is that the platform allows you to share and follow the content categories you like.

On Pinterest, users can create virtual boards to ‘Pin’ the images or follow other boards. It has a massive database of pictures. The platform was immensely popular, and this is what given rise to similar websites and apps.

Right now, there are hundreds of Pinterest alternatives available on the web which can be used to share images. In this article, we have decided to share some of the best sites like Pinterest that you can use right now.

Best Sites Like Pinterest That You Should Check Out

Before exploring the list, please keep in mind that inspired by Pinterest’s massive success, there are now literally hundreds of sites like Pinterest available out there. Some of them are direct copycats, and some of them are unique in different ways.

1. We Heart It

We Heart It

Well, We Heart It is a little bit different than Pinterest when it comes to the user interface and target audience. Unlike Pinterest, which targets every age group, We Heart It is aimed at teenagers. It’s an image-sharing platform where you can share or organize the images you love on the internet. Apart from that, We Heart It also allows you to create collections of your favorite pictures and discover new and interesting people around you. The user interface of the site is a plus point as it has an easy-to-use layout.

2. PearlTrees

PearlTrees

PearlTrees is pretty much similar to Pinterest when it comes to the concept. Both sites were the same, but instead of the board & pin, you get pearls & trees on PearlTrees. The site allows users to explore and share different types of image content. Soon after sharing content, you will come across ‘trees’ similar to the content you share. Overall, PearlTrees is an exciting website that you can visit today.

3. Dribbble

Dribbble

Well, if you are a designer and looking for image sharing site similar to Pinterest, then Dribbble might be the best pick for you. Guess what? The user-interface of Dribbble is also identical to Pinterest, and it has lots of content for designing, poster making, graphics, Pixel art, and more.

4. Hometalk

Hometalk

If you are searching for a website to expand your ideas for home decoration and home designing, HomeTalk might be the best pick. This is the site that could help you plan your dream home. The site is filled with thousands of home decor ideas. It’s a Pinterest-type site, but it’s meant for home decoration.

5. 500px

500px

Well, 500px is a popular image-sharing site where you can download images for personal and commercial use. It’s a stock image site, which has both premium and free images. We have listed this site because it allows users to tag photos with specific keywords, just like Pinterest. Those tags help other users to discover the images.

6. VisualizeUs

VisualizeUs

VisualizeUs is a photo-sharing platform like Pinterest, but it focuses more on furniture and interior designs. The site is best for those who are running sort of ideas to design their home interior. You will come across lots of decoration ideas, furniture, etc. Also, the pictures shared on VisualizeUs help you get a better idea of how a particular piece of furniture looks in the home environment. Overall, it’s an excellent website for interior designers.

7. Everplaces

Everplaces

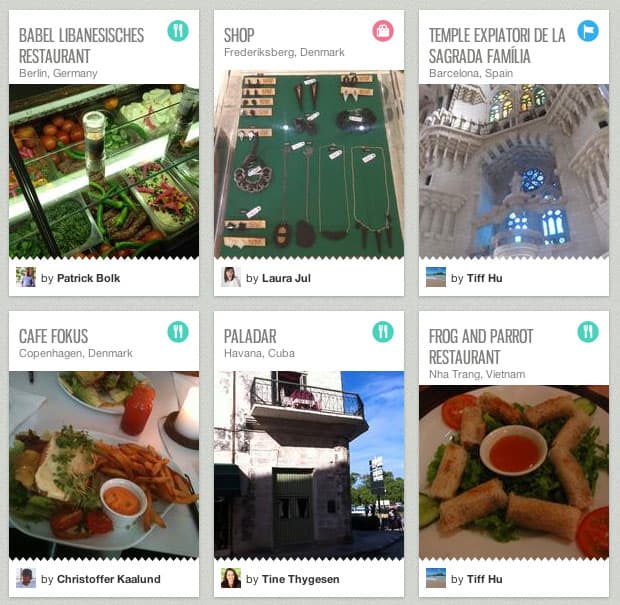
It’s a platform where you can discover or share your favorite food, accommodation, and sight-seeing suggestions. Lots of travelers share their best places and experience on this site. You can also communicate with the community to plan your next travel.

8. Juxtapost

Juxtapost

This site could be the biggest competitor of Pinterest when it comes to the user base and interface. Just like Pinterest, Juxtapost also has categories where you can share or discover new photos. Not just that, but the site also has a special tab where you can see posts similar to the ones which you have viewed before.

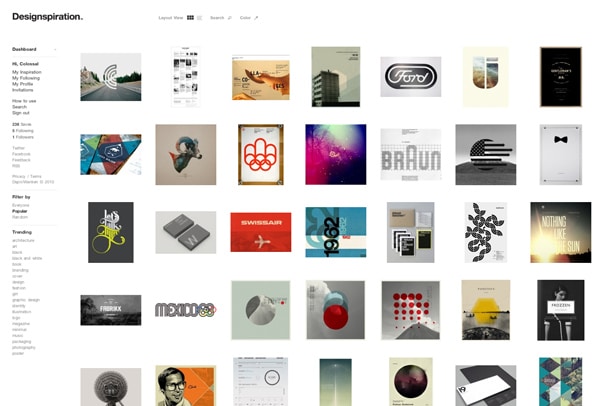
9. Designspiration

Designspiration

It doesn’t matter whether you are into photography, web designing, book cover designing, or any other such things; Designspiration is one such website that you will love to follow for sure. The explore section of Designspiration arranges posts by categories, allowing you to browse posts you are interested in. Yes, you can even share, like, and comment on your favorite posts.

10. FoodGawker

FoodGawker

If you are a food lover like me and searching for a site to discover new foods & recipes, your search should end with FoodGawker. It’s an interesting website with a massive collection of delicious food recipes in different communities and genres. The site also lets you choose from various categories like Breakfast, desserts & sweets, etc. Overall, it’s an excellent site for food lovers.

So, these are some of the famous sites like Pinterest. I hope this article helped you! Please share it with your friends. If you want to add some other websites to the list, let us know in the comment box below.

The post 10 Sites Like Pinterest That You Should Check Out appeared first on TechViral.


from TechViral https://ift.tt/37LqY6x

How to Disable Typing Indicators in Signal Private Messenger

How to Disable Typing Indicators in Signal Private Messenger

The previous month, WhatsApp updated its privacy policy, and due to that, many users have considered migration to apps like Signal and Telegram. As of now, there are lots of WhatsApp alternatives available for Android, but out of all those, Signal Private Messenger seems to be the best one.

We have already shared a detailed guide comparing WhatsApp, Telegram, and Signal. You can check out that article to know the difference between the apps. If you have ever used WhatsApp, you might know that the instant messaging app shows typing indicators when the other one types in a chat.

The same feature is also seen in Signal Private Messenger. The Typing Indicators in Signal indicates that the recipient is typing something. They appear as animated dots that can be enabled or disabled at any time. While some may like these features, others may want to hide them from their contacts.

Also Read: How to Send Disappearing Messages On Signal Private Messenger

Steps to Disable Typing Indicators in Signal Private Messenger

In this article, we will share a detailed guide on how to disable the Typing indicators in Signal Private Messenger. The process is going to be very easy; just follow some of the simple steps given below. Let’s check out.

Step 1. First of all, open Signal Private Messenger on your Android device.

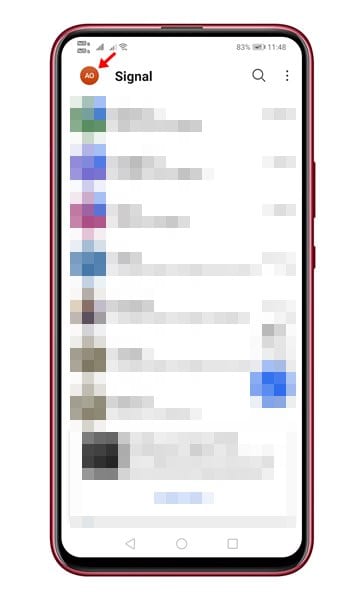
Step 2. Now tap on your profile photo to open the Settings page.

tap on your profile photo

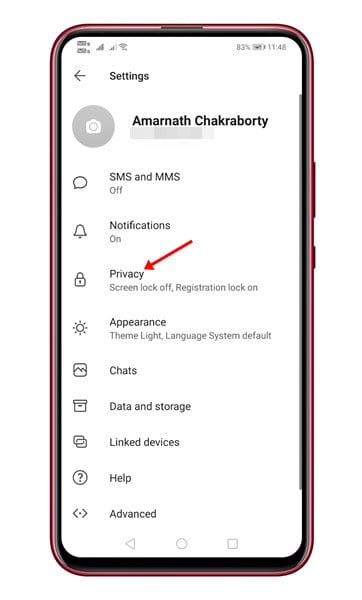
Step 3. On the Settings page, scroll down and tap on the ‘Privacy‘ option.

tap on the 'Privacy' option

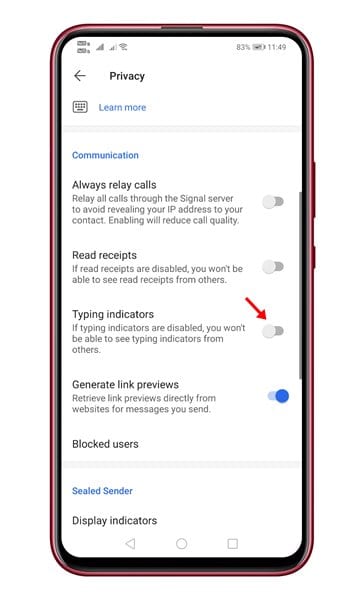
Step 4. Under the Privacy page, scroll down to the Communication section.

Step 5. Now find the option ‘Typing Indicators.’ Use the toggle button behind it to enable/disable the feature.

Disable the feature

Important: If you disable the Typing indicators, your contacts will not see when you are typing. Also, the incoming typing indicators will not be displayed. If you have enabled the feature but can’t see your friend’s typing indicator, then your friend might have disabled the feature.

That’s it! You are done. This is how you can enable/disable Typing indicators on Signal Private Messenger.

So, this article is all about how to disable Typing indicators in Signal Private Messenger. I hope this article helped you! Please share it with your friends also. If you have any doubts related to this, let us know in the comment box below.

The post How to Disable Typing Indicators in Signal Private Messenger appeared first on TechViral.


from TechViral https://ift.tt/2ZUzAoM

Saturday, February 27, 2021

The influencer effect: 'Love Island star transformed my business'

Influencers can have a bad reputation but for some people they have proved to be a business lifeline.

from BBC News - Technology https://ift.tt/2O8K01i

Cryptocurrencies: Why Nigeria is a global leader in Bitcoin trade

A devaluing currency and hard economic conditions make cryptocurrencies attractive despite the risks.

from BBC News - Technology https://ift.tt/3uCAXXi

How to Add Lock Option to the Taskbar in Windows 10

How to Add Lock Option to the Taskbar in Windows 10

Being the most used desktop operating system, Windows 10 offers endless sets of security and privacy features. Out of all security options, the ‘Lock’ feature seems to be the best and easiest way to secure a computer. Windows 10 ‘Lock’ feature is different from hibernate or sign out as it doesn’t quit or interrupt any of your running applications.

The lock feature of Windows 10 takes you to the Lock Screen, where you need to type in your PIN or password to reaccess the computer. There are plenty of ways to lock a Windows 10 computer. You can do it from the Start menu, use the CTRL+ALT+Delete Keyboard combination, or else you can press the Windows Key + L button.

Although Windows 10 can be locked in numerous ways, users still search for an easier way to lock down their computer. In this article, we will share the best and easy method to lock your Windows 10 pc.

Also Read:  How to Change the Taskbar Color in Windows 10 PC

Steps to Add Lock Option to the Taskbar in Windows 10

The tutorial will show you how to add the Lock shortcut to the Start menu and the taskbar in Windows 10. With the shortcut, you don’t need to use the Start button or any keyboard shortcut to lock down your PC. All you need to do is click on the locked shortcut placed on the Taskbar to lock your Windows 10 computer. So, let’s check out.

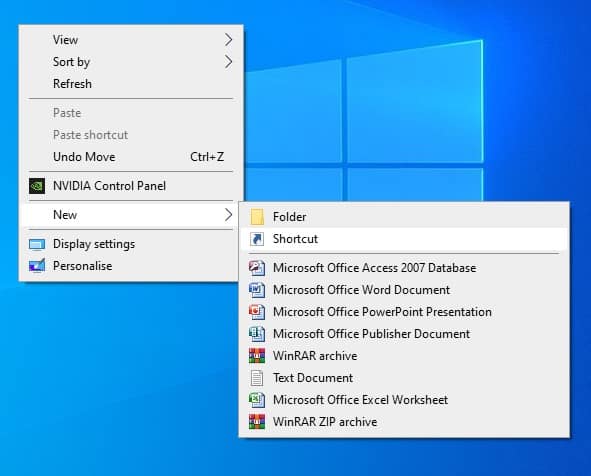
Step 1. First of all, right-click anywhere on your desktop and select New > Shortcut.

Select New > Shortcut

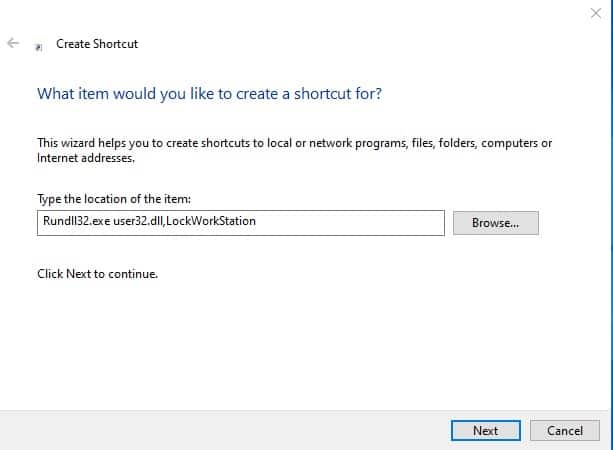
Step 2. On the “Type the location of the item” field, enter the path –

Rundll32.exe user32.dll,LockWorkStation

Step 3. Once done, click on the ‘Next‘ button.

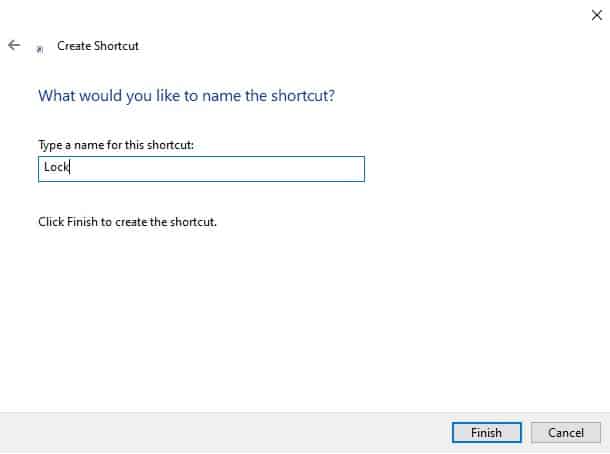
Step 4. Now in the ‘Type a name for this shortcut’ field, enter ‘Lock’ and click on the ‘Finish‘ button.

enter 'Lock'

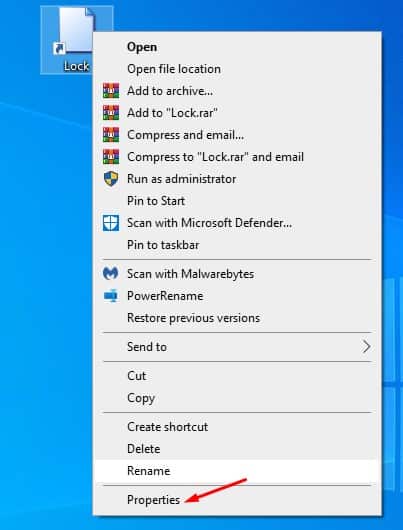
Step 5. Now you will find a Lock Shortcut icon on the desktop. Right-click on it, and select ‘Properties

select 'Properties'

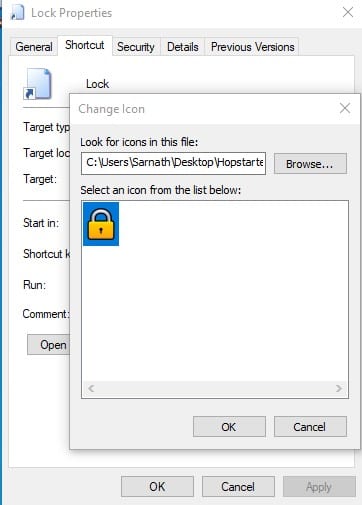
Step 6. Click on the ‘Change icon’ button and browse the icon that resembles the lock option best for you.

Change the icon

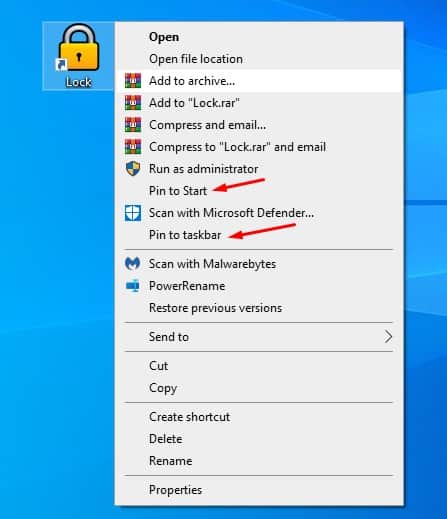
Step 7. Once done, right-click on the shortcut file, and select ‘Pin to taskbar’ or ‘Pin to Start’

Pin to taskbar

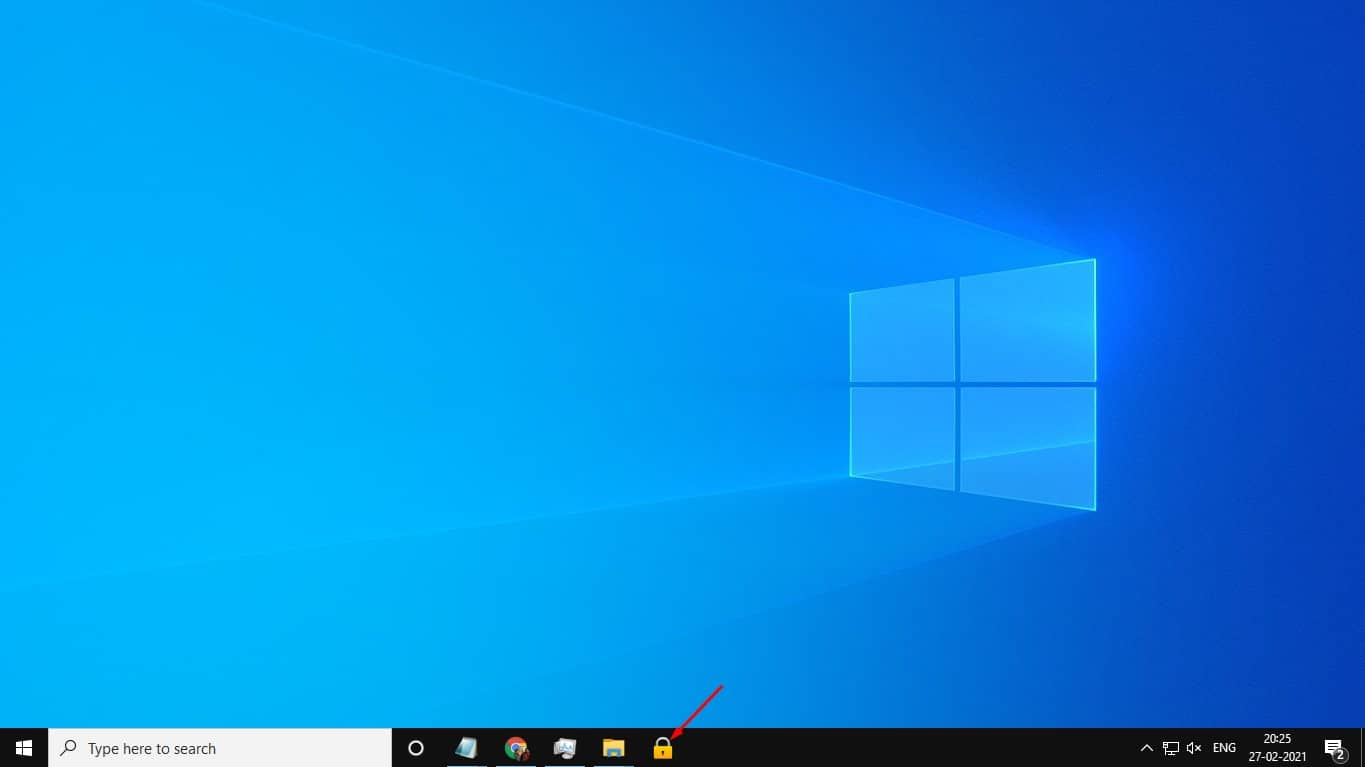
Step 8. Now, whenever you want to lock your PC, click on the Taskbar lock icon.

That’s it! You are done. This is how you can add the lock option to the Start menu and Taskbar in Windows 10.

This article is all about adding a lock option to the Taskbar in Windows 10 computer. I hope this article helped you! Please share it with your friends also. If you have any doubts related to this, let us know in the comment box below.

The post How to Add Lock Option to the Taskbar in Windows 10 appeared first on TechViral.


from TechViral https://ift.tt/3aYkcOl