Today I'll show you the easiest and simple ways to show or hide any widget in your blog to show on pages you like. So let's start.
To hide (or show) widgets in particular posts, static pages, homepage or archive pages, you can use these conditional tags.
How to Hide or Show a Widget on some Pages Blogger
Step 1. Go to Blogger's Dashboard > Layout and name the HTML/Javascript gadgets that you have already added. Doing this, it will be easier for you to identify the widgets that you have in your Blogger's template. Give it a unique title so that it does not match with any of the titles of any other widgets already added.
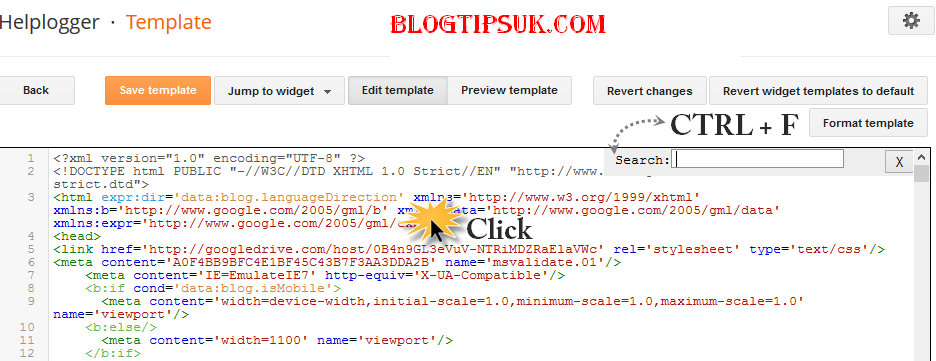
Step 2. Next thing to do is to go to Template and click on Edit HTML
Step 3. Click anywhere inside the code area and press the CTRL + F keys to open the search box

Step 4. Find the HTML of your widget by typing the widget's name in the search box - hit Enter.
Let's say that the title for one of your widgets is "Recent Posts". After searching for the widget's name, You will find a similar code in my template:
<b:widget id='HTML1' locked='false' title='Recent Posts' type='HTML'>This code represents the widget/gadget that you have added in the Page Elements location (Layout).
<b:includable id='main'>
<!-- only display title if it's non-empty -->
<b:if cond='data:title != ""'>
<h2 class='title'><data:title/></h2>
</b:if>
<div class='widget-content'>
<data:content/>
</div>
<b:include name='quickedit'/>
</b:includable>
</b:widget>
Step 5. After you've found your widget's code, add the following conditional tags marked with red just below and above to hide the widget from specific pages or posts in Blogger. For instance, in case you want:
To show the widget only in Homepage:
<b:widget id='HTML1' locked='false' title='Recent Posts' type='HTML'>
<b:includable id='main'>
<b:if cond='data:blog.url == data:blog.homepageUrl'>
<!-- only display title if it's non-empty -->
<b:if cond='data:title != ""'>
<h2 class='title'><data:title/></h2>
</b:if>
<div class='widget-content'>
<data:content/>
</div>
<b:include name='quickedit'/>
</b:if>
</b:includable>
</b:widget>
To show Blogger widget only in post pages
<b:widget id='HTML1' locked='false' title='Recent Posts' type='HTML'>
<b:includable id='main'>
<b:if cond='data:blog.pageType == "item"'>
<!-- only display title if it's non-empty -->
<b:if cond='data:title != ""'>
<h2 class='title'><data:title/></h2>
</b:if>
<div class='widget-content'>
<data:content/>
</div>
<b:include name='quickedit'/>
</b:if>
</b:includable>
</b:widget>
To hide Blogger widget in post pages
<b:widget id='HTML1' locked='false' title='Recent Posts' type='HTML'>
<b:includable id='main'>
<b:if cond='data:blog.pageType!= "item"'>
<!-- only display title if it's non-empty -->
<b:if cond='data:title != ""'>
<h2 class='title'><data:title/></h2>
</b:if>
<div class='widget-content'>
<data:content/>
</div>
<b:include name='quickedit'/>
</b:if>
</b:includable>
</b:widget>
To show the widget in a specific page
<b:widget id='HTML1' locked='false' title='Recent Posts' type='HTML'>
<b:includable id='main'>
<b:if cond='data:blog.url == "URL of the page"'>
<!-- only display title if it's non-empty -->
<b:if cond='data:title != ""'>
<h2 class='title'><data:title/></h2>
</b:if>
<div class='widget-content'>
<data:content/>
</div>
<b:include name='quickedit'/>
</b:if>
</b:includable>
</b:widget>
Note: Replace URL of the page with the address of the page in which you want the widget to appear
To hide a widget only in a particular page
<b:widget id='HTML1' locked='false' title='Recent Posts' type='HTML'>
<b:includable id='main'>
<b:if cond='data:blog.url != "URL of the page"'>
<!-- only display title if it's non-empty -->
<b:if cond='data:title != ""'>
<h2 class='title'><data:title/></h2>
</b:if>
<div class='widget-content'>
<data:content/>
</div>
<b:include name='quickedit'/>
</b:if>
</b:includable>
</b:widget>
To show widgets only in static pages
<b:widget id='HTML1' locked='false' title='Recent Posts' type='HTML'>To hide widgets in Static Pages
<b:includable id='main'>
<b:if cond='data:blog.pageType == "static_page"'>
<!-- only display title if it's non-empty -->
<b:if cond='data:title != ""'>
<h2 class='title'><data:title/></h2>
</b:if>
<div class='widget-content'>
<data:content/>
</div>
<b:include name='quickedit'/>
</b:if>
</b:includable>
</b:widget>
<b:widget id='HTML1' locked='false' title='Recent Posts' type='HTML'>
<b:includable id='main'>
<b:if cond='data:blog.pageType != "static_page"'>
<!-- only display title if it's non-empty -->
<b:if cond='data:title != ""'>
<h2 class='title'><data:title/></h2>
</b:if>
<div class='widget-content'>
<data:content/>
</div>
<b:include name='quickedit'/>
</b:if>
</b:includable>
</b:widget>
To show widgets only in Archive Pages
<b:widget id='HTML1' locked='false' title='Recent Posts' type='HTML'>Note: Pay attention each time you're adding a new address which should end up with .com, otherwise it may not work.
<b:includable id='main'>
<b:if cond='data:blog.pageType == "archive"'>
<!-- only display title if it's non-empty -->
<b:if cond='data:title != ""'>
<h2 class='title'><data:title/></h2>
</b:if>
<div class='widget-content'>
<data:content/>
</div>
<b:include name='quickedit'/>
</b:if>
</b:includable>
</b:widget>
Step 6. After you have added the conditional tags, Save Template and view your blog.
Summary:
1. See which widget you are willing to hide or show in some pages.2. Give that widget a Title in you Blogger Layout.
3. Search it in your HTML code and use the above tags.
That's it! Have a Good Day :)
No comments:
Post a Comment