Saturday, November 15, 2014

SEO Meta Tags for Every Post in Blogger

SEO Meta Tags for Blogger Post
SEO Meta Tags are most important and useful for our blog's SEO. Meta tags are added to tell search engines what that page is all about. Most important meta tags are the Title and Description of a page. Only these two tags are included in search engines results with site link obviously. As blogs and sites have more than one pages i.e., a blogger blog normally have following pages. Blog home page , post pages, static pages, Labels and archives.

So we cannot use same meta tags for all our pages. Because every page have different content with unique Title and Description. So it is our duty to add different meta tags that perfectly defines our pages to the Search Engines if we want to rank high in the search results.

If we use same meta tags to all of our blog posts, our blog search engine rankings and traffic will be decreased. But, if we add different unique meta tags to different Blog posts, it will make the search engines to know more about our individual blog posts and make them crawl and index our pages better and it also improves our Search engine rankings for sure :)

Well this is the importance of unique meta tags for unique pages. Now lets learn about adding them in your site.

Add Meta Tags for Every Post in Blogger

There are many ways to do this. I'll write each step but the first one is my favourite and I recommend you to apply this method.

Step 1.  Change your blogger settings

Login to Blogger Dashboard >> Select Blog >> Select Settings tab >> Search Preferences

Now Enable search description to Yes.

Write your blog description in the box, it should be limited to 150 characters. Click on Save Changes Button.

Now whenever you create a new post, there will be option for Search Description on the right side. You can write a brief description of every post you are writing. 
(This option will be visible after changing search description setting to �Yes� as described above).

Now we just have to add following code in HTML to add these in our blog.

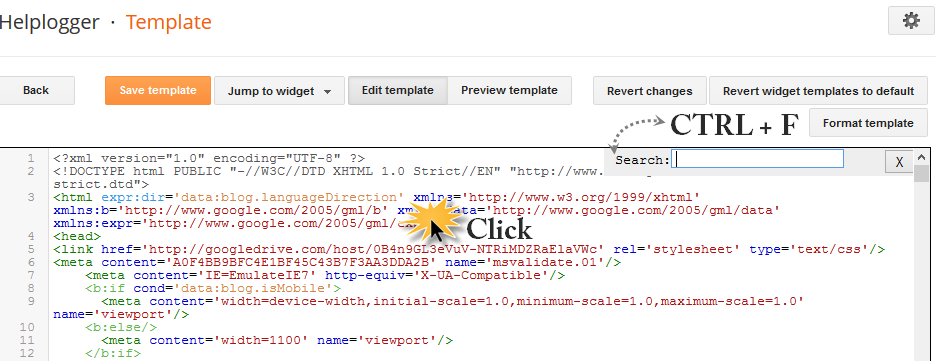
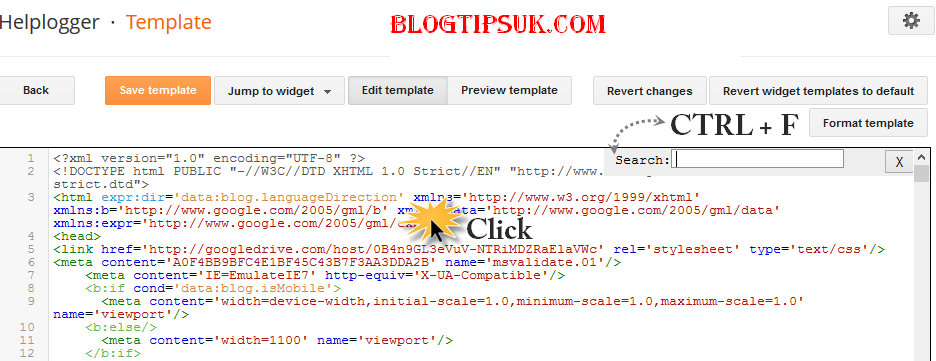
Go to Blogger Dashboard >> Click Template tab >> Click Edit HTML

Find the following code [Tip: Ctrl+F]
<head>
After/under this line paste the following code.
           <!-- Meta Tags ~  blogtipsuk.com  -->
 <b:if cond='data:blog.metaDescription != &quot;&quot;'>
<meta expr:content='data:blog.metaDescription' name='description'/>
</b:if>
 <title><data:blog.pageName/> - <data:blog.pageTitle/></title>
               <!-- /Meta Tags ~   blogtipsuk.com  -->
Now Save Template. Your blog posts will now have Title and Description that you wrote while creating your post.

Step 2. Add blogger pages HTML codes

This step is a little tricky. Why? Because you have to add the HTML codes of blogger pages one by one. Just see the code below that can be used to add meta tag for your blog home page URL.

Go to Blogger Dashboard >> Click Template tab >> Click Edit HTML
Find the following code [Tip: Ctrl+F]
<head>
After/under this line paste the following code.
<b:if cond='data:blog.url == data:blog.homepageUrl'>
 <meta content='Your Blog Description' name='description'/>
<title>Your Blog Title</title> </b:if>
Your blog homepage will now have Title and Description that you wrote in this code in place of RED color. Now Save Template. 
You can add other page codes as well see full codes here HTML codes for all blogger pages

Step 3. Add meta tags with URLs

You can add meta tags with specific URLs as well. Just write your desires URL and give that URL specific Title and Description. 

Go to Blogger Dashboard >> Click Template tab >> Click Edit HTML
Find the following code [Tip: Ctrl+F]
<head>
After/under this line paste the following code.
<b:if cond='data:blog.url == &quot;Write URL of page&quot;'>
 <meta content='Your page Description' name='description'/>
<title>Your page Title</title> </b:if>
Your blog page will now have Title and Description that you wrote in this code in place of RED color. Now Save Template.

Remember some points


1. Apply only one method. Because writing multiple tags will be of no use. 
2. Google and all other Search Engine Bots only take those meta tags in their system which come on top the site i.e., if you have multiple title tags then only one title will be taken by bots which in on the most top.
3. You can see your HTML code by pressing [CTRL + U] , just open your blog link and press CTRL + U this will open your blogs page source. and your html site will open.

Need any assistance, don't hesitate to comment down. Have a good day!

Sunday, October 26, 2014

Social Media and SEO Ranking Factors

I observed traffic and rankings to my personal SEO blog after penguin 3.0 update I have got extreme changes.

SEO ranking factors
Here are the techniques I have applied in 2014 to my BlogSpot blog.
  1. Monthly updating blog posts
  2. Content optimization (internal linking for long tail keywords)
  3. Sharing post on social media sites Google plus, Facebook, Twitter, Pinterest, Stumbleupon, Delicious and Linkedin.
Suggestions to get good traffic and ranking to your website in search results.
On Page Checklist & Techniques

  1. Add your website in Google webmaster tools and register Google analytics
  2. Proper redirects (Make sure your website URL�s everything with www)
  3. Update XML Sitemaps for Images and videos.
  4. Update robots.txt
  5. Write Meta tags for all pages (Title and description only)
  6. Write H1 and ALT tags
  7. Put schema code for your website official logo.
  8. Update internal linking to your unique and quality content
  9. Check and fix broken links
  10. Create custom 404 pages
Read more �

Saturday, October 18, 2014

External Linking


�Did you know that an external links going out to these high authority sites can boost your site SEO? When search engine spiders crawl your site and see a link and follow it to BBC or Huffington Post, they weight it as a positive. The trick is to find organic ways to link to these sites.�

Monday, September 1, 2014

Google talk direct download link


Even though Google Talk app has updated to HANGOUTS, You can download the old version from right here .>> 

 Here is a download directly from Google: http://dl.google.com/googletalk/googletalk-setup.exe

Friday, August 22, 2014

How to do Minijobs in NeoBux

how to start mini jobs in NeoBux
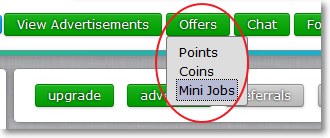
Basically, Mini Jobs are small and simple tasks for which you get instantly credited into your main balance. To access this feature, sign up to neobux just click on the "Offers" button on the top, then select Mini Jobs.

Earn Money with NeoBux Minijobs complete Guide

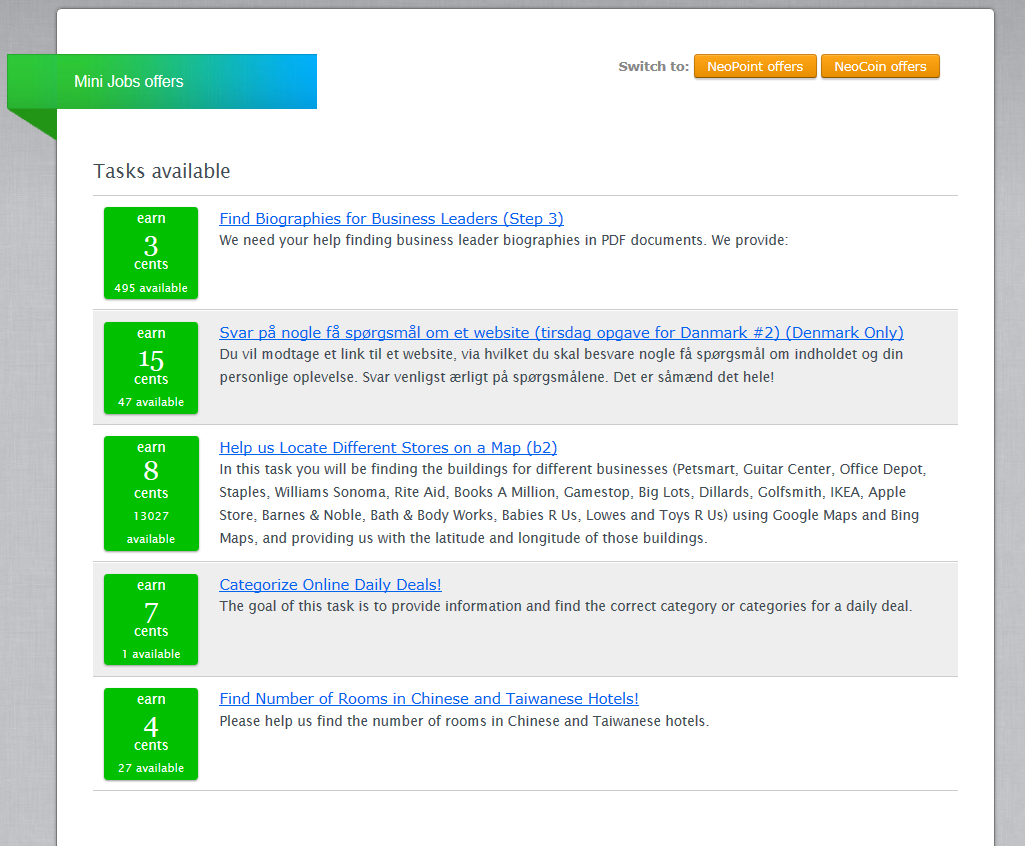
Some tasks will appear for you to choose. The number of jobs displayed may vary from time to time, as well as the types. You can also see the number of available tasks and their pay rates. Some example minijobs in NeoBux.


minijobs in neobux


If you are a new member of neobux without any referrals (complete guide), the earning from Mini Jobs can be more and easier than clicking ads.

The objective of the available Mini Jobs is to solve problems ranging from data collection and product categorization to business lead verification, content generation / modification and academic research.

If it�s your first time you will be presented with the training mode. You must complete this phase in order to gain payment. Review carefully on the instructions too, each task will have their own procedure to follow. After you have understand what to do, begin to complete the selected task as instructed. Detailed instructions about what exactly your work will be are available on screen, what you need is to follow these details to accomplished the Mini Jobs under a certain time. If you want to end current task or change task, click on the Give Up button on the top.

Do not give random answers. A number of false answers higher than a Mini Job�s accuracy threshold may prevent you from completing a Mini Job.

Bonus:Mini Jobs will grant you a commission from your direct referrals earnings and will provide you with a productivity bonus for your own work.

For each $1 you earn from doing Mini Jobs you'll get a 12% bonus as a standard member and a 24% bonus as a golden member.
You�ll earn 12% from each of your direct referrals earned by completing Mini Jobs.

Some questions you may ask:

There's no Mini Jobs to do?
The availability of Mini Jobs depends on multiple factors like the current needs of the offers� providers and demographical criteria, but this doesn't mean new Mini Jobs won't appear in the near future. You only need to visit the Mini Jobs section frequently to catch one of the new assignments as they come and go.

My answers have been marked as wrong, but they were clearly correct.
If you feel that their system has treated you unfairly, then be sure to contest the question on the feedback page.
You may also send them a clear and concise explanation of the problem using the "File a ticket" link by clicking the "listing" button at the top-right inside any Mini Job�s interface and selecting "help".

What happens if I get flagged or banned?
CrowdFlower�s system can flag or ban you from a single Mini Job or from all the Mini Jobs if you repeatedly submit a number of wrong answers higher than a Mini Job�s accuracy threshold.
If you consider their decision as unfair, you�ll need to contact CrowdFlower�s support directly.

For more information, you can visit: FAQ  > Offers > Mini Jobs

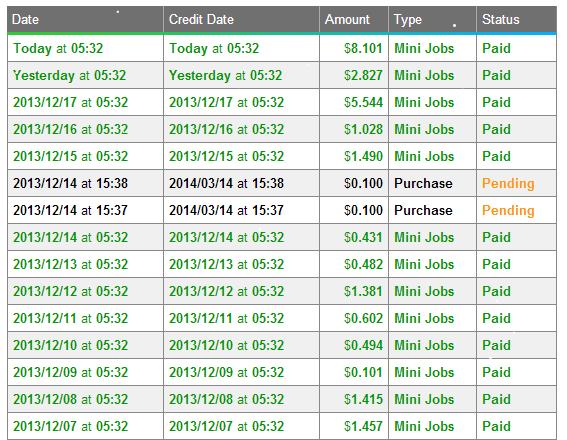
Take a look at my NeoBux minijobs Earnings.
my neobux minijobs Earning

How to get more Minijobs in NeoBux

Some people are earning around 2-3 dollars even if they haven't got any active referrals.
And one of the key is the MINIJOBS.
But when you're in some regions and countries minijob offers are less appearing
than other members from United states and U.K.

Like members from the Pakistan, Philippines, well If you are looking for solutions, there is one.
I know, many members doing this most of the time to earn faster than clicking those
worthless ads worth 0.001 dollars.

This trick is legal, and Neobux wont ban you doing this.
Here is what I'm talking to.

TUNNELBEAR
Just download the link where your device is capable of running.
This application will change your Internet Protocol Address to other I.P. around the globe.
They offer UNITED STATES, CANADA, UNITED KINGDOM, JAPAN, and I guess
DENMARK i.ps also belongs here.

It is a VPN or virtual private network that use to hide your IP and change it to a different
Internet Protocol.
You can also use any other software.

There is an on and off feature so you can change it on what suits your time. So when you
use this you can notice that there are a lot of offers in the minijob section. where you can
earn lots of cents in a single task alone.

Remember: 

You can only use this trick to do Minijobs but not for Clicking advertisements.
If you do so Neobux might ban you. Just turn the application off so that you wont risk your account.

Thursday, August 21, 2014

Dynamic URLs vs Static URLs


Issue:

Websites that utilize databases which can insert content into a webpage by way of a dynamic script like PHP or JavaScript are increasingly popular. This type of site is considered dynamic. Many websites choose dynamic content over static content. This is because if a website has thousands of products or pages, writing or updating each static by hand is a monumental task.

There are two types of URLs: dynamic and static. A dynamic URL is a page address that results from the search of a database-driven web site or the URL of a web site that runs a script. In contrast to static URLs, in which the contents of the web page stay the same unless the changes are hard-coded into the HTML, dynamic URLs are generated from specific queries to a site's database. The dynamic page is basically only a template in which to display the results of the database query. Instead of changing information in the HTML code, the data is changed in the database.

But there is a risk when using dynamic URLs: search engines don't like them. For those at most risk of losing search engine positioning due to dynamic URLs are e-commerce stores, forums, sites utilizing content management systems and blogs like Mambo or WordPress, or any other database-driven website. Many times the URL that is generated for the content in a dynamic site looks something like this:

   http://www.somesites.com/forums/thread.php?threadid=12345&sort=date

A static URL on the other hand, is a URL that doesn't change, and doesn't have variable strings. It looks like this:

   http://www.somesites.com/forums/the-challenges-of-dynamic-urls.htm


Static URLs are typically ranked better in search engine results pages, and they are indexed more quickly than dynamic URLs, if dynamic URLs get indexed at all. Static URLs are also easier for the end-user to view and understand what the page is about. If a user sees a URL in a search engine query that matches the title and description, they are more likely to click on that URL than one that doesn't make sense to them.

A search engine wants to only list pages its index that are unique. Search engines decide to combat this issue by cutting off the URLs after a specific number of variable strings (e.g.: ? & =).

For example, let's look at three URLs:

   http://www.somesites.com/forums/thread.php?threadid=12345&sort=date
   http://www.somesites.com/forums/thread.php?threadid=67890&sort=date
   http://www.somesites.com/forums/thread.php?threadid=13579&sort=date

All three of these URLs point to three different pages. But if the search engine purges the information after the first offending character, the question mark (?), now all three pages look the same:

   http://www.somesites.com/forums/thread.php
   http://www.somesites.com/forums/thread.php
   http://www.somesites.com/forums/thread.php

Now, you don't have unique pages, and consequently, the duplicate URLs won't be indexed.

Another issue is that dynamic pages generally do not have any keywords in the URL. It is very important to have keyword rich URLs. Highly relevant keywords should appear in the domain name or the page URL. This became clear in a recent study on how the top three search engines, Google, Yahoo, and MSN, rank websites.

The study involved taking hundreds of highly competitive keyword queries, like travel, cars, and computer software, and comparing factors involving the top ten results. The statistics show that of those top ten, Google has 40-50% of those with the keyword either in the URL or the domain; Yahoo shows 60%; and MSN has an astonishing 85%! What that means is that to these search engines, having your keywords in your URL or domain name could mean the difference between a top ten ranking, and a ranking far down in the results pages.

Solution:

So what can you do about this difficult problem? You certainly don't want to have to go back and recode every single dynamic URL into a static URL. This would be too much work for any website owner.

If you are hosted on a Linux server, then you will want to make the most of the Apache Mod Rewrite Rule, which is gives you the ability to inconspicuously redirect one URL to another, without the user's (or a search engine's) knowledge. You will need to have this module installed in Apache.This module saves you from having to rewrite your static URLs manually.

How does this module work? When a request comes in to a server for the new static URL, the Apache module redirects the URL internally to the old, dynamic URL, while still looking like the new static URL. The web server compares the URL requested by the client with the search pattern in the individual rules.

For example, when someone requests this URL:
   http://www.somesites.com/forums/the-challenges-of-dynamic-urls.html

The server looks for and compares this static-looking URL to what information is listed in the .htaccess file, such as:

   RewriteEngine on
   RewriteRule thread-threadid-(.*)\.htm$ thread.php?threadid=$1

It then converts the static URL to the old dynamic URL that looks like this, with no one the wiser:
   http://www.somesites.com/forums/thread.php?threadid=12345

You now have a URL that only will rank better in the search engines, but your end-users can definitely understand by glancing at the URL what the page will be about, while allowing Apache's Mod Rewrite Rule to handle to conversion for you, and still keeping the dynamic URL.

If you are not particularly technical, you may not wish to attempt to figure out the complex Mod Rewrite code and how to use it, or you simply may not have the time to embark upon a new learning curve. Therefore, it would be extremely beneficial to have something to do it for you. This URL Rewriting Tool can definitely help you. What this tool does is implement the Mod Rewrite Rule in your .htaccess file to secretly convert a URL to another, such as with dynamic and static ones.

With the URL Rewriting Tool, you can opt to rewrite single pages or entire directories. Simply enter the URL into the box, press submit, and copy and paste the generated code into your .htaccess file on the root of your website. You must remember to place any additional rewrite commands in your .htaccess file for each dynamic URL you want Apache to rewrite. Now, you can give out the static URL links on your website without having to alter all of your dynamic URLs manually because you are letting the Mod Rewrite Rule do the conversion for you, without JavaScript, cloaking, or any sneaky tactics.

Another thing you must remember to do is to change all of your links in your website to the static URLs in order to avoid penalties by search engines due to having duplicate URLs. You could even add your dynamic URLs to your Robots Exclusion Standard File (robots.txt) to keep the search engines from spidering the duplicate URLs. Regardless of your methods, after using the URL Rewrite Tool, you should ideally have no links pointing to any of your old dynamic URLs.

You have multiple reasons to utilize static URLs in your website whenever possible. When it's not possible, and you need to keep your database-driven content as those old dynamic URLs, you can still give end-users and search engine a static URL to navigate, and all the while, they are still your dynamic URLs in disguise. When a search engine engineer was asked if this method was considered "cloaking", he responded that it indeed was not, and that in fact, search engines prefer you do it this way. The URL Rewrite Tool not only saves you time and energy by helping you use static URLs by converting them transparently to your dynamic URLs, but it will also save your rankings in the search engines. 

Saturday, August 9, 2014

Buy or Sell Ad spaces in new Low Traffic Blogger/Blogspot

Buy or Sell Ad spaces in Low Traffic blogs
I see many bloggers and website owners that they sell ad spaces on there blog/website like renting a house and they earn a decent amount from that.I also like this method because in this method you don't need any kind of clicks or worry that how to increase CTR.

By selling ad spaces directly to your clients you will earn decent money of your choice because you are the admin of your site and blog. By selling ad spaces you also need a decent traffic to fulfill the requirement of advertiser but if your site contains a low traffic and cannot fulfill the advertisers need then the main problem is how to make money in a low traffic blog by selling ad spaces.

Best BuySellAds.com Alternatives for Low traffic sites

As we know that Buysellads is one of the famous site and best sites for publishers to put there ad spaces for renting.But we all know that buysellads have such requirement that they need minimum 50K Monthly Impressions.But your site contains only 500 to 1000 Daily visits and monthly impressions are 10k to 20k then you don't need to worry more there are some sites that will provide advertisers our site ad space and advertiser will directly contact you.I Recommended Buysellads for those sites whose monthly impressions are over 50,000 to 70,000. So here is a list of sites that can be called as Best BuySellAds.com Alternatives.

How to sell ad spaces in Low traffic blogs?

If you have a low traffic blog and still want to sell your Adspaces then you can use the below given websites.

1.  BlogAds.com is serving publishers from year 2002.Blogads represents thousands of premiere blogs like PerezHilton, DailyKos, Wonkette and Cute Overload.It allows you to choose your own prices,Accept or reject Ads,Phone and email publisher support,Advertsers can purhcase Adspaces directly,70%+ of revenue goes to the publishers.

2.  AdSella.com makes your task lot more easier.Simply set your listing,price and paste a line of code to your blog and just wait for your adspace to sell.It�s completely free and quite easy as well.Advertisers will contact your directly.Adsella gives you 80% of your revenue which is quite nice for low traffic blogs.

3.  According to me Puxee.com is the best alternative of BuySellAds.com for low traffic blogs.It provides you the easiest way to sell Advertising spaces on your blog.It pays through Paypal and shares 75% of the total revenue.As an administrator of your blog,you always keep control over your Adspace.

4.  Advertisespace.com is another best alternative of BuysellAds for low traffic blogs.It allows you to set your own price for a variety of adspaces.All un-sold inventory can be syndicated to their impact network to instantly generate revenue for you until your individually priced Adzones are sold.They provide javascript codes for the Ads which ensures that the loading speed of your blog remains same.

5.  PublicityClerks.com is another BuySellAds alternative.This site was launched in the year 2012 and is very popular now.Major advantage of using this site is,it accepts a blog which has only 5000 visits per month which means low traffic blogs.Just give it a try.

In this post I tell you that how to sell Ad spaces in Low Traffic Blogs. Hope that you will like my tutorial.
Tell me your opinions and feedback in comments below. Have a good day!

Thursday, August 7, 2014

Use stylish Mouse Pointers in Blogger/Blogspot

use Mouse Cursor in Blogger
Hello Friends, in today's tutorial I am going to tell you how to install a beautiful mouse cursor in your blogger blog with a very simple HTML code. Make your blog look beautiful with stylish mouse cursor and back to top button.

Mouse Cursor:

In computing, a pointer or mouse cursor (as part of a personal computer WIMP style of interaction) is a graphical image on the computer monitor or other display device. The pointer echoes movements of the pointing device, commonly a mouse or touchpad, and signals the point where actions of the user take place. It can be used to select and move other graphical user interface elements, and is distinct from the cursor, which responds to keyboard input. The cursor may also be repositioned using the pointer.
You would also like to add:  Emotion Smileys for Blogger Comments

Mostly people, especially new blogger want to make their blog more beautiful and shiny. There are many tricks have been shared on the internet about this issue. But the one I'm going to share, is the easiest method to add a mouse cursor in your blog. Let's now come straight to the solution.

How To Change Mouse Cursor In Blogger

Follow the steps below to do this

  • Log-in to your blog
  • Template >> HTML >> Proceed
  • Search For this code ]]></b:skin> (tip: Use CTRL+F)
  • Now Just above/before ]]></b:skin> insert following code

body{
cursor: url(IMAGE LINK), auto;
}
Now Save your template and view your blog.
Replace IMAGE LINK with the image link of your mouse pointer image.

Tell me in comments if this worked for you. In case of any error comment down I will try to solve your problem. Have a good day ahead!

Saturday, August 2, 2014

How i Earn money with PTC site Neobux

Hello to my fellow bloggers, Today I want to talk about some money making sites. Last time I showed you some basic steps to start a blog and earn money with blogging. There are various sites on internet which are called PTC sites or Pay-to-Click sites.
earn money with PTC sites
PTC is an abbreviation or short-form of Paid To Click. PTC sites are sites which pay you for clicking certain ads to improve their alexa ranking,generate leads,make sales or simply for gaining members to their websites. PTC sites are sites that pay you every time you click and watch an advertisement, usually ranging from 5 seconds to 2 minutes, and they pay anywhere from $0.001 to $0.02 per click. And Yes this is a very low amount.

Despite the small earnings, some PTC websites have very sophisticated referral systems that pay quite handsomely, often around $0.01 per referral click.
That means if you can refer 1000 people and each of them clicked 1 ad a day, you would be earning a $10.00 on a daily basis.
Of course the main challenge is getting to that point.
In the world of PTC there are a whole lot of scam sites out there that are just trying to rob you of your time and money, but there are a few gems out there that I highly recommend you join.

How to find good paying PTC sites?

Well,this is the most difficult task. Most of the users get it wrong when they enter in to PTC industry.
I too am one of those,when i started joining PTC sites,i started to click at sites with high click rates and failed every almost every time.Also i had lost my own money , by investing in upgrades on risky PTC sites and then loosing it when the sites would close down.

But later as i gained experience in this field,i learned some bitter truth about ptc industry.
After my 2+ years of experience i have found some very best PTC sites for Earning money online. Click them to read details.

1. Neobux Guide (English)
2. Neobux earn money in urdu

These sites are best when you are thinking of investing some money and time. Because you certainly will get profit against your money. And you can take this as 100% guaranteed. As I am also making money with these sites.

I recommend everybody to join these sites, these sites are the best and you will get good profits from these sites. You just have to invest some money to go premium and the rest of the work will be done by referrals. See the details in these links for making money with referrals in PTC sites. 
Now, let's join some Best PTC Sites. You can also join for free if you do not want to upgrade.

How to Make Income from PTC Sites

In order to be successful with Neobux, you have to be very organized, consistent, and patient.

Neobux is a very unique website in that you can earn thousands of dollars without recruiting a single referral. The way it works is that you spend your advertisement clicking money (or any money that you decide to invest) into renting referrals for a set amount of time.

These rented referrals work exactly like direct referrals, except that they expire after 30 or more days.
These rented referrals act like real direct referrals, except after a while they expire, unless you decide to renew them.

This makes Neobux not only one of the most unique PTC websites out there, but also highly lucrative if done correctly. Can you imagine renting 6000 active referrals, and each active referral earns you $0.02 every day?
You�ll be making $120 on a daily basis! 

That is pretty good actually, So what are you waiting for. Let's join some Best PTC Sites.Its free!


Does this sound interesting to you? Why not join me?


You can join me using my referral link and we can be Neobux PTC buddies. :-)

Are you planning on joining Neobux as well? Do you think Neobux is legit? Post below your thoughts.

Wish me luck!


Evo Magz: Template Blogger Keren Responsive & SEO Friendly

Halo.. sahabat Blogger apa kabar? Blogger Peer kembali lagi setelah lama menghilang tentunya dengan desain dan tampilan yang baru. Terima kasih selama ini telah berkunjung ke blog ini dan mohon maaf kalau komentar anda semua tidak sempat saya balas, karena kesibukan saya dalam pekerjaan dan waktu istirahat sedikit jadinya untuk nyalurin hobby untuk nge-blog juga sedikit. Okey.. sesuai dengan judul post ini Evo Magz: Template Blogger Keren Responsive & SEO Friendly adalah template yang saya pakai di bloggerpeer.blogspot.com sekarang, kenapa saya memakai template Evo Magz? karena saya sangat suka dengan tampilan elegan, simple, fast loading, SEO friendly dan responsive dari Evo Magz Blogger magazine theme ini. Saya banyak ketinggalan dari teman-teman Blogger yang lainnya dalam perkembangan dunia Blog dan SEO, apalagi sekarang menggunakan template HTML5, menerapkan Schema.org markup dan responsive design adalah hal yang sangat direkomendasikan oleh semua search engine termasuk Google yang tentunya sangat berpengaruh positif pada perkembangan SEO pada blog (Onpage SEO) dan agar bisa terindeks cepat oleh search engine dan juga agar mobile friendly karena sekarang ini hampir 75% orang-orang menggunakan internet dengan mobile ataupun tablet. Mungkin ada yang bertanya kenapa template yang dulu saya ganti? dan kenapa tidak di-edit saja sendiri agar bisa responsive? padahal template itu tampilannya lumayan bagus, jawabannya adalah sederhana template saya yang dulu tidak memakai HTML5, tidak responsive, tidak memakai Schema markups dan juga skill saya dalam hal designing dan waktu untuk meng-edit terbatas makanya saya memakai template yang langsung jadi dan tinggal memasang saja, cuman saya hanya merubah sedikit tampilan sidebar dan merubah form komentarnya memakai versi comments form dari Adhy Suryadi www.kompiajaib.com

Evo Magz Blogger Template

Evo Magz adalah template yang dibuat oleh Mas Sugeng, salah satu Blogger Indonesia yang template hasil karyanya banyak dipakai oleh para Blogger. Dibawah ini adalah beberapa fitur dari Evo Magz Blogger Template ini

Fitur-Fitur Evo Magz Template - SEO Friendly Responsive HTML5 Blogger Theme

  • 100% Responsive
  • Custom Mobile Template
  • SEO Optimized
  • Ad and AdSense Optimized
  • Fully Customizable
  • Font Awesome
  • Breadcrumb
  • Auto Readmore
  • Related Posts
  • Share Buttons
  • Tab View Widget
  • Recent Post Widget
  • Numbered Page Navigation
  • Back to Top button
  • Custom Error page
  • Facebook Comments
  • and much more

Demo bisa dilihat di blog ini atau klik disini

Nah bagi anda yang ingin memakai template Evo Magz ini silahkan kunjungi blog-nya Mas Sugeng di www.mas-sugeng.com

Friday, August 1, 2014

Add Emoticons Smileys in Blogger Comments

Add Smileys in Blogger Comments
Emoticons/Smileys are a great way of making discussions more interesting and fun, so it's a pity that Blogger don't support them. In this tutorial, I will show you some simple steps on how to add some very cool emoticons called Kolobok to your Blogger/Blogspot comments, so that you and your blog visitors will be able to have an enjoyable time together.

UPDATE: Now available for threaded commenting system too!

How To Add Kolobok Smileys Emotions to Blogger Comments
Step 1.  Log in to your Blogger account and go to Template - Edit HTML

Step 2.  Click anywhere inside the code area and press the CTRL + F keys to open the search box

open the search box in blogger HTML

Step 3.  Search (CTRL + F) for this tag:
</body>

Step 4.  Copy and paste just above it, this code:

a) For previous commenting system with comments that have no reply function:
<!--kolobok-smileys-->
<script src='http://helplogger.googlecode.com/svn/trunk/[helplogger.blogspot.com]smileys.js' type='text/javascript'/>
<!--kolobok-smileys-->
b) For threaded commenting system with comments that have the reply function:
<script src='https://helplogger.googlecode.com/svn/trunk/kolobok threaded.js' type='text/javascript'/>
Note: ignore steps 5-8 if you are using threaded comments!

Step 5.  Now find this code snippet:
<b:loop values='data:post.comments' var='comment'>
Step 6.  Paste the following code just above it:
<div id='smileys'>
Step 7.  Find the following code (look carefully, it should be somewhere below the code from step 5)
</b:loop>
Step 8.  Paste the following tag just after it:
</div>
Step 9.  Now find this code:
a) For previous commenting system:
<data:blogTeamBlogMessage/>
Note: if you'll find it like 4 times, stop to the 2nd one!

b) For threaded commenting system:
<div class='post-footer-line post-footer-line-3'>

Step 10.  And add this code just after it:
<b:if cond='data:blog.pageType == &quot;item&quot;'><script type='text/javascript'>
//<![CDATA[
function moreSmilies() {
    document.getElementById('smiley-more').style.display = 'inline';
    document.getElementById('smiley-toggle').innerHTML = '<a href="javascript:lessSmilies()"><div style="font-size:small; font-weight:bold;color:#000000;">Hide Emoticons</div></a>';
}
function lessSmilies() {
    document.getElementById('smiley-more').style.display = 'none';
    document.getElementById('smiley-toggle').innerHTML = '<a href="javascript:moreSmilies()"><div style="font-size:small; font-weight:bold;">Show Emoticons</div></a>';
}
//]]>
</script>
<div class='emoticons'>
<a href="http://www.blogtipsuk.com/2014/08/add-emoticons-smileys-in-blogger-comments.html" ><img alt="Emoticons Smileys for Blogger Comments" title="Add these Smileys in your site" border="0" src="https://blogger.googleusercontent.com/img/b/R29vZ2xl/AVvXsEiDmllr9nOSfao1qljIRgkfbDNnuTM4x0QHq9XEOYobVNKXVFsnAKaBeQ4lrE-tVy4gUvUllcyM5bGY4bsG3jzmAwGkersSeh6uJ-aJeD-u_169-eJ2RmORgsjm1h3dXhdgz7hgfnPWSVoJ/s1600/Add+in+your+Site.jpg" height="20" width="100" /></a>
<span id='smiley-more' style='display: none;'>
<img src='https://blogger.googleusercontent.com/img/b/R29vZ2xl/AVvXsEh1zjBfunCN8Kin9SRlvlQb2XMtx6gEOwpJkh15nBVRS7E5l7HjKcFHXUwiLz3GRNbvIIw2VBW_d5ZZtlLfC38z-U-4XpZcFg6fI2rKx6O4WStwa8a8-WNvLimHvPAFdsVSJ2SAn6L_FJw/s1600/smile3.gif'/>:)
<img src='https://blogger.googleusercontent.com/img/b/R29vZ2xl/AVvXsEjWdFidwySYMHeXNYqYoQlvSG7J6arxL_x1qFQzpUWnABfT8l3BUSOlL1ShH-lewqiWP5G2sfGA8euzK78tmzJa44orPqRB1bJpvTcqbE8fJSBN0hQLTYosNLY_9OIxOQnTLRijXlqsWUQ/s1600/sad.gif'/>:(
<img src='https://blogger.googleusercontent.com/img/b/R29vZ2xl/AVvXsEi6B49TwelRiByli3-ldLDB9-O_gJ5kmvTxqDMG9PkDEcmaY0DAyQmcPFNCNL_tCFjyydbpfD9HCr1JS8WmLQ-JRhRoqdsLYHi1Rpc7KjyVg6i5V0Lp6VHm6I5mw_cw3exwTc2HldbF4jg/s1600/taunt.gif'/>:))
<img src='https://blogger.googleusercontent.com/img/b/R29vZ2xl/AVvXsEjLlfaCDGqhMkpu_LdFPL6QmhppoONoCJ-G_duZ5EqUF99118y6aGt7ibqKWdx5_bcfhlMji-79NVuoZSHDjGL0uHHmFyU1jZrHCGgnSYoNUPS2zPs3qf7pFsWTQNbVP25SSuSZgOzb2CE/s1600/cry2.gif'/>:((
<img src='https://blogger.googleusercontent.com/img/b/R29vZ2xl/AVvXsEiuNRbQ_e6BjB4mnB4fUTD-UvXnuuC4AnWEsyXqYqrQsuHPDTiTl6-12G0jAbwhW1597cLefenBkSvJ421-63t1ndw2UfV2JItJCDokRRH4CJuH8JtDQ13sBaWAob8_qCR7NFfzZ5QAync/s1600/rofl.gif'/>=))
<img src='https://blogger.googleusercontent.com/img/b/R29vZ2xl/AVvXsEj8AlS74q9JaUUAJqofU7KAnvwtSzZtujJWfS4UzK8coTIayc1tbgevftwMsEq5tjNCzbaYwwxYZQOqAJkH_-wl1sBmzNnZ1eaw5SVPN9jV0omRyTgyZncLTA0c-s3BMRruAhiR70t0rkU/s1600/suicide.gif'/>=D&gt;
<img src='https://blogger.googleusercontent.com/img/b/R29vZ2xl/AVvXsEin2sGqnYVffk8c24-VASKp9uUoxqmfIY72vU2IERNaPnfMOCaKmafDhNJq5UESHihxPcWmexSANvS_iWG887qys4LGTNQ4t7PNCV8TDRh9N3tLhtUKSLgAfe_GNiWC1c5ux0Qq96quGjE/s1600/biggrin.gif'/>:D
<img src='https://blogger.googleusercontent.com/img/b/R29vZ2xl/AVvXsEgODRyluB6QGL2JAVLZBv3KDmM0Z2N-hCX7qMkiKFfePQ1UwBIb4X-zH1p5NnrM2IB6mcvuiUXPXJH0PmrP1RW04kDLBQz4akmzWR_85pIDFkN1BP7hR8EeHCOY4LZ1D8OudJXTPjjaFJI/s1600/tongue.gif'/>:P
<img src='https://blogger.googleusercontent.com/img/b/R29vZ2xl/AVvXsEgM65y3Nrb5TG-PAv-f7bOtlxF7IYQi7CnSEoxdKU-aAZZw1ELVALbD6RFoEPMZ5JkhNLPsxVJ1-WWKI0SoUamU29JqAlm2TUSa5AmnQpax_V1HjMWeB_x0ek1DBX8dkfq80OOOxn3LfIU/s1600/shock.gif'/>:-O
<img src='https://blogger.googleusercontent.com/img/b/R29vZ2xl/AVvXsEg8X9CqOHdvsgEGXB0wxZUdJ6UBKQY5f3YqRCD8azO9ajmL5xjcEPz8-XuZOuBtaT4b8pbNRc7rmqSkH8CNvpjrICjbLqKwelLlRRuB__YbWUtGUUsXi59Vhl2JECMGxrgK926lhKjq4eE/s1600/think.gif'/>:-?
<img src='https://blogger.googleusercontent.com/img/b/R29vZ2xl/AVvXsEjh9JACyMilyWdkq1iORRRhiFcBkr4EYvbzGZMV1GIuzS5cu-OO5BBcI8ivE7rcnlqghCXx24UTnVz4mkGp9Pkqqb-Oji37qN38CHtzMfP4cFdUvQy-WuH6m6L7wuk9DSatrOTPs3VJojQ/s1600/unsure.gif'/>:-SS
<img src='https://blogger.googleusercontent.com/img/b/R29vZ2xl/AVvXsEjDo7zoHF0b18t8_7eD2xImVREpCI20cytHZptjOrAWCyCPly5OJxiWhbI4xi_I4o6-dhFENYIWxAIvys_qziLEZ3MVLcPWjo4m0d7NrxePq7PcHGCCJEgh6Bd18P0cl4o_Xz3rnk86qzw/s1600/flowers1.gif'/>:-f
<img src='https://blogger.googleusercontent.com/img/b/R29vZ2xl/AVvXsEhiBhr38Js3PSN62b3-CdzW2EPnZ6Nnoy9VVkgY6Ck6AprhMY64UfmHssrIRikfOZStqOf1-_ldbITJBdXC7pSceFCx2Hq2bCSbnoxIhbXrlyUJRoSK5X1EAcPHs80oM6xPVfjeb4HtQcw/s1600/doh.gif'/>d(
<img src='https://blogger.googleusercontent.com/img/b/R29vZ2xl/AVvXsEhFRMoX8IOQfy4pADd2ri-CUccTmc7zQwlJurEsLb4zGbnpO-r9IR3hWlFD_9GfSWKumRLwcQTxemlyThuLzNdT4mfAKIahKST8FZQBZz-QUUESywS2rl8YgjkfxssRX9uEqua3ax5-eZQ/s1600/air_kiss.gif'/>:-*
<img src='https://blogger.googleusercontent.com/img/b/R29vZ2xl/AVvXsEhzz0pllrAfPkDnnPhMJUAXaUiF3tDlbya-5TmdXi8LIuJYE4hbWxGfDG4KMNFZDiwjcQldpsl0sRlt8M2WA-QqLGSs6addusNot84I5YP-2HHY6R4av5cUQg4NmK8UCKCGyOx6DMSLA9A/s1600/threaten.gif'/>b-(
<img src='https://blogger.googleusercontent.com/img/b/R29vZ2xl/AVvXsEjmWx7cIfvAP5tmI6QNc9FKEqiRg0SVb28h-BImAlRzNZE10plj4o1mjMKlcm_gsMub5sURMNt4ofEezePSV5vCFzat0uzzgEm_7PZMfoZFltzAsJ6_iAIlLB5wTnXZvY5T8b4yow_FNoQ/s1600/help.gif'/>h-(
<img src='https://blogger.googleusercontent.com/img/b/R29vZ2xl/AVvXsEiuGPDhI6DEMgY_oO-gMvP8DpU_2pEVhJh34eG9fpRWdssu-TsmRkW2pTg9Q6QD9mslG6dP6xLC6BWvM9UeKe4P8yXOQH_NZN3E4Ao1bWaR3Q4Zx6CiJgUSKHFdN3a2suL3eLZrwG168xQ/s1600/good.gif'/>g-)
<img src='https://blogger.googleusercontent.com/img/b/R29vZ2xl/AVvXsEjcdap34WKwZXX9DW4vL6jvjYyCkeuj7RRxEdTXO37EBUHVAeP39yvL8PwMcUTWkMBijkL5KJy83El_It7lzHURyw56Aqc1FZ-exJLQC9oGSONvV2_ALeUim3Y4lptQyR5KQWK-gdcB-Ys/s1600/beee.gif'/>5-p
<img src='https://blogger.googleusercontent.com/img/b/R29vZ2xl/AVvXsEisKBNgV0HbZhyphenhyphencGbRYrkWI8f6mlZPIdsEw-Ow3hPlrU3hAgXa-DxoO5m_V6xNquPV1iQyL3SYeLUFW6P6i6I1csPuWO5fl2VDnagU6zVr2L2QOOG7pV0vhC3OF-FpSV-CxB5Ol3uAybxw/s1600/yahoo.gif'/>y-)
<img src='https://blogger.googleusercontent.com/img/b/R29vZ2xl/AVvXsEgXTKx_kWJSrn-uGQS-GEoyaXxf-W425hgL9N28IGC-k7lvecliHFov3HDJ_5hdmVkO2mvWOutakwpDp8OiTkXWiNLceDQXPIXa7YGsSVOwkqhl7wYjtU3N2ch0TcpheeukqXW3LM01vOc/s1600/crazy.gif'/>c-)
<img src='https://blogger.googleusercontent.com/img/b/R29vZ2xl/AVvXsEhPu98FOFtc043LfXPLNKoAwKNmXp2fyQ7bXLYTqNxHHSWy3bTXe4sh7YihBiDJ5MoWMdUHNHlbDw9Gmv4kcq56S9lbRow2SFxbyaWxrtCuO9OzhGR8obcabTiFTMJkm07ZIyg5CFjWtTg/s1600/spiteful.gif'/>s-)
<img src='https://blogger.googleusercontent.com/img/b/R29vZ2xl/AVvXsEgKdEyjAL2GDJpIzJ9NNOZJnHxCx9FK5uCDwwmxitOqgLbjY_oQl0e9VkzusQqoHkILHaOyqqthosXjHvdoMsGZkmoH7xQ5sh9zm3uHOUW_AvHdGeCNzsXhDfXYdFqWwJER8zPur_uBxWY/s1600/drinks.gif'/>d-)
<img src='https://blogger.googleusercontent.com/img/b/R29vZ2xl/AVvXsEi4b1nURvPslB6IESYpCZQeK-xJeC85I_PdKbPL5zA_3u_L89rCUuNh_I1BLyAlLfQLPbsyWBEm1lqGVIw5yIODM7Nq-acvDGWTiYaOsFJFu_SPDjolAwuO6t1WE_qB6M9hCf94GyRXTRg/s1600/cheer.gif'/>w-)
<img src='https://blogger.googleusercontent.com/img/b/R29vZ2xl/AVvXsEh677RC1AmEcIuoLvJ1ImAiujU1kGSv7JbIYxvs_Fwr5cQ3rnOvlaTPSA8h0_vPwzfSgfPSQuSXWvBxW2Yg_nkrIDwdP6VPXMTUygPJfuHmmiaI2uwNO4LcM_fVuUgFcQZch78slw1nlqI/s1600/hi+2.gif'/>:-h
<img src='https://blogger.googleusercontent.com/img/b/R29vZ2xl/AVvXsEh70YEfXa9u-hrFuMlWolLHrIxto1jRaX71NEoP8UwC0i8JOlc9MjW7IrsDSySF4dFYEbh3MeQuzgXmKr_rgjs3gj-Jgdtxhbr6A_75oeZQkxw_-Rf8TJrwtdzQvUYCZPZkxrNR02AKEiw/s1600/give_heart.gif'/>:X
</span>
<span id='smiley-toggle'><a href='javascript:moreSmilies()'><div style='font-size:small;font-weight:bold;'>Show Emoticons <img src='https://blogger.googleusercontent.com/img/b/R29vZ2xl/AVvXsEh1zjBfunCN8Kin9SRlvlQb2XMtx6gEOwpJkh15nBVRS7E5l7HjKcFHXUwiLz3GRNbvIIw2VBW_d5ZZtlLfC38z-U-4XpZcFg6fI2rKx6O4WStwa8a8-WNvLimHvPAFdsVSJ2SAn6L_FJw/s1600/smile3.gif'/></div></a></span>
</div></b:if>
Note: Ignore steps 11-12 if you are using threaded comments!


Step 11.  Finally, find this code
]]></b:skin>
Step 12.  Add this one below, just above ]]></b:skin>
.emoticons {-moz-background-clip: -moz-initial;-moz-background-origin: -moz-initial;-moz-background-inline-policy: -moz-initial;text-align: left;width:400px;}
.emoticons a, .emoticons a:hover {margin-left: 20px;text-decoration:none;}
Note: if you want to change the size of the emoticon container, edit the red code.

Step 13.  Save the Template and you're done. Enjoy!

Sunday, July 13, 2014

Hide or Show a Widget on some Pages Blogger

show and hide blogger widgets
Hi Bloggers, you may have noticed, all the widgets/gadgets you add to your blog, will be displayed on all the pages by default, including the homepage as well. And I'm sure very few know that AdSense could disable your account in case you've put ad units inside the content of your contact or privacy policy pages. Therefore, hiding certain elements inside your blog pages is not only a matter of design, but it is also a requirement.

Today I'll show you the easiest and simple ways to show or hide any widget in your blog to show on pages you like. So let's start.

To hide (or show) widgets in particular posts, static pages, homepage or archive pages, you can use these conditional tags.

How to Hide or Show a Widget on some Pages Blogger


Step 1. Go to Blogger's Dashboard > Layout and name the HTML/Javascript gadgets that you have already added. Doing this, it will be easier for you to identify the widgets that you have in your Blogger's template. Give it a unique title so that it does not match with any of the titles of any other widgets already added.

Step 2. Next thing to do is to go to Template and click on Edit HTML

Step 3. Click anywhere inside the code area and press the CTRL + F keys to open the search box

blogger template, ctrl + f, search box

Step 4. Find the HTML of your widget by typing the widget's name in the search box - hit Enter.

Let's say that the title for one of your widgets is "Recent Posts". After searching for the widget's name, You will find a similar code in my template:
<b:widget id='HTML1' locked='false' title='Recent Posts' type='HTML'>
<b:includable id='main'>
<!-- only display title if it's non-empty -->
<b:if cond='data:title != ""'>
<h2 class='title'><data:title/></h2>
</b:if>
<div class='widget-content'>
<data:content/>
</div>
<b:include name='quickedit'/>
</b:includable>
</b:widget>  
This code represents the widget/gadget that you have added in the Page Elements location (Layout).


Step 5. After you've found your widget's code, add the following conditional tags marked with red just below and above to hide the widget from specific pages or posts in Blogger. For instance, in case you want:

To show the widget only in Homepage:

<b:widget id='HTML1' locked='false' title='Recent Posts' type='HTML'>
<b:includable id='main'>
<b:if cond='data:blog.url == data:blog.homepageUrl'>
<!-- only display title if it's non-empty -->
<b:if cond='data:title != ""'>
<h2 class='title'><data:title/></h2>
</b:if>
<div class='widget-content'>
<data:content/>
</div>

<b:include name='quickedit'/>
</b:if>
</b:includable>
</b:widget>

To show Blogger widget only in post pages 

<b:widget id='HTML1' locked='false' title='Recent Posts' type='HTML'>
<b:includable id='main'>
<b:if cond='data:blog.pageType == "item"'>
<!-- only display title if it's non-empty -->
<b:if cond='data:title != ""'>
<h2 class='title'><data:title/></h2>
</b:if>
<div class='widget-content'>
<data:content/>
</div>

<b:include name='quickedit'/>
</b:if>
</b:includable>
</b:widget>

To hide Blogger widget in post pages

<b:widget id='HTML1' locked='false' title='Recent Posts' type='HTML'>
<b:includable id='main'>
<b:if cond='data:blog.pageType!= "item"'>
<!-- only display title if it's non-empty -->
<b:if cond='data:title != ""'>
<h2 class='title'><data:title/></h2>
</b:if>
<div class='widget-content'>
<data:content/>
</div>

<b:include name='quickedit'/>
</b:if>
</b:includable>
</b:widget>

To show the widget in a specific page

<b:widget id='HTML1' locked='false' title='Recent Posts' type='HTML'>
<b:includable id='main'>
<b:if cond='data:blog.url == "URL of the page"'>
<!-- only display title if it's non-empty -->
<b:if cond='data:title != ""'>
<h2 class='title'><data:title/></h2>
</b:if>
<div class='widget-content'>
<data:content/>
</div>

<b:include name='quickedit'/>
</b:if>
</b:includable>
</b:widget>

Note: Replace URL of the page with the address of the page in which you want the widget to appear

To hide a widget only in a particular page

<b:widget id='HTML1' locked='false' title='Recent Posts' type='HTML'>
<b:includable id='main'>
<b:if cond='data:blog.url != "URL of the page"'>
<!-- only display title if it's non-empty -->
<b:if cond='data:title != ""'>
<h2 class='title'><data:title/></h2>
</b:if>
<div class='widget-content'>
<data:content/>
</div>

<b:include name='quickedit'/>
</b:if>
</b:includable>
</b:widget> 

To show widgets only in static pages

<b:widget id='HTML1' locked='false' title='Recent Posts' type='HTML'>
<b:includable id='main'>
<b:if cond='data:blog.pageType == "static_page"'>
<!-- only display title if it's non-empty -->
<b:if cond='data:title != ""'>
<h2 class='title'><data:title/></h2>
</b:if>
<div class='widget-content'>
<data:content/>
</div>

<b:include name='quickedit'/>
</b:if>
</b:includable>
</b:widget> 
To hide widgets in Static Pages
<b:widget id='HTML1' locked='false' title='Recent Posts' type='HTML'>
<b:includable id='main'>
<b:if cond='data:blog.pageType != "static_page"'>
<!-- only display title if it's non-empty -->
<b:if cond='data:title != ""'>
<h2 class='title'><data:title/></h2>
</b:if>
<div class='widget-content'>
<data:content/>
</div>

<b:include name='quickedit'/>
</b:if>
</b:includable>
</b:widget> 

To show widgets only in Archive Pages

 <b:widget id='HTML1' locked='false' title='Recent Posts' type='HTML'>
<b:includable id='main'>
<b:if cond='data:blog.pageType == "archive"'>
<!-- only display title if it's non-empty -->
<b:if cond='data:title != ""'>
<h2 class='title'><data:title/></h2>
</b:if>
<div class='widget-content'>
<data:content/>
</div>

<b:include name='quickedit'/>
</b:if>
</b:includable>
</b:widget> 
Note:  Pay attention each time you're adding a new address which should end up with .com, otherwise it may not work.

Step 6. After you have added the conditional tags, Save Template and view your blog.

Summary:

1.  See which widget you are willing to hide or show in some pages.
2.  Give that widget a Title in you Blogger Layout.
3.  Search it in your HTML code and use the above tags.

That's it!  Have a Good Day :)

Friday, June 13, 2014

Google Panda 4.0 Algorithm Update


Google�s Matt Cutts declared on Twitter the release of Google Panda 4.0 Update. Google's Panda update is meant to prevent sites with poor quality content from operating their way into Google�s search results. Panda 4.0 should be a significant update to the particular formula versus simply an information refresh.

Meaning, Google has created changes to however Panda identifies sites and has released a replacement version of the formula .


Google Panda 4.0 Algorithm Update


Google Panda 4.0 update affects different languages to different degrees. In English for instance, the impact is ~7.5% of queries that area unit affected to a degree that a every day user may notice. 

The Panda rule, that was designed to help boost great-quality content sites whereas pushing down low-quality content sites within the search results, has constantly targeted low-quality content sites so as to produce searchers with the most effective search results.

Wednesday, June 11, 2014

Free On Page SEO for Blogger/Blogspot blogs

Get Free on-page SEO for Blogger
Hello from BlogTipsUK.com to all the new beginner bloggers who are facing problems establishing their blogs. Beginners work a lot in writing content but face problems like doing basic SEO of their blogs to get traffic naturally from Search Engines.

We believe good Content without good traffic is nothing. Basic SEO is the best source for getting organic traffic from search engines. So today I am going to share a simple task from BlogTipsUK.com , by doing which you can earn a simple reward that is free on-page SEO for your blog from our SEO analyst and professional blogger, Umar Khaleeq.

Note: You must Join BlogTipsUK.com socially to earn rewards. Every blog will be picked for SEO by owner's choice.

Follow these simple steps. and read the note at the end of post for the terms of the task.

Step 1.  Join BlogTipsUK.com

You must Join BlogTipsUK.com socially to earn rewards.


Step 2.  Join these sites under our Referral Link

By joining these all sites will help you to start earning money online with your blog and eventually will help us too if you join with my links. See a complete list of sites that work best for bloggers to earn money online. if you need any help regarding any site, comment on the respected post.
(this is optional)

Step 3.  Apply all our Widgets in your blog

Apply all our 100% working Best Blogger widgets in your blog without any changing. These widgets will help your blog in many ways. All widgets are stylish and loads fast. Here is the list:
1.  Social Media Floating Widget
2.  Recent Posts Widget
3.  Related Posts Widget
4.  Sliding Facebook Like Box Widget
5.  Facebook comment box in blogger (this is optional)

Step 4.  BackLinks

Enter any one link in a blog post of your choice. Remember only one link is required in any one of your blog's post. (in a post not in sidebar). These two links are mentioned below:

1.  <a href="http://www.blogtipsuk.com/2014/03/increase-traffic-visitors-to-blog-easily.html" rel="dofollow">Increase blog traffic</a>
2.  <a href="http://www.blogtipsuk.com/2014/03/earn-money-from-blogger-blogs-blogging.html" rel="dofollow">earn money from blogging</a>

After doing all the above procedures, please post your blog's link on our facebook page. I will try to reply you as soon as possible. When a blog is picked for on-page SEO, you just need to select a template and I�ll fully optimized it for better SEO. Which will results in better ranking and increases your blog's traffic from all the search engines. Else you can also see our blog's SEO section for more help and info on traffic and SEO.

Reward Terms

1. You must join our site socially e.g., on facebook, twitter and subscribe us by email.
2. You must complete all the steps given above to qualify for free SEO.
3. Optional points are not required for getting rewards.
4. After doing all the steps, leave your blog link on our FB page, which I will review and reply you.
5. Finally, You'll need to select a template and I�ll fully optimized it for better SEO.

Have a Good Day ahead! Keep Smiling.